Recreate infrared photography in Photoshop
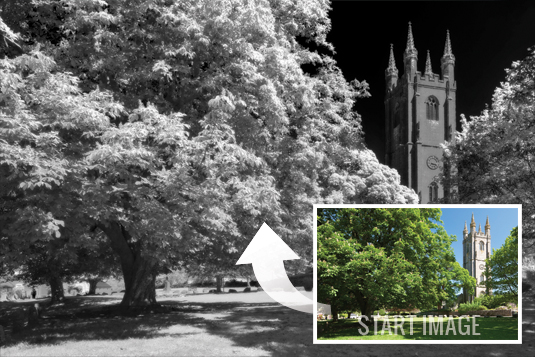
You don't need a dedicated camera to take an infrared image - you can do it in Photoshop instead. We explain how, in just six simple steps.

Infrared photography has been around for many years. Although it’s often associated with black and white, there are colour forms, too. It’s best to remember that infrared is an interpretive medium, but it doesn’t necessarily need a special infrared camera to achieve a similar effect - it can be done in Photoshop CS6 and most other versions too.
The best way of getting a similar infrared effect is to take an image with lots of green in it. Leaves and grass turn pure white in infrared, so images that contain green in abundance will be most affected.
Click here to download your start image
01. Duplicate the Layer
First, it’s important to duplicate the Background layer and work on a copy because the layer is going to be converted to black and white and radically changed using the Channel Mixer. Also, this layer will become merged with another layer copy, so avoid working on the Background layer at all costs.
Article continues below02. The Monochrome Channel Mixer
Open the Channel Mixer and tick the Monochrome button at the bottom left. In order to create a pseudo IR effect, some radical changes to the colour palette are going to be necessary. Push the red and greens to positive values, around +120 and +50 respectively, then drop blue to -100.
03. Make Shadows/Highlights corrections
Make any corrections to blown highlights or blocked out shadows using this tool. Although the Channel Mixer is a great creative tool, it’s easy to lose detail by pushing the sliders too far. Make sure to check the image histogram to examine the picture’s tones.
04. Add Gaussian Blur
Duplicate the layer once more and add Gaussian Blur. This technique is more depictive of IR film than digital, and it’s a good technique to add a dreamy soft-focus feel. Push the blur to about 10-15 pixels and this will seem to make a mess of things.
05. Change the Opacity
Now drop the Opacity of the layer and the image will snap back into focus. Drag the slider to 0% and then, while staring at the image, increase the Opacity to a point that looks complimentary and not too excessive. Now flatten all the layers and add some final polish.
Sign up to Creative Bloq's daily newsletter, which brings you the latest news and inspiration from the worlds of art, design and technology.
06. Add Curves adjustments
Either as an Adjustment Layer or as a standard Curves adjustment, push the mid-tones of the image upwards and add some lift to that Gaussian Blur glow. Again, keep an eye on the histogram, but you should find that neither the shadows nor the highlights will move very much.
Words: David Clapp
This article first appeared in Practical Photoshop magazine, the number one magazine for lovers of photography and image-editing.
Don't forget to check out:
- Create a sinister fantasy backdrop in Photoshop
- Master studio portrait photography: set up a studio today!
- 101 Photoshop tutorials!

The Creative Bloq team is made up of a group of art and design enthusiasts, and has changed and evolved since Creative Bloq began back in 2012. The current website team consists of eight full-time members of staff: Editor Georgia Coggan, Deputy Editor Rosie Hilder, Ecommerce Editor Beren Neale, Senior News Editor Daniel Piper, Editor, Digital Art and 3D Ian Dean, Tech Reviews Editor Erlingur Einarsson, Ecommerce Writer Beth Nicholls and Staff Writer Natalie Fear, as well as a roster of freelancers from around the world. The ImagineFX magazine team also pitch in, ensuring that content from leading digital art publication ImagineFX is represented on Creative Bloq.
