The hidden powers of Preview and Automator
These two humble built-in Mac apps are often overlooked, but they're a designer's best friend – and they're free!
Chances are you never really think about the Preview app on your Mac except on those occasions when it opens a JPEG or a PDF for you, and chances are you've never even heard of, never mind opened and used, the Automator app that's also sitting on your hard disk. Yet both are spectacularly powerful weapons in any creative professional's arsenal, and by the time you've finished this we're confident you'll agree.
The best photo apps for iPhone, iPad and Android
So come with us as we uncover the tremendous potential and flexibility these apps have, and how they can help you in your work and at home.
We'll be focussing on the most recent version of OS X as we write this, OS X 10.10 Yosemite, but much of what we show you will work on older versions as well.
Supported file formats
The first thing most people don't know about Preview is that it can open a vast range of different file formats in addition to the basics such as JPEG, PNG and PDF. Drawing on OS-level support, it can open DNGs and a very wide range of cameras’ raw formats, for example, but also BMP and ICO files from Windows, and even PowerPoint presentations.
Even more surprisingly, not only can it open PSDs from Photoshop and AIs from Illustrator, but also PostScript files and EPSs – though the latter two it first converts to PDF. Once opened, of course, you can do lots with the file using Preview's manipulation tools, and then optionally export to JPEG, TIFF, PDF, PNG and more.
Importing from other devices
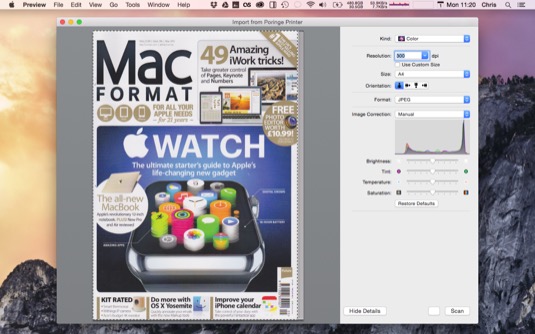
Preview can import files from connected cameras and iPhones from its File menu, and it can also control a scanner connected up either with a cable or wirelessly. The scanning interface looks simple, but there's actually quite a lot of power there too, and it can be refreshing compared to the bloated scanner drivers manufacturers bundle.
Indeed, consider not installing from the manufacturer's CD/download at all; plug in the scanner/printer/multi-function device and OS X should install drivers for you, then you can just use Preview or Image Capture to control the scanner.
Daily design news, reviews, how-tos and more, as picked by the editors.
Taking screengrabs
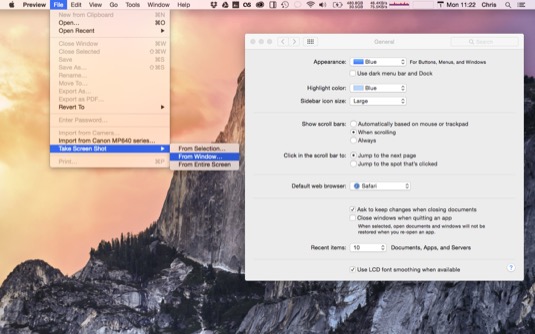
You can take grabs with keyboard shortcuts, but if you can't remember them, fire up Preview and look for the Take Screen Shot option in its File menu.
Compress a PDF
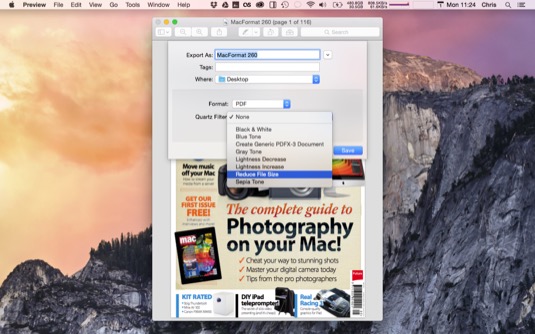
Got a monster PDF to share but don't have the full version of Adobe Acrobat to use to crush its file size down? Open it in Preview, choose File > Export, choose PDF, then from the Quartz Filter drop-down, pick Reduce File Size. There are some other options in that menu you should explore, but that's the most useful one.
Cutting images out and removing backgrounds
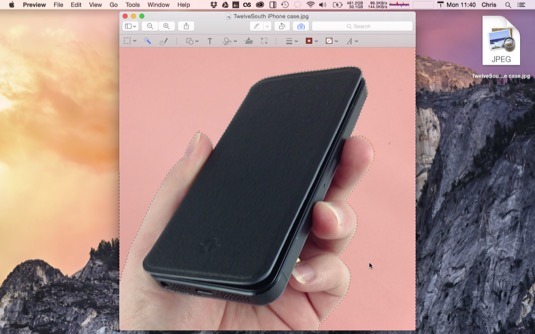
Of course Photoshop and its competitors are the daddy when it comes to isolating portions of images, but if you don't have one of these, or if you're just doing a quick-and-dirty job for a mock-up, say, then reach for Preview.
In fact, its two tools can actually be surprisingly effective on not-too-challenging files. The first is Instant Alpha, used for removing backgrounds; handy when you've been given a flat JPEG of a logo on white, say, but need to put it on a coloured background. Open your image in Preview, and click the toolbox icon top right then the magic wand tool. Click and drag on the background, keeping an eye on the edge of the thing you're trying to cut out.
It’s likely you won't get all the background on the first go, and there's no way to add to a selection like in Photoshop, but all this means is that you do it in stages; select a bit, hit Delete, select the next bit, Delete, and so on. When you're done, save as a PNG.
The newer feature is called Smart Lasso, and you access it from the selection drop-down at the left of the tools toolbar in Preview. Pick it, then draw carefully around the outline of the object you want to isolate. Once you're done, release the mouse button and if the contrast is reasonable Preview will snap to the outline. You can Copy these selected pixels, or choose Invert Selection from the Edit menu then hit Delete so you get a file that just contains the thing you selected. Save as a PNG.
Adjusting colours
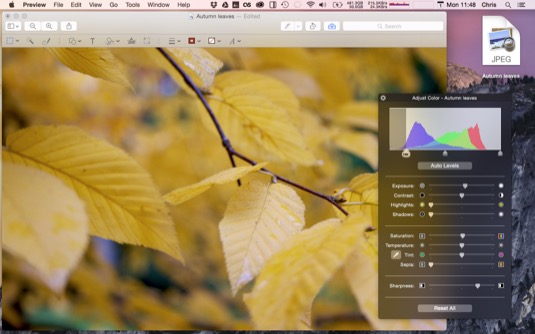
Preview actually has a pretty sophisticated engine built into it for adjusting the colours in your image. Click the toolbox icon in Preview then pick the icon that looks like light refracting through a prism. Now you see a histogram of your image and can adjust black-, white- and mid-points, tweak exposure, highlights and shadows, saturation, colour temperature, sharpness and more.
Cropping and scaling images
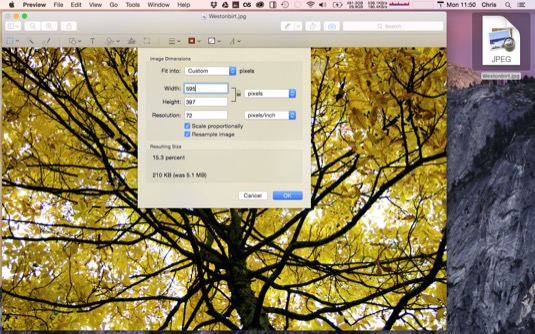
Preview can crop images (just select the area you want then choose Crop from the Tools menu) and it can also scale images too. Choose Adjust Size… from the Tools menu, or click the icon in the toolbar that looks like a two arrows breaking out of the opposite corners of a box. There are plenty of options in here to play with.
Working with PDFs
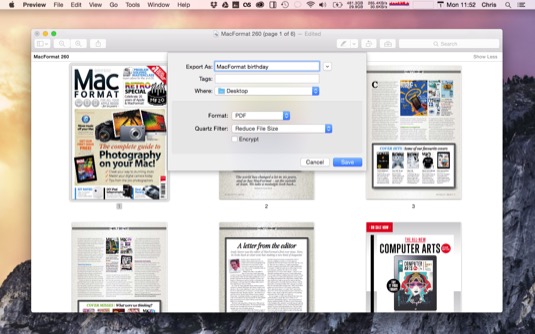
Of course, one of Preview's main jobs is viewing PDFs, but you can do much more, too. Check the View menu for different ways of viewing your PDFs, and note that you can easily combine PDFs just by dragging and dropping them onto each other. (Show the Thumbnails sidebar to make this easier.)
You can also rearrange pages within a PDF, or if you want to send only a few pages from a PDF to a client, say, select the ones you don't want then hit Delete before saving out your PDF for emailing, possibly with the Reduce File Size Quartz filter.
Filling in and annotating forms – and proofs
Although the annotation features in Preview – drawing arrows, adding text, highlighting areas with a magnifying loupe, say – are mostly geared towards filling in forms (where they're very welcome!) don't forget that you can use them for marking up proofs or providing feedback to people you’re collaborating with. They work in images and PDFs.
Signing PDFs
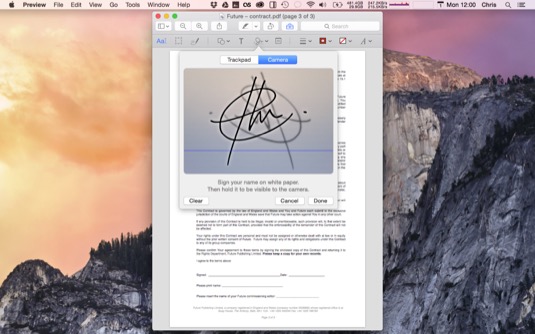
This is a belter. No more will you have to print out then scan in a form if it just needs a signature on the bottom; Preview lets you digitise your signature so you can add it with a couple of clicks.
Now, you can do it two ways, either signing your name on the trackpad (use an iPad stylus if you have one), or, which is usually better, signing your name on a piece of paper and holding it up to your webcam. The latter method might sound rubbish, but Preview cleverly isolates your signature from the paper.
Next page: the power of Automator

The Creative Bloq team is made up of a group of art and design enthusiasts, and has changed and evolved since Creative Bloq began back in 2012. The current website team consists of eight full-time members of staff: Editor Georgia Coggan, Deputy Editor Rosie Hilder, Ecommerce Editor Beren Neale, Senior News Editor Daniel Piper, Editor, Digital Art and 3D Ian Dean, Tech Reviews Editor Erlingur Einarsson, Ecommerce Writer Beth Nicholls and Staff Writer Natalie Fear, as well as a roster of freelancers from around the world. The ImagineFX magazine team also pitch in, ensuring that content from leading digital art publication ImagineFX is represented on Creative Bloq.
