Create your own Photoshop actions in 5 simple steps
Don't let repetitive tasks drain your creativity. We explain how to automate them by creating your own Photoshop actions.
As a Photoshop user, you've probably run into a situation where you have had to do repetitive tasks, such as resizing images, creating vignettes or something else. Having to do all of this manually can be very time-consuming. Fortunately there is an easier way, whether you're using an older CS Photoshop, the very latest Creative Cloud version, or even some newer versions of Photoshop Elements.
Win clients & work smarter with our FREE ebook: get it now!
Photoshop actions enable you to record a repetitive process and save that information as an action which you can then use for other tasks down the road. Not only that, you can edit actions after the fact and customize them to suit your needs.
01. Open the Actions panel
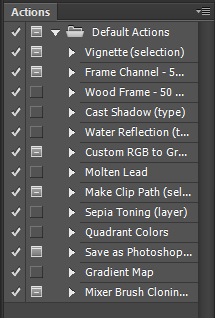
When you open the Actions panel in Photoshop CC this is what you see. Note all the actions which are included, which you can use immediately.
Before beginning to record actions, it is a good idea to close the Default Actions and create a New Set with your name.
Click on the icon at the top right of the Actions panel. When the pop-up appears, choose New Set and in the dialog box that appears immediately after that, type in your name and click on OK.

A new set appears with your name.
Daily design news, reviews, how-tos and more, as picked by the editors.

02. Record your action
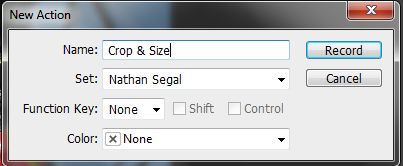
Recording an action is easy. Simply click on the icon at the top right of the Actions panel and in the popup menu click on New Action.

In the New Action dialog box, type in the name of your action and click on Record.
All the steps you take will be recorded in the Actions panel.
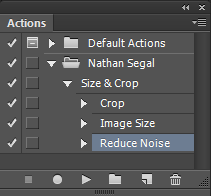
What you will find is that creating an action is often a process of experimentation to get the effects you desire. To end the recording, press the stop button.
03. Play the action
When playing actions, you have a few options. To access those, click on the icon at the top-right of the Actions panel and in the pop-up menu, click on Playback Options.
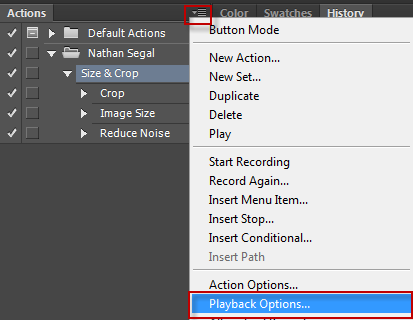
This brings up the Playback Options dialog box. You have three choices: Accelerated, Step by Step and Pause For.
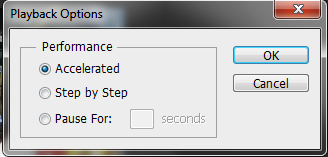
Accelerate will play the action at normal speed. Be aware that when you do so, you might not be able to see what the action is doing to your file. If you want to see how the Action performs, choose the Step by Step option instead.
The third option, Pause for ___ Seconds allows you to set a pause between each step of the action. This could be useful for debugging if you are having trouble with the execution of the action.
04. Managing and editing actions
You can apply an action to other images after it has been recorded. Another way to apply actions is to go to File>Automate>Batch.
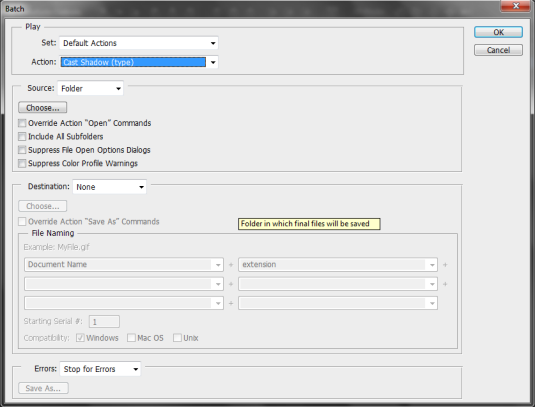
Note that at the top of the dialog box are three important drop downs. The Set heading refers to Action Sets that have been recorded. In this case, the default action set is available.
Immediately under that is the action heading. Here, you can chose which action you want to use. The third drop down is for the source of images, which could be a folder, import, opened files, or Bridge.
05. For best results
Take some time to plan the steps of the actions before recording them and if necessary, write down all the steps on a piece of paper before you begin. While you can edit actions after the fact, it is a better use of your time to work out any potential problems before you begin recording.
It is also a good idea to keep a log of the actions you record with all the steps in case you need to make changes later.
Next page: the list of commands that can be recorded, and numerous useful resources

The Creative Bloq team is made up of a group of art and design enthusiasts, and has changed and evolved since Creative Bloq began back in 2012. The current website team consists of eight full-time members of staff: Editor Georgia Coggan, Deputy Editor Rosie Hilder, Ecommerce Editor Beren Neale, Senior News Editor Daniel Piper, Editor, Digital Art and 3D Ian Dean, Tech Reviews Editor Erlingur Einarsson, Ecommerce Writer Beth Nicholls and Staff Writer Natalie Fear, as well as a roster of freelancers from around the world. The ImagineFX magazine team also pitch in, ensuring that content from leading digital art publication ImagineFX is represented on Creative Bloq.
