Create a space warp implosion in Photoshop
Photoshop innovator Per Gustafsson explains how to create a classic space scene by building up visual elements on layers, applying filters and creating unique lighting effects
Sign up to Creative Bloq's daily newsletter, which brings you the latest news and inspiration from the worlds of art, design and technology.
You are now subscribed
Your newsletter sign-up was successful
Want to add more newsletters?
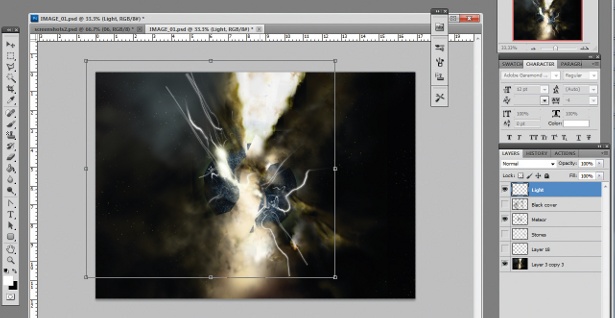
06 To add glowing lights use a brush to draw lines freehand at 100% opacity. To twist them, use the Warp tool: Ctrl/right-click on the layer with the Marquee tool, twice. Paint each line on a separate layer before merging them all together. Then duplicate that layer, add some Gaussian blur (Filters>Blur>Gaussian Blur) and lower it to 30% opacity before merging them again. Here I like to rotate the layer to find a good spot for the lines to be placed. You can also twist them all together now with the Warp tool to give them a bit of motion. Some radial blur on this layer might create a nice effect too.
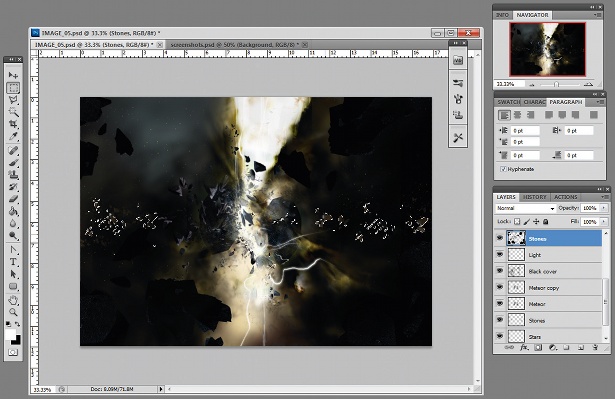
07 Now select the layer with the stone textures from step five. Copy these objects and place them on another layer on top. Make them smaller and maybe change the shape of each of them just to get a bit of variety in your asteroids. Multiply the layers and move and change the new ones so they look different from the first. This way we create a kind of meteor belt with a lot of smaller stones in the background. Add the Overlay Layer effect to that layer and the objects will blend well into the backdrop, and look different to the larger meteors in the foreground.
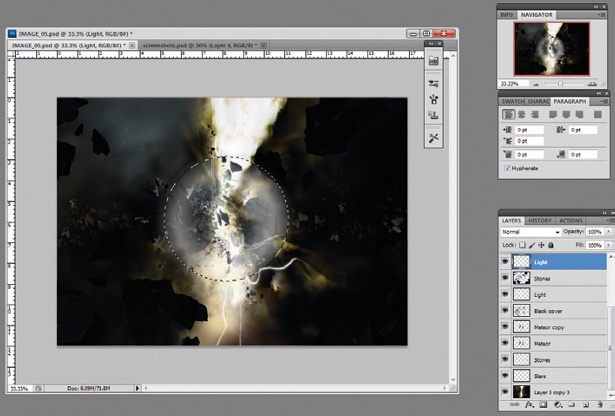
08 Some glow will draw the eye to the focal point, so let’s add more light to this part of the image. Create a new layer and paint inside this area with a bigger brush at 50% opacity. Then use Gaussian blur (Filters>Blur>Gaussian Blur) again before repeating this step a few times until you are satisfied. Work within the marked area and try not to overdo it.
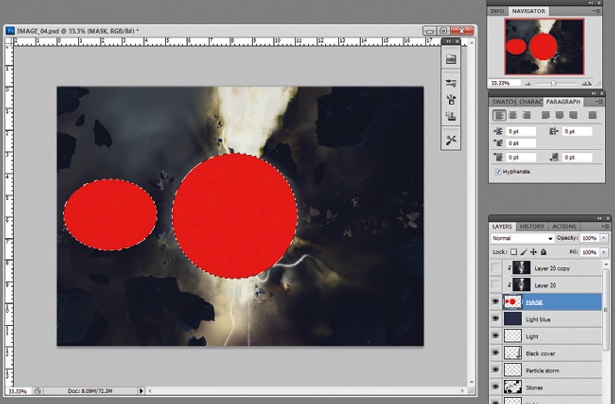
09 Choose two areas where you want to create a warp. Add a new layer and mark out the areas, filling them with a colour just so that they are more visible in the layer view. Hide this layer and take a screen grab of the actual image of how it looks right now, and then create a new layer pasting in your screen grab above the mask layer. Show the mask layer again, then Ctrl/right-click on the screen grab and select Create Clipping Mask. You’ll see an arrow appear on that layer, assigned to the mask layer. So whatever effect we decide to apply to the captured image, it will only be visible in the areas of the coloured shapes.
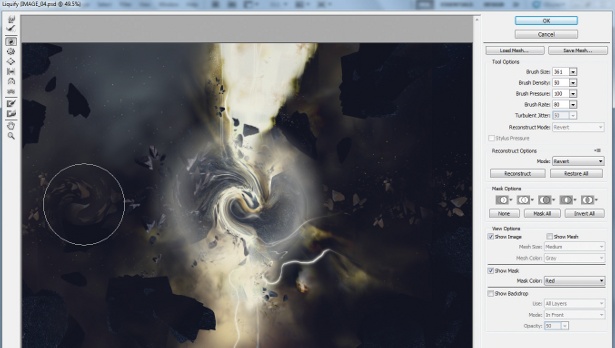
10 Now use the layer effect Liquify (Filters>Liquify). This filter has an interface enabling you to see the full image. Decide on the size of the brush and choose the Twirl Clockwise tool. Be careful to not smear it too much, but do explore the filter and brush sizes. This, combined with the Pucker tool and a smaller brush, creates similar effects to the implosion seen here. And the mask is covering up the edges of the effect perfectly.
Sign up to Creative Bloq's daily newsletter, which brings you the latest news and inspiration from the worlds of art, design and technology.

The Creative Bloq team is made up of a group of art and design enthusiasts, and has changed and evolved since Creative Bloq began back in 2012. The current website team consists of eight full-time members of staff: Editor Georgia Coggan, Deputy Editor Rosie Hilder, Ecommerce Editor Beren Neale, Senior News Editor Daniel Piper, Editor, Digital Art and 3D Ian Dean, Tech Reviews Editor Erlingur Einarsson, Ecommerce Writer Beth Nicholls and Staff Writer Natalie Fear, as well as a roster of freelancers from around the world. The ImagineFX magazine team also pitch in, ensuring that content from leading digital art publication ImagineFX is represented on Creative Bloq.
