
Today's tutorial will show you how to draw a dog. The skeletons of dogs and cats are quite similar, especially in the simplified version drawn here. But it's important to remember that these animals move differently and look very different from each other.
This tutorial will take you through the step-by-step process of how to draw a dog. We will be sketching an anatomically correct portrait of a German Shepherd. This will start with sketches and move on to drawing the skeleton, muscles and fur. By the end, you'll be drawing a dog with ease. For more advice, take a look at our roundup of tutorials exploring how to draw animals.
01. Observe in quick sketches

Many people – especially those who are new to art – disregard the sketching phase and consider it a waste of time. Often they will draw one or two sketches and call it a day. It's very easy to be tempted to speed up this stage. After all, details are much more fun to draw, aren't they?
The problem is, if we’re too eager to get to the details, it's easy to ignore the overall anatomy. And trust me on this: beautifully rendered fur on a creature that only partially resembles a dog will impress no one.
If you own a dog yourself, observe how they walk, run, jump, sit or lie down. You may think you know how they move, but you really won't until you consciously observe the animal. You can also google some photos of dogs and use them as reference to quickly sketch different poses. Try not to spend time on details – the sketching phase is not about that.
02. Find the skeleton

Focusing on the skeleton is a key part of mastering how to draw a dog. Even though in the end no one is going to see it, it's essential to understand the skeleton and be able to draw it in proportion. As you become more proficient you may start drawing the skeleton more loosely or perhaps even be able to skip this step altogether because by then the proportions will be engraved in your memory.
Before you move on to drawing the skeleton in your chosen pose, a good exercise would be to draw the structure on top of your previous quick sketches. This will help you become more familiar with the idea of a skeleton underneath all that cute fur that dogs are covered in.
03. Draw the skeleton

As you sketch dogs in different positions you will soon realise which one appeals to you the most. Perhaps you'll choose to draw a dog napping, or sitting. This tutorial will use a walking pose as this shows the animal and its anatomy in the best possible way.
Loosely draw the skeleton of a dog in your chosen pose. A good tip is to draw the skull, ribcage and pelvis bone, and use single lines to indicate the spine, tail and limbs.
Dogs’ skeletons have many similarities with human skeletons. You can clearly see the equivalent of human knees, elbows, feet and hands. Dogs’ legs are not that different from our arms and legs – the only real difference is in the proportions of the bones.
If you look closely you'll see that dogs walk on the balls and toes of their feet, sort of like a woman in high heels. Notice how opposing front and back legs carrying most of the weight of the dog. They are firmly placed on the ground, while the other two barely touch the floor.
If you work in traditional media, use very light strokes for the skeleton, so that you can erase it later. If you work digitally, draw each step on a separate layer.
04. Draw in the muscles

The point of this step is to establish the anatomy beneath all the fur. German Shepherds are not particularly fluffy, so the muscles will be visible through the outer coat. However, if you choose a breed such as an Afghan Hound or Bernese Mountain Dog you'll face a slightly bigger challenge finding the muscles under all the fur.
It is important to understand how the muscles sit under the skin. Understanding the general rules will give you the tools you need to draw any dog, regardless of the hair length.
05. Focus on the face

Now it’s time to refine the drawing, beginning with the head. We want to start using stronger, more decisive lines at this point.
It's very important to observe the correct position of the eyes. If you’re drawing a dog’s head straight-on, it’s fairly easy to maintain the correct proportions between the eyes and nose. However, drawing the face in a slightly turned view can be much trickier. Not only are the eyes now at a different angle, which changes their shape and size, but their position in relation to the nose also changes.
It's important to remember that the eye that is further away from the viewer will not be the same size as the one in the foreground. Perspective means the closer eye will be slightly bigger.
06. Draw in the muzzle

Like many other dogs, German Shepherds have quite long muzzles. Even pugs, which don't have prominent muzzles, don’t have entirely flat faces. The length of the dog’s muzzle will vary depending on its breed, so make sure to observe this carefully.
Making the muzzle too long or too short will drastically alter the likeness of the dog. Remember that in a three-quarter view, the muzzle will appear shorter.
Pay close attention to the shape and size of the nose as well. Most dog's noses look quite similar, but depending on the breed they can be bigger or smaller in relation to the rest of the head. If the dog has an open mouth they will usually show their teeth, gums and tongue, which is typically quite long and flexible.
07. Move on to the ears

As with the eyes, it is necessary to pay close attention to perspective when drawing ears. Observe the shape of the head and how the ears are attached to it. The ears are generally a mirror image of each other, but even when painting uneven ears (some dogs have one droopy ear, for example) they will stay a consistent shape at their base. In this example one of the ears has been altered on purpose as an example
08. Refine the body

We already have a good idea of the musculature of the body, but on top of the muscles there is skin and fur. In some cases this can drastically change the look of the dog (think about how different certain dogs can look after they’ve been groomed).
German Shepherds are still hairy in places, so where necessary use smaller strokes to indicate fur. The dog we're drawing has thicker fur around its neck, under its belly and on its tail, but on the rest of his body, especially the head and legs, his hair is shorter. Avoid using the same kind of strokes all over unless it's a short-haired breed.
When you're done, erase the underlying lines if working traditionally or turn off the skeleton/muscle layers if you’re working digitally.
09. Consider fur patterns
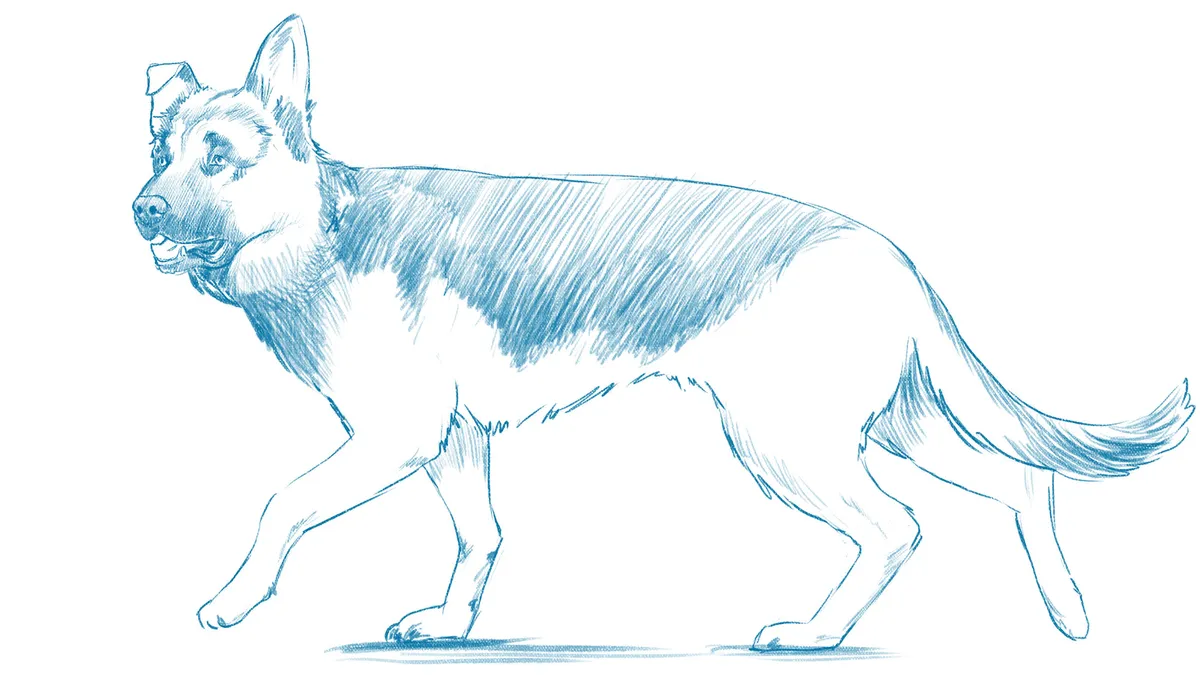
Every dog is a little different, and their colours can vary greatly. This can still be shown even in a black-and-white sketch. Use varying pencil strokes when shading to ensure the coat pattern doesn't look flat.
This dog’s hair is mainly brown and black. It's not necessary to recreate all of the tonal values, so instead you could sketch in only the black parts of the fur. A good tip is to use lighter strokes along the dog's back to indicate a light source hitting the fur.
10. Add final touches

Finally, add some subtle strokes along the dog’s legs to give a suggestion of muscles showing underneath the fur. The idea is to convey enough information to give the dog character without having to shade the entire silhouette. The last touch is to add some shadows under the paws and voilà – you drew a dog!
If you want to learn more, you could check out how to draw a pencil portrait of a dog or discover a guide to drawing a dog's muscle groups.
Read more:

