Mo.js is a unique motion graphics JavaScript library that not only facilitates full-screen page animation loaders, but also click-to-animate micro-interactions, and tons of shape manipulations.
If you have been following the web design scene for a while now, chances are that you will have come across – or perhaps interacted with – a wide array of animation techniques and libraries. Core technologies such as CSS, HTML5 and JavaScript are becoming even more powerful, and browser support is improving with time. The implication is that more sophisticated web animations can be supported across devices. Remember, if you're building a complex site, your web hosting service must be capable of supporting your project.
Need some animation inspiration? Here are some awesome examples of top CSS animation to recreate. Want to build a site without coding? Try these website builders.
How can mo.js help?
Web animation, as it appears, is here to stay. However, a shortcoming with most popular animation techniques is that they are gravitated towards animating conventional UI/UX elements such as slideshows, tabbed buttons and drop-down menus. As a result, using them can eventually make your site too familiar and non-exciting.
Mo.js can help with this. Using the library helps to animate the not-so-ordinary site elements by utilizing its built-in components such as html, shape, swirl, burst and stagger. The library is very easy to use, fast, retina ready, modular and open source. In this tutorial, the basics of working with mo.js are introduced and two techniques demonstrated; blast and bubble.
01. Get started
Begin by creating a folder, mo.js, on your desktop to store the tutorial files. Create three additional folders within it: css to store the styling files, img for images and js for the JavaScript files. HTML files will be stored in the root folder. (You may want to consider backing up with cloud storage).
02. Create page structure
Open your code editor and create an index.html document to contain mark up for the main web page. Begin by creating the basic structure and give a suitable title to the page.
<! DOCTYPE html>
<html lang="en">
    <head>
        <meta charset="utf-8">
        <title>Blast Technique <
title>
 </head>
<body> </body>
</html>
03. Structure the page
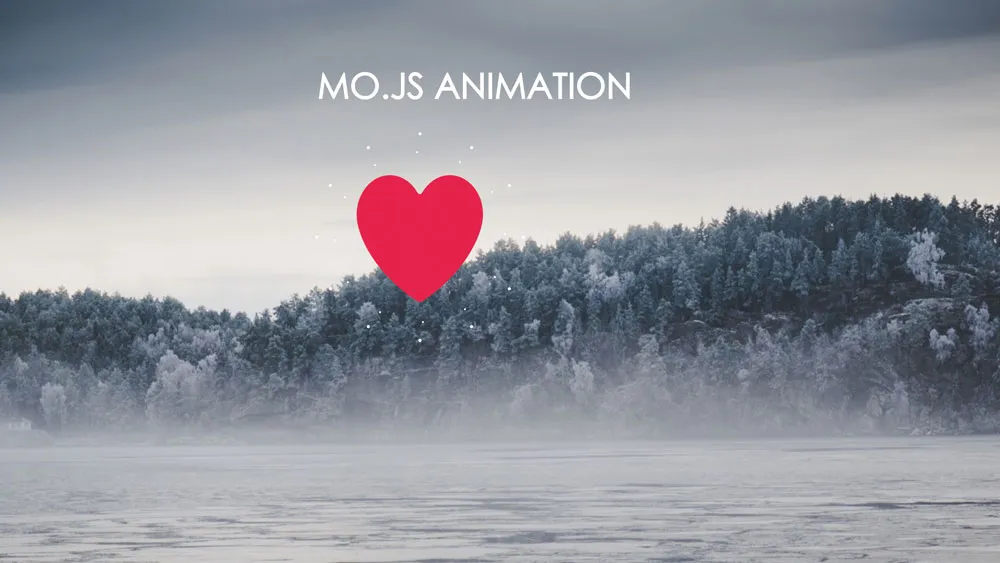
The tutorial is divided into two parts; the first demonstrates the blast technique, whereas the second illustrates the bubble concept. As a result, we prepare two HTML files, one for each technique. To kick-start the blast technique, create a div section to contain the page title. Render the page in your browser where you should observe un-styled text at the top-left corner.
<body>
      <div class="text">
<p> Mo.js Animation </p>
     </div>
</body>
04. Link the CSS
Open your code editor and create styles.css file inside the css folder. Create a link to this file in your html document by adding this code in the head section, <link rel=”stylesheet” href =”css/styles.css” >. Since no styles have been added, the page renders as illustrated in step 3. Alternatively, since the styling is minimal, you can opt to use inline styling by combining the HTML and CSS.
05. Style the background

Next, we style the background by adding a background image. We have used the free scenic landscape background by Nikolai Ultang from Pexels. You can download it here. Save this (or your own image) inside the img folder. Render the page to show changes to the background.
body, html {
  	background-image: url (bg.jpg);
  	background-size: cover;
  	padding: 0;
  	margin:  0;
  	width: 100%;
  	height: 100%;
  	overflow: hidden;
}
06. Style the text

The text is then styled to render at the centre of the page, as it currently appears at the top left corner. Note that to centralise the text, we select an absolute position and set its exact positioning using the top, left and right margins. The text is also transformed using the text-transform property. The text-align property is also set to centre.
text {
  	font-family: Century Gothic, sans-serif;
  	color: #fff;
  	text-transform: uppercase;
  	font-size: 50px;
  	font-weight: bolder;
  	position: absolute;
  	top:50px;
 	left: 25%;
 	right: 30%;
  	text-align: center;
     }
07. Install mo.js
As with other libraries, mo.js is installed through multiple options. The simplest approach, which we employ, is accessing it directly from a CDN server. Add the following code in the body section.
<script src= ‘//cdn.jsdelivr.net
mojs/0.265.6/mo.min.js’></script>
In case you are developing offline, the library can be downloaded directly from GitHub and installed by using the Bower or NPM packages by using the appropriate commands.
bower install mo-js
npm install mo-js
Once downloaded, it can be referenced directly.
<script src="mo.js" type="text
javascript"></script>
Finally, create a new script.js file and save it in the js folder. We will add JavaScript functionality to this file. Link it in the body section as follows. Place it below the text title as shown below.
<body>
<div class="text">
<p> mo.js Animation </p>
</div>
   <script src='https://cdn.jsdelivr
net/mojs/0.265.6/mo.min.js'></script>
  <script src="js/script.js"><
script>
</body>
08. Create the first blast
Before proceeding to develop the code, it wise to highlight what we are creating. To blast something simply means to break it apart into smaller bits in an explosive manner. We will create a simple object (circle) and set it up search that when a user clicks it, it breaks apart in an explosive manner.
09. Create the circle object

First, the object to be blasted is created (circle). However, mo.js supports other shapes, including rectangle (rect), cross, equal, zigzag and polygon. Where you fail to specify the shape type, it will default to a circle.To create a simple circle, declare it using the var or const and assign its attributes by calling the shape function.
//creating a simple object
Const Circ = new mojs.Shape({
  	isShowStart: true,
             radius: 100,
});
The code creates the default circle object with the given radius. The isShowStart variable is assigned a Boolean value to specify whether you need to show the object or not. Render the code to display a small magenta-coloured circle at the centre of the page.
10. Animate the circle
The code snippet specifies that the scale and opacity will change from 1 to 0, indicating that the object disappears. Aduration and delay of the animation are also set. Note that the animation does not play since we are yet to initialise it. To do so, add the function below.
document.addEventListener('click', function
(e) {
Circ.
 	 replay ( );
});
11. Make exploding polygons

Now that the circle is animating, we create a blast animation that renders at the same time. The first blast uses the polygon shapes to draw out the explosion. To create a blast, use the mo.js function Burst as shown in the code snippet below.
const burst1 = new mojs.Burst({
  left: 0, top: 0,
  count: 7,
  radius: { 50: 250 },
  children: {
    fill: ‘white’,
    shape: ‘polygon’,
    stroke: {‘white’:’#A50710’},
    strokeWidth: 4,
    radius: ‘rand(30, 60)’,
    radiusY: 0,
    scale: {1: 0 },
    pathScale: ‘rand(.5, 1)’,
    degree: 360,
    isForce3d: true } });
The code assigns seven polygon shapes to the explosion and specifies two radii. The first refers to the overall animation, while the second focuses on the specific polygon objects within the animation. Ensure to add the burst to the event listener function so that it responds to mouse clicks. Note that two new parameters have been added; the tune and generate. Tune makes the blast to render anywhere in the page, whereas generate initialises the burst animation. Render the page. Observe the exploding elements that appear at the same time as the circle.
document.addEventListener(‘click’, function
(e) {
             burst1.
  	tune ({ x: e.pageX, y: e.pageY }).
  	generate ().
 	replay ();
Circ.
 	 replay ( );
});
12. Create the second blast

Next, we create the second blast by using different shape options. The code follows the structure of the previous blast and only changes a few parameters.
const burst2 = new mojs.Burst({
  top: 0, left: 0,
  count: 4,
  radius: { 0: 250 },
children: {
    shape: [‘circle’, ‘rect’],
    points: 5,
    fill: [‘white’],
    radius: ‘rand(30, 60)’,
    delay: ‘stagger(50)’,
    easing: [‘cubic.out’, ‘cubic.out’,
‘cubic.out’],
    scale: { 1: 0 },
    pathScale: ‘rand(.5, 1)’,
    isForce3d: true } });
Add the burst to the event listener function.
document.addEventListener(‘click’, function
(e) {
             burst1.
  	tune ({ x: e.pageX, y: e.pageY }).
  	generate ().
 	replay ();
             burst2.
             tune({ x: e.pageX, y: e.pageY
}).
             generate().
             replay();
Circ.
 	replay ( );
});
13. Add circle explosions
In order to enhance the animation further, we add circular explosions. Examining the code in steps 11 and 12 reveals a lot of similarities existing between the two type of bursts. In creating the third blast, we avoid rewriting too much code by using the spread operator which is written as three dots (...). However, first, we declare a variable that contains the similar features that we want to reuse. Thereafter, the other two circles can be created by simply using the spread operator.
  // creating the variable with similar
parameters
    	const CIRCLE_OPTS = {
  	left: 0, top: 0,
   fill: ‘white’,
  	scale: { .2: 1 },
  	opacity: { 1: 0 },
  	isForce3d: true,
  	isShowEnd: false
};
The code specifies the fill type, scale, opacity and whether to display them at the end of the animation. The two circle animations are created as follows.
const circle1 = new mojs.Shape({
  ...CIRCLE_OPTS,
  radius: 200 });
const circle2 = new mojs.Shape({
  ...CIRCLE_OPTS,
  radius: 240,
  easing: ‘cubic.out’,
  delay: 300 });
Add the circular shapes.
document.addEventListener(‘click’, function
(e) {
             burst1.
  	tune ({ x: e.pageX, y: e.pageY }).
  	generate ().
 	replay ();
             burst2.
             tune({ x: e.pageX, y: e.pageY
}).
             generate().
             replay();
Circ.
 	replay ( );
});
14. Render a basic bubble
Unlike the blast animation, which breaks the object into smaller pieces, the bubble animation, on the other hand, translates the clicked object into a bigger space. The concept adopts the analogy of blowing up a balloon where the object continually expands in size. To do this, we simply create a new variable openBackground and assign attributes that will make the entire background achieve a similar colour to the object. As a result, this creates the nuance of bubbling.
const openBackground = new mojs.Shape({
  fill: ‘#FC2D79’,
  left: 0, top: 0,
  scale: { 0: 4.5 },
  isShowStart: true,
  radius: 15,
  isForce3d: true,
  isTimelineLess: true,
delay: 150,
  radius: 200,
  easing: ‘cubic.out’,
  backwardEasing: ‘expo.in’,   });
Ensure to add the background variable to the event listener function.
openBackground.
  tune({ x: e.pageX, y: e.pageY }).
  replay();
15. Add multiple shapes
Following the concept in step 14, we now advance the example to include multiple coloured circular objects, which upon clicking expand in a similar manner and display some text. Edit the existing html file and copy the code within the body. It creates the basic structure of the page.
16. Add helper libraries
Next, some additional libraries are added in the body section in order to facilitate scrolling and produce sounds when the objects are clicked.
<script src=’https://cdnjs.cloudflare.com
ajax/libs/howler/1.1.26/howler.min.js’><
script>
<script src=’https://cdn.jsdelivr.net
mojs/0.119.0/mo.min.js’></script>
<script src=’https://cdn.jsdelivr.net
hammerjs/2.0.4/hammer.min.js’></script>
<script src=’https://cdnjs.cloudflare.com
ajax/libs/iScroll/5.1.1/iscroll-probe.min
js’>
</script>
17. Advance the animation
Next, we add styles for the individual classes highlighted in the html files. The mo.js functionality is then added. The full code (css and js) is shared with the tutorial files for review.
18. Learn more about mo.js
While the tutorial demonstrates the bubble and blast techniques, there are further resources available online that can help you fast-track your learning process. Some of these include mo.js tutorials on Github and demos also on Github.
This article was originally published in issue 291 of creative web design magazine Web Designer. Buy issue 291.
Read more:
