How to customise animated GIFs in Photoshop
Matthew Broerman reveals three methods to help you add your own style to any animated GIF.
Sign up to Creative Bloq's daily newsletter, which brings you the latest news and inspiration from the worlds of art, design and technology.
You are now subscribed
Your newsletter sign-up was successful
Want to add more newsletters?
02. Blending options

With the Animation/Timeline window open, select all the frames and click the 'trash' icon.

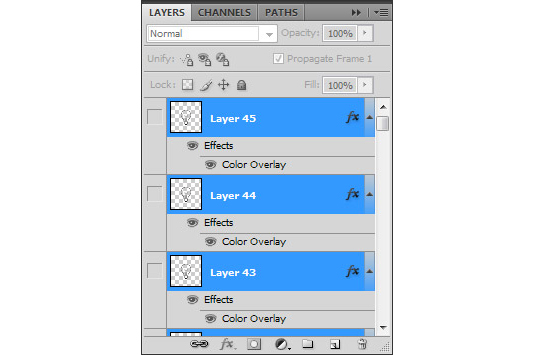
Go to the Layers window, and select the first layer. With the layer selected, click the 'fx' icon to reveal the 'Blending Options' menu.

Apply the desired blending option to the first layer. In this example I'm showing Color Overlay, but you can add any layer effect like this, including Drop Shadow, Stroke, or combinations of multiple effects.

Once the blending option is set, right-click on the layer and select 'Copy Layer Style'. Then select all the other layers, right-click again and select 'Paste Layer Style'. All your layers should now have the same effects.

In the Animation/Timeline window, choose the More menu in the upper right. Select 'Make Frames from Layers' to turn each layer into an individual frame.

Select all the frames again and click the down arrow beneath any frame. Here you can set the frame speed. Select 'Other' and enter 0.03 for 30fps playback.
You're now ready to save. Select 'Save for Web and Devices' from the File menu. In Photoshop CC, it's under File>Export. Select GIF, and the desired number of colors. Be sure to check the Transparency, Matte, and Animation Options at the bottom of the dialog. Click 'Save' and save the file as a new name.
Sign up to Creative Bloq's daily newsletter, which brings you the latest news and inspiration from the worlds of art, design and technology.
Results


Next page: method three - frame by frame

The Creative Bloq team is made up of a group of art and design enthusiasts, and has changed and evolved since Creative Bloq began back in 2012. The current website team consists of eight full-time members of staff: Editor Georgia Coggan, Deputy Editor Rosie Hilder, Ecommerce Editor Beren Neale, Senior News Editor Daniel Piper, Editor, Digital Art and 3D Ian Dean, Tech Reviews Editor Erlingur Einarsson, Ecommerce Writer Beth Nicholls and Staff Writer Natalie Fear, as well as a roster of freelancers from around the world. The ImagineFX magazine team also pitch in, ensuring that content from leading digital art publication ImagineFX is represented on Creative Bloq.
