Build a real-time team dashboard app (part 1)
In the first part of a two-part tutorial, Henrik Joreteg explains how to build a team dashboard app that updates in real time, leveraging Node.js and Backbone.js.
Daily design news, reviews, how-tos and more, as picked by the editors.
You are now subscribed
Your newsletter sign-up was successful
Want to add more newsletters?

Five times a week
CreativeBloq
Your daily dose of creative inspiration: unmissable art, design and tech news, reviews, expert commentary and buying advice.

Once a week
By Design
The design newsletter from Creative Bloq, bringing you the latest news and inspiration from the worlds of graphic design, branding, typography and more.

Once a week
State of the Art
Our digital art newsletter is your go-to source for the latest news, trends, and inspiration from the worlds of art, illustration, 3D modelling, game design, animation, and beyond.

Seasonal (around events)
Brand Impact Awards
Make an impression. Sign up to learn more about this prestigious award scheme, which celebrates the best of branding.
The future of the web is real-time. The reason I can say this with certainty is because it's already happening under our noses. Facebook, Gmail, Google Talk and GitHub, to name but a few, have all implemented some form of automatic page updating. When they have something new to tell you, they don't wait for you to ask for it. They push it out to you, from the server to the client.
In some cases this is as simple as the page automatically polling to see if there's something new. In other instances it's more advanced, where all the data used to build and update the page is coming over an open WebSocket connection. For our purposes, the transport mechanism is largely irrelevant; the point is, data comes to you.
This inherently breaks the statelessness of web pages. It used to be that I hit a URL and got back a web page. As a user, I understood that the information on the page was accurate as of the time it was requested. If I wanted to check for something new, I'd go ask for it again and get another snapshot in time.
Dealing with the concept of 'state'
As soon as we make any effort to keep the information on the page in sync with the server, we've acknowledged that the webpage has 'state'. Of course, it always did - but when we as developers decide we want to do partial updates of the page, the only way we can do so is by knowing what we currently have and comparing it with the server. State duplication has occurred, and we're now maintaining 'state' in some form in the client.
As users get increasingly comfortable with that idea, we'll reach a point where always-current, self-updating information is the expectation rather than a surprise. I promise you: this will happen, whether you're on board or not. If you want to stay at the top of your field as a web developer, you'll have to know how to build apps that work this way.
When you duplicate state, you increase complexity. Because now, rather than worrying about just rendering some data correctly, you're have to care about staleness, caching and merge conflicts.
Distributed system
If we step back a bit and look at what we're doing, we start to realise that we're actually building a distributed system, and we'll have all the same challenges that come with building those.
Daily design news, reviews, how-tos and more, as picked by the editors.
You're probably thinking: "Some framework is going to come along that solves this problem for me." You may be right: there are different approaches to the problems of duplicated state, and frameworks like Meteor, SocketStream and Derby, do aim to simplify the process of building apps that work this way.
The problem with those frameworks, from where I sit, is that there's a lot of emphasis on trying to share code and logic between the client and the server when the two really should be performing fundamentally different roles. Servers are for data; clients are for presentation. To me, this is just a basic principle of separation of concerns.
The way you solve complex problems is by not tackling them as complex problems. Instead, complex problems are solved by building small, maintainable pieces that tackle a small portion of the issue at hand. In addition, when you try to share too much server code with a browser, it's very easy to fall into the trap of coupling your application to that particular client too tightly. This makes it much harder to build other clients: for example, a native iOS version of your app.
While these frameworks are useful for creating web apps, they can cause problems when we go beyond them. And with more and more talk about 'the internet of things', we have good reason to believe that the breadth of device types that may want to communicate with your app will continue to increase.
Code structure and single-page apps
If we've decided that we want our server to be able to focus on data, we may as well transfer as much of the rendering and presentation to the client. Some developers are advocating partial rendering on the server, and so forth.
To me, once we recognise we're building a 'thick' client, we may as well render it all there. Otherwise, if part of our page state is rendered on the server, we have to somehow retranslate the HTML into state information. Again, I prefer an explicit separation of concerns.
As a result, the two lines of code below is the entirety of the HTML we send to the browser for our product, And Bang ('&!' for short):
<!DOCTYPE html>
<script src="/&!.js"></script>
Yup, that's it (and yes, omitting <html>, <head>, and <body> is allowed by the HTML specs).
The purpose of this extreme minimalism is primarily aesthetic. But it also makes it abundantly clear that it's the client's responsibility to render the application and manage everything within it, including the page title and life cycle of all the page elements.
If you've ever tried to build a complex single-page app, you'll know that keeping your code clean and tidy is one of the toughest challenges. I can tell you from my experience that the best way to stay sane (and that's not an exaggeration) is to make darned sure that you separate your application state from the DOM cleanly. This means your DOM can be simply a reflection of the current model state.
Enough background, let's build something cool
Real-time apps suck without an external data source. What's the point of updating a page if nothing's changed that you didn't change yourself? So I'm going to walk you through how to build a dashboard app for your team using And Bang's shiny new real-time API.
If you've seen the Panic Status Board, you'll know what I'm talking about. When we're done, we'll be able to keep this app running - and if our team is using And Bang for collaboration, we'll be able to see what everybody's up to.
We'll try to keep the scope of the tutorial fairly narrow, but I'll be sure to throw in some goodies to keep it interesting. Hopefully, it will show you a lot of the tools and techniques needed in order to build these types of applications.
What we'll build
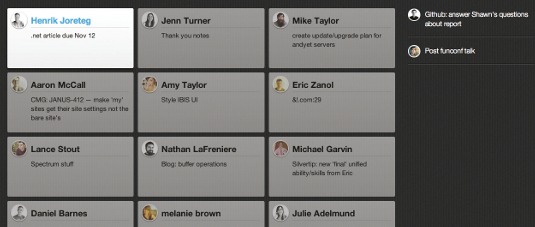
So what will we be building? You can find the full source - and instructions on how to run it - for this project here. Note how there is a 'card' for each member on the team. We'll live-sort and animate these member cards based on who is online and whether they're working or not.
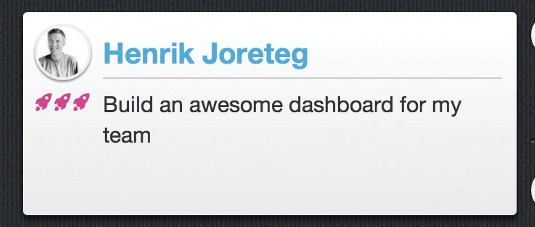
We can also see how many items they've 'shipped' that day, based on how many little pink rockets there are on their card. Recent shipped items for the whole team appear in the list on the right-hand side. Our app will only render shipped items that happened that day, and will be reset at 4am each morning.
Basic set-up
You'll need Node.js 0.8+ and npm installed on your system. (These days, npm ships with Node.js.) I'm assuming that you're working in a Mac or Linux environment, but with very minor tweaks you should be able to follow along just fine if you're using Windows.
If you want to follow along with me from scratch, we'll create a folder structure that looks like this:
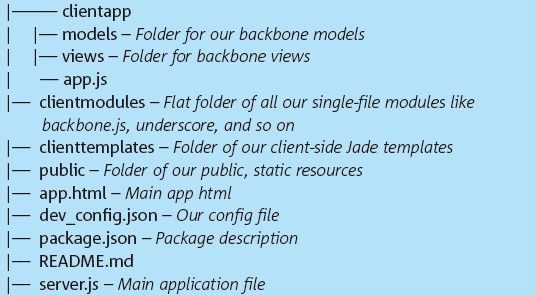
First, we know we'll need to install some stuff. Create a new folder for your project and create a package.json file in it that looks something like this:
{
"name": "sample-dashboard.andbang.com",
"version": "0.0.1",
"homepage": "https://sample-dashboard.andbang.com",
"repository": {
"type": "git",
"url": "git@github.com:henrikjoreteg/sample-dashboard.andbang.com.git"
},
"description": "Mind-meldification for teams",
"dependencies": {
"backbone": "",
"underscore": "",
"express": "",
"stitch": "",
"andbang-express-auth": "",
"precommit-hook": "",
"clientmodules": "",
"templatizer": "",
"andlog": "",
"getconfig": ""
},
"clientmodules": ["andlog", "backbone", "underscore"],
"main": "server.js",
"scripts": {
"postinstall”: "node node_modules/clientmodules/install.js"
}
}
Next switch into your new project folder and type:
npm install
This should install everything you need.
Build a server.js file
Next, we need to build a server.js file. This will set up our server application and handle everything we need to do OAuth with https://accounts.andbang.com so we have access to our team data.
Once this is done, we import the modules we'll need:
var express = require('express'),
stitch = require('stitch'),
andbangAuth = require('andbang-express-auth'),
templatizer = require('templatizer');
We build our client templates into vanilla JavaScript:
templatizer(__dirname + '/clienttemplates', __dirname + '/clientmodules/
templates.js');
Here we use Stitch to specify the files that will make up our client-side application:
var clientSideJS = stitch.createPackage({
paths: [__dirname + '/clientmodules', __dirname + '/clientapp'],
dependencies: [
__dirname + '/public/jquery.js',
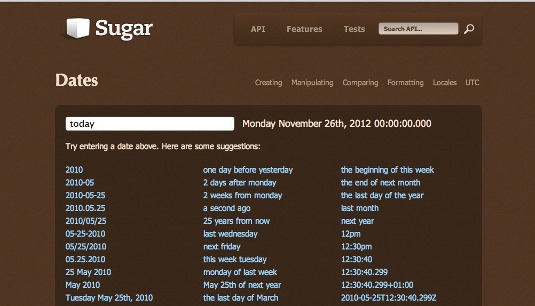
__dirname + '/public/sugar-1.3.6-dates.js',
__dirname + '/public/socket.io.js',
__dirname + '/public/init.js'
]
});
Now we create and configure our express.js application. (You can find the docs here.)
var app = express();
app.use(express.static(__dirname + '/public'));
app.use(express.cookieParser());
app.use(express.session({ secret: 'neat-o bandit-o' }));
app.use(andbangAuth.middleware({
app: app,
clientId: 'andbang-client',
clientSecret: 'dev-client-secret',
defaultRedirect: '/',
loginPageUrl: '/auth'
}));
We can now use our application to specify which URL we'll use to serve the client-side application. Stitch turns it into a single file for us. While we're in development, it can also watch for changes and update itself so we don't have to restart the server each time we change any of our client files.
We wouldn't want to serve our application this way in production. For that, we can write the file to disk, minify it and just serve it as a static JavaScript file.
app.get('/&!-dashboard.js', clientSideJS.createServer());
Next, we serve our app.html file and tack on our API access token as a cookie.
app.get('/', andbangAuth.secure(), function (req, res) {
res.cookie('apiToken', req.session.accessToken, {expires: new Date(Date.
now() + 30000)});
res.sendfile(__dirname + '/app.html');
});
Start listening for requests:
app.listen(3003);
And write some helpful log output:
console.log('Dashboard is running at: http://localhost:3003. Yep. That\'s pretty awesome.');

Breaking it down, part 1: OAuth
You'll see we're using some middleware to handle OAuth with And Bang for us. For this to work, you'll need to enter your client ID and secret. (In order get these credentials, you will need to have registered your app at www.andbang.com first.)
app.use(andbangAuth.middleware({
app: app,
clientId: '<< YOUR CLIENT APP ID >>',
clientSecret: '<< YOUR APP SECRET >>',
defaultRedirect: '/',
loginPageUrl: '/auth'
}));
Then, by securing the main route with the middleware, you'll immediately be redirected to log in via And Bang. You can see that in action here. Note the andbangAuth.secure() middleware:
app.get('/', andbangAuth.secure(), function (req, res) {
// some secured action
});
Breaking it down, part 2: Stitch and the client side
We use Stitch, written by Sam Stephenson of 37signals. This enables us to keep our client-side code cleanly separated into modules that only do one thing.
If you're unfamiliar with CommonJS, it's a pattern for structuring modules where you explicitly require other modules you want to use and export functions or objects that you want to make available to other modules. Nothing has done more for the cleanliness of my client-side applications than switching to this approach.
Since Node.js also uses this module system, it has the added benefit of letting me reuse a module on the server or client. In addition, it facilitates structuring code into as many files and folders as make sense to you, without having to worry about what that does to <script> tags in your HTML.
Stitch simply takes your folder structure and builds and concatenates all of it into a single JS file. It also supports using regular JS libraries that are not written in the CommonJS style: for example, jQuery.
For other files that we want to include, we simply list them out as dependencies, in the order we want them, as follows:
var clientSideJS = stitch.createPackage({
paths: [__dirname + '/clientmodules', __dirname + '/clientapp'],
dependencies: [
__dirname + '/public/jquery.js',
__dirname + '/public/sugar-1.3.6-dates.js',
__dirname + '/public/socket.io.js',
__dirname + '/public/init.js'
]
});
During development, we just bundle that as if it were a server. This lets us make changes to modules and not have to worry about restarting or recompiling anything, since Stitch handles that for us by creating a little server that watches our directories for us:
app.get('/&!-dashboard.js', clientSideJS.createServer());
When it's time to put this in production, you just need to write the file to disk, minify it and serve it statically. Stitch makes that easy too, with its compile() function. Assuming clientSideJS was our stitch package from above, we could minify and write it to disk as follows. The first section of the script builds the &!.js and public.js files for production use:
var uglifyjs = require('uglify-js'),
fs = require('fs');
function uglify(code) {
var ast = uglifyjs.parser.parse(code);
ast = uglifyjs.uglify.ast_mangle(ast);
ast = uglifyjs.uglify.ast_squeeze(ast);
return uglifyjs.uglify.gen_code(ast);
}
clientSideJS.appPackage.compile(function (err, source) {
fs.writeFileSync('build/&!.js', uglify(source));
});
Next time, the client
Now we're set up and ready to start building the client-side app. We've got our app server, authentication, client templating and client package management. In part two, which will appear on Creative Bloq one week from today, we'll dig into Backbone.js and really start to see what it's like to build a real-time app with it.
I hope you've enjoyed the first instalment of this tutorial. My Twitter address is @HenrikJoreteg, so ping me if you have any questions or feedback. I'd love to hear from you.
Words: Henrik Joretag
This article originally appeared in .net magazine issue 237.
Liked this? Read these!
- How to build an app: try these great tutorials
- Check out these top examples of JavaScript
- The best jQuery plugins humanity has to offer
Questions? Ask away in the comments!

The Creative Bloq team is made up of a group of art and design enthusiasts, and has changed and evolved since Creative Bloq began back in 2012. The current website team consists of eight full-time members of staff: Editor Georgia Coggan, Deputy Editor Rosie Hilder, Ecommerce Editor Beren Neale, Senior News Editor Daniel Piper, Editor, Digital Art and 3D Ian Dean, Tech Reviews Editor Erlingur Einarsson, Ecommerce Writer Beth Nicholls and Staff Writer Natalie Fear, as well as a roster of freelancers from around the world. The ImagineFX magazine team also pitch in, ensuring that content from leading digital art publication ImagineFX is represented on Creative Bloq.
