How to model a fantastical 3D creature
3D modeller Aybars Turan uses reference and concept art by Jan Vidra to model a realistic yet fantastical creature, the Imperator.
Daily design news, reviews, how-tos and more, as picked by the editors.
You are now subscribed
Your newsletter sign-up was successful
Want to add more newsletters?

Five times a week
CreativeBloq
Your daily dose of creative inspiration: unmissable art, design and tech news, reviews, expert commentary and buying advice.

Once a week
By Design
The design newsletter from Creative Bloq, bringing you the latest news and inspiration from the worlds of graphic design, branding, typography and more.

Once a week
State of the Art
Our digital art newsletter is your go-to source for the latest news, trends, and inspiration from the worlds of art, illustration, 3D modelling, game design, animation, and beyond.

Seasonal (around events)
Brand Impact Awards
Make an impression. Sign up to learn more about this prestigious award scheme, which celebrates the best of branding.
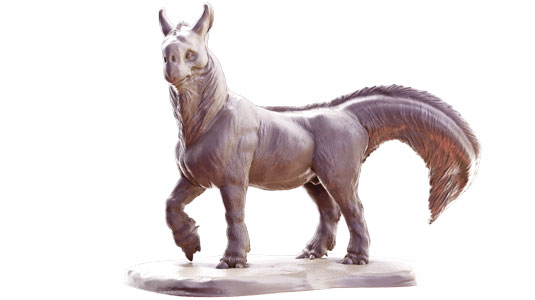
Creating creatures in 3D requires a lot of research – referencing real animals is absolutely vital if you're going to pull off a believable character. It's all about planning and paying attention to everything step by step, from large-scale shapes to the finest details.
Jan Vidra recently won a contest hosted by Helpful Bear Productions to conceptualise a unique creature. Referencing real world animal forms – including horses and tapirs – Jan's winning entry, the Imperator, forms the reference for my 3D model.
As I modelled Jan's Imperator at Helpful Bear, I was supervised by leading creature designer Terryl Whitlatch, who is known for her work with Lucasfilm and the book Katurran Odyssey.
Jan looked at African wild asses for proportion. The legs were borrowed from tapirs, and the tail is more of a dinosaur element. And although it's not very evident, Jan was inspired by marine animals, too, with Parrot Fish serving as inspiration for the shape of the lips, and influencing the colour patterns on the head.
In this tutorial you'll follow my process for modelling a fantastical creature, using concept art as a guide. I have found ZBrush to be the most effective tool for sculpting creatures and other biological forms.
- Download the source files for this tutorial here
01. Reference concept art
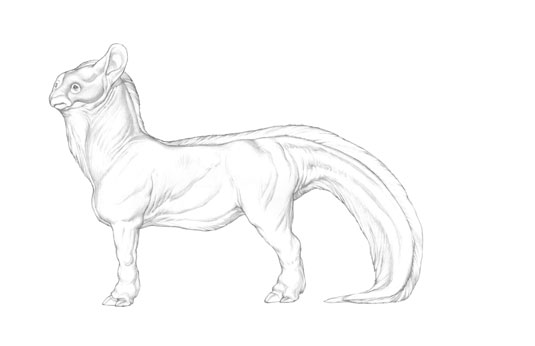
I receive a .pdf from Jan, which includes photo references, orthographic plans, sketches, and notes. He also includes essential facts such as where this creature lives, climate and environment. I also gather additional photo images and research living animals.
For reference I strongly recommend these books: Terryl Whitlatch: Animals Real and Imagined; Ken Hultgren: The Art of Animal Drawing; DK: Natural History; Seven Stories Press: Evolution.
Daily design news, reviews, how-tos and more, as picked by the editors.
02. Building the base mesh
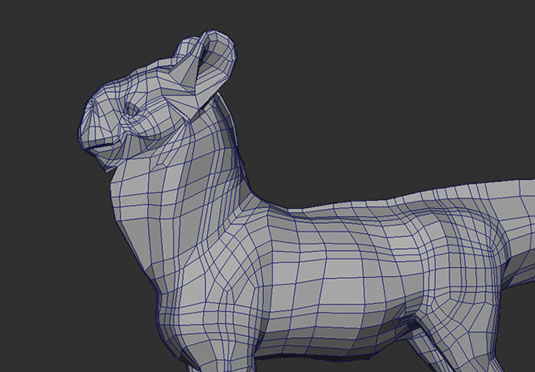
My aim is to capture the perfect silhouette of Jan Vidra's Imperator. I start by creating my base mesh in Maya; I like to see a solid mesh with low polygons before I start sculpting in ZBrush.
I start in Maya building the base mesh and go back and forward between Maya and ZBrush for the initial steps. One thing that's great about ZBrush is that it interfaces well with a wide variety of 3D packages.
03. Create the topology
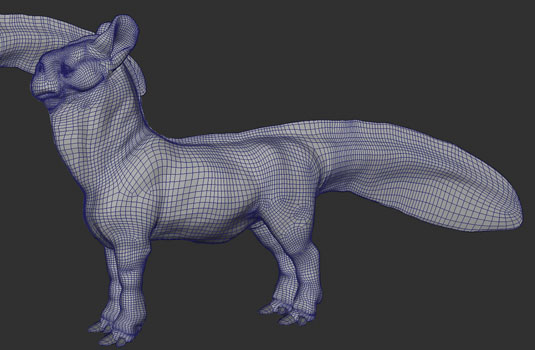
Set up the orthographic images and block out the basic shape, then build a solid base mesh that matches the front and side views. Take the mesh into ZBrush and further develop it by using the Move Topology brush and Move brush.
The basic shape is so important at this stage: even though this is only a static sculpt, I pay attention to edge loop flows and maintain a high poly count around places that need more detailed work, such as the head and tail.
04. Check the silhouette
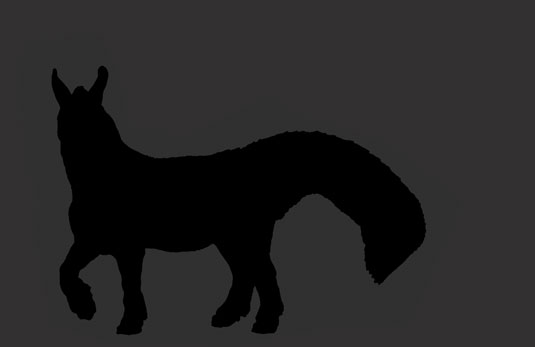
Now that the basic shape is complete in ZBrush, start subdividing the mesh one stage at a time, saving working on the details for later. Check the silhouette throughout the entire process to make sure you’re not straying far from the concept.
The silhouette is very important; whenever I think something is wrong with the character I always look at the silhouette. It's so easy to get lost in details, and doing this will keep you on track.
05. ZBrush brushes
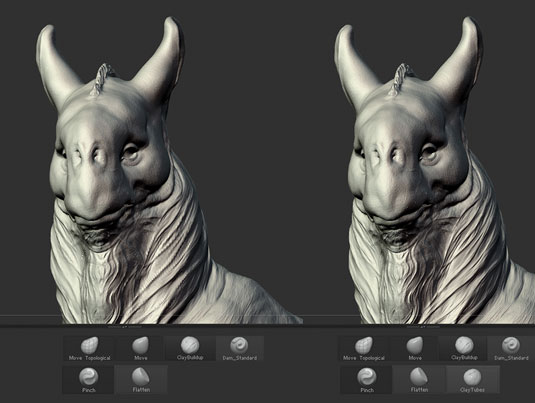
So far we've used only the Move and Move Topological brushes. Now we're going to delve a little deeper: I tend to use the Clay Buildup brush to add clay mass if it's needed. ZBrush has an amazing brush library, but usually you really only need a few brushes to produce good work.
Just as in traditional sculpting, you should stick to three to five brushes at most. The Move, Standard, Clay Buildup, ClayTubes, Flatten and Pinch brushes are what I typically use.
06. Creating the fur
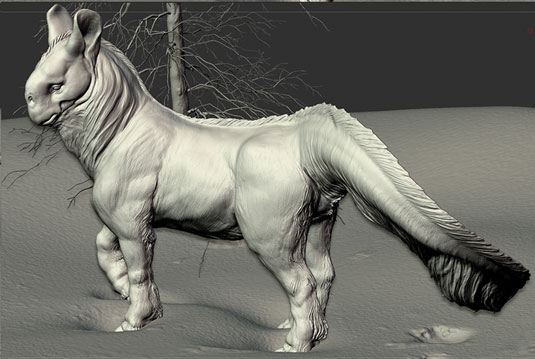
Next, use the Clay Buildup and Standard brush with a Lazy Mouse radius of 30 to draw the major fur forms. Refine the forms using the Standard, Flatten and Pinch brushes. To complete the transition between fur and skin, use ClayTubes (intensity 5-7), Brush>depth>imbed 1-4.
This takes a while, but the result is very nice. For the head details, I use ClayTubes and Standard brushes, then I use a couple of alphas to get really rich, wrinkly looking eyelids.
07. Sculpting detail
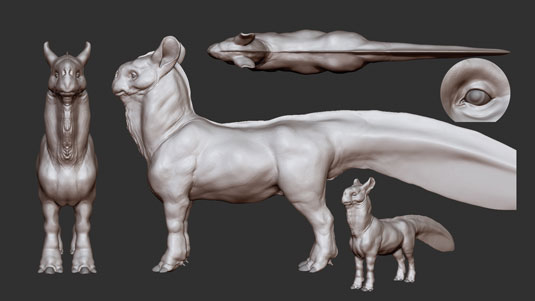
The Imperator has fur, wrinkles, skin and muscles. We'll devote time and planning to each of these. First, sculpt the creature without the fur, as if it had been shaved. Then add the fur. Use Standard and ClayTubes brushes to create wrinkles.
Creating the fur takes the most time. In this case the fur needs to look lush and the tail in particular should be quite extravagant. Using thin brush strokes and S shaped curves in different layers to achieve this.
08. Start posing
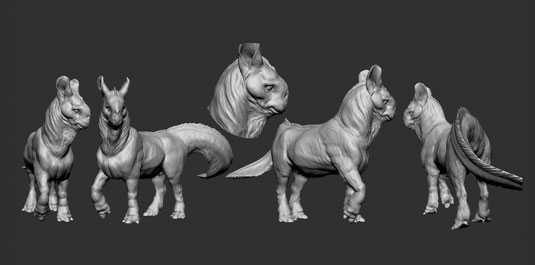
Posing brings the sculpture to life. T-poses and A-poses are essential, but posing your characters is just as important for presentation. I research horses and related animals in various poses, and Jan also provides additional sketches and drawings.
Knowing the animal's background is important, too: where does it live, how does it behave, what does it eat, and so on. Using Jan's Imperator information, I start to think about the pose and do some quick tests.
09. Rigging the creature
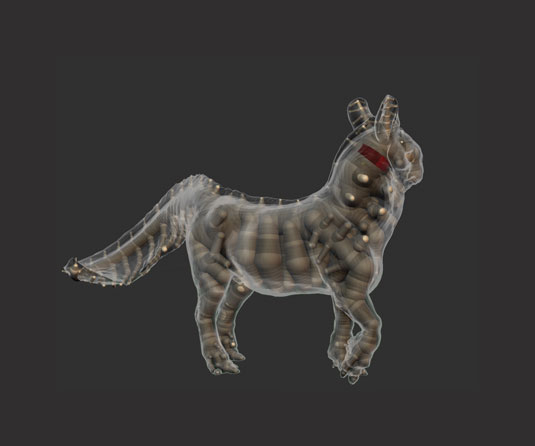
Use Transpose Master with a ZSphere rig in ZBrush; it's a great rigging tool for posing. While referring to the anatomical information, place ZSphere rigs within the mesh. Make sure to place ZSpheres in areas that will articulate, such as joints and digits.
Filling the geo with ZSpheres gives you more control over the form. Bind the spheres to the mesh and start posing, making sure you maintain the S-curved line of action seen from the top and side views.
10. The final sculpt
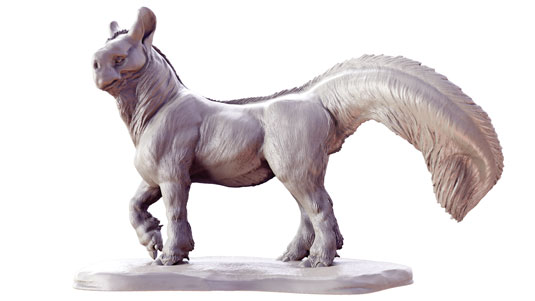
Having solid concept art, anatomy information, reference pics and a creature's habitat information helped me to make the Imperator a convincing character. Sculpting creatures that do not exist is always a challenge; the more information and story you have, the more believable the creature will be.
The biggest challenge in this project was sculpting the fluffy fur. I was able to create the look I wanted by planning the steps before I got lost in the details.
Words: Aybars Turan
Aybars Turan is an experienced 3D modeller based in San Francisco. He uses his fine art background to imbue his sculpts with life and realism. This article originally appeared in 3D World issue 182.

The Creative Bloq team is made up of a group of art and design enthusiasts, and has changed and evolved since Creative Bloq began back in 2012. The current website team consists of eight full-time members of staff: Editor Georgia Coggan, Deputy Editor Rosie Hilder, Ecommerce Editor Beren Neale, Senior News Editor Daniel Piper, Editor, Digital Art and 3D Ian Dean, Tech Reviews Editor Erlingur Einarsson, Ecommerce Writer Beth Nicholls and Staff Writer Natalie Fear, as well as a roster of freelancers from around the world. The ImagineFX magazine team also pitch in, ensuring that content from leading digital art publication ImagineFX is represented on Creative Bloq.
