How to sculpt fur in Maya
Joe Parente explains how to sculpt fur for his pipe smoking, dread-lock sporting yeti creature using Maya.
Sign up to Creative Bloq's daily newsletter, which brings you the latest news and inspiration from the worlds of art, design and technology.
You are now subscribed
Your newsletter sign-up was successful
Want to add more newsletters?
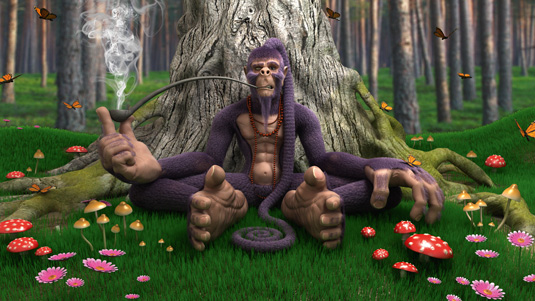
In this example, I start by sculpting all of my geometry in ZBrush. I use UV Master for some quick UVs, and then generate my texture and normal maps.
This process in ZBrush is fast and easy. It works really well for still images. And especially for a model that will be mostly covered in fur. So you don't really need to worry about your seams as much. It only matters on the portions of the skin that will be showing. I export everything into Maya using the GoZ plug-in.
There are several different ways to approach hair and fur in the more recent versions of Maya. This is why it's important to plan out your composition, to get an understanding of which approach will work best in the specific circumstance.
For this project I was originally going to use the groomable splines option for the fur. I already had a good idea in my head of what I wanted the finished look to be. Then later I switch methods to placing individual guides along the plates, for that added level of control. The guides make it really easy to go back and modify a specific area of the fur.
To create the grass I don't feel the need to use guides, and just use expressions and modifiers to control the look. I modify the width and taper of the primitives and also use a rand expression to make the length of the grass less uniform. I use density maps for the grass to lower the amount growing under the tree, roots and other parts of the scene that aren't visible in the final render.
V-Ray gives the rendered image a softer look, especially when it's dealing with subsurface scattering and hair
I use V-Ray to render the whole scene. I find that V-Ray gives the rendered image a softer look, especially when it's dealing with subsurface scattering and hair. I apply a VRayFastSSS2 to the skin. I plug in my diffuse and normal maps. Then I play with the settings. I think there is a delicate balance between how much of your diffuse map you want showing through versus how much subsurface scattering there is.
You can deal with this in the compositing stage with render passes, but I prefer to get it as close as possible in the initial render. For the fur I used a VRayMtlHair3. I tweak the diffuse and specular settings until I am happy with the sort of desaturated purple colour. Once the render is completed I take the images into Photoshop to composite them.
Sign up to Creative Bloq's daily newsletter, which brings you the latest news and inspiration from the worlds of art, design and technology.
01. Setting up fur plates
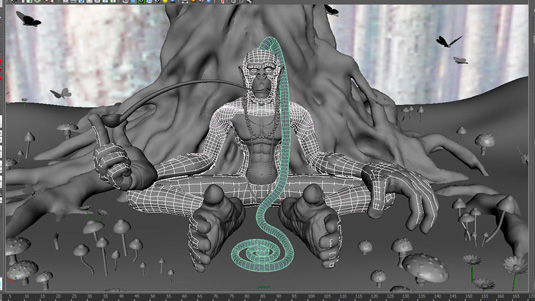
Block out where you want your fur to be and begin to retopologise the model with Quad Draw. Make separate pieces for the eyebrows, the eyelashes, the dreadlock, and the upper and lower portions of the body. The fur plates need to conform to the contours of the base mesh (but don't have to be perfect).
02. Placing guides
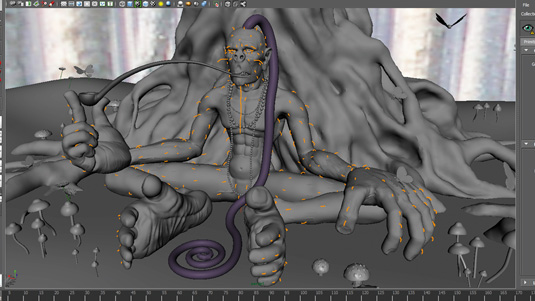
Next, place the guides across the fur plates. Create separate descriptions for each plate to allow for maximum control. Use these to set the length and direction of the fur on the model. In this case, the fur on the cheeks and chin is long, and is short on the hands, feet, eyelashes and eyebrows.
03. Using density maps
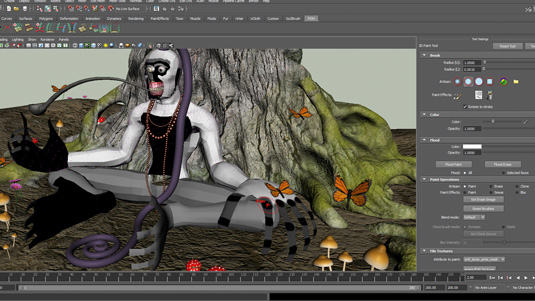
I want the fur to thin out in some areas and completely disappear in others. xGen will save out Ptex maps for density after you paint the values on your plates. I lower the density in certain areas by painting them a dark grey. And I remove the fur completely in other areas by painting them black.
04. Using modifiers
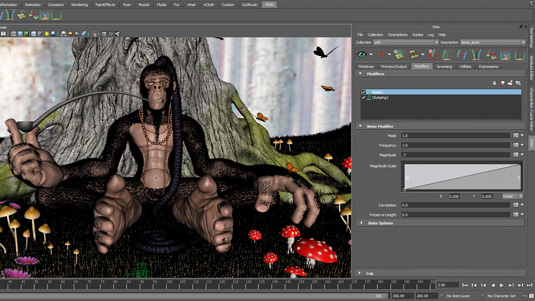
The modifiers I use on most of the fur descriptions are Noise and Clumping. Noise makes the fur look unkempt. I set up the clumping maps and then lower the magnitude and frequency to give it a more subtle effect. For the dreadlock I use a Noise and Coil modifier, to make the hair bunch up and curly.
Expert tip: Composition is key
Composition is really important to create an aesthetically pleasing image. Try placing the assets of your scene strategically, to maintain a level of symmetry. This will help to keep the viewer's eye moving
around the image.
Words: Joe Parente
Joe Parente is a freelance CG artist with experience in 3D modelling, animation, editing and post-production, and a strong background in the visual arts. This article originally appeared in 3D World issue 198.
Like this? Read these!

The Creative Bloq team is made up of a group of art and design enthusiasts, and has changed and evolved since Creative Bloq began back in 2012. The current website team consists of eight full-time members of staff: Editor Georgia Coggan, Deputy Editor Rosie Hilder, Ecommerce Editor Beren Neale, Senior News Editor Daniel Piper, Editor, Digital Art and 3D Ian Dean, Tech Reviews Editor Erlingur Einarsson, Ecommerce Writer Beth Nicholls and Staff Writer Natalie Fear, as well as a roster of freelancers from around the world. The ImagineFX magazine team also pitch in, ensuring that content from leading digital art publication ImagineFX is represented on Creative Bloq.
