Paint realistic rain using Photoshop Layer Styles
Now you can show that your character has been in the rain with these great tips and simple step-by-step guide.
Words: Paul Tysall
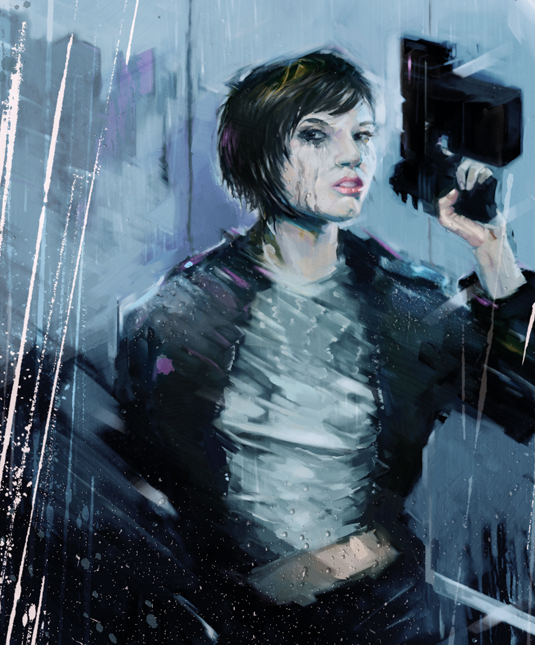
Rain reacts to surfaces in two ways: it’s either repelled or absorbed, depending on how porous the surface is. It’s these properties you’re looking to enhance in your scene - it’s all about the details.
In this image I dressed my character in clothing that plays to both properties - a water-repellant leather jacket (and trousers) and a light cotton T-shirt. The jacket collects water on its surface, which in turn helps to reflect ambient light. It also retains water droplets that are expressed as a mix of blobs and highlight streaks; we’ll look at how to paint these in the following step-by-step.
Wet t-shirt composition
When the T-shirt gets wet, it absorbs the water and makes contact with the skin beneath, which is where it becomes a great pin-up art device, pronouncing the underlying form. To translate this you need to make the folds more defined than you would with dry clothing.
Our own repelling and absorbing surfaces - skin and hair - should be considered in a similar way. When hair gets wet, the strands bind together and make contact with the skin and we start to see more defined highlights.
The following step-by-step is an easy way to create the appearance of raindrops using Photoshop CS6’s Effects settings. How well it works depends on its context within your painting, so you might want to use it as a painting guide only.
01. Bevel and emboss
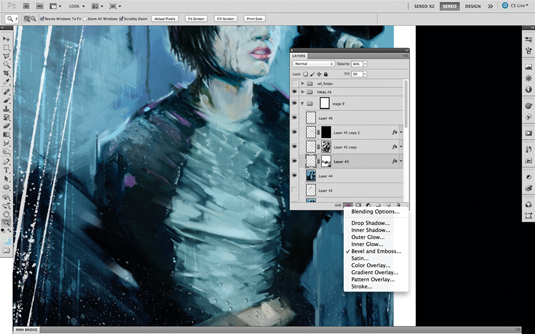
Create a new Normal layer, set the Layer Fill to zero per cent and then from the Layer Style menu (at the bottom of the Layers palette) select Bevel and Emboss.
Daily design news, reviews, how-tos and more, as picked by the editors.
02. Adjust the settings
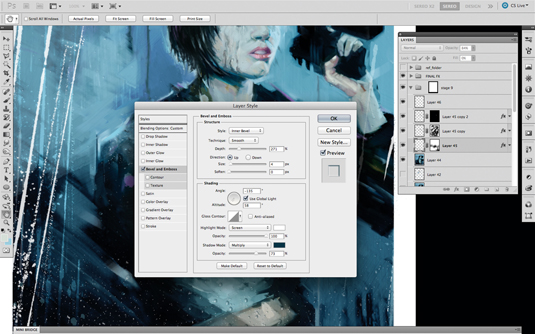
Layer Style should be left on its default of Inner Bevel, and Technique left on Smooth. I set the Depth to around 250 per cent. It’s up to you which Direction you want to use: in this image I have it set to Up. You should set the Size value quite low - I’ve set it to 4px - and don’t select Soften. For the Shading settings, you want to place the crosshairs somewhere just off-centre.
03. Paint in the raindrops
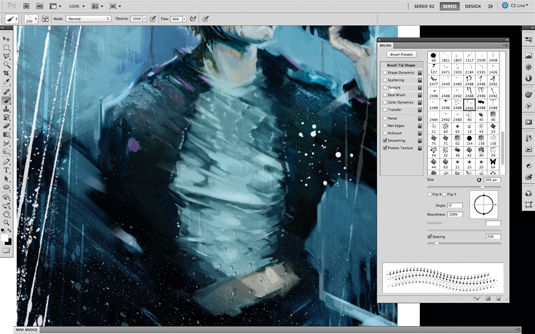
I leave the Highlight Mode on Screen but drag it to 100%; the only change I make to the Shadow Mode is to select a dark hue from within the image. Hit OK, then with a small, Hard-edge brush start to paint in your raindrops. To speed this up I use a splatter-style custom brush. Use a Layer Mask to brush away some of the drops and tweak the layer’s opacity until you’re happy with the results.
These tips first appeared in ImagineFX magazine issue 88. You can get a free sample issue here!
Now read:
- 20 great examples of print in 3D
- 50 best iPad apps for designers
- 20 best Photoshop plugins

The Creative Bloq team is made up of a group of art and design enthusiasts, and has changed and evolved since Creative Bloq began back in 2012. The current website team consists of eight full-time members of staff: Editor Georgia Coggan, Deputy Editor Rosie Hilder, Ecommerce Editor Beren Neale, Senior News Editor Daniel Piper, Editor, Digital Art and 3D Ian Dean, Tech Reviews Editor Erlingur Einarsson, Ecommerce Writer Beth Nicholls and Staff Writer Natalie Fear, as well as a roster of freelancers from around the world. The ImagineFX magazine team also pitch in, ensuring that content from leading digital art publication ImagineFX is represented on Creative Bloq.
