Automate your Android app testing
Don’t trust humans to do all of your testing – not even experts. John Senner, Koa Metter and Emory Myers of MokaSocial reveal how to delegate the dirty work.
Sign up to Creative Bloq's daily newsletter, which brings you the latest news and inspiration from the worlds of art, design and technology.
You are now subscribed
Your newsletter sign-up was successful
Want to add more newsletters?

Five times a week
CreativeBloq
Sign up to Creative Bloq's daily newsletter, which brings you the latest news and inspiration from the worlds of art, design and technology.

Once a week
By Design
Sign up to Creative Bloq's daily newsletter, which brings you the latest news and inspiration from the worlds of art, design and technology.

Once a week
State of the Art
Sign up to Creative Bloq's daily newsletter, which brings you the latest news and inspiration from the worlds of art, design and technology.

Seasonal (around events)
Brand Impact Awards
Sign up to Creative Bloq's daily newsletter, which brings you the latest news and inspiration from the worlds of art, design and technology.
- Knowledge needed: Basic Android app development
- Requires: Eclipse, Android SDK
- Project Time: Two hours to begin running tests, eight hours to construct an automatic nightly application test suite
- Support file
This article first appeared in issue 219 of .net magazine - the world's best-selling magazine for web designers and developers
A number of factors make thorough testing extremely important for Android application developers. There are hundreds of different devices in the wild, each running multiple potential versions of Google’s Android OS. Seasoned developers who deploy products to the Android market know that high ratings (and conversely, an extremely smooth, stable build) are crucial for keeping users happy – earning lots of stars and generating downloads. From a product perspective, it’s crucial to release stable builds from the starting line; testing ensures that your application’s weak points are shown before release, regardless of different hardware configurations.
Android developers already know that they’re developing for a wide array of platforms, but it can be difficult to decide how to best test for a variety of devices. Should you subscribe to a cloud-based service that will enable you to test remotely on actual hardware? Should you outsource your testing to a contract test firm? Use emulators and hope for the best?
At MokaSocial, we have a three-pronged test plan that leverages the tools available to Android developers and gives us a lot of confidence that we’re not releasing a buggy application. The process manages itself without requiring too much maintenance and requires relatively little set-up.
01. Unit tests
Where engineers trust industry-standard principles and adhere to construction codes to ensure that the final product won’t fail in the field, software developers trust thorough unit testing. Increasingly, many software development shops have some degree of unit testing in place. Implementing unit tests is an important step to undertake to ensure that your model classes are doing exactly what you expect them to. Beyond that, the practice of writing unit
tests early on ensures that you plan out your objects as you code them, and solidifies the spec by forcing you to resolve ambiguities.
The Android SDK ships with jUnit, and Eclipse makes it easy to create a jUnit test project. The remaining challenge is for your team to ensure that the unit tests are coded for each object, that the tests are as complete as possible and that they effectively test the behaviour of the object under different circumstances. Together, these goals are referred to as unit test coverage. Unit tests are only as good as their coverage – they need to be updated and expanded in the course of development in order to be effective.
02. Robotium
There are two great tools available for automated functional testing on Android. Each has its advantages and both are easy to install – we recommend getting a feel for what each covers. Robotium is a great UI test tool that acts like a user; it sees what a user sees, tapping around on the device just like a user would, even switching between landscape and portrait on occasion. Robotium has a lot of the best components of unit tests and regression tests – the level of thoroughness depends on how specific the developer’s test scripts are. Robotium’s biggest advantage is that it allows for extremely fine-grained control of views and gives a pass/fail result for each.
Sign up to Creative Bloq's daily newsletter, which brings you the latest news and inspiration from the worlds of art, design and technology.
Here’s a step-by-step look into running your first Robotium test script using Eclipse – we’re assuming that you already have Eclipse and the Android SDK installed and configured on your system.
03. Initial set-up
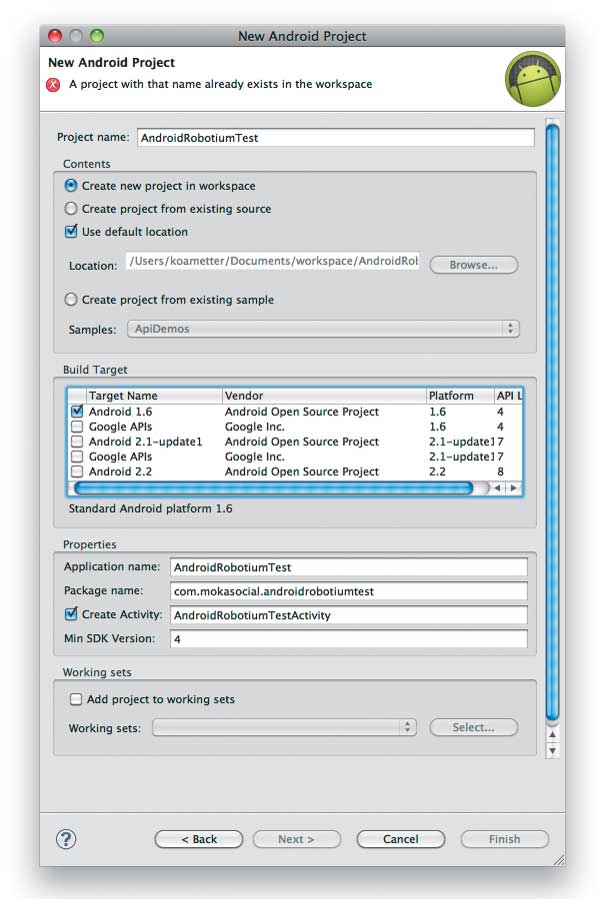
Download the AndroidTesting project source to your computer and unzip it into a folder of your choice. Open Eclipse and import the AndroidTesting project by selecting File>New>Project>Android Project>Create project from existing source and browsing to the location of the downloaded project source. Download the latest version of Robotium and selecting the newest featured robotium-solo JAR file – currently, the latest version is robotium-solo-2.3.jar. Create a new Android project in Eclipse called AndroidRobotiumTest: File> New> Project> Android Project. Fill in the details:
Project name: AndroidRobotiumTest
Build Target: Android 1.6
Application name: AndroidRobotiumTest
Package name: com.mokasocial.androidrobotiumtest

Here’s our new AndroidRobotiumTest app creation panel – take note of the fact that we’re targeting Android 1.6 to run our app
In Eclipse, right-click on the AndroidRobotiumTest project folder and click Build Path>Configure Build Path, then the Add External JARs button. Select the Robotium JAR file that you downloaded in the step above and click Open. While still in the Java Build Path properties of the AndroidRobotiumTest project, click the Projects tab and then click the Add button. Check the box next to the Android test project you imported in step two, titled AndroidTesting. Click OK to close the properties window and return to your project. Open the AndroidManifest.xml file of your AndroidRobotiumTest project and add the following code just before your </application> tag:
<uses-library android:name="android.test.runner" />
Then add the following code just before the </manifest> tag:
<instrumentation
android:name="android.test.InstrumentationTestRunner"
android:targetPackage="com.mokasocial.androidtesting"
android:label="Label" />
Save and close the file. You have the shell of a Robotium app ready to roll.

04. Creating Robotium tests
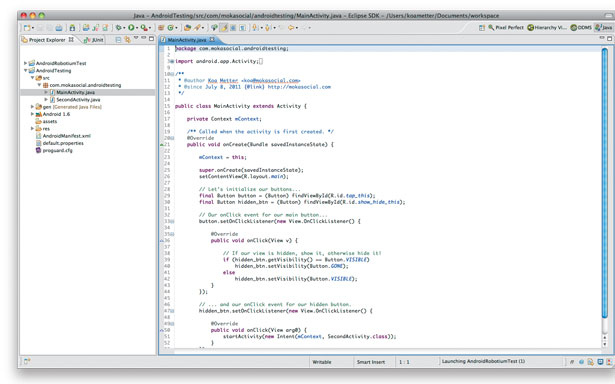
Creating an actual Robotium test is a piece of pie; we’ll walk you through the basics of setting up a couple of tests for our simple example app, AndroidTesting. (All of the code we’ll be creating already lives in AndroidRobotiumTest app in the tutorial files. Have a look inside the src/com/mokasocial/robotiumtest/AndroidRobotiumTest.java file for details.)
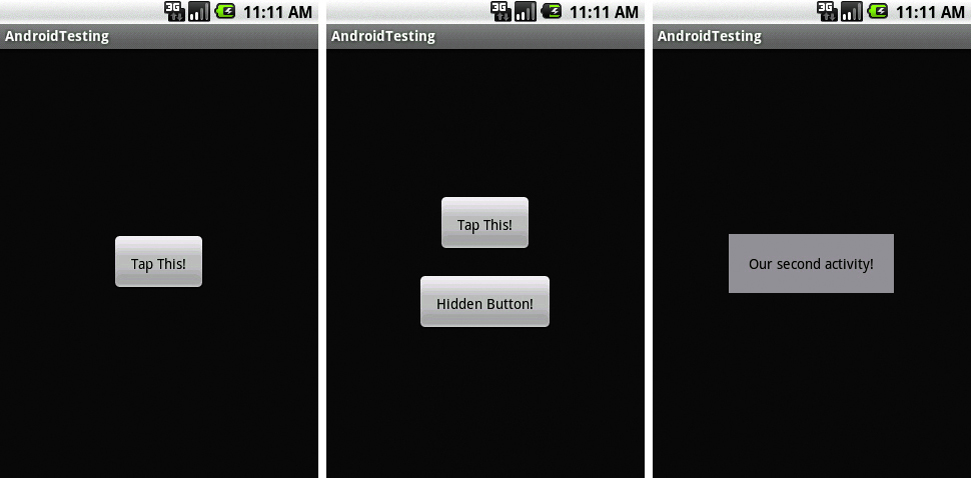
Robotium’s output comes in the shape of a list of tests and resulting pass/fails for each test. It’s very good at checking the quantitative details of user interfaces – you can check, for example, that after tapping the Tap This! button in our app, a hidden button is shown.
To get started, create the basic shell of your test class. Right-click on your com.mokasocial.robotiumtest package in the AndroidRobotiumTest app and select New>Class – call your class AndroidRobotiumTest.java. The class needs to extend ActivityInstrumentationTestCase2<ActivityName>, where ActivityName is the name of the activity that we’re testing. In our case, the name of the activity is MainActivity, so create the class like so:
public class AndroidRobotiumTest extends ActivityInstrumentationTestCase2<
MainActivity> {
// Our tests are soon to come...
}
All Robotium tests have three basic functions – a constructor, setUp() and tearDown() – which tell the app which activity we’re starting with, initial variables we’d like to set up, and any database resets and/or activities we’d like to finish after each test.
Inside our new class, we’ll need the functions as follows:
public AndroidRobotiumTest() {
super("com.mokasocial.androidtesting", MainActivity.class);
}
// Our setUp...
public void setUp() throws Exception {
solo = new Solo(getInstrumentation(), getActivity());
}
// Our tearDown...
public void tearDown() throws Exception {
try {
solo.finalize();
} catch (Throwable e) {
e.printStackTrace();
getActivity().finish();
super.tearDown();
}
Now that we have our necessary Robotium functions included in our class, we can write a function that actually tests an area of our AndroidTest app. Let’s check to make sure that our hidden button is shown when a user taps on the Tap This! button. Start by creating a function in your AndroidRobotiumTest class called testClickFirstButton(), and have Robotium click our Tap This! button:
public void testClickFirstButton() throws Exception {
// Click our button!
solo.clickOnButton("Tap This!");
}
Add expected and actual variables and finish with an assertEquals() call to make sure that our expected and actual vars match:
public void testClickFirstButton() throws Exception {
// Click our button!
solo.clickOnButton("Tap This!");
boolean expected = true;
boolean actual = solo.searchButton("Hidden Button!", true);
// Assert that our hidden button is no longer hidden
assertEquals("Our hidden button is still hidden!", expected, actual);
}
If the values don’t match, then we’ll be thrown the error “Our hidden button is still hidden!” and Robotium will conclude the test as failed.

05. Running your Robotium test
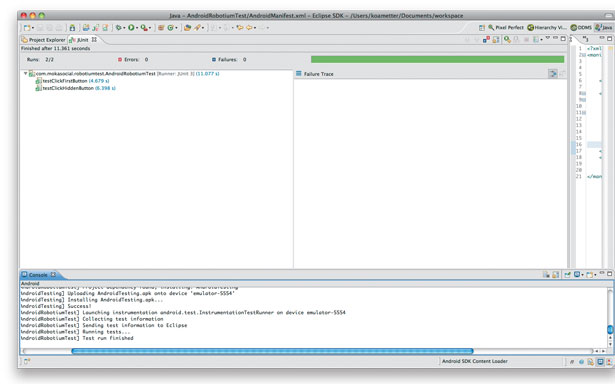
Running the test couldn’t be easier; right-click on the AndroidRobotiumTest project, select Run As, then Android JUnit Test. The Android emulator will load your app and begin tapping through the tests. The results of your tests, including tests run, errors and failures, will be shown in the JUnit tab in Eclipse.
Read up on all that Robotium has to offer by visiting the tutorial section of its website. All of MokaSocial’s example test code can be cloned at our GitHub repository.

06. MonkeyRunner
Android’s MonkeyRunner tool is included in the Android SDK and fulfils a similar function to Robotium, but with a different approach. MonkeyRunner uses Jython (a Python implementation in Java) scripts to walk through applications. It’s particularly good at walking through multiple devices or emulators. However, rather than pass/fail testing, it takes screenshots at designated points. It lacks the tight UI integration of Robotium, but is far easier to get up and running. It’s also adept at handling multiple emulators and devices.
Monkeyrunner’s approach is to walk through the application, clicking on buttons and taking screenshots throughout. After the script has run, you can compare the screenshots taken with those you’d expect to see. If it hit a button that didn’t work, or wound up in the wrong activity, you’ll know straight away.
It’s a very configurable stress-testing engine that executes absolutely brutal tests on devices by rapidly sending pseudo-random input commands. MonkeyRunner taps and drags all over the screen, changes the device orientation, and mashes keys. It’s especially effective at finding things that even dedicated test scripts won’t, because it operates faster than a user and will happily pound on a button five times before anything loads.
You’ll want it to have access to all of your app’s activities, so if you have a screen that’s particularly difficult to reach, you may want to write a workaround to get to it. You’ll also want to cordon MonkeyRunner off to a test version of any live APIs, and use the -p option to constrain it to the designated package.
07. Putting it all together
These tests take a bit of time to configure and write, but once you get them going they lend a lot of confidence to the development process. At MokaSocial, our system consists of a dedicated test machine that’s set up to run the unit tests, the functional tests and MonkeyRunner, before repeating. Every morning, an email is sent to the development team with a test report. It was well worth our initial set-up effort. When we start a new project, the functional tests and unit tests all need to be rewritten, but cloning the test script is as simple as copying and pasting.
If you want to do regular automated tests, here are a few steps to start:
- Secure a test server – you probably want a dedicated test box, unbothered by other everyday use. The OS is unimportant, but you’ll want to be comfortable putting together and scheduling shell scripts on it.
- Obtain some test devices – this step is optional, as you may instead choose to create a series of AVDs with separate hardware configurations.
- With Crontab or Task Scheduler, schedule a script (an example is included in the tutorial files) to do the following:
- Start a logfile with tee and begin writing all output to it (feel free to substitute your preferred logging method!)
- Pull the project’s latest source code
- Run your unit tests with: adb shell am instrument -w your.package.name.tests/android.test.Instrumentation TestRunner
- Run your Monkeyrunner script: monkeyrunner monkey_runnertest.jy
- Run your monkey stress tests with a command like: adb shell - monkey -p your.package.name -v 5000000
- Email the results to yourself or your team.
Now you can enjoy reading test completions with your morning coffee. Bravo!
Words: John Senner and Koa Metter and Emory Myers, Seattle-based agency MokaSocial www.mokasocial.com brings tasty application design and top-quality development to your mobile phone.

The Creative Bloq team is made up of a group of art and design enthusiasts, and has changed and evolved since Creative Bloq began back in 2012. The current website team consists of eight full-time members of staff: Editor Georgia Coggan, Deputy Editor Rosie Hilder, Ecommerce Editor Beren Neale, Senior News Editor Daniel Piper, Editor, Digital Art and 3D Ian Dean, Tech Reviews Editor Erlingur Einarsson, Ecommerce Writer Beth Nicholls and Staff Writer Natalie Fear, as well as a roster of freelancers from around the world. The ImagineFX magazine team also pitch in, ensuring that content from leading digital art publication ImagineFX is represented on Creative Bloq.
