How to manage a solo animation project
Director Nicolas Brunet discusses how he managed his 'Christmas in Alsace' project without losing his mind in the process.
Daily design news, reviews, how-tos and more, as picked by the editors.
You are now subscribed
Your newsletter sign-up was successful
Want to add more newsletters?

Five times a week
CreativeBloq
Your daily dose of creative inspiration: unmissable art, design and tech news, reviews, expert commentary and buying advice.

Once a week
By Design
The design newsletter from Creative Bloq, bringing you the latest news and inspiration from the worlds of graphic design, branding, typography and more.

Once a week
State of the Art
Our digital art newsletter is your go-to source for the latest news, trends, and inspiration from the worlds of art, illustration, 3D modelling, game design, animation, and beyond.

Seasonal (around events)
Brand Impact Awards
Make an impression. Sign up to learn more about this prestigious award scheme, which celebrates the best of branding.
"Christmas in Alsace" was a project I started in 2012 and have only just finished. It included three full CG animated short films, two theatrical trailers and many posters.
The goal was to promote the idea of spending Christmas time in Alsace, a French region next to Germany. The adventure ended this year with a film focused on the traditional pine tree and Alsatian folklore characters. I'd like to share with you some tips and knowledge I gathered along the way...
My main advice after working on this project is: don't work on huge projects alone. That being said, it's a great way to improve your skills in time management and workflow to become more efficiently.
Take your time to prepare the project, gather references and resources to avoid being stuck in the creation process later.
Time-saving tools

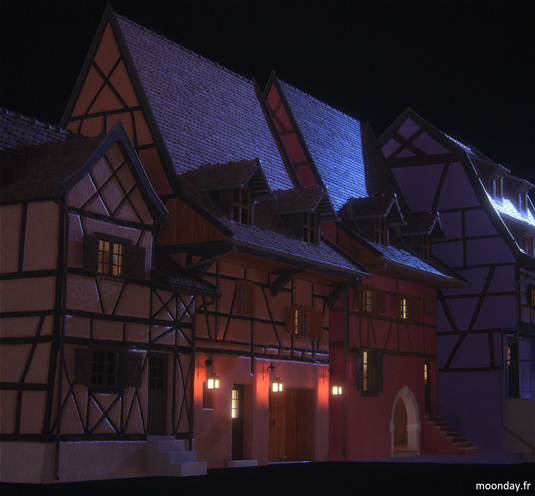
To avoid wasting time, thinking out of the box is crucial; that's why I focused on finding plugins to meet specific needs. Using the procedural modelling plugin RailClone, I could easily generate streets full of typical houses from Alsace and quickly edit pavements.
Similarly to instead of modelling every detail on the house facades, I decided to go down the texture route. Displacement offered good quality results. Of course I couldn't texturize each house one by one the old way. The solution: Substance Designer.
I created several substance materials: woods, concrete etc. Then I used the Multi material with ID option to automatically assign the right material to the right place on the UVs. Therefore only the ID textures
needed to be hand painted.
Daily design news, reviews, how-tos and more, as picked by the editors.

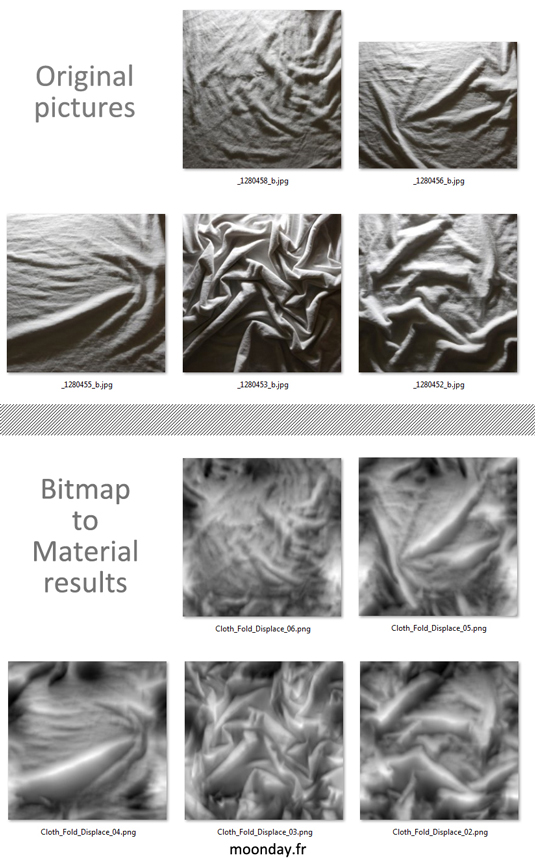
Allegorithmic software is a real time saver. Bitmap2materials allowed me to quickly create displacement maps for some of my clothes from pictures when I had no time to create them using a normal maps photography method.
Cartoony style
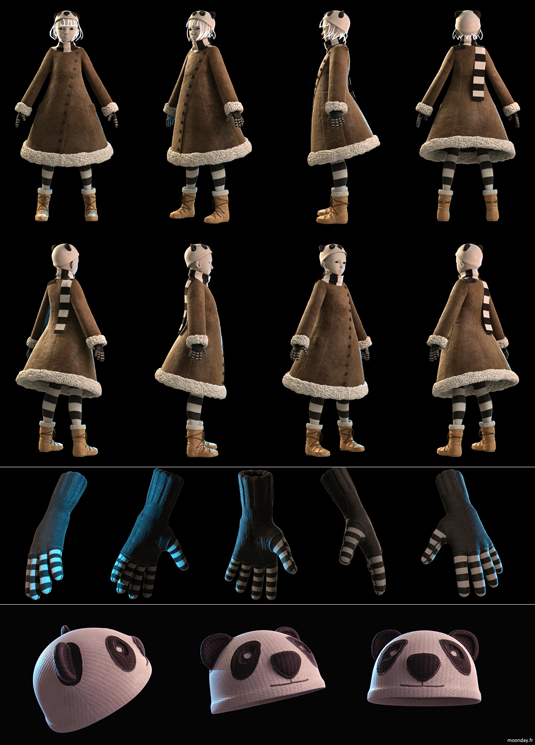
This year I went on a more cartoony style for the characters, based on references from the artist Toru Ehara I created slightly anime like /disproportioned body shapes and I tried to model faces from my
original drawings. Once all the "human process" was achieved, cloth simulations entered the game to create folded scarfs and dresses.
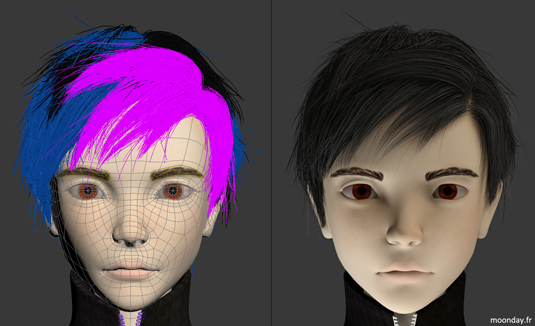
I must admit modelling hair was an easy process on that episode, mostly because FurGuidesPainter script from Clovis Gay simplified the process a lot. This combined with Hair Farm, characters hairstyles were designed in a couple of hours.
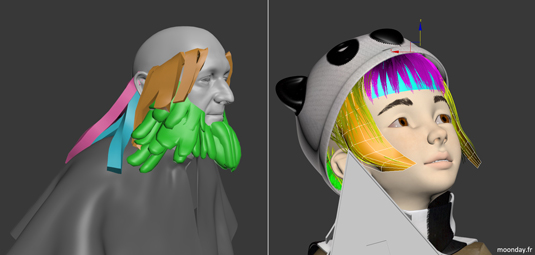
Cloth simulation also helped me on hair animation, simple hair cages models were created and splines or Hair Farm geometry were skinwraped to them.
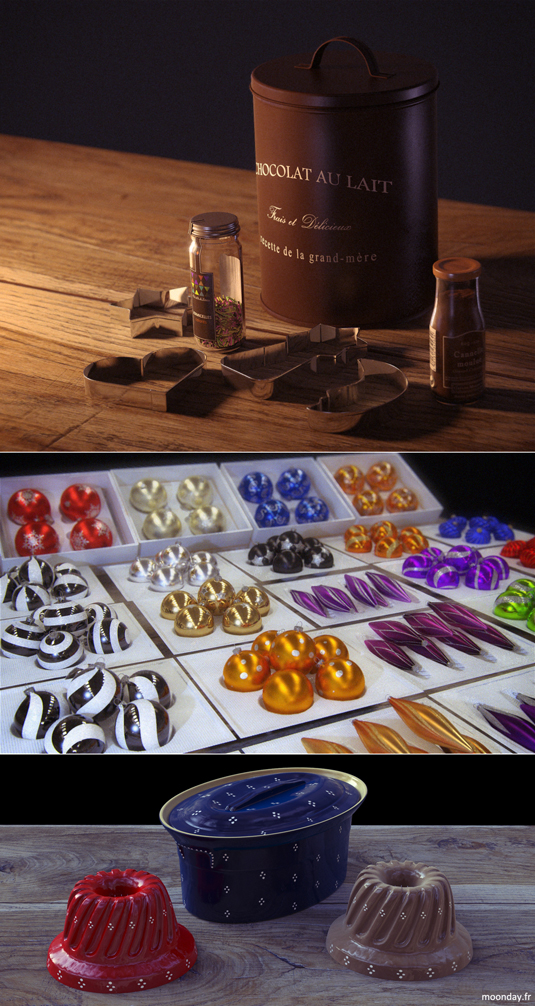
When it came to texturing, I created a lot of tileable dirt and scratch textures I could blend inside the texture file or in 3ds Max composite material, giving more flexibility in the final look of the shaders. Some elements like Xmas balls are entirely procedurally textured using 3ds max basic maps.
Mental Ray was the main render engine on the film, 3ds Max Scanline has been used to quickly render Hair Farm passes.
If I had more time, I'd have definitely used Mental Ray to render hair, I'm not a real fan of compositing images having different sampling settings on different render engine.
However, rendering the scene with hair and fur invisible to camera, casting only their shadows, and then render smooth looking hair in seconds in Scanline provided good enough result to become the standard workflow on the film.

Learn to scream and cry
The last tip I'll share here is, sometimes, when the deadline is knocking on your door and your render farm is not powerful enough to compute images as fast as you want, go out of your office and scream; or
cry, it depends on the kind of education you had.
Then go back to work and start to think about end project optimizations, the kind of optimizations you didn't want to use but you have no alternative.
Mine was heavily using camera projection/ mapping on environments, project composited passes onto original 3D scene and turning motion blur on in Mental Ray to get real 3D motion blur in seconds vs waiting hours.
Another optimization would be only focusing on what's close to camera and what doesn't need too much detail. It's always good to have perfects assets and models but on that project I unfortunately worked too many hours on detailing some models and textures that definitely only needed standard quality.
I could fill pages talking about the project but I'll conclude that article by inviting you to visit my website soon to get an in-depth making of, covering all the creation aspect of the film.
Words: Nicolas Brunet
Nicolas Brunet is a 3D Ninja.
Liked this? Read these!

The Creative Bloq team is made up of a group of art and design enthusiasts, and has changed and evolved since Creative Bloq began back in 2012. The current website team consists of eight full-time members of staff: Editor Georgia Coggan, Deputy Editor Rosie Hilder, Ecommerce Editor Beren Neale, Senior News Editor Daniel Piper, Editor, Digital Art and 3D Ian Dean, Tech Reviews Editor Erlingur Einarsson, Ecommerce Writer Beth Nicholls and Staff Writer Natalie Fear, as well as a roster of freelancers from around the world. The ImagineFX magazine team also pitch in, ensuring that content from leading digital art publication ImagineFX is represented on Creative Bloq.
