How to animate a character with mocap
Transfer motion-capture data to a digital character model using RADiCAL Live with Unreal Engine 5.2.
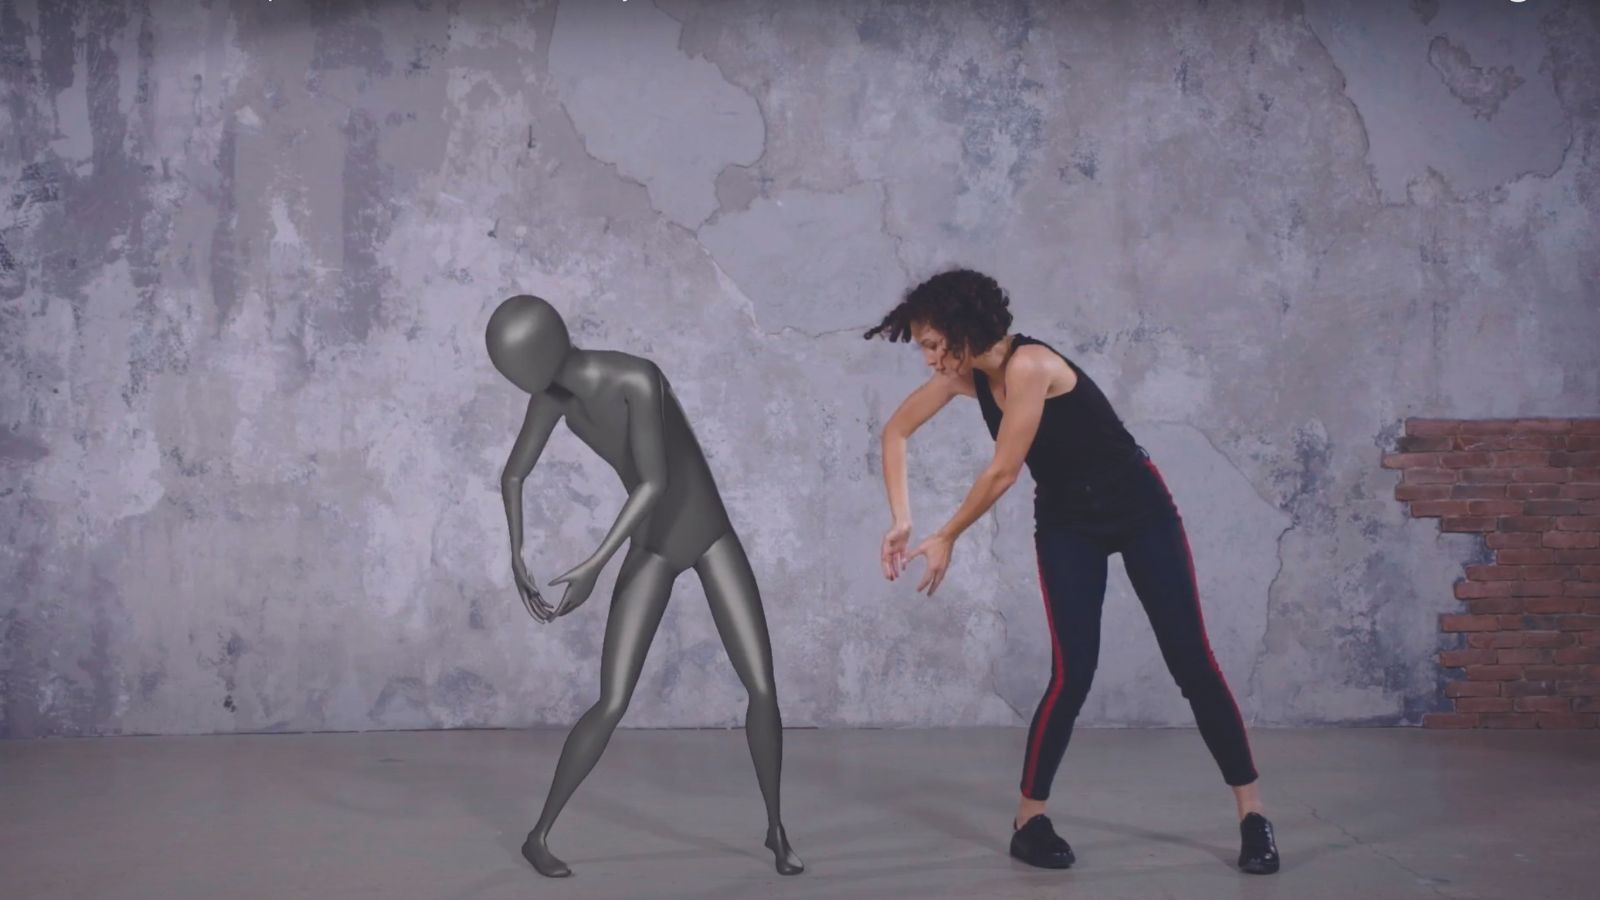
Live link motion capture is becoming increasingly popular technology within virtual production workflows. The requirement for high-end and expensive hardware and software is almost non-existent with free or inexpensive options centre stage.
The applications for this tech are widespread including film, TV, archviz, advertising and videos for education. Some cases will still need higher-end solutions, but for a lot of the industry these emerging tools will begin to take centre stage. Projects that could have benefited from some form of custom animation but didn’t have the budget will now find their options wide open.
There are a number of AI tools for filmmaking breath through, and one example of this tech is Wonder Studio, an AI tool that transfers motion-capture data onto a CG character for use in a live-action scene. This does all the hard work of generating motion-tracking data, roto masks and clean plates, and finally replacing a live actor with a CG character. Such developments are helping to revolution is e the way directors and creators are generating their content. Tools such as these are drastically reducing film and TV budgets , and making it possible to get live feedback on set.
Article continues belowRADiCAL is not limited to only MetaHuman characters, but any character that’s properly rigged and set up
Another example, this time with a game engine, is Live Link Face for Unreal Engine, which enables animators to capture facial movements to be used with MetaHuman Animator. This can all be achieved in real-time, but is unfortunately limited to use on iPhones and iPads.
The raw video and depth data captured can be applied to any MetaHuman character and offers a quick workflow for creating virtual content from real human performances. It’s also possible, through its ARKit, to stream data live to Unreal Engine, removing unnecessary steps between the actor and final product.
RADiCAL makes use of similar technology, but applies it to a whole character rather than just faces. It’s also not limited to only MetaHuman characters, but any character that’s properly rigged and set up. The motion-tracking data can be linked into Unity, Unreal Engine and a number of other applications. If a character model includes blendShapes or Face Morphs and is connected to RADiCAL’s Quick Rig retargeter, you can use face tracking in your scene without the need for any extra equipment.

Paul is a digital expert. In the 20 years since he graduated with a first-class honours degree in Computer Science, Paul has been actively involved in a variety of different tech and creative industries that make him the go-to guy for reviews, opinion pieces, and featured articles. With a particular love of all things visual, including photography, videography, and 3D visualisation Paul is never far from a camera or other piece of tech that gets his creative juices going. You'll also find his writing in other places, including Creative Bloq, Digital Camera World, and 3D World Magazine.
Mocap with Unreal Engine and RADiCAL: the process
RADiCAL Live includes a free starter option, plus a professional alternative with live integration and FBX export. In this tutorial, we’ll explain how to get RADiCAL up and running in conjunction with Unreal Engine 5.2. Head here to download the assets you'll need.
Sign up to Creative Bloq's daily newsletter, which brings you the latest news and inspiration from the worlds of art, design and technology.
01. Prepare the plugin files
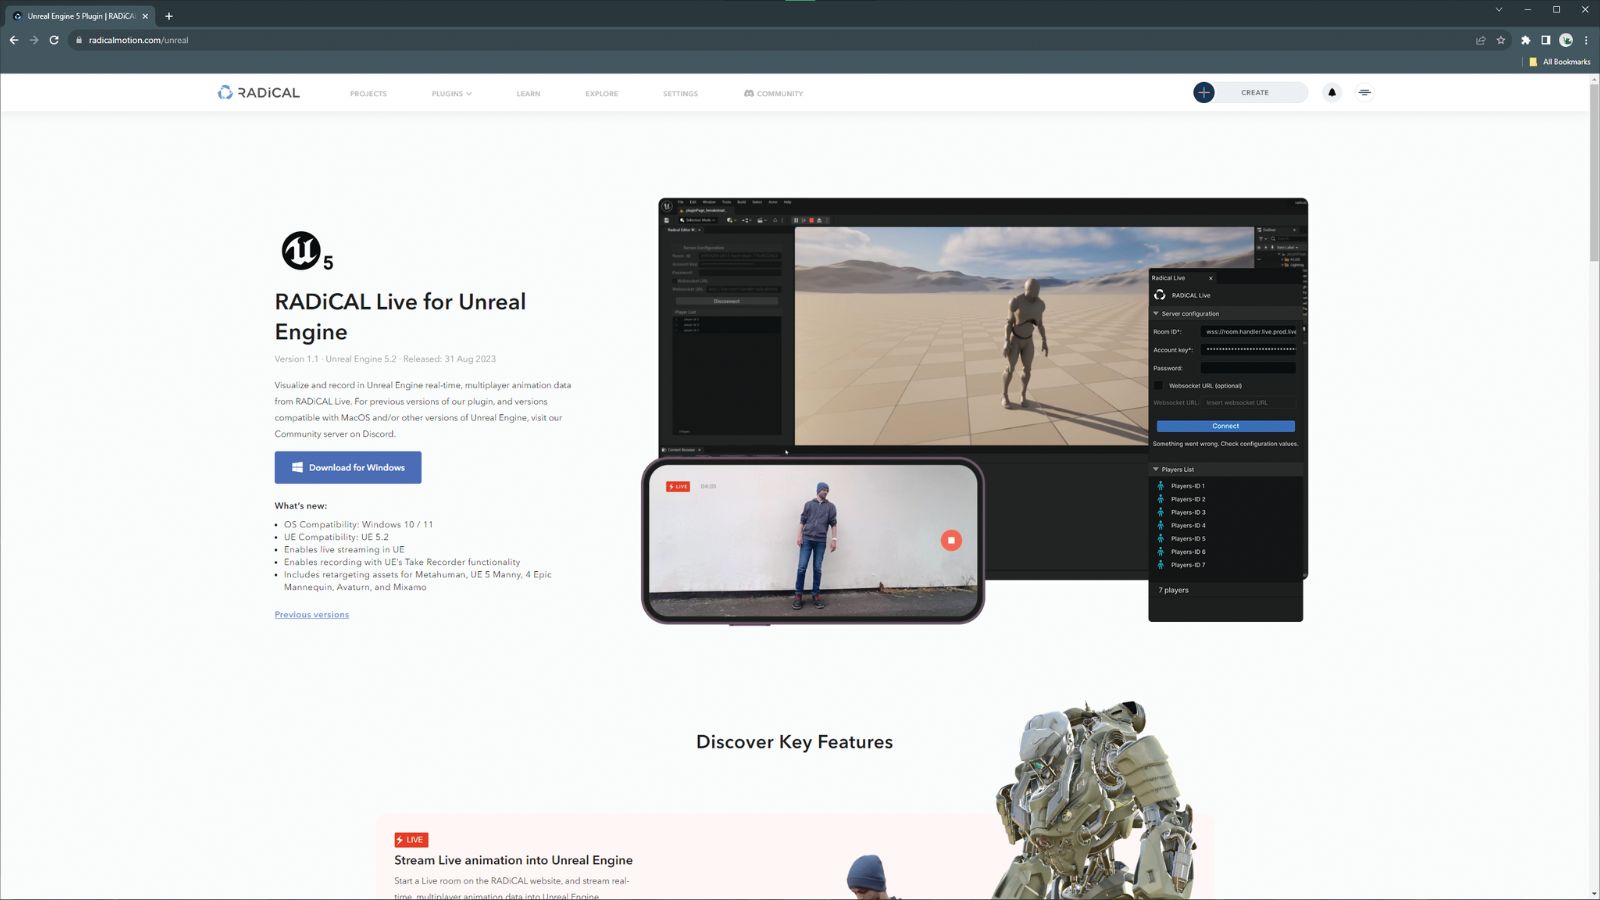
Download the Windows or Mac plugin from the RADiCAL website. When the plugin is downloaded, unzip the file and you’ll be presented with a folder that contains all the files that are needed.
Plugins must be added into a specific folder before they can be found by Unreal Engine, which is in the location the app is installed on your machine. Head to your local drive and find the Epic Games folder, then choose the Unreal Engine application folder that correlates with the plugin version you just downloaded. Navigate over to the Plugins folder, open it up and copy the downloaded folder into it. With this done, you’re now ready to activate the plugin.
02. Activate the plugin
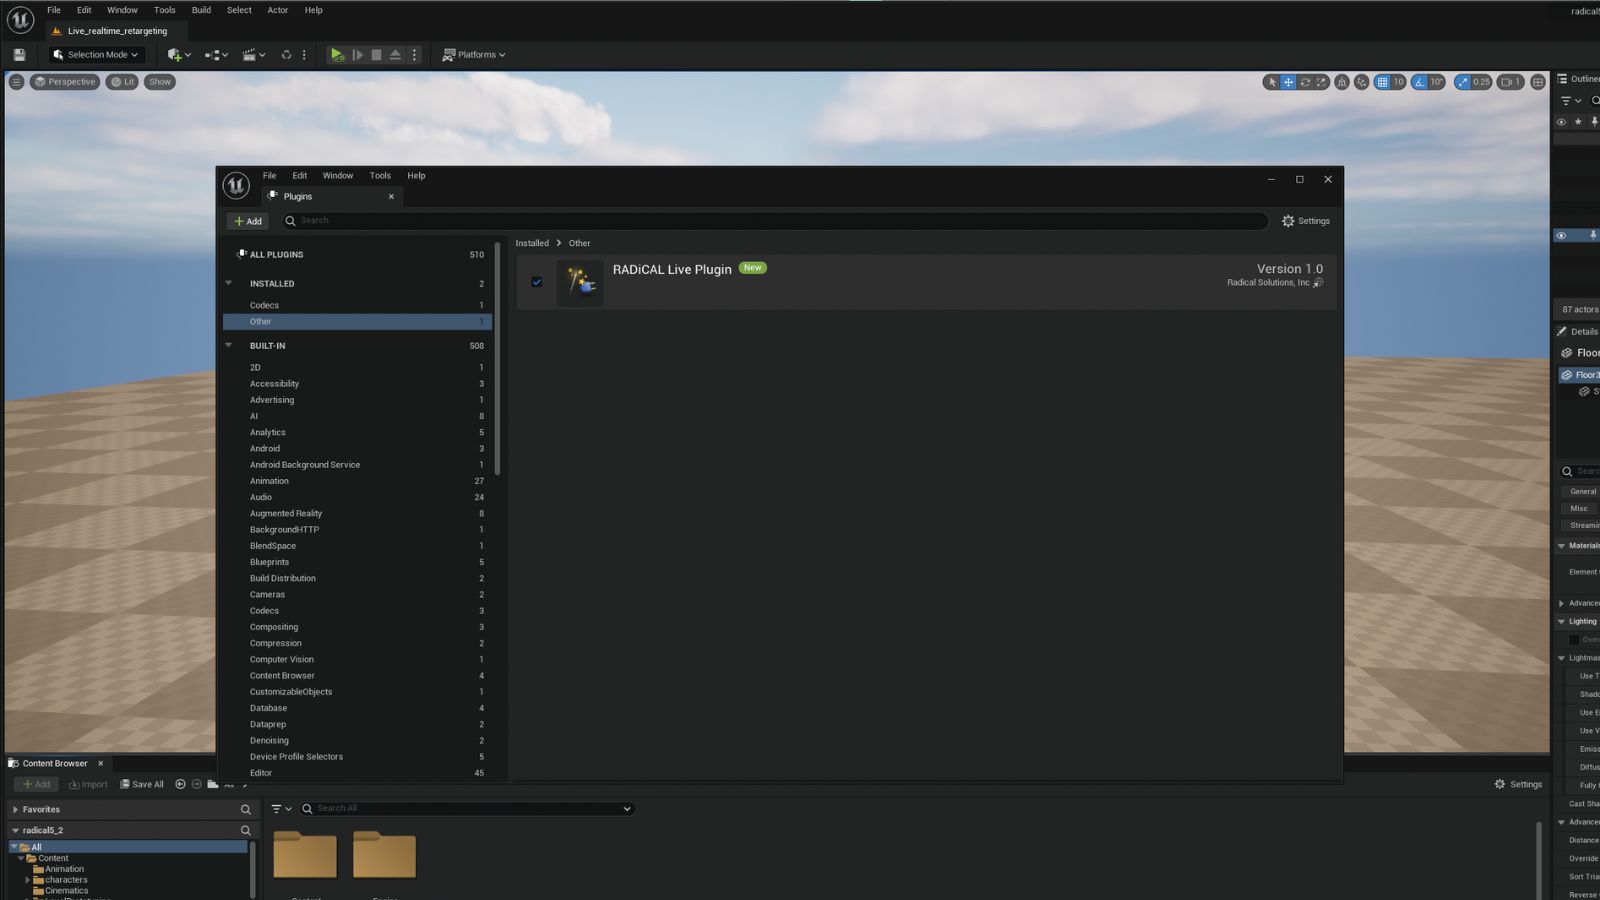
With that done, we now need to get the plugin up and running within Unreal. Open up the program and create a new project, which can be one of your own or one of the premade templates in Unreal.
Head over to the Edit menu at the top and select Plugins. On the left-hand side go to the Installed rollout and select Other. Tick the RADiCAL Live Plugin and you’ll notice that a button appears at the bottom, requiring you to restart Unreal Engine before the plugin will work. Do this and your plugin will be activated.
03. A note about the plugin
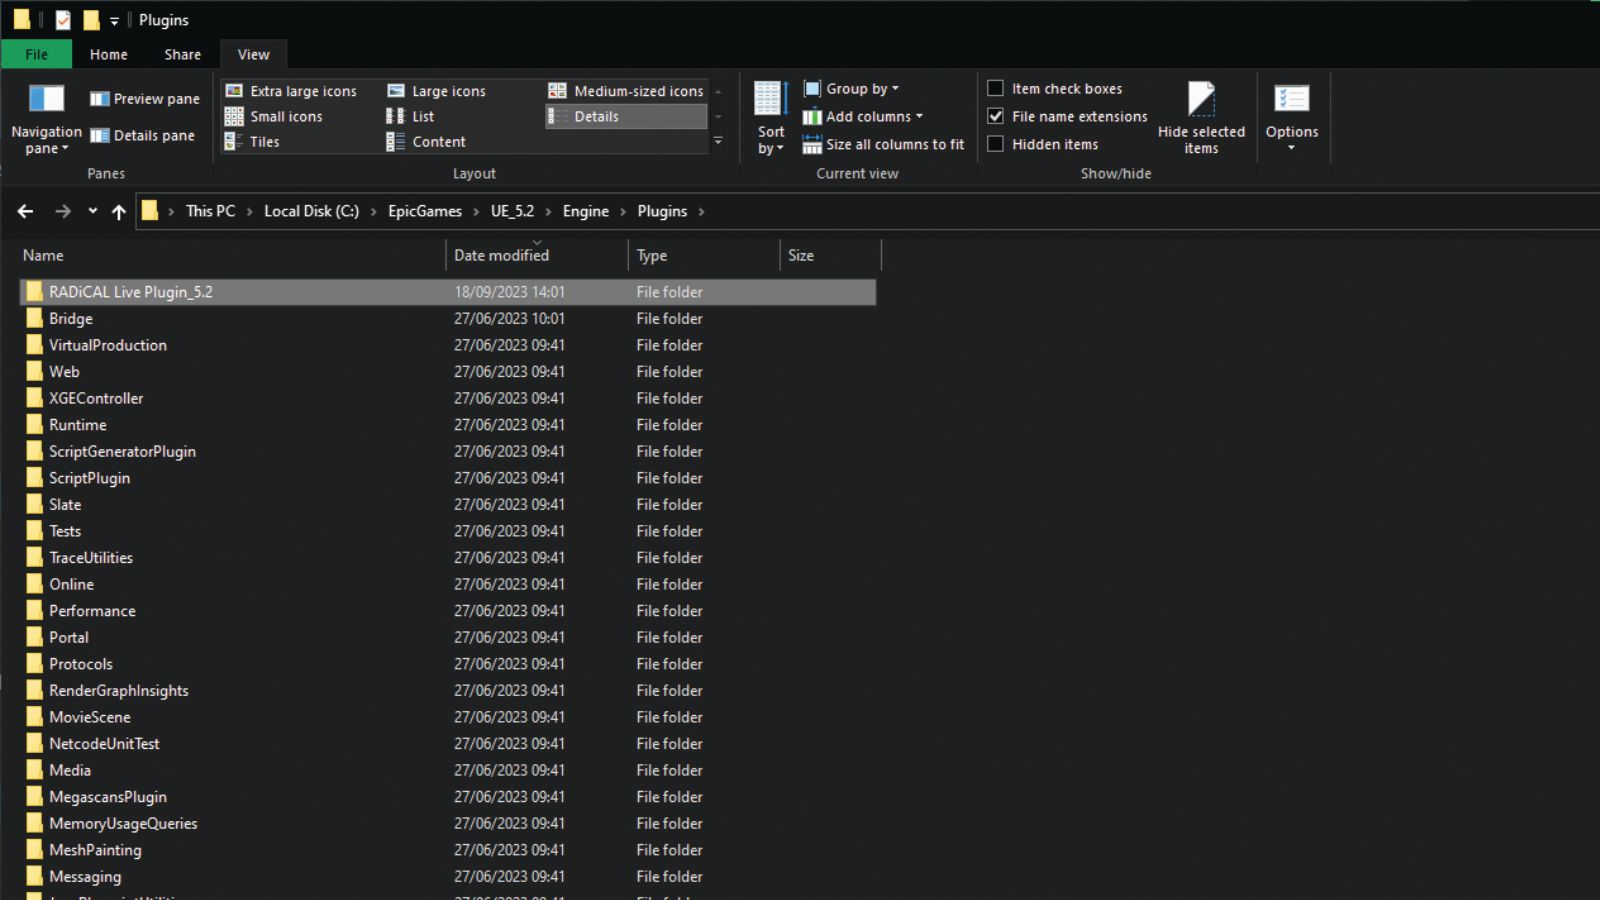
The RADiCAL Live plugin is what’s called an engine plugin rather than a project plugin. This means the plugin has to be installed inside the root installation folder, and that it must be reactivated with every new project you start. This is laborious and, at times, difficult to remember, but it’s just the way it is. This isn’t the fault of RADiCAL, just a requirement of using Unreal Engine.
04. Create a simulation room
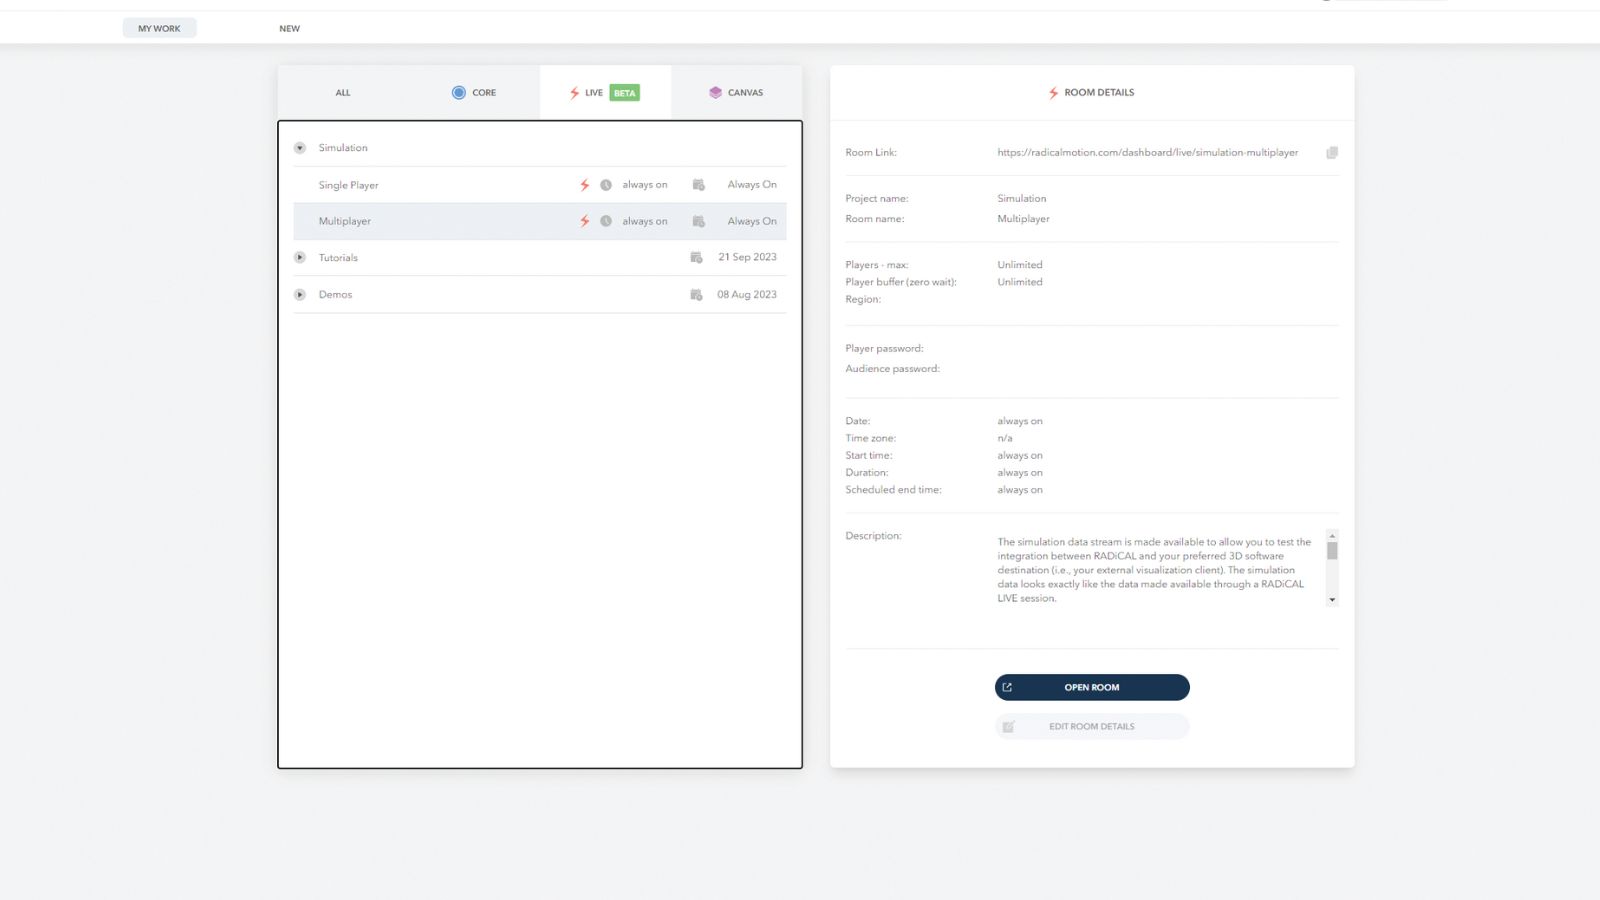
Simulation rooms are made available to allow users to test the integration between RADiCAL and their creation software of choice; in this instance Unreal Engine. This part of the process doesn’t create a live motion-capture link between your camera and Unreal Engine, but is rather a way to familiarise yourself with the process and simulation tools. Create a Simulation room by navigating to the RADiCAL website and select Projects on the top tab. Go to Live, followed by Simulation and Single Player.
05. The room details
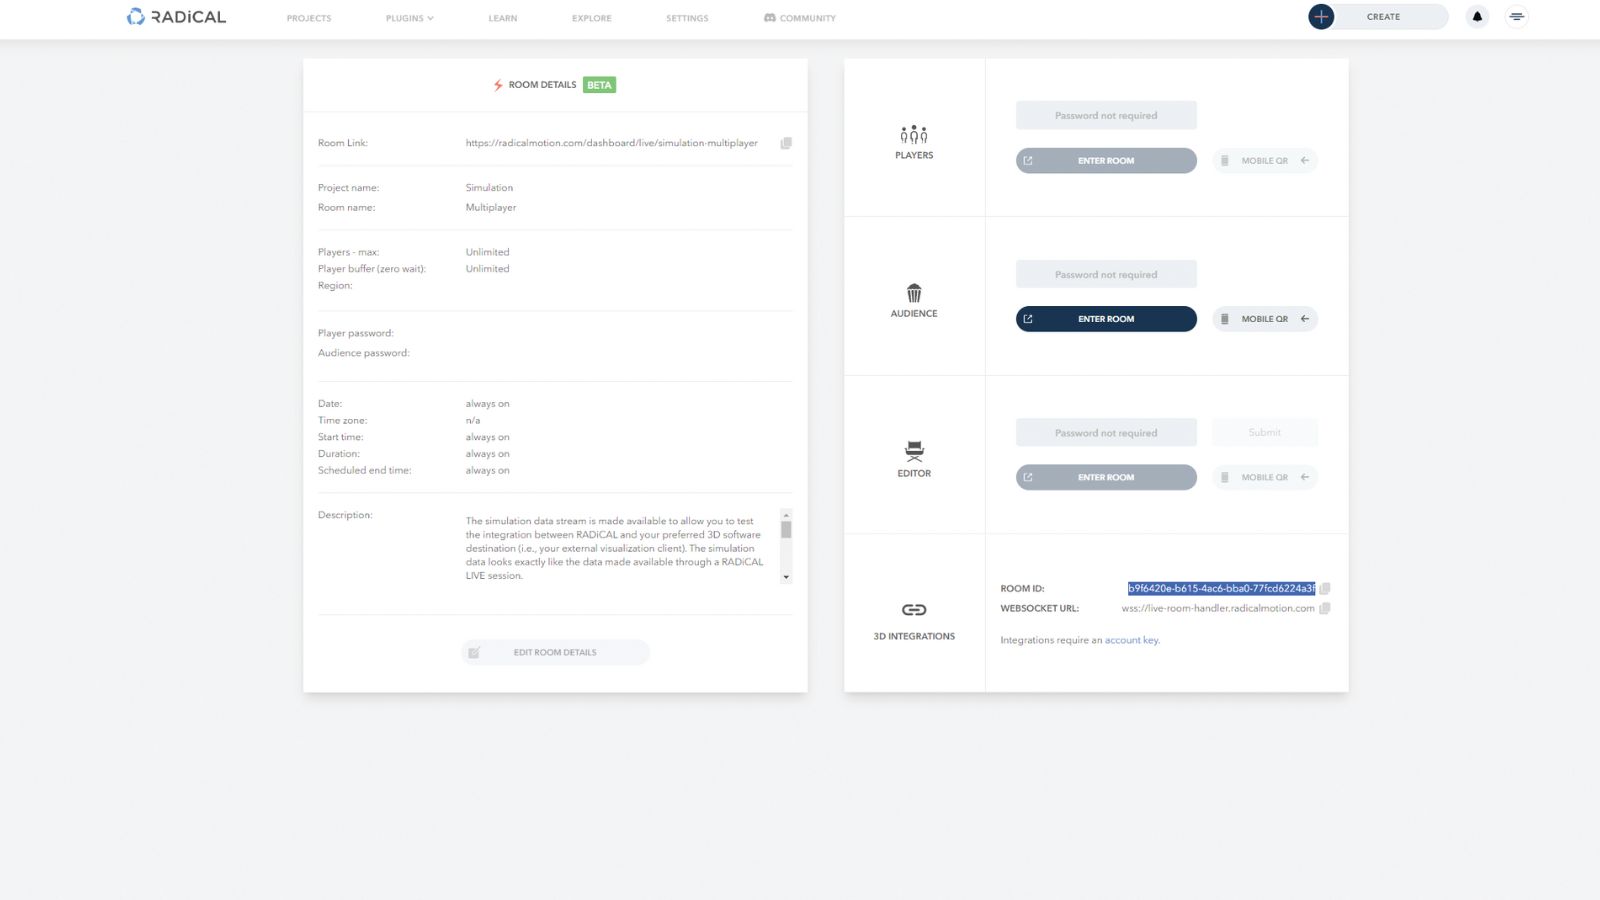
To set the Simulation room up, simply hit the Open Room button at the bottom of the Room Details panel. Be sure to make a copy of the Room ID as you’ll need this for connecting the simulation with your Unreal Engine character. This simulation connection is hard coded, so the Room ID is the same every time. However, this isn’t the case when we move on to live motion capture later.
06. The account key
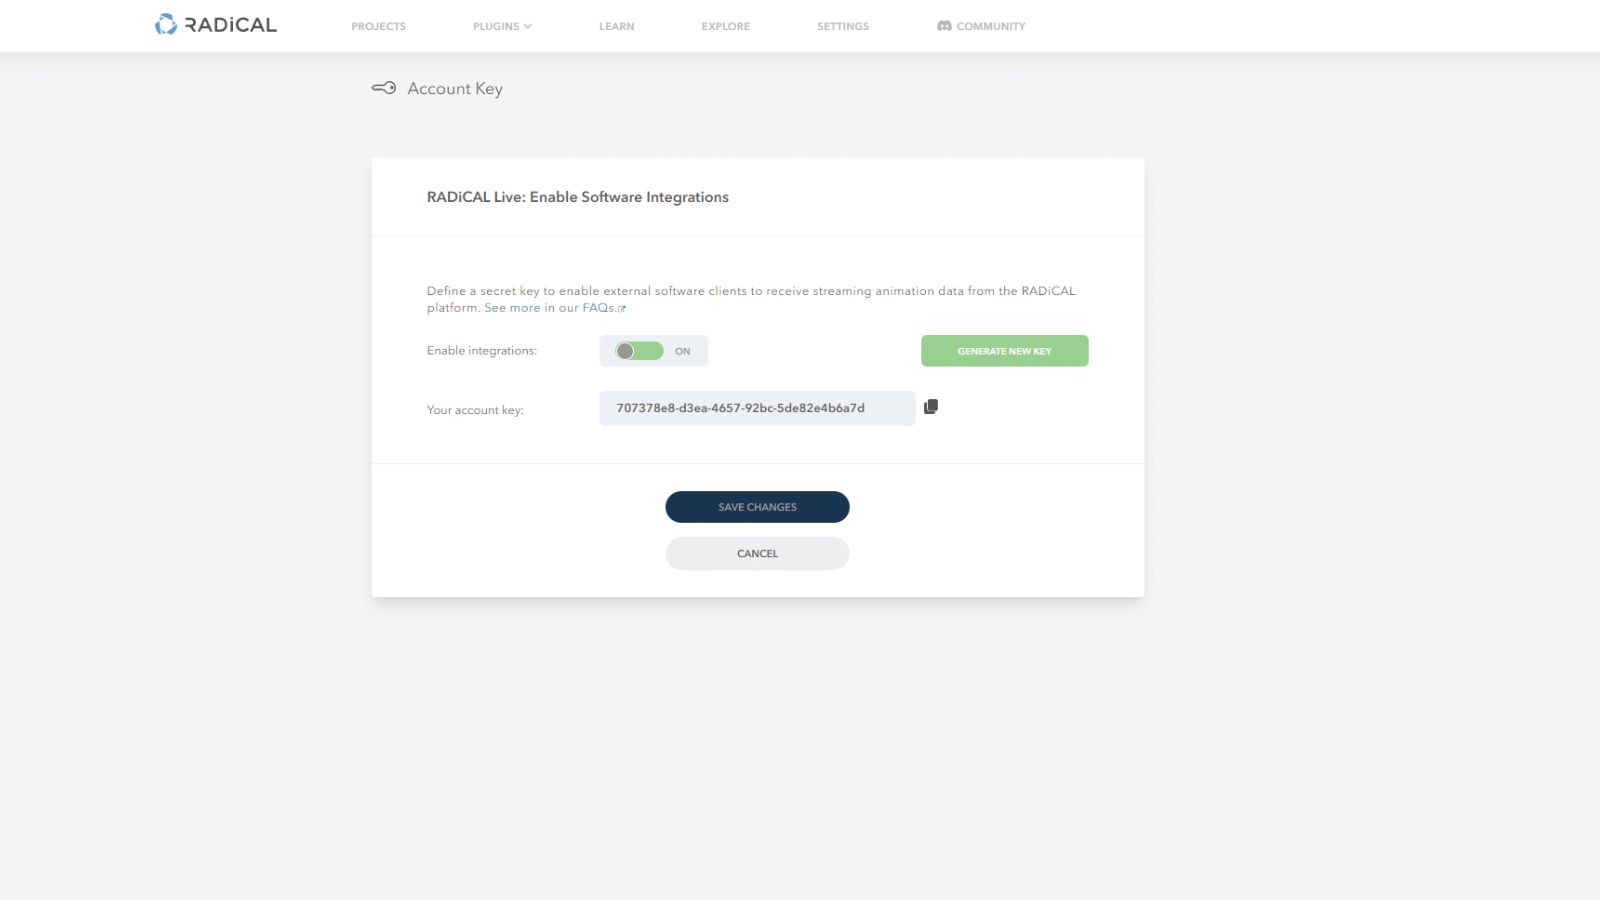
If it’s the first time you’ve set up a RADiCAL room you’ll need to activate the account key. With the room open, scroll to the 3D Integrations section and look out for the sentence ‘Integrations require an account key’. Click on the link and check ‘Enable integrations’. Whenever you need the account key just head back here. You’ll only ever need to activate this once for your account rather than on a per room basis. The account key can also be reset at any time if you feel your account has been misused by someone else.
07. Open up the RADiCAL interface
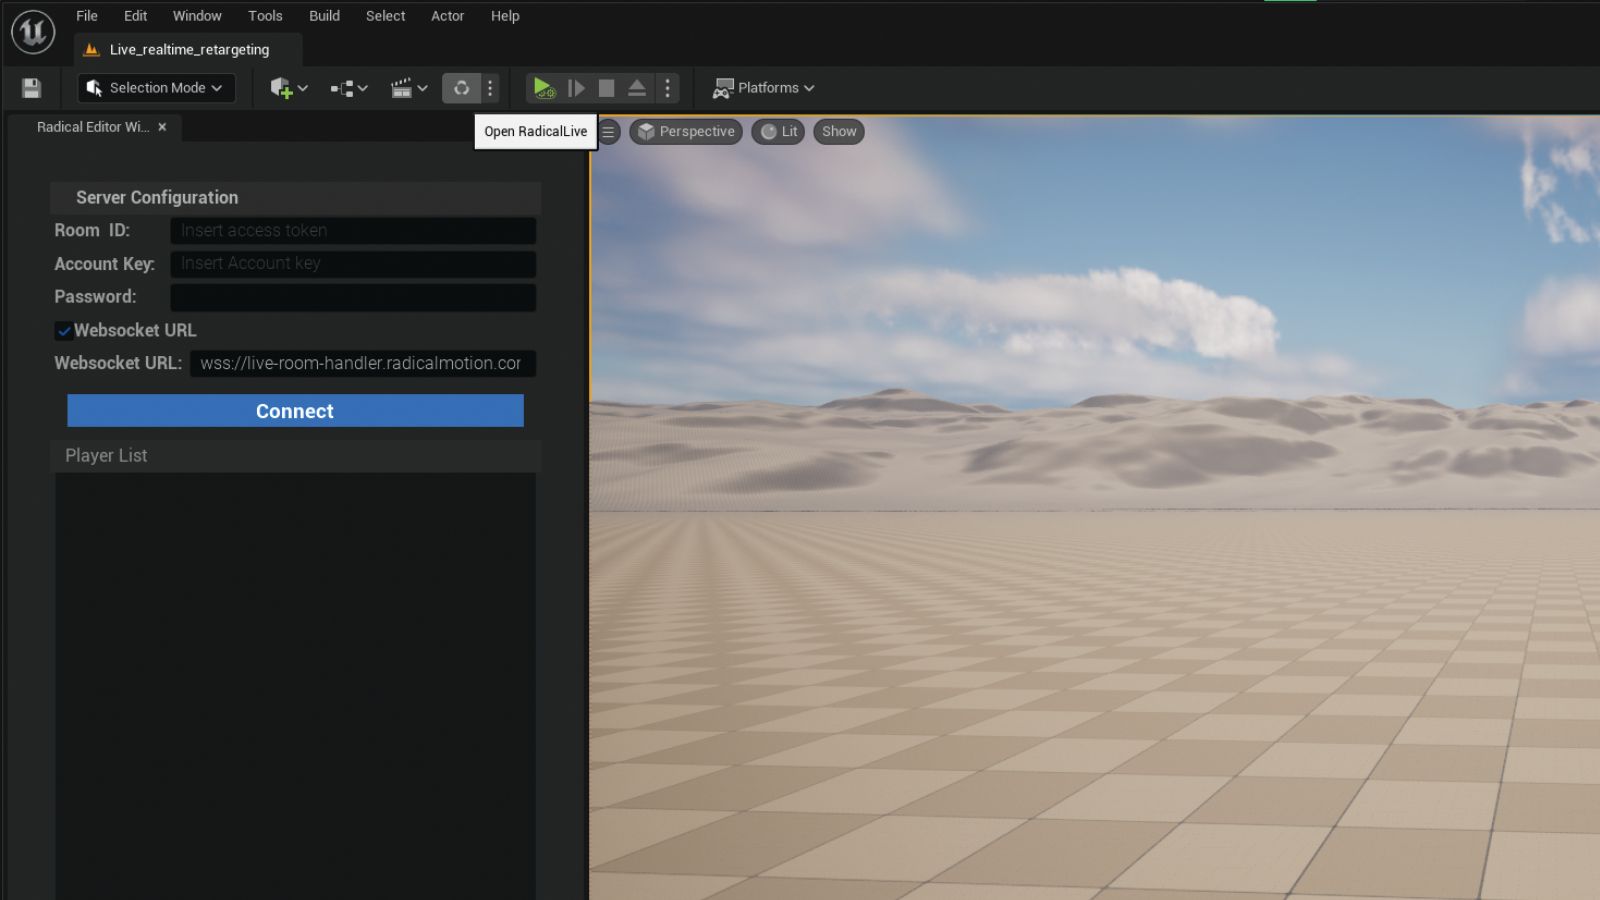
You’re now ready to launch the RADiCAL interface in Unreal. You can do this in one of two ways. The first is to head to the Window menu and select Radical. The second involves clicking the RADiCAL Live button found at the top of Unreal Engine, next to the play controls. If you can’t locate the button, make sure that your plugin is activated and that you’ve restarted Unreal.
08. Link to your simulation room
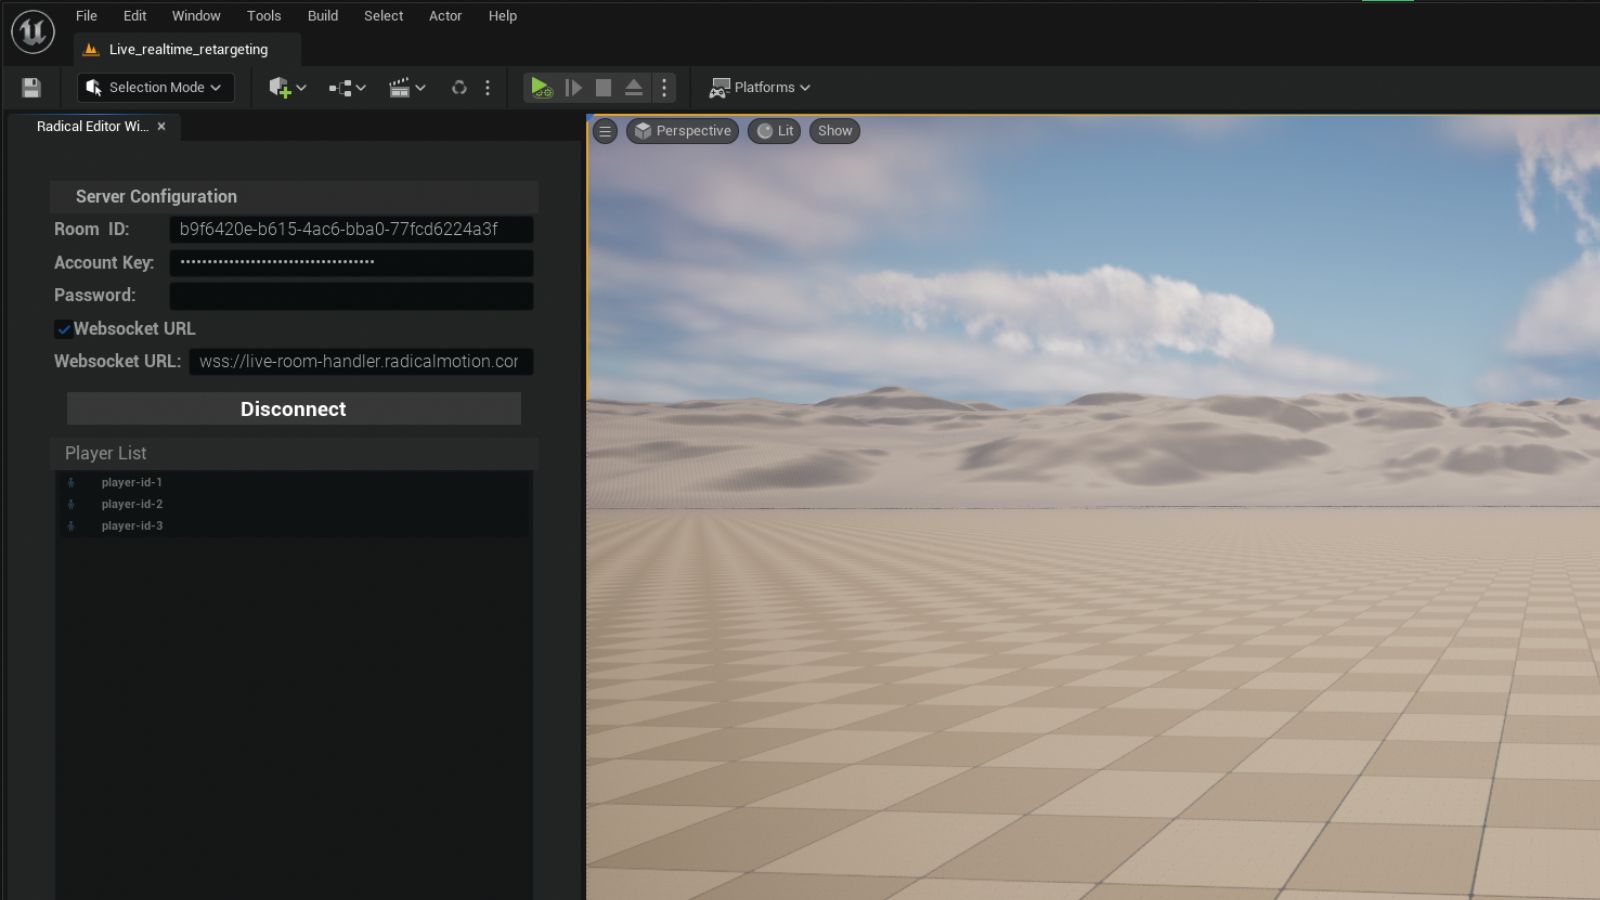
As RADiCAL operates on its servers, it’s vital to connect Unreal with these. This isn’t challenging, but does require you to have copied the details of the room and account key from RADiCAL’s web interface. Paste in the Room ID and account key to the appropriate boxes. You’ll only need a password if you’ve specified this when you created the room. Finally, click Connect.
09. Import your character
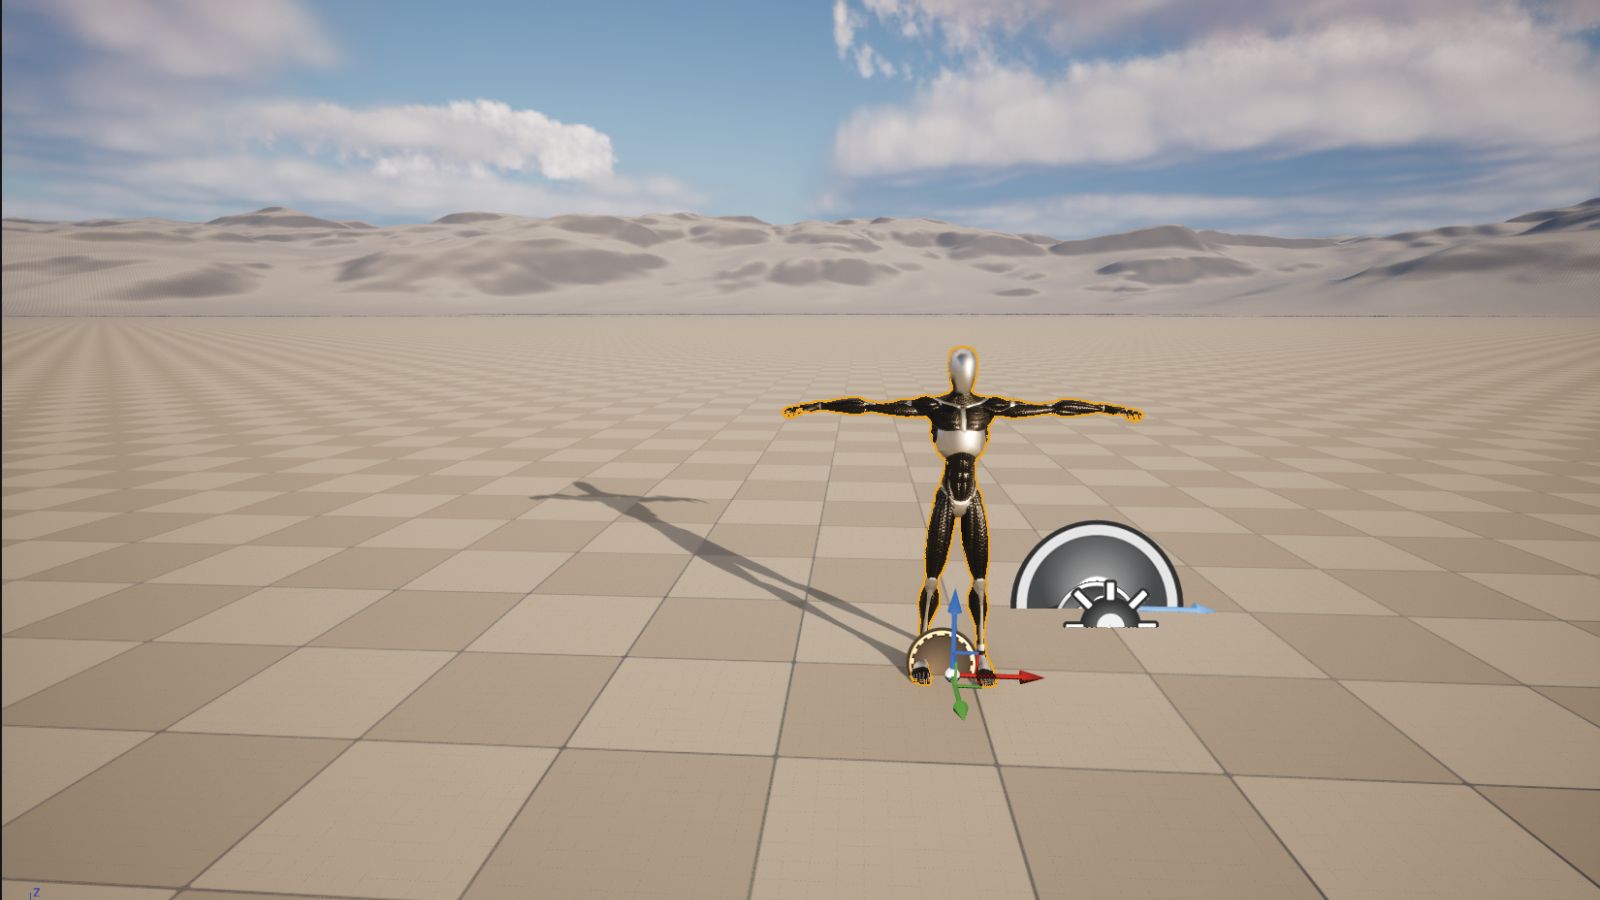
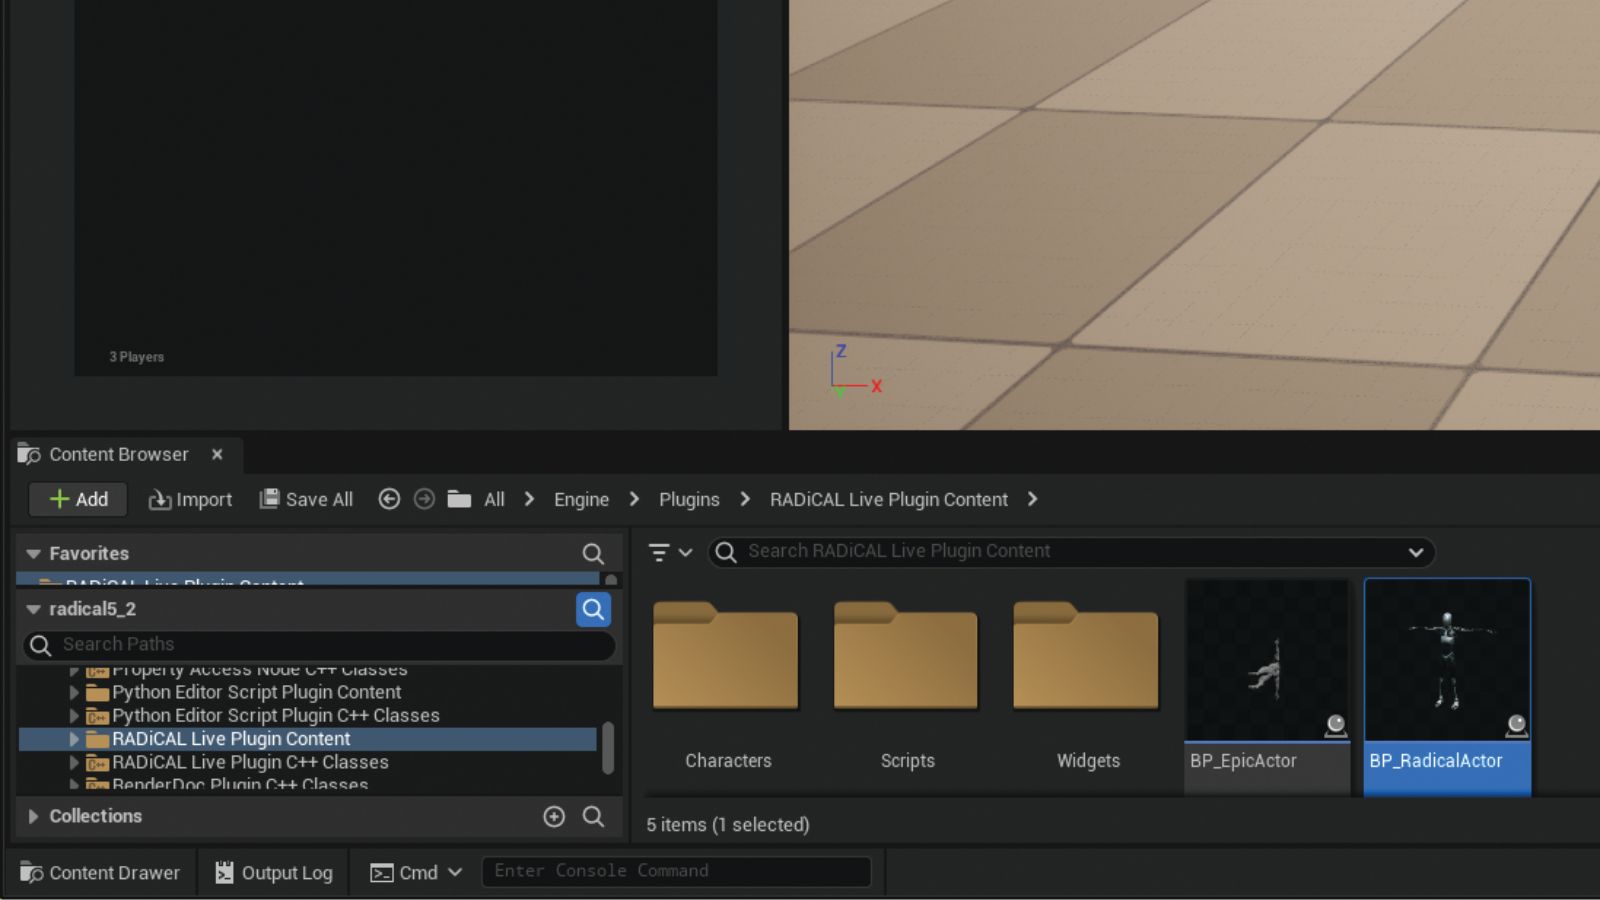
The RADiCAL plugin provides a character that can be found in the Content Browser window. Make sure Show Engine Content and Show Plugin Content are ticked in the Content Browser settings. Use the search bar and type in “RADiCAL”, select the RADiCAL Live Plugin Content folder from the list, and then drag and drop it into the viewport’s BP_RadicalActor item. Do note that if the orientation of the object is incorrect, this will be corrected when your simulation is applied and played.
10. Connect simulation to character
Assuming you’ve clicked Connect back in step 08, you’ll see a list of ‘players’ displayed. Navigate to the properties for your character, and scroll down to the Test Category section and the Player ID property, then use the dropdown to select the player you want to attach to your character. The simulation loaded onto your character is driven from the player you choose.
11. Play the simulation
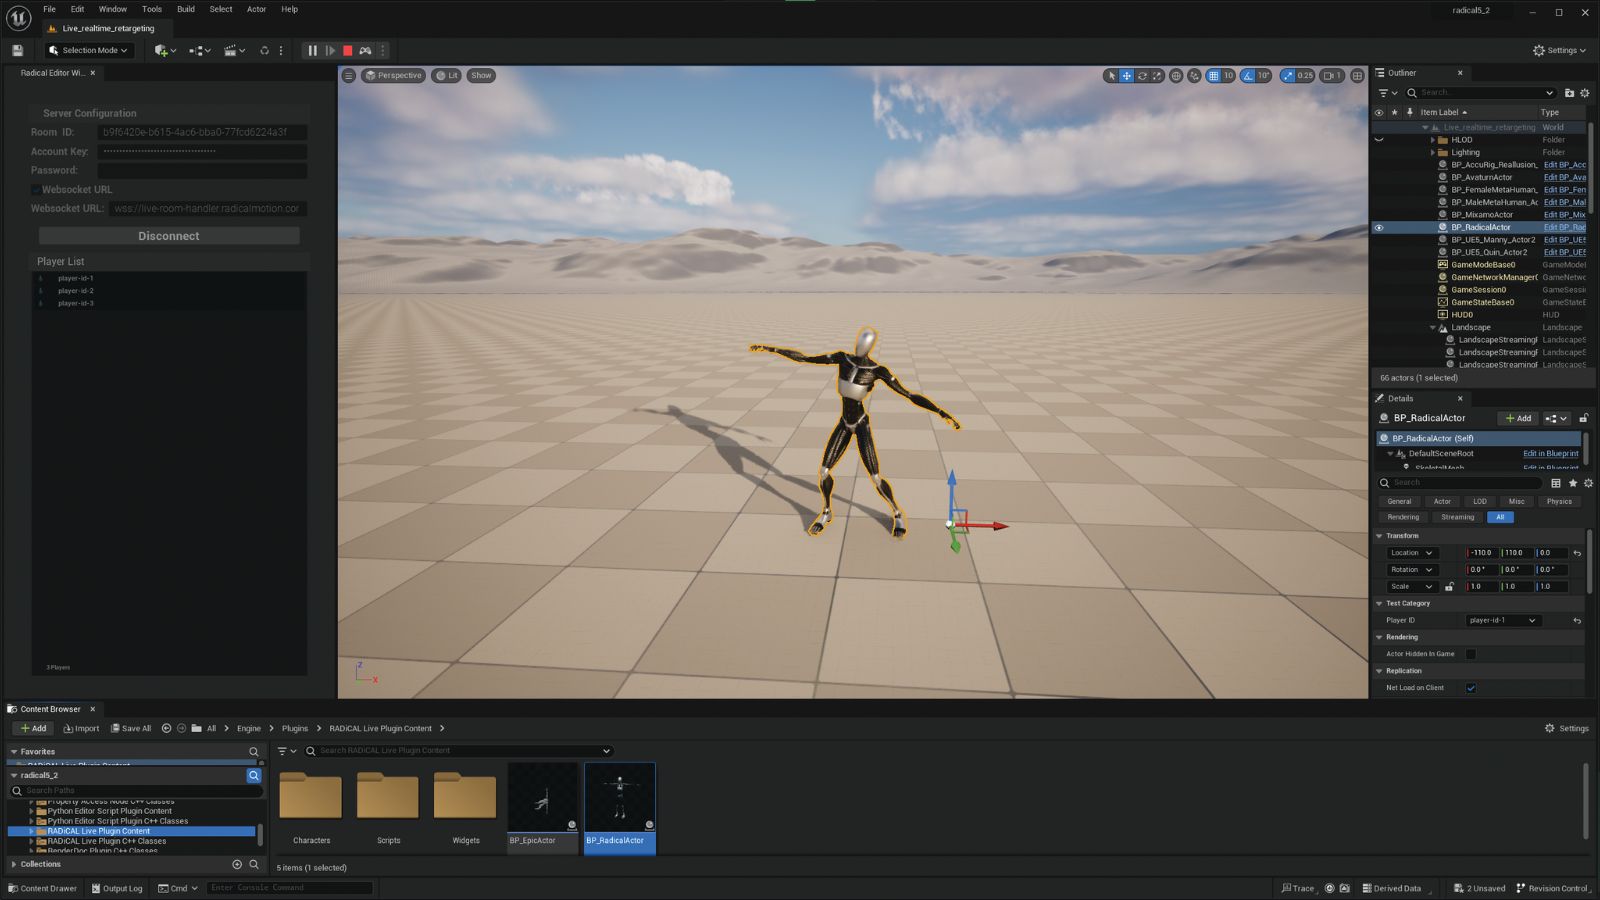
The final step for this simulation mode is to enjoy it! You can do this by hitting Play on the Navbar. When you set up your room on the RADiCAL website you can pick a Multiplayer room that will include multiple players, each with their own unique simulation data. You’ll then be able to create multiple characters in Unreal and assign players to each, resulting in multiple simulations running at once.
12. An introduction to live rooms
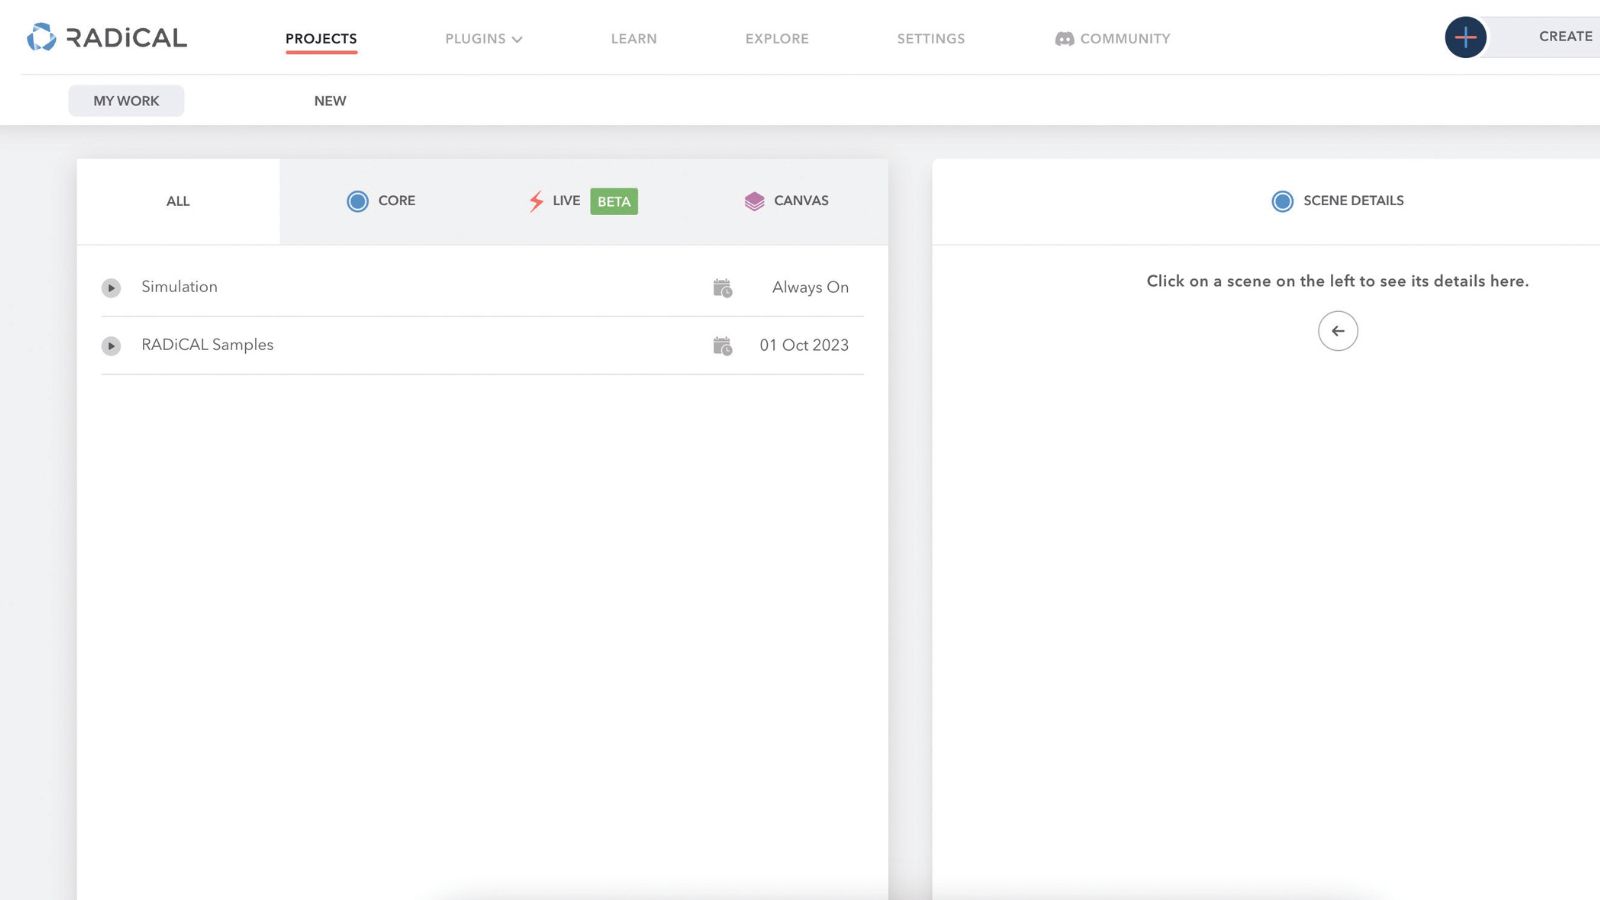
Live rooms are different to Simulation rooms in the fact that they let you record live motion through a camera and instantly apply it to your character in Unreal. This is perfect for situations where you want specific types of movement and need an actor to drive the motion. Live rooms are easy to set up and it’s incredibly rewarding to see motion you create perfectly replicated virtually
13. Create a live room
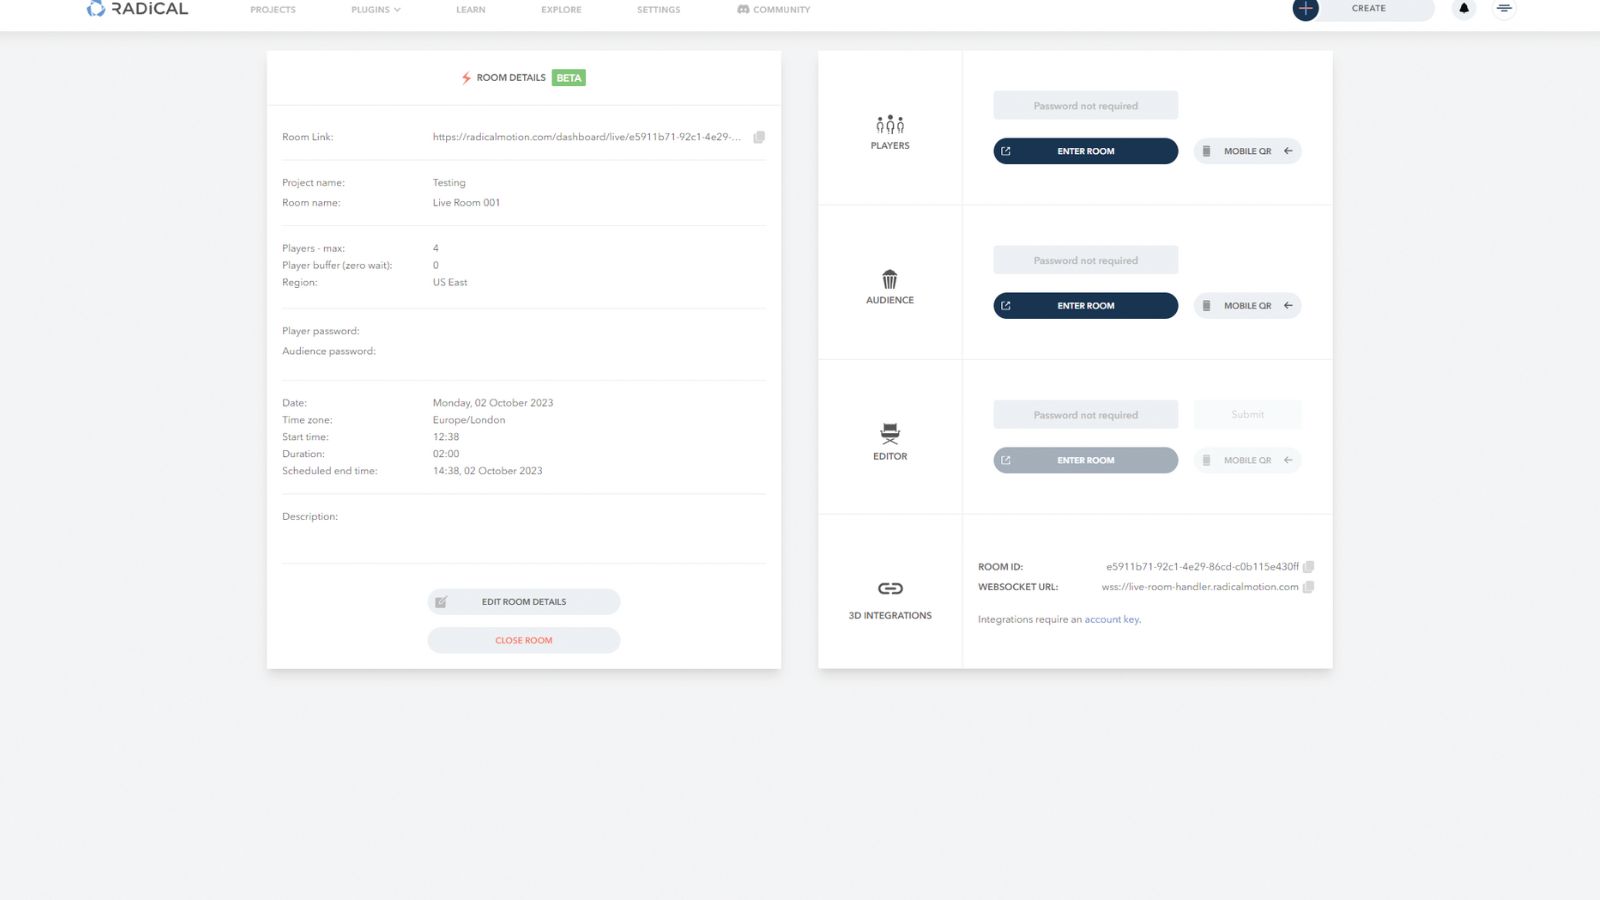
Create a Live room by navigating to the RADiCAL website and select Projects on the top tab. Go to the Live tab followed by New and you’ll be presented with some settings for the room prior to actually creating it, but for this demo just keep them all default. Click the Start Room button followed by Open Room, copy the Room ID for use later in Unreal Engine, and finally hit Enter Room.
14. Camera setup
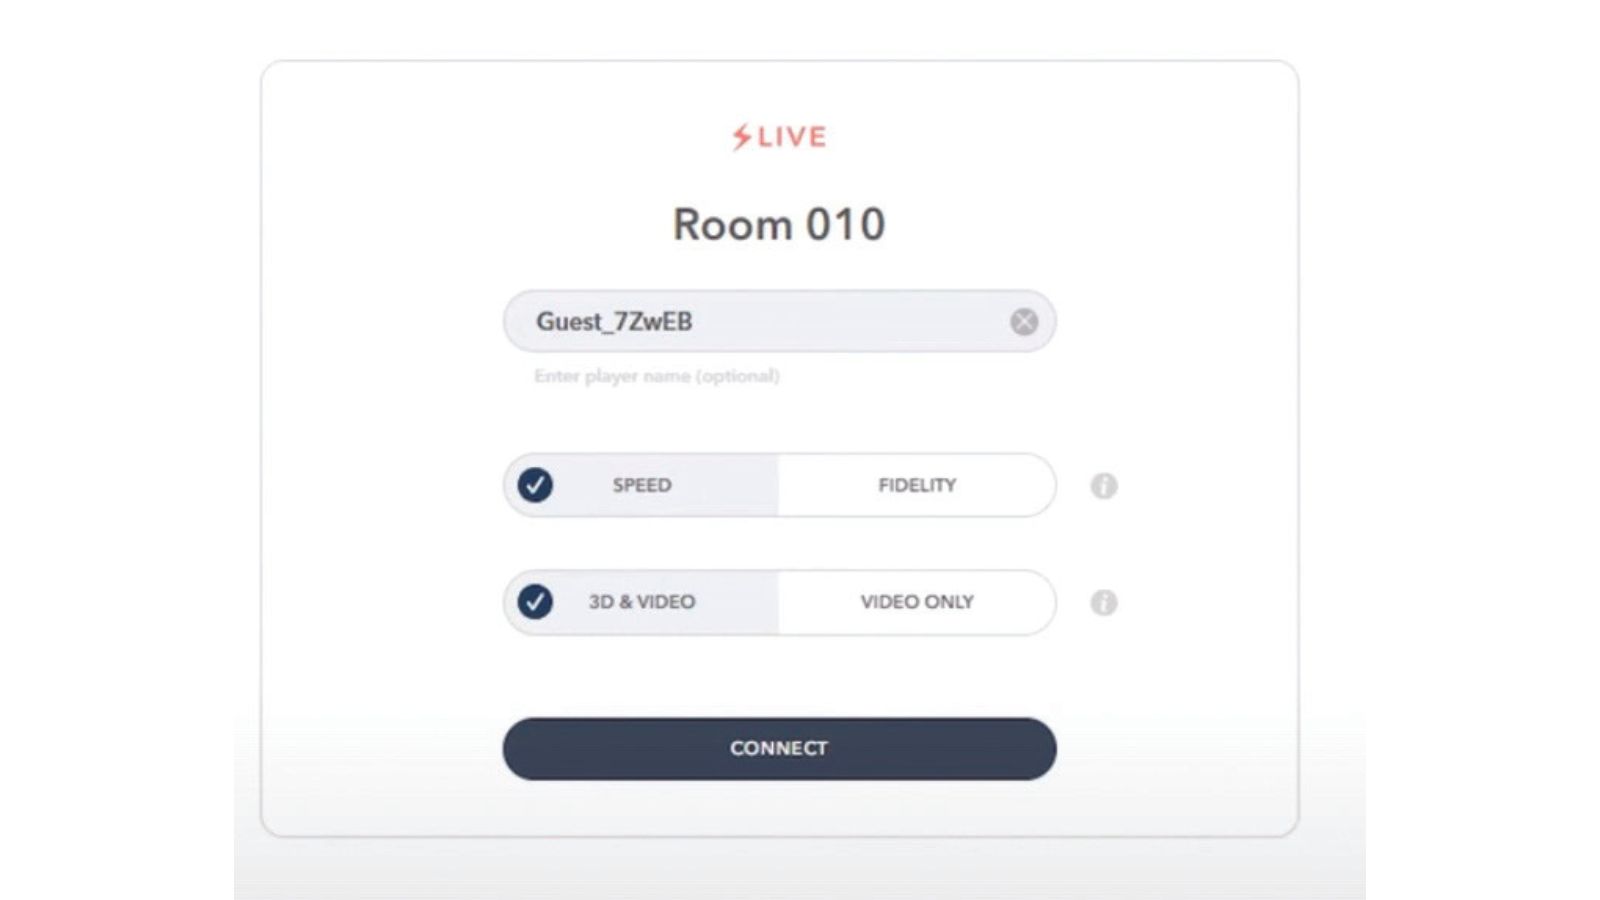
You’ll now be presented with a view of the camera on your device – either your laptop or phone – though you may need to grant access for it to be used. Set the camera parameters in the browser and RADiCAL will present you with a few extra settings. The Speed versus Fidelity choice depends on the level of accuracy you want. Fidelity is best but does result in a one-second delay that can be a bit off-putting, but if you focus on your own movements and less on how they’re represented on the model you’ll be fine.
15. Capture your acting
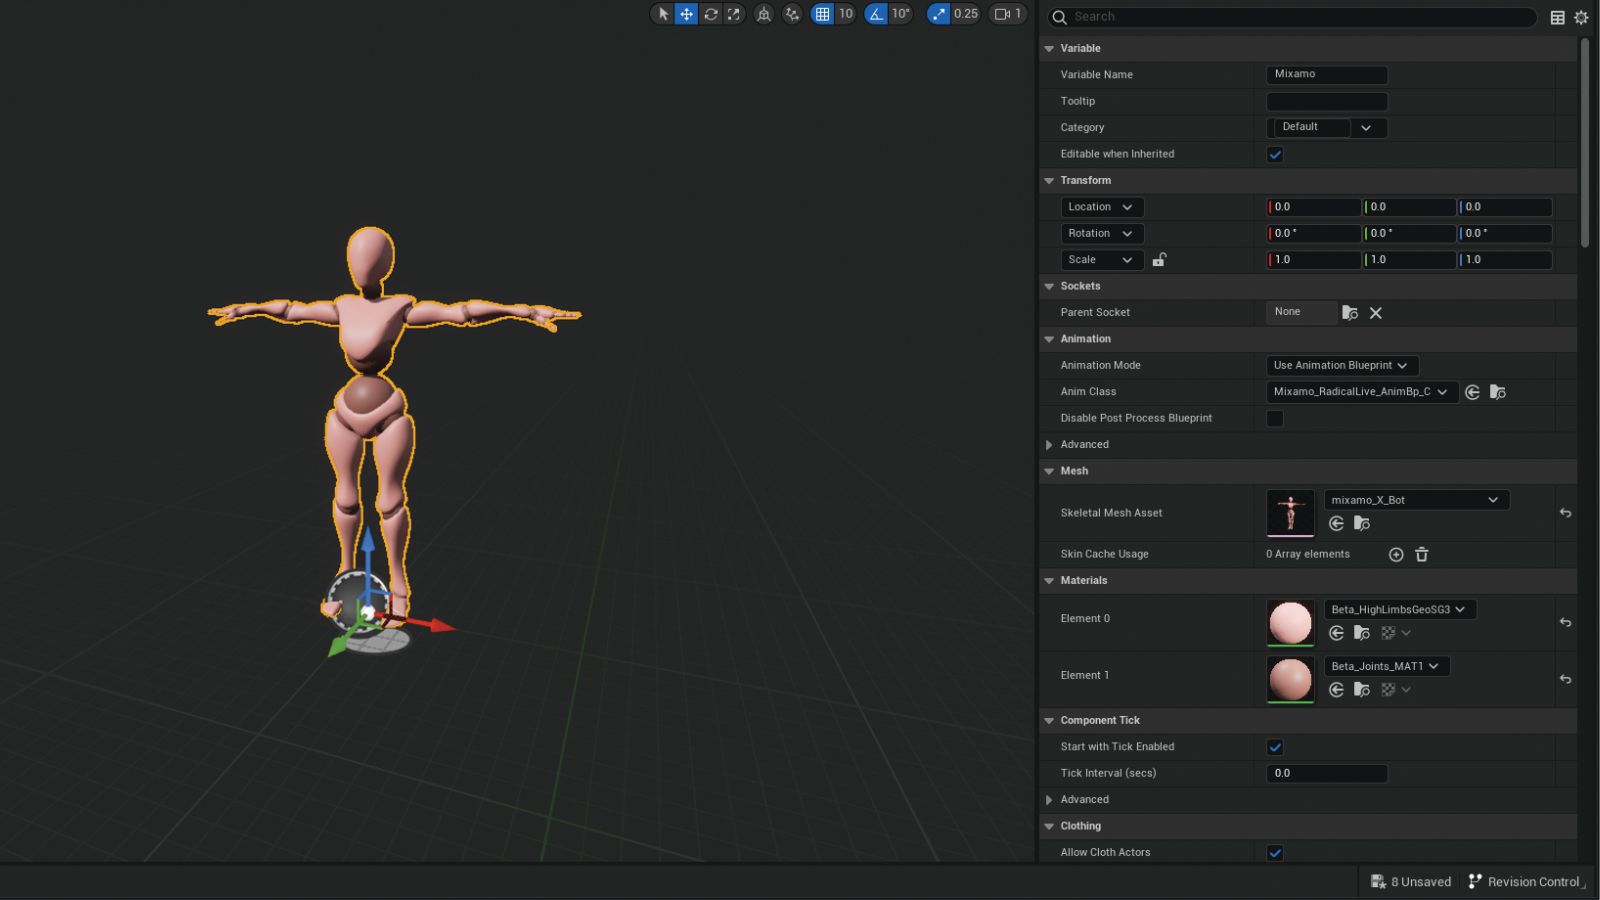
RADiCAL gives you a 10-second countdown to get in position to record your motion. It’ll require you to enter into a T-pose for calibration purposes. Make sure every part of your body remains in view of the camera at all times, and you’re free to perform your motion. Try to remain natural, trusting RADiCAL will capture the data and apply it accurately to the character in Unreal.
16. Recording the motion data
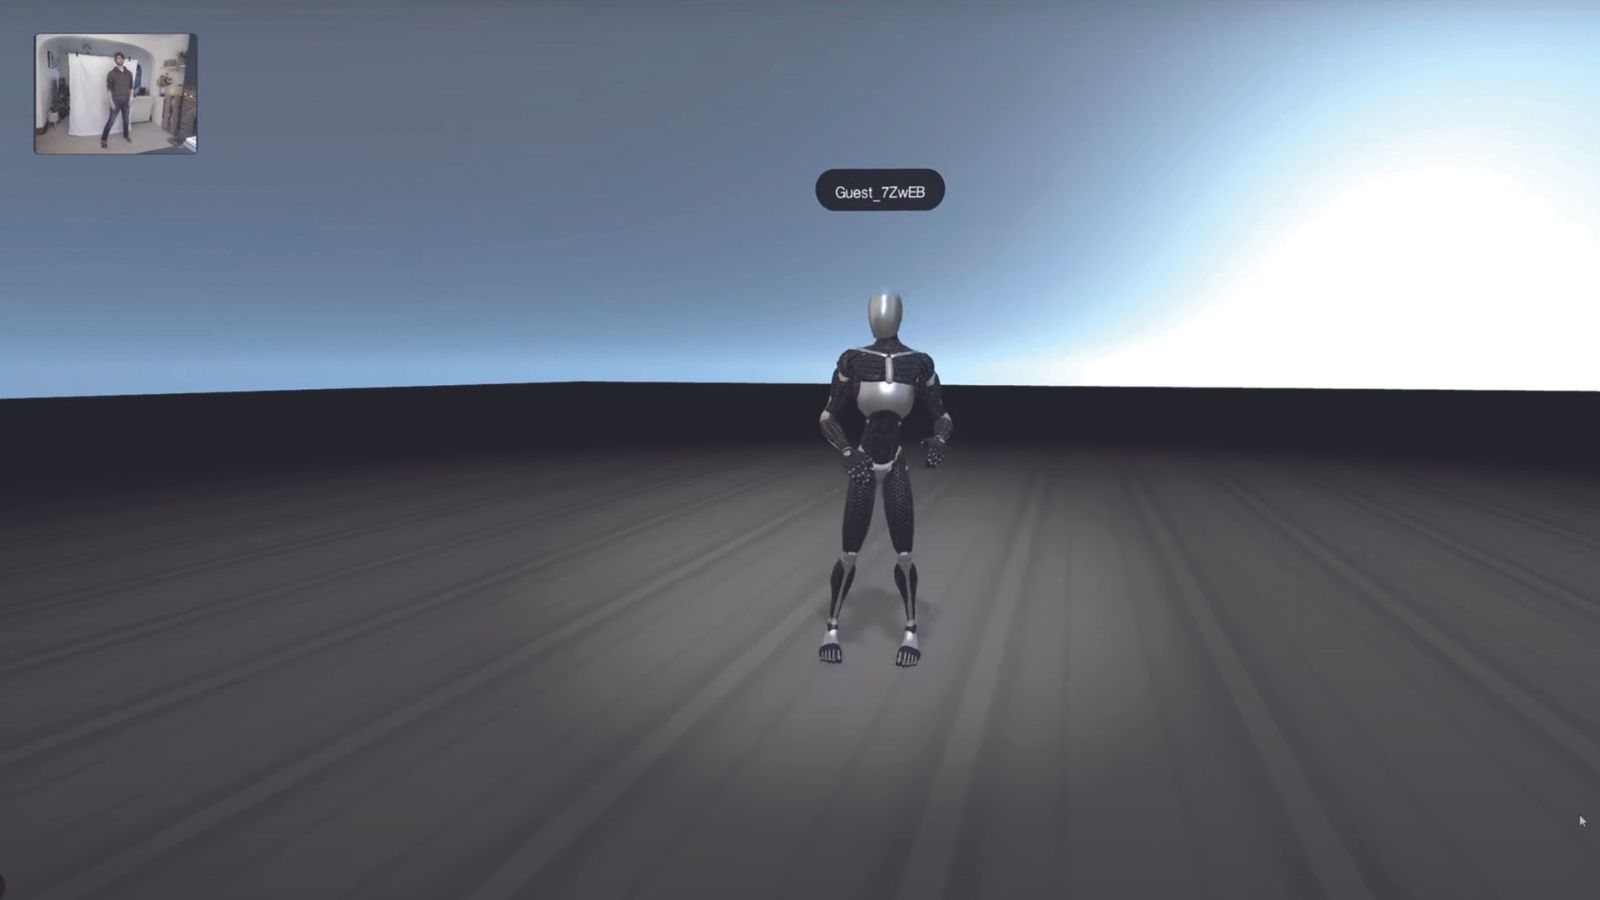
It’s important to be able to record the motion data so that it can be permanently applied to your character for later playback in your scene. You can do this by dragging the object you wish to record into the Take Recorder stage as you require, start the recording and the game environment, and the data will be recorded to the Sequencer. You can then edit and tweak it to get what you need. Finally, you can export this as either a sequence of images or a video file, depending on the output you desire.
17. Using pre-created rigs and retargets
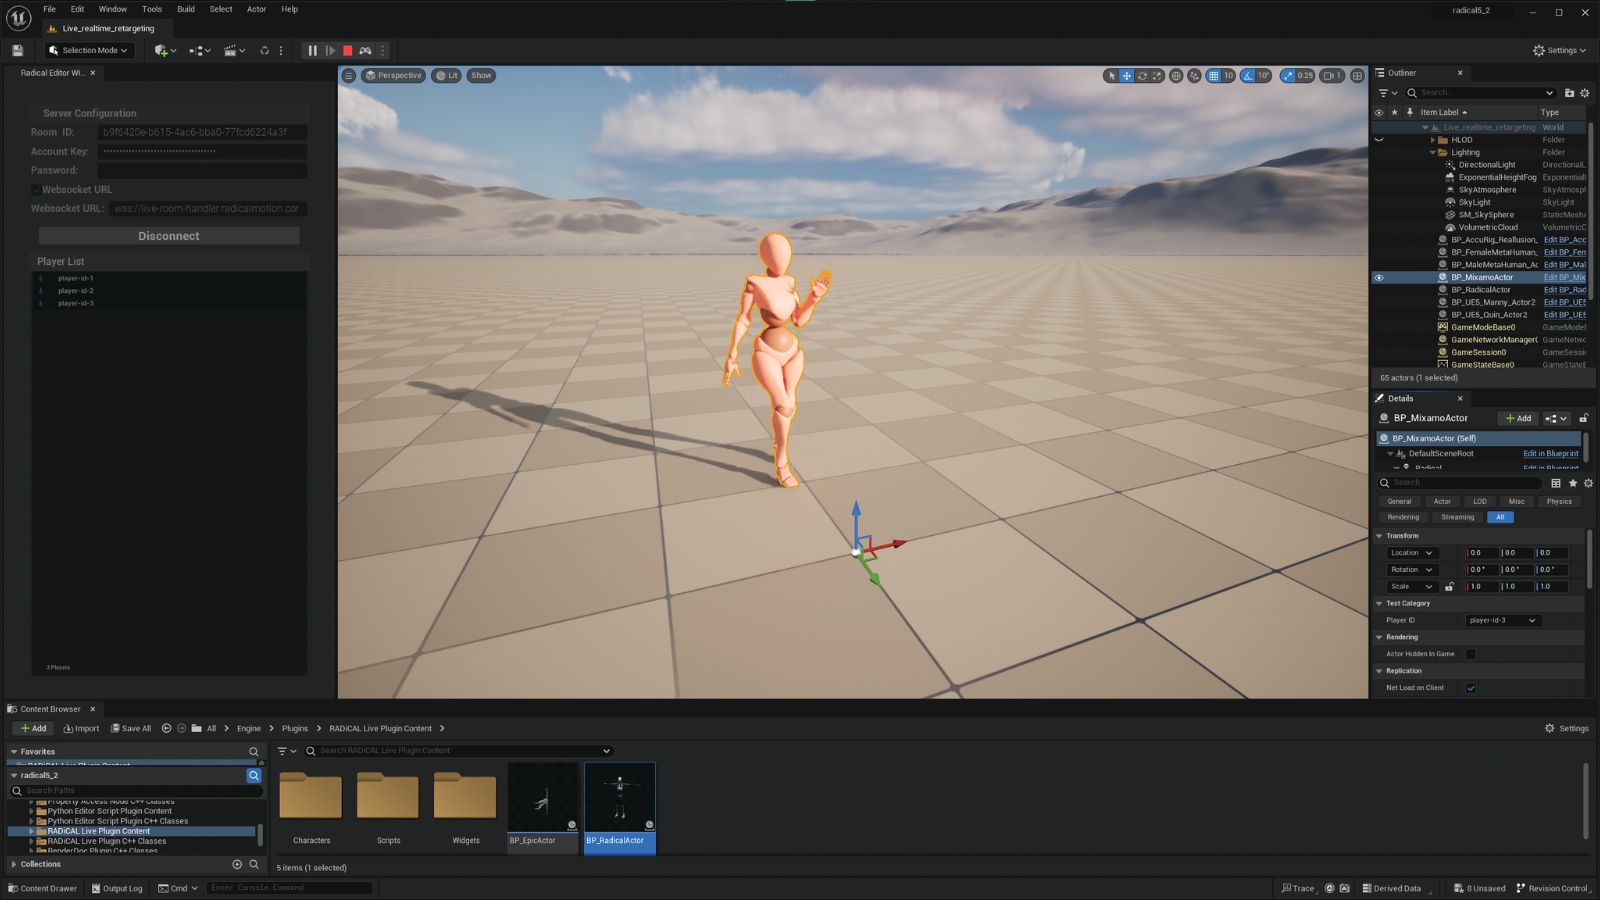
Some Rigs and Retargets have already been created. The IK Rigs and Retargeters can be found in their own folders within ‘Engine/Plugins/RADiCAL Live Plugin_5.2/ Content/Characters’. The rigs will have the prefix ‘_IKRIG’. and the retargeters the suffix ‘RTG_Radical_to_’. With these you can skip the rig creation and retargeting steps, and jump straight to creating the actor
Mocap with Unreal Engine and RADiCAL: quick tips
Here are a few more quick tips to keep in mind when you're using RADiCAL.
Get the right setup
Place your phone on a tripod and avoid moving this during the motion capture. You can record in almost any environment, but if you have a solid background colour that contrasts with the actor that will provide the best results. Set your camera up in such a way that the whole of the actor, for the whole routine, will remain in shot.
Using other software
RADiCAL Live works with other software including Blender and Maya. Make use of RADiCAL’s excellent YouTube training videos to understand the correct workfl ow for each. If you’re still struggling, you can also reach out to its helpful team on Discord for advice.
Get more tutorials in 3D World
This content originally appeared in 3D World magazine, the world's leading CG art magazine. 3D World is on sale in the UK, Europe, United States, Canada, Australia and more. Limited numbers of 3D World print editions are available for delivery from our online store (the shipping costs are included in all prices). Subscribe to 3D World at Magazines Direct.

Paul is a digital expert. In the 20 years since he graduated with a first-class honours degree in Computer Science, Paul has been actively involved in a variety of different tech and creative industries that make him the go-to guy for reviews, opinion pieces, and featured articles. With a particular love of all things visual, including photography, videography, and 3D visualisation Paul is never far from a camera or other piece of tech that gets his creative juices going. You'll also find his writing in other places, including Creative Bloq, Digital Camera World, and 3D World Magazine.
