Mock up AR graphics with After Effects
Discover how to use After Effects to mimic augmented reality.
After Effects has some powerful tools that we can use to mimic augmented reality. You may find this necessary if, for example, you wanted to make a pitch video to show what an app with augmented reality capabilities could look like.
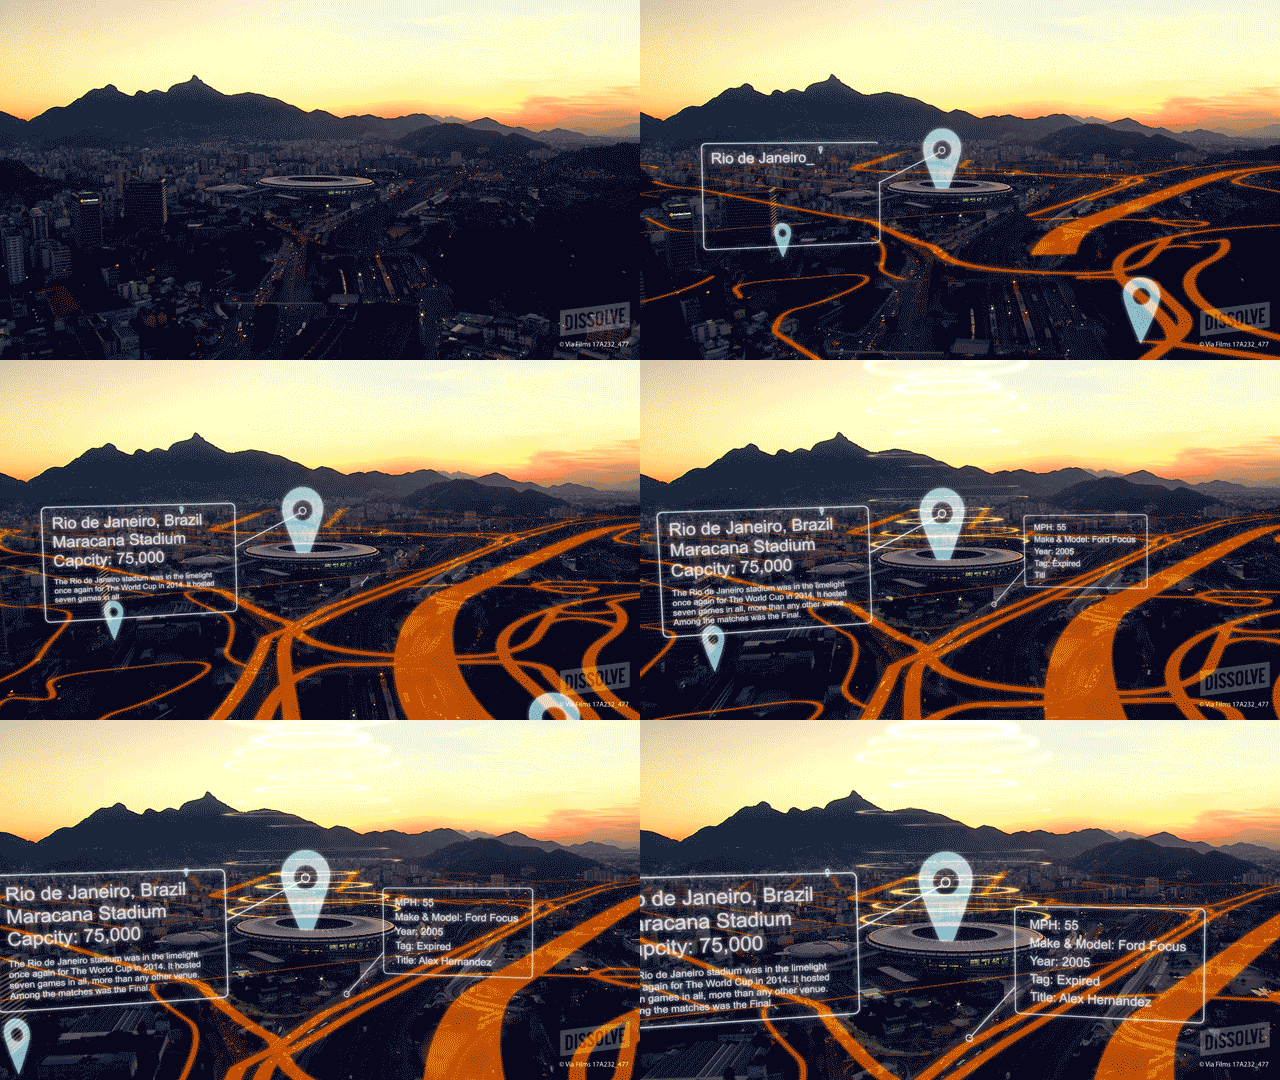
For this tutorial we’ll be using footage of Rio and some map graphics to overlay on the city. We should end up with something that looks like this:
01. Get familiar with the 3D Camera Tracker
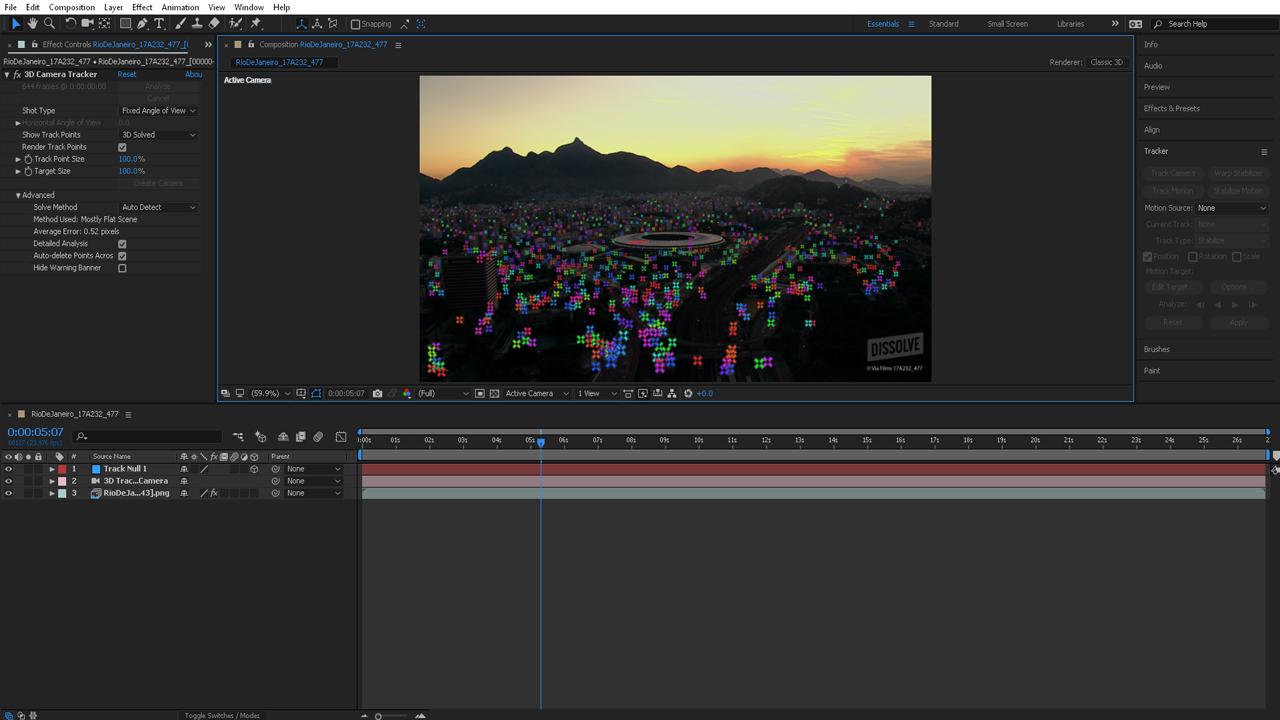
Select the footage layer you want to track and click the Track Camera button in the Tracker Panel – you’ll see a blue bar appear across the footage that says Analyzing. To get a better solve, click on Detailed Analysis in the Effects Controls Panel for the 3D Camera Tracker. You can also get a better solve by specifying the Shot Type, if you know which one you want for your particular shot.
Article continues belowIn the Advanced tab you can specify the solve method or just leave it set to Auto Detect. Choosing the correct solve method can sometimes result in a better track than using the default Auto setting.
02. Solve your footage
Once your camera begins solving you’ll notice the banner colour changes from blue to orange, and when it's finished the banner will disappear. Sometimes you may get points in the sky or on areas that you can tell are not using good data. Delete those points.
Select at least three or more of the points that represent the ground plane. Right-click with those points selected and choose Set Ground Plane & Origin. With the same points selected, right-click and choose Create Null & Camera. You’ve now solved your footage and set yourself up for success with a Camera and Null object that can be used as a reference point.
03. Add a graphic
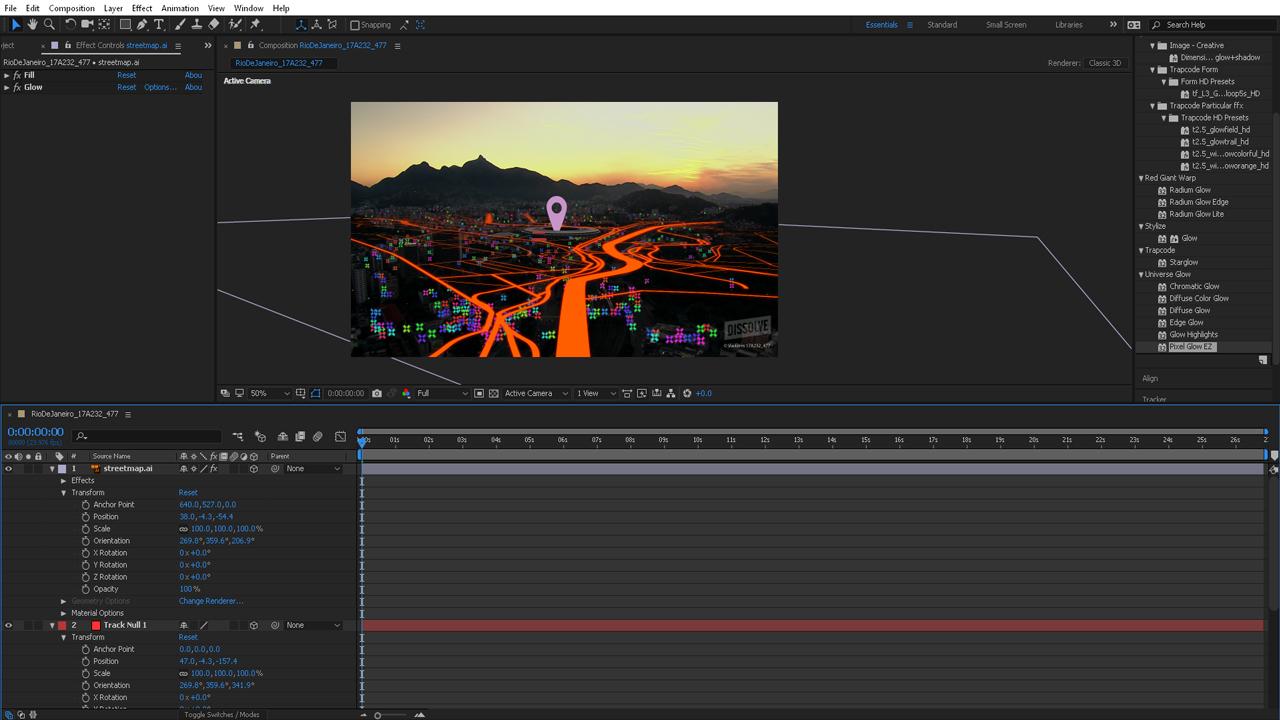
Now you can begin adding graphics to the timeline. I’m using a map marker that I want to pop up from inside the stadium. Edit the Anchor Point of the graphic as needed, so the correct edge is used for the position data. In my case, I moved the anchor point to the bottom middle using the Pan Behind (Anchor Point) tool.
Sign up to Creative Bloq's daily newsletter, which brings you the latest news and inspiration from the worlds of art, design and technology.
Click the 3D switch for the layer so it can also move in Z space. Select a point in the picture where you’d like the graphic to appear, right-click that point and choose Create Null. Now copy the position data from that Null to the position of your graphic, scale and mask the graphic as needed. It may be necessary to key the mask over time.
04. Integrate larger graphics
Now you can repeat step 03 to integrate more graphics. For instance, you can integrate something along the entire ground plane like a map. To do this, select several points over the ground plane area. Note: to select the points now you’ll need to actually have the 3D Camera Tracker Effect selected in the Effects Controls Panel. Right-click those points and create a Null.
Repeat the process of copying data and moving the anchor point if needed. This time you should also copy the orientation of the Null to the graphic so it's lying on the ground. You may still need to adjust things a bit to get the graphic to line up with the streets in the footage.
05. Add text
You can also add text to follow and flow along with the footage. For text that only needs to track with static objects like buildings, you can use the same method of match moving as we used for the markers and the map. If you want text to follow along with a walking person or driving car, you’ve now got two types of motion involved: the movement of the camera and the movement of driving or walking.
For these types of tracks we’ll use a more traditional tracking approach. With the footage selected, choose Track Motion from the Tracker Panel. To prepare for the track, create a Null Object and name it Car Tracker. Choose a car on the road (you may need to turn up the brightness and contrast of your footage to see one).
06. Track moving objects
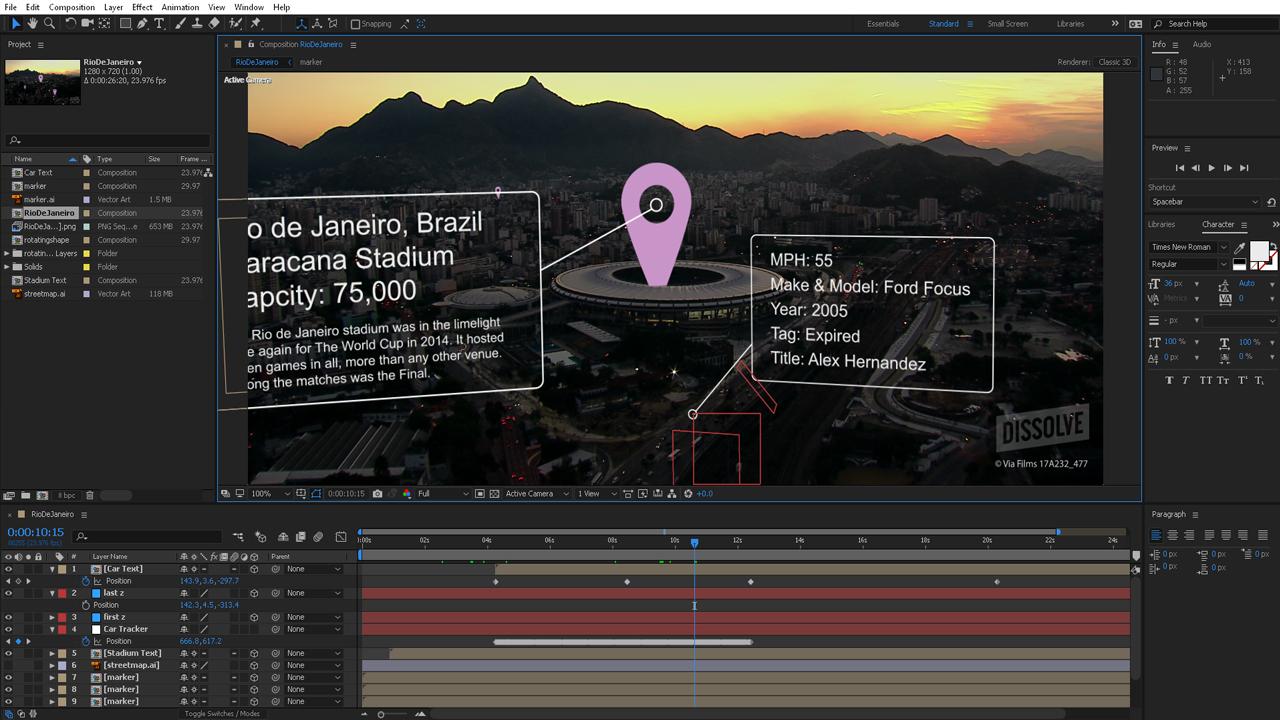
Because the cars in this footage are so small, there isn’t enough data to do a two-point track to get scale data. We’ll have to hack this just a bit! Proceed as if you’re only gathering the X and Y tracking data.
Place Track Point 1 on something highly visible like the headlights. It may take some time to get your track correct, and you may need to fix some parts by hand. Once your track is ready, it’s time to apply it to the Null Object we created called Car Tracker. Jump back to your footage and select the 3D Camera Tracker effect in the Effects and Controls panel.
Choose the closest point to the place where the car begins, right-click that and create a Null. Rename this Null 'z start'. Repeat the Null creation step for the closest possible point to where the car ends, and rename this 'z end'. Now change the Car Tracker Null object into a 3D object and add two keyframes: one key with the Z value of the 'z start' Null, and another at the 'z end' value. These keys should be at the beginning and end of the tracking keyframes.
Finally, parent the text you want to follow along with the car to the Car Tracker Null. Rejoice that your small hack job has achieved the results you wanted!
07. Tweak your work
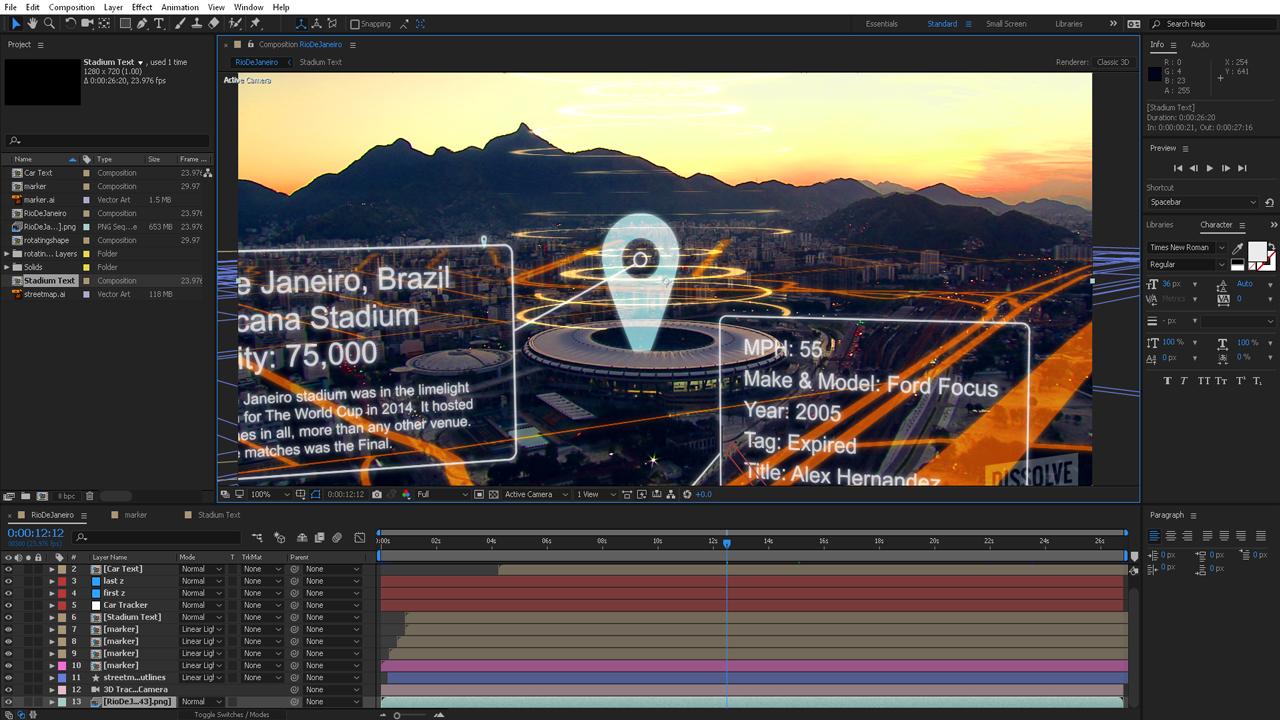
If you need to change anything, select the whole Position property and then drag the position value. This will change everything relative to the existing data so you don’t accidentally make a fix for just one frame.
If you built your text boxes in After Effects, try using trim paths to animate them on-screen as they become relevant to the action. Animate your text on as well, perhaps with a typewriter or word processor effect. Feel free to add other animated graphics as needed to flesh out the composition.
If you want to get the tutorial in detail check out my full course at Pluralsight: Using the 3D Camera Tracker and Integrating Graphics in After Effects.
About Pluralsight
Pluralsight is an enterprise technology learning platform that delivers a unified, end to end learning experience for businesses across the globe. Through a subscription service, companies are empowered to move at the speed of technology, increasing proficiency, innovation and efficiency. For a free trial and more information, visit www.pluralsight.com.
Related articles:

Laura is a passionate visual effects and motion graphics author at Pluralsight. Her favourite projects are her two in-depth After Effects introductory courses on Pluralsight, which were each built around training motion artists and VFX artists, respectively. Using her vast skill set, Laura has taught thousands of artists everything from shot-tracking and rotoscoping to motion design.
