How to set up site theming with CSS variables
Use CSS Custom Properties and the Web Storage API to change a site's layout and colours.

Sign up to Creative Bloq's daily newsletter, which brings you the latest news and inspiration from the worlds of art, design and technology.
You are now subscribed
Your newsletter sign-up was successful
Want to add more newsletters?

Five times a week
CreativeBloq
Sign up to Creative Bloq's daily newsletter, which brings you the latest news and inspiration from the worlds of art, design and technology.

Once a week
By Design
Sign up to Creative Bloq's daily newsletter, which brings you the latest news and inspiration from the worlds of art, design and technology.

Once a week
State of the Art
Sign up to Creative Bloq's daily newsletter, which brings you the latest news and inspiration from the worlds of art, design and technology.

Seasonal (around events)
Brand Impact Awards
Sign up to Creative Bloq's daily newsletter, which brings you the latest news and inspiration from the worlds of art, design and technology.
CSS Custom Properties, commonly known as CSS variables, are now supported by all major modern browsers. This means that for projects that aren't burdened by having to support legacy browsers such as Internet Explorer, CSS variables can be considered – for all intents and purposes – safe to use.
Many developers already use variables with preprocessors such as Sass or Less as a means of reducing code repetition. Native CSS variables work in largely the same way, but don't require any additional build step, cascade like a regular CSS property, and most importantly, are available at runtime. (To keep your site running smoothly, be sure you've chosen the right web hosting service.)
These benefits give native CSS variables an edge over their preprocessor siblings, and opens the door for developers to do a lot of interesting things with a lot less code. Interested in zero-code options for your site? Here's our guide to the top website builder.
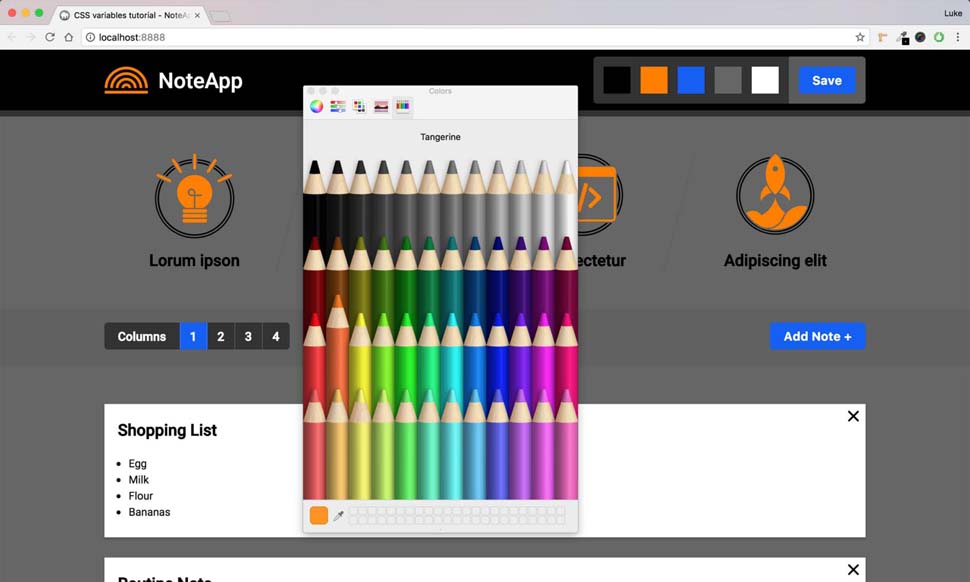
In this tutorial, we'll be exploring how we can use CSS variables to implement website theming into a mock web app called NoteApp. This will involve writing CSS and JavaScript to allow the user to change the colour scheme and toggle the amount of columns shown. We'll then leverage the Web Storage API to make sure any changes are saved for future sessions.
Get the tutorial files
First things first, download the project files from Web Designer's FileSilo (issue 264). Note: First time users will have to register to use FileSilo.
01. Set up the workspace
In the /website-template directory you'll find the static NoteApp webpage in which we'll be implementing website theming using CSS variables and the Web Storage API. Open the directory in your preferred text editor.
Sign up to Creative Bloq's daily newsletter, which brings you the latest news and inspiration from the worlds of art, design and technology.
02. Set up our CSS variables
In main.css, you'll find much of the project's CSS. At the top, create a block targeting the root pseudo-class. Within it define variables like in the snippet below. This root block contains global variables that will cascade down through our stylesheet like any regular CSS property.
:root {
  --primary: #2F353E;
  --secondary: #2B9BCA;
  --tertiary: #F3583F;
  --quaternary: #E0E1E2;
  --quinary: #FFFFFF;
}
03. Replace colours with variables
Go through the stylesheet, either manually or using find/replace, and swap any static colour hex codes with their corresponding variable from the root block. To do this, use the var function and pass the variable's name. This tells the browser to reference that variable's value. For example:
.c-header {
  background-color:var(--primary);
  color:var(--quinary);
}
04. Locate inline SVG for icons
Open index.html and one of the first things you notice is a large SVG element. This contains the paths for all the page's icons, each wrapped in a symbol element, and given a unique ID. These symbols are then referenced where needed with the use element, allowing for the reuse of icons without any duplication of SVG code.
05. Add CSS variables to the SVG
One benefit of using inline SVG instead of a .SVG file is that CSS can access its internal structure. This means so can our CSS variables (check browser support here). In index.html, replace the SVG's style block with the snippet below. Now each of the SVG's colours are linked to the values of our CSS variables.
<style>
  .primary {
  fill:var(—primary, #2F353E);
  }
  .secondary {
  fill:var(—secondary, #2B9BCA);
  }
</style>
06. Create a columns variable
We can also use CSS variables for properties other than colour. Create a new variable in the root block, call it columns, and give it a value of 3. This should match the default value of the Columns UI component on the page. When functional, this component will toggle the number of columns.
:root {
  --primary: #2F353E;
  --secondary: #2B9BCA;
  --tertiary: #F3583F;
  --quaternary: #E0E1E2;
  --quinary: #FFFFFF;
  --columns: 3;
}
07. Implement a columns toggle
Using our new columns variable and the calc() function, we'll now calculate how wide each note component should be in order to create the correct number of columns. For example, if columns is set to 4, each note should have a width of 25%.
.c-note {
  width:calc(100% / var(--columns));
}
08. Add JS classes and data attributes
When applying JS behaviour to a DOM element, hook into it via a class with a JS prefix. This decouples the functional aspects of an element from CSS ones. Let's add a js-update-variable class to all colour and radio inputs as well as a data-attribute referencing the corresponding variable to update.
<input type="color" value="#2F353E"
class="js-update-variable u-hidden-visually"
data-variable="primary">
09. Add JS to update CSS variables
Open main.js and add the snippet below. This loops through all our js-update-variable inputs and adds logic, so on change, the variable referenced in its data-variable attribute is updated with the inputs value. The colour swatches and column toggle should now be working!
var varTrig = document
.querySelectorAll(".js-update-variable");
for(var i = 0; i < varTrig.length; i++){
varTrig[i]
.addEventListener("change", function(){
document.documentElement.style
.setProperty("--" + this.dataset.variable,
this.value);
});
}
10. Attach a JS class to the Save button
It makes sense to only save the user's colour scheme when they click the save button, as that allows them to experiment with themes as much as they'd like without automatically overriding the current one. To start, add .js-save-colours to the Save button to function as our JS hook.
<button class="c-button js-save-colours"
data-modal="js-modal" data-modal
-content="js-colours-modal-content">
Save</button>
11. Create colours array
Back in main.js, declare a new variable called colours and assign to it a new array containing all the colour variables we want to be saved once the save button has been clicked.
var colours = [
  "primary",
  "secondary",
  "tertiary",
  "quaternary",
  "quinary"
];
12. Build Save button event listener
Below the colours array, create a click event listener for the js-save-colours class which we previously added to the Save button. Inside it create a new variable called htmlStyles and assign it the computed properties of the root HTML element. We will use this to access our CSS variables.
document.querySelector(".js-save-colours")
.addEventListener("click", function() {
var htmlStyles = window
.getComputedStyle(document
.querySelector("html")),
}),
13. Record CSS colour variables
Next, within the event listener, create a new variable called coloursToSave and assign it an empty object. Next, create a FOR loop using the colours array from step 11. Within it, we'll add a complete key/value record of the variables mentioned in the colours array to the coloursToSave object.
array to the 'coloursToSave' object.
coloursToSave = new Object;
for(var i = 0; i < colours.length; i++) {
coloursToSave[colours[i]] = htmlStyles
.getPropertyValue("--" + colours[i]);
}
14. Send coloursToSave to localStorage
Now we have all the colour variables saved in coloursToSave, we'll send it to a component of the Web Storage API called localStorage. This is essentially an object that persists across sessions. We can store other objects within it using its setItem() method. Let's send it our coloursToSave object.
localStorage.setItem("colours",
JSON.stringify(coloursToSave));
15. Add a JS class to Columns
In addition to colours, we also want to make sure that our chosen columns number also persists across sessions. The first step towards this would be to add js-update-columns to all radio inputs within the columns component.
<input type="radio" name="columns" class
="js-update-variable js-update-columns
u-hidden-visually" value="1"
data-variable="columns">
16. Send columns to localStorage
For each js-update-columns, we'll next assign event listeners to watch for changes. On detection, we'll then send the current value of the columns variable to localStorage, again using its setItem() method. Unlike with colours, we don't need to stringify this value as it's not an object.
var colInputs = document
.querySelectorAll(".js-update-columns");
for(var i = 0; i < colInputs; i++) {
colInputs[i].addEventListener("change",
function(){ var htmlStyles = window
.getComputedStyle(document
.querySelector("html"));
localStorage.setItem("columns",
htmlStyles.getPropertyValue("--columns"));
});}
17. Handle new sessions
If the user returns after previously choosing a colour and column preference, we need to build logic so this saved data is turned back into CSS variables. The first step is to define a DOMContentLoaded event listener, and then an if statement to check for any saved data in localStorage using its getItem() method.
document.addEventListener
("DOMContentLoaded",function() {
if(localStorage.getItem("colours")) {
}
if(localStorage.getItem("columns")) {
}
});
18. Amending colour variables
In the colours if statement, create a new variable called savedColours and assign it the value of a parsed colours object from localStorage. Using a FOR IN loop with savedColours, grab each colour key/value pair and append it to the root HTML element as a CSS variable.
var savedColours = JSON.parse
(localStorage.getItem("colours"));
for(colour in savedColours){
document.documentElement.style.setProperty
("--" + colour, savedColours[colour]); }
19. Gather column variables data
Before we can amend the columns variable, we have to first grab references to the saved data in localStorage and also the radio inputs within the Columns component. The latter is so we can updates its state to make sure the correct number is pre-selected.
var columns = localStorage
.getItem("columns"),
columnTriggers = document.
querySelectorAll(".js-update-columns");
20. Amend variable and state
Finally, we'll update the columns CSS variable with its saved localStorage counterpart and set the checked attribute of the relevant radio input within the Columns component to true. The columns - 1 is to compensate for the fact that the columns NodeList is zero-based.
document.documentElement.style
.setProperty("--columns", columns);
columnTriggers[columns - 1].checked = true;
21. Test the finished product

That's it! Everything on the mock NoteApp page should now work. You can create your own colour scheme by clicking the swatches and then commit it to localStorage via the Save button. If you wish to toggle the amount of columns shown, click the appropriate number in the columns component.
And remember, it's always worth upgrading your cloud storage ahead of a new project so it can handle the files you throw at it.
This article originally appeared in Web Designer magazine issue 264. Subscribe here.
Read more:
