Build a Facebook Open Graph app
Facebook recently unveiled the Open Graph as its next generation platform. Mat Clayton shows you how to build a simple demo app on the Open Graph
This article first appeared in the issue 226 of .net magazine – the world's best-selling magazine for web designers and developers.
In this tutorial we will create a simple Open Graph application using the Facebook JavaScript SDK and a single HTML page. The application will make use of the new Open Graph APIs, allowing users to publish to the ticker, timeline and newsfeed.
The Open Graph platform has the potential to unlock massive distribution for developers, yet it can feel complex and overwhelming. This demo app has been kept deliberately simple to focus on the key concepts and to allow you to understand how they can be applied to your own applications.
The app will allow users to authenticate with it, and post to their ticker/ timeline whenever they climb a mountain. We will then look at using Social plug-ins as a way of providing a social experience to the user before they even authenticate!
Creating an application
Before we can build our app we need to register it with Facebook. This is a relatively straightforward process. Go to developers.facebook.com/apps and click create new app. You will then have to choose a display name and namespace for your application. The namespace is a unique short code used to identify the application: in our example we have chosen ‘climbingapp’. You’ll need to choose your own unique one and use that instead.
Make sure to make a note of what your namespace is, as you will need it later on. If you haven’t created an application before Facebook will sometimes ask you to verify your account by asking you to confirm your mobile number: this should be simple and fairly painless.
At this point you will be presented with a few options: most of these aren’t relevant for our demo app. You want to tick the box I want to allow people to log in to my website using Facebook as we will be integrating Facebook into a website and not creating an application embedded into Facebook. Take a note of your APP ID, as you will need this later on when we’re coding the app.
You will require static web hosting to create the demo app: however, setting this up is beyond the scope of this tutorial. Due to the way Facebook pulls in the metadata for objects you will not be able to develop locally and will require hosting that’s externally accessible. At this point you need to enter the URL where you will be hosting the app and save your settings.

Objects, Actions and Aggregation
There are three key concepts in the Open Graph; Objects, Actions and Aggregations. Using these, an application can publish user actions into Facebook in a structured manner. The user activity will be aggregated and distributed throughout the social graph.
In our demo we allow users to connect the application to their timeline, which will then post to Facebook when they click the button in the application. Although this is a very basic demonstration, hopefully it should provide a solid basis for you to build upon in your own apps.
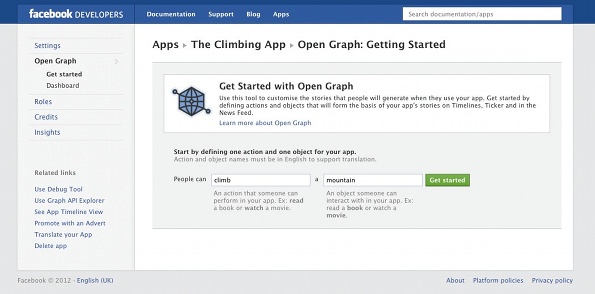
Our application is a climbing app, and therefore we provide the ability for users to post to their timeline when they climb a mountain. We therefore need an action called climb and an object type of mountain. One way to think of objects and actions is that objects can be represented by nouns and actions as verbs. Most complex web applications will have multiple actions and objects; however it’s best to start simple and build it up. Before we publish actions to Facebook these need to be defined in the Open Graph settings pane, shown on the opposite page.
If you click the Open Graph link on the left-hand column, you should see the Open Graph wizard: this will guide you through getting started with a single action and object combination. You can add more later, but for now let’s just create one, so enter People can climb a mountain and click Get Started to continue.
Fine-tuning
You now have the ability to fine-tune the definition of your action; most of it should be self explanatory. Facebook is relatively smart in calculating the past and plural versions of words, and in the case of ‘climb’ the defaults should be correct. However, you can alter these if required. It’s also possible to associate properties with an action: these allow you to add additional metadata associated with the action when it occurs. Typically only complex examples will need additional metadata, so we won’t be needing them today.

After saving the definition of the action, we now have to define our object type. By default objects require at least a URL, title, description and image. However, you may associate additional properties with your object type. In our example app let’s add a height property, click Add another property and type in height, then select integer from the dropdown, then click Save Changes. I sometimes find it useful to add in sample data at this point, as this will allow you to get an idea of how Facebook will display the action in the newsfeed. If you have the time, go and flesh these out, although it isn’t required.
Facebook is now aware of our action and object definitions, so the final step is to define how these actions should be aggregated together, ensuring that they display in some meaningful manner on users’ timelines. There are a million different ways of combining actions, but for this tutorial we are going to go with the defaults, which is a list of climbs. Once the Open Graph launches, it should become much clearer what type of aggregations users like on their profiles, but for now we can only speculate.
We have completed defining our actions and objects, now let’s get on with some code. The first step is to create an instance of our object. This is done by creating an HTML page with the required meta tags, to allow Facebook to extract information about that object.
To do this we need to create the following HTML and upload it to our hosting provider so it’s available at the URL we submitted during the application creation process. Make sure to insert your own app id, namespace and URL otherwise it won’t work.
<!DOCTYPE html<html xmlns="http://www.w3.org/1999/xhtml" dir="ltr" lang="en-US"><head prefix="og: http://ogp.me/ns# fb: http://ogp.me/ns/fb# YOUR_NAMESPACE: http://ogp.me/ns/fb/YOUR_NAMESPACE#"><!-- Open Graph Meta tags --><meta property="og:type" content="YOUR_NAMESPACE:mountain" /><meta property="og:url" content="http://YOUR_DOMAIN.com/" /><meta property="og:title" content="Snowdon" /><meta property="og:description" content="Snowdon is the highestmountain in Wales" /><meta property="og:image" content="http://farm8.staticflickr.com/7172/6622506511_3f6a78e781_z.jpg" /><meta property="YOUR_NAMESPACE:height" content=“1085”<meta property="og:locale" content="en_GB" /><meta property="og:site_name" content="Awesome Climbing App" /><meta property="fb:app_id" content="YOUR_APP_ID" /><head/><body></body></html>Although this is a blank webpage, we have created an instance of our object that Facebook is able to interpret, which, in this case, is a mountain called Snowdon. It’s important to note that an object exists at a specific URL, and you can only have one object per URL. In our example we only have one object, but in a more complex application you would have significantly more.
To check everything is going smoothly, you can use the Object Debugger. If you go to developers.facebook.com/tools/debug then you should be able to enter your URL and check that all the metatags are correct. If Object Debugger shows any errors you should make sure to go back and correct them.
Daily design news, reviews, how-tos and more, as picked by the editors.
Authentication
Next we need to load Facebook’s JavaScript SDK and provide a way for our users to authenticate and give us permission to post to their timeline. The easiest way to do this is with the following code, which needs to be placed just below the <body> tag, making sure to replace the APP ID with your own.
<!-- Load Facebook JS SDK --><div id="fb-root"></div><script>(function(d, s, id) {var js, fjs = d.getElementsByTagName(s)[0];if (d.getElementById(id)) return;js = d.createElement(s); js.id = id;js.src = "//connect.facebook.net/en_GB/all.js#xfbml=1&appId=YOUR_APP_ID";fjs.parentNode.insertBefore(js, fjs);}(document, 'script', 'facebook-jssdk'));</script><!-- Add to Timeline --><div class="fb-add-to-timeline" data-show-faces="true" ></div>The first block loads in the Facebook JS SDK, and although it appears complex you don’t need to know the details – you can just treat it as boilerplate code. The next line gets more interesting, as this provides a frictionless method for users to authenticate with an application, by displaying the add to timeline widget on your site.
If you upload this code to your hosting provider you should now see a widget allowing your users to authenticate and connect your application to their timeline. Go ahead and try it!
Publish Actions
Now that your users can log in to the app, we need to provide some actual functionality, so let’s add a button that will allow your users to post when they climb Snowdon. Add the following code just above the </body> tag:
<!-- Sample Action --><button onclick="FB.api('me/YOUR_NAMESPACE:climb', 'post',{'mountain':'http://YOUR_DOMAIN.com/'});">I climbed Snowdon</button>This creates a simple HTML button which, when clicked, uses the Facebook SDK to inform Facebook that the user just did the ‘climb’ action on your website.

Go ahead and upload the new HTML file, and try clicking the button. If you go and visit Facebook you should now see a post on both your ticker and timeline.
This is a very basic example: however, the concepts are identical in much larger and more complex applications. You should now be able to define some actions and objects, and attach them to user-initiated events within your applications.
On Mixcloud, one of the social websites I develop, we have custom actions for uploading, commenting on and listening to music. All of these actions are triggered by user behaviour on the site and seamlessly publish to the user’s Facebook ticker, timeline and friend’s news feed. The complexity is limited mainly by your own imagination, but you should be able to come up with lots of new ways to define what activity takes place on your apps.
At the moment the Open Graph is in beta, and all the actions need to be approved by Facebook, so before you launch your app, go back to the settings panel and click submit for approval.
Social Plug-ins
Now you have the app publishing actions, let’s try and make it a little more social for new visitors. Another cool new feature is the ability to embed social plug-ins in your applications. These allow unregistered users to see what actions their friends have been doing on your site. Let’s try two of them, the Facepile and Activity box. Add the following code, just above the </body> tag.
<!-- Facepile example --><div class="fb-facepile" data-href="http://YOUR_DOMAIN.com" dataaction="climb" data-max-rows="1" data-width="200"></div><!-- Activity example --><div class="fb-activity" data-width="300" data-height="300" dataheader="true" data-recommendations="false"></div>The Facepile plug-in will show which of your friends have done the ‘climb’ action on this particular object. This is an enormously powerful tool for converting new visitors into registered users, by providing social proof and showing them that some of their friends already use and trust the app.
The second plug-in takes this one step further and shows the activity of all your friends across the entire app. In this example that isn’t too impressive, as we only have one action and one object. However, on larger applications it’s far more powerful.

Conclusion
In this tutorial we have created the simplest of Open Graph applications. In only 40 lines of code, give or take, we have managed to allow users to authenticate with the application, which then posts when they go climbing on Facebook. This content will then be distributed along the social graph via the ticker, timeline and newsfeed. We’ve then added some social plug-ins to our application to deliver social context to non-logged-in users.
Hopefully this has given you a great starting point to think about your own applications and how you can express them in terms of Objects and Actions, to give them that next level of social interaction.
Find 20 inspirational examples of CSS at our sister site, Creative Bloq.

The Creative Bloq team is made up of a group of art and design enthusiasts, and has changed and evolved since Creative Bloq began back in 2012. The current website team consists of eight full-time members of staff: Editor Georgia Coggan, Deputy Editor Rosie Hilder, Ecommerce Editor Beren Neale, Senior News Editor Daniel Piper, Editor, Digital Art and 3D Ian Dean, Tech Reviews Editor Erlingur Einarsson, Ecommerce Writer Beth Nicholls and Staff Writer Natalie Fear, as well as a roster of freelancers from around the world. The ImagineFX magazine team also pitch in, ensuring that content from leading digital art publication ImagineFX is represented on Creative Bloq.
