Recreate a fish-eye effect with Photoshop
Give images the super-distorted fish-eye treatment, then crop and add text to get the look of an iconic album cover.
Sign up to Creative Bloq's daily newsletter, which brings you the latest news and inspiration from the worlds of art, design and technology.
You are now subscribed
Your newsletter sign-up was successful
Want to add more newsletters?

Five times a week
CreativeBloq
Sign up to Creative Bloq's daily newsletter, which brings you the latest news and inspiration from the worlds of art, design and technology.

Once a week
By Design
Sign up to Creative Bloq's daily newsletter, which brings you the latest news and inspiration from the worlds of art, design and technology.

Once a week
State of the Art
Sign up to Creative Bloq's daily newsletter, which brings you the latest news and inspiration from the worlds of art, design and technology.

Seasonal (around events)
Brand Impact Awards
Sign up to Creative Bloq's daily newsletter, which brings you the latest news and inspiration from the worlds of art, design and technology.

Music downloads might have lessened the pleasure of browsing album art, but the iconic covers that appeared on many records from the mid to late 1960s are still revered today.
Some of the most memorable used original photographic techniques to produce eye-catching effects, such as long exposures or spot lighting, while others used specialist lenses to create psychedelic fish-eye distortion, as seen on The Rolling Stones' UK release of their 1966 compilation Big Hits (High Tide and Green Grass). The fish-eye lens used to shoot the cover dramatically increased the angle of view, the width and height of what was seen through the camera's viewfinder, ultimately meaning that more of the scene would fit into the frame.
A side effect of this is the massive barrel distortion that spherizes the content and the large circular blackout around the edges of the image itself. To create an image in this style you could use an expensive circular fish-eye lens, but an equally effective look can be achieved in Photoshop simply using the Spherize filter.
Read on to find out how it's done with Photoshop Elements 8 (you can also use all versions of CS up to and including Photoshop CS6) - there's a sample image for you to use below.
Click here to download image
01. Crop the image

Open fisheye_before.jpg. To ensure that after applying the fish-eye effect the main area of interest is centred, select the Crop tool and, holding down the Shift key, select a perfect square. To position the area of crop, click into the selection and use the arrow keys to move it into position.
02. Get the fish-eye look
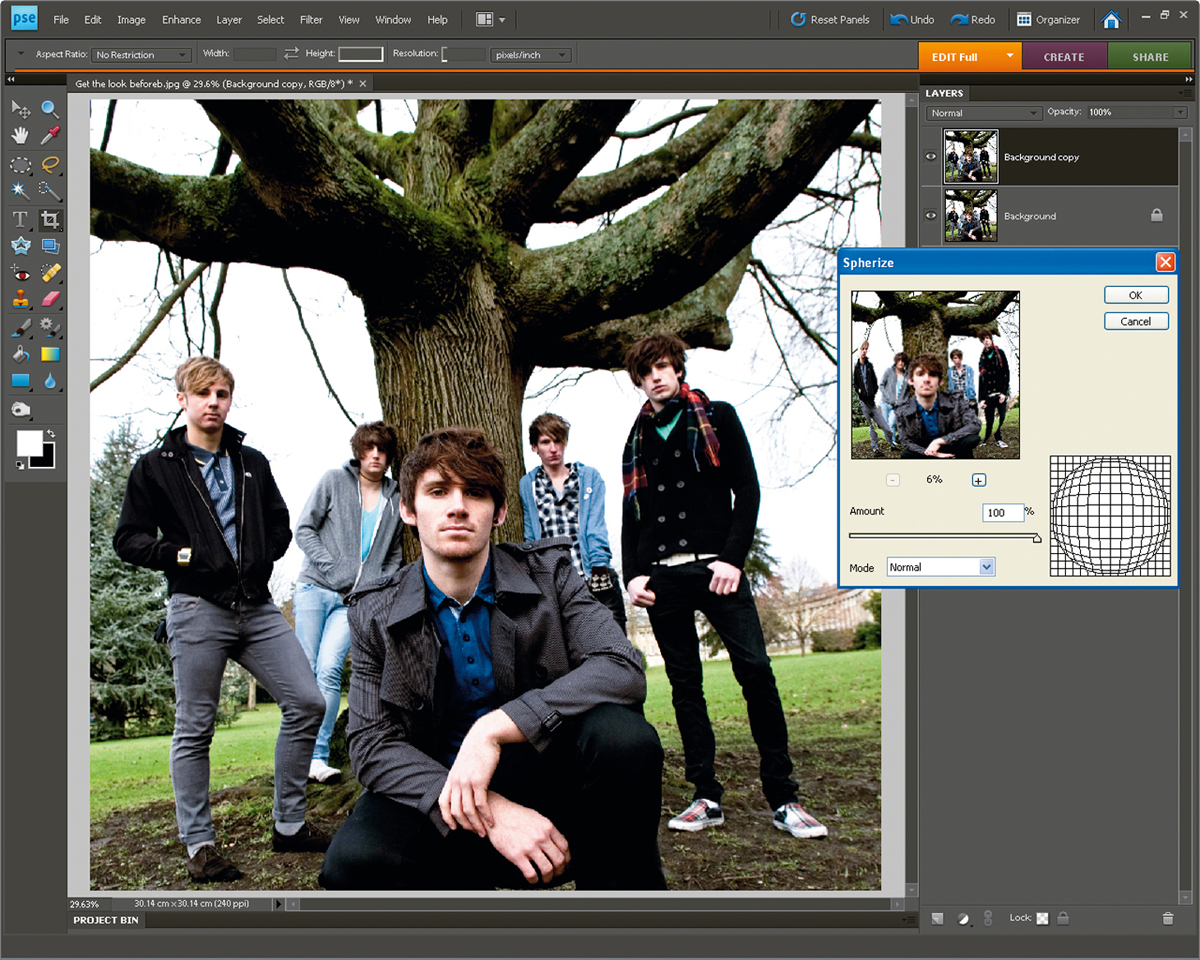
Duplicate the 'Background' layer (Layer>DuplicateLayer). Make sure that you have the duplicated layer selected and then go to Filter>Distort>Spherize. Use the slider to the right of the mesh preview to set Amount to 100%. Make sure the Mode drop-down menu is set to Normal and click OK.
03. Enlarge the canvas size
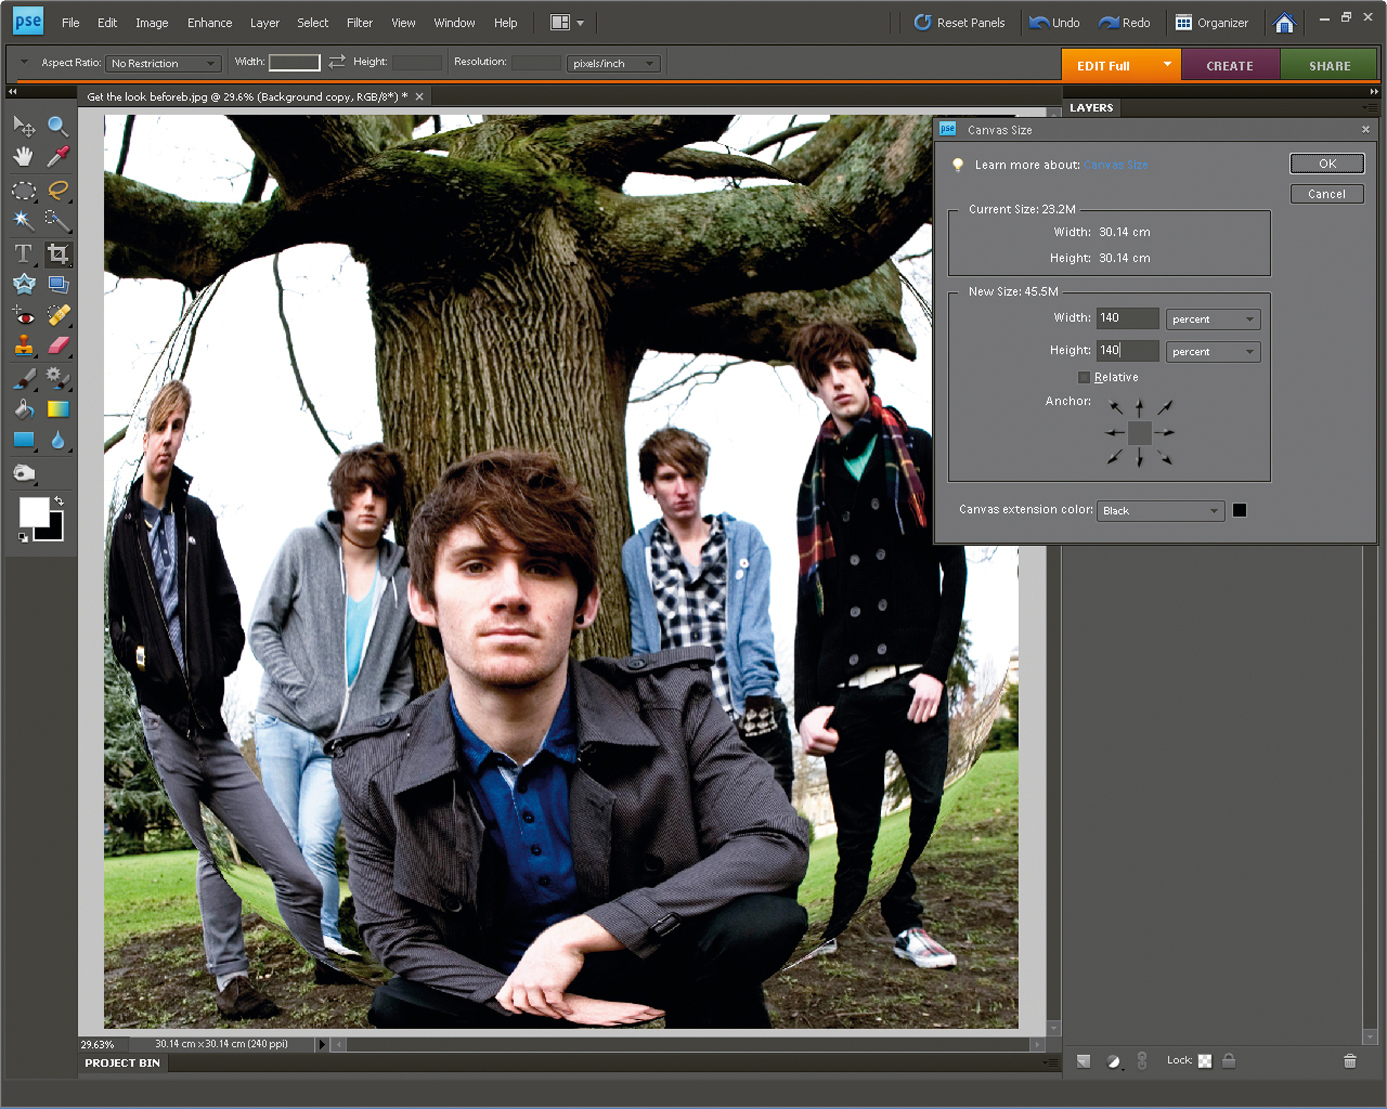
After applying the fish-eye effect you'll need to enlarge the canvas so you can add a realistic soft edge around the curvature of the distortion. Go to Image>ResizeCanvas>CanvasSize. Select Percentage and increase both values from 100% to 140%. Set the Canvas Extension Colour to black and click OK.
Sign up to Creative Bloq's daily newsletter, which brings you the latest news and inspiration from the worlds of art, design and technology.
04. Select the border
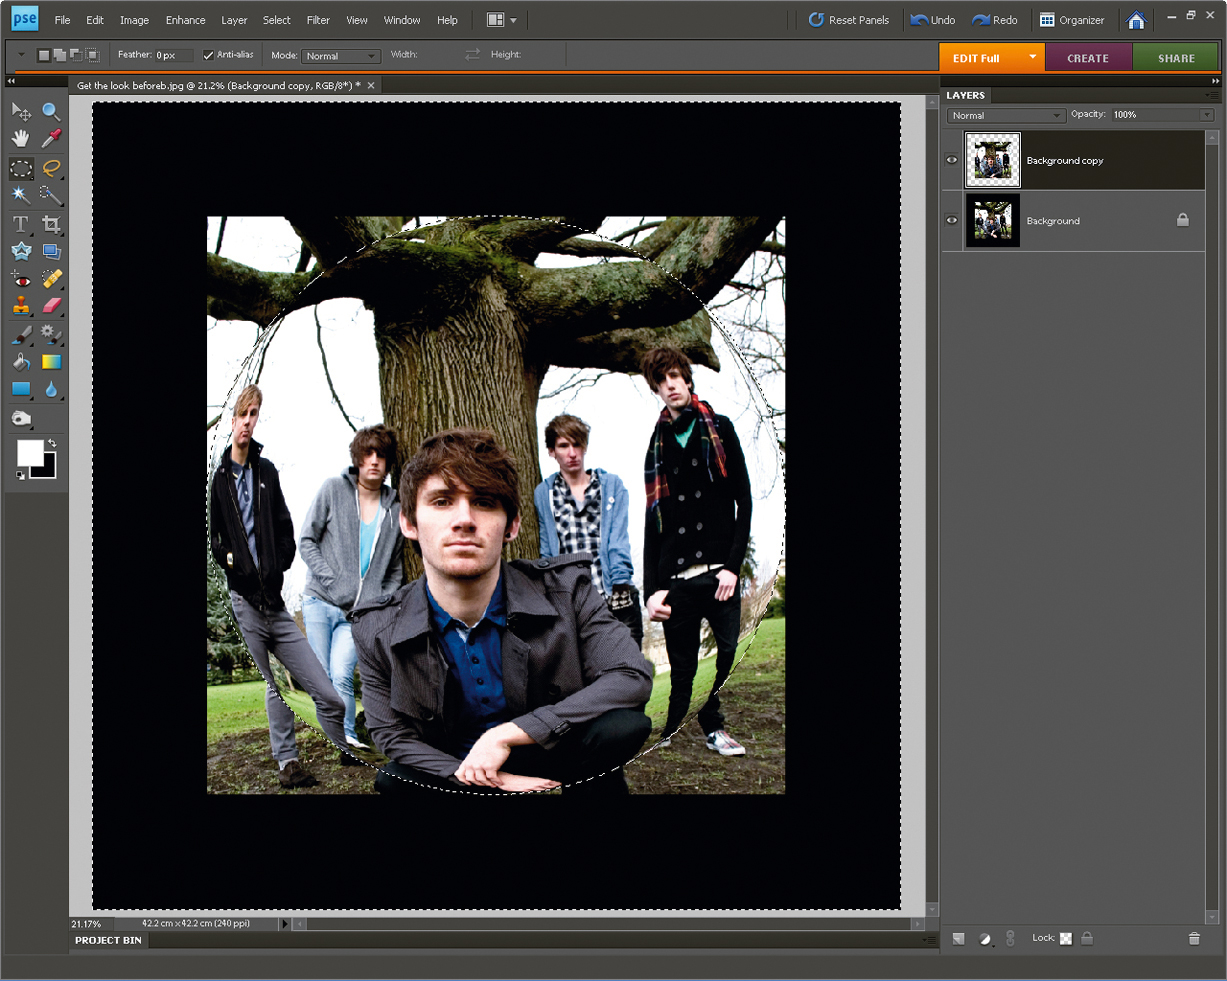
Click and hold your left mouse button on the Marquee tool in the Tools palette. Select the Elliptical Marquee tool. Switch off the duplicate layer in the Layers palette using the eye icon and click the Marquee tool into the top-left corner of the image. Hold down Shift and drag it down to the bottom right.
05. Feather the edge
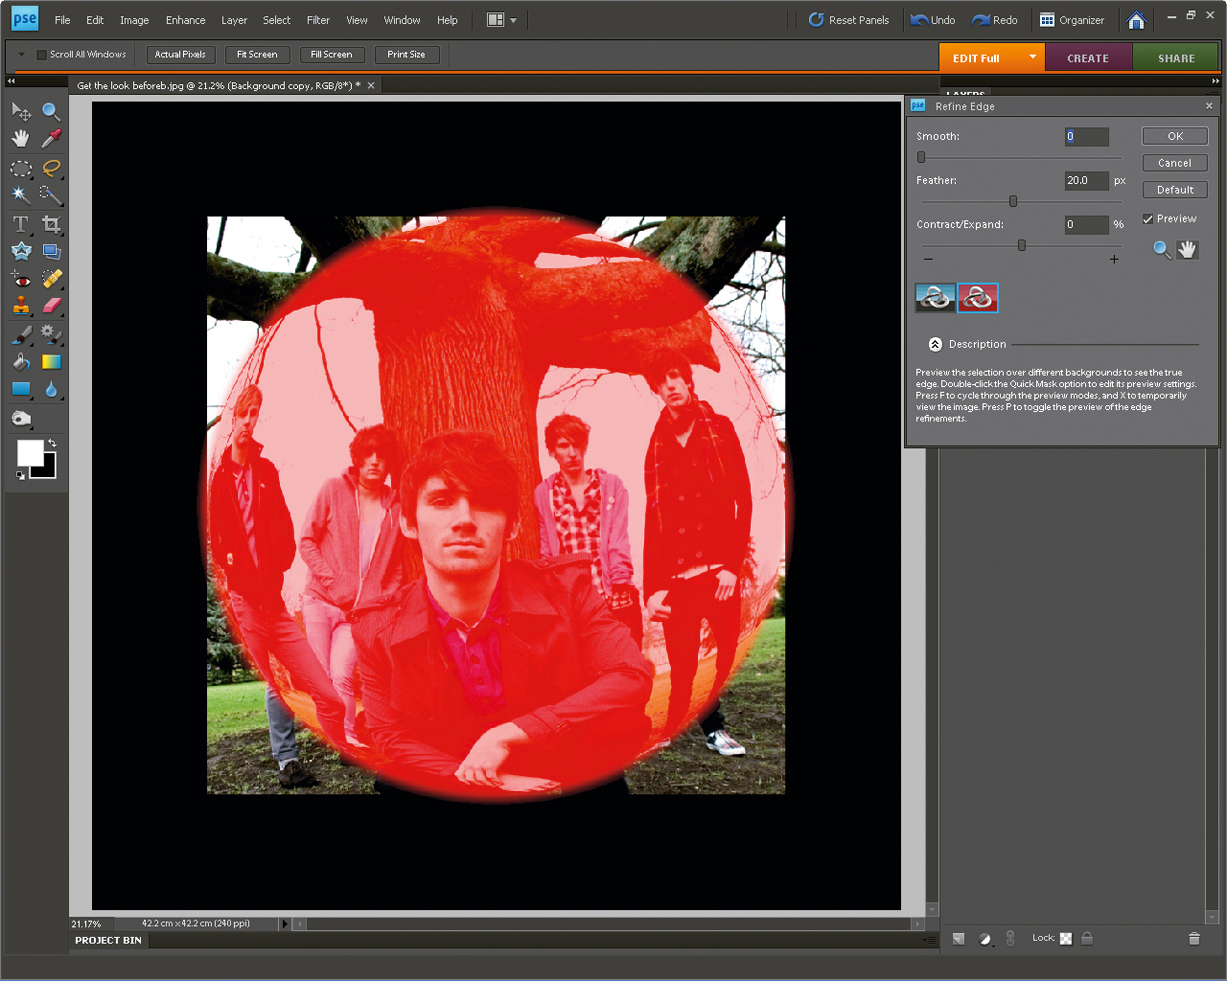
Inverse the selection by going to Select>Inverse, then enlarge the selection (Select>Modify>Expand) and set Expand By to 10. Go to Layer>New>Layer, then Select>RefineEdge. Increase Feather to 20px and click OK. From the Edit menu, select Fill, choose Black as the fill colour and click OK to apply.
06. Add some text
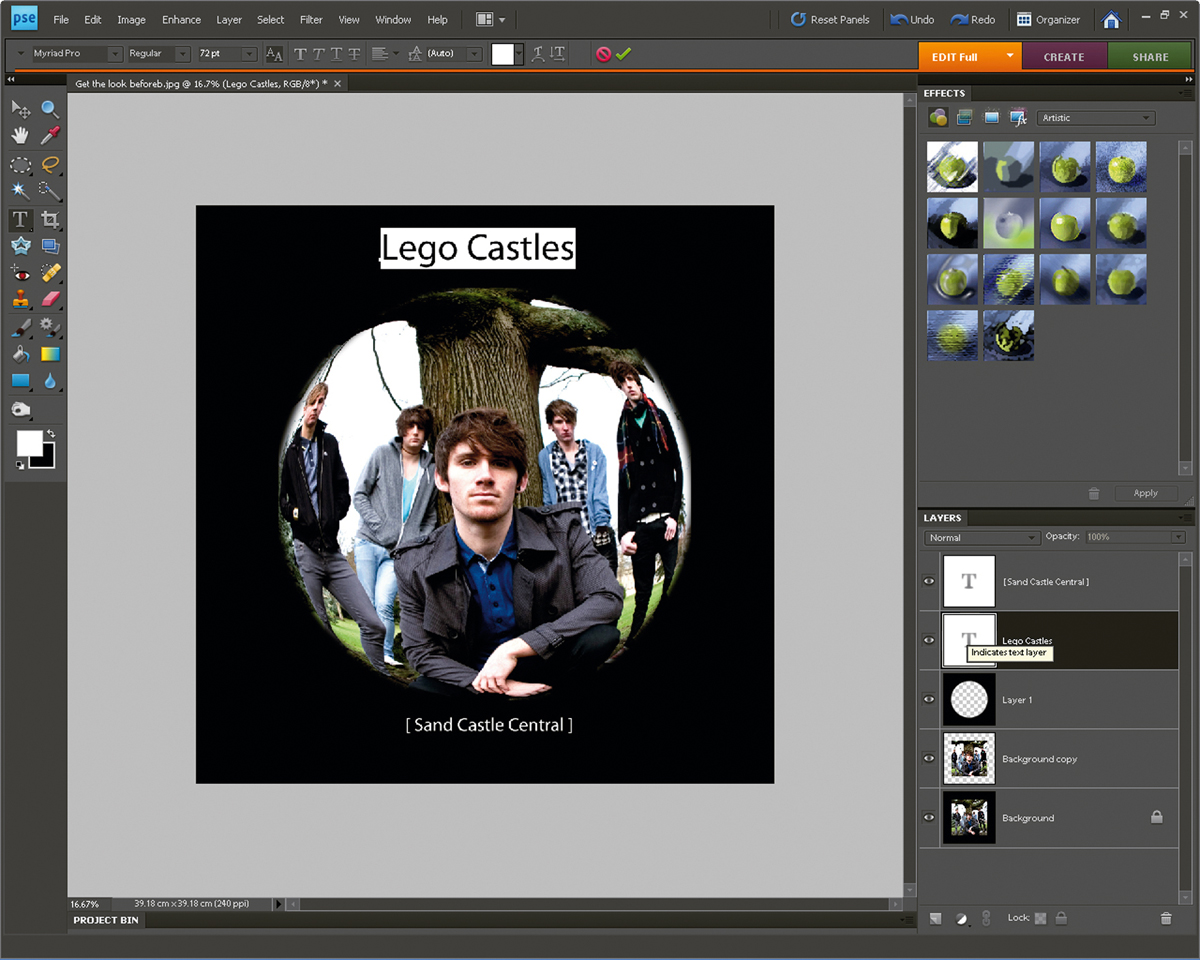
Select the Text tool and then click into the image where you want the band name to appear. Type in the name of the band and then use the cursor to select the text. Click onto the text options, set the font and size, and then click the green tick to confirm the change. Go to Layer>
FlattenImage to finish.
This tutorial first appeared in Portrait Photography Made Easy - a bookazine from the makers of PhotoPlus.
Now read:
- 30 free Photoshop brushes every creative must have!
- 101 Photoshop tutorials
- 20 best Photoshop plugins

The Creative Bloq team is made up of a group of art and design enthusiasts, and has changed and evolved since Creative Bloq began back in 2012. The current website team consists of eight full-time members of staff: Editor Georgia Coggan, Deputy Editor Rosie Hilder, Ecommerce Editor Beren Neale, Senior News Editor Daniel Piper, Editor, Digital Art and 3D Ian Dean, Tech Reviews Editor Erlingur Einarsson, Ecommerce Writer Beth Nicholls and Staff Writer Natalie Fear, as well as a roster of freelancers from around the world. The ImagineFX magazine team also pitch in, ensuring that content from leading digital art publication ImagineFX is represented on Creative Bloq.
