Master gradient meshes
Luke O'Neill demonstrates how to avoid gradient pitfalls with clever use of the Gradient Mesh tool.
Daily design news, reviews, how-tos and more, as picked by the editors.
You are now subscribed
Your newsletter sign-up was successful
Want to add more newsletters?

Five times a week
CreativeBloq
Your daily dose of creative inspiration: unmissable art, design and tech news, reviews, expert commentary and buying advice.

Once a week
By Design
The design newsletter from Creative Bloq, bringing you the latest news and inspiration from the worlds of graphic design, branding, typography and more.

Once a week
State of the Art
Our digital art newsletter is your go-to source for the latest news, trends, and inspiration from the worlds of art, illustration, 3D modelling, game design, animation, and beyond.

Seasonal (around events)
Brand Impact Awards
Make an impression. Sign up to learn more about this prestigious award scheme, which celebrates the best of branding.
Gradients are abundant within design and illustration, whether they're applied in Photoshop, InDesign or Illustrator.
Used well, they can really help to boost a piece of work by adding an extra level of interest, but applied in the wrong manner they can often come off looking cheap and even lazy on the part of the designer. This could be in part to the overuse of the Linear and Radial default settings in all of the aforementioned programs.
When working in Illustrator, you have another option: the Gradient Mesh tool. This tool enables you to take control of your gradients by creating a mesh, which you're then able to edit and apply colour to as you see fit. Through this five-step tutorial I'll run through the basics of using the Gradient Mesh tool in Illustrator.
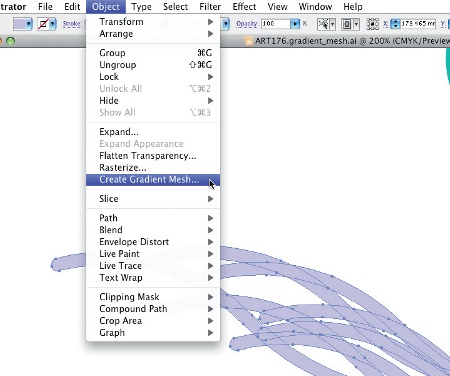
01 Begin in Illustrator by drawing a selection of flat objects using the Pen tool. Now select a group of objects and go to Object>Create Gradient Mesh. A dialog box will appear.
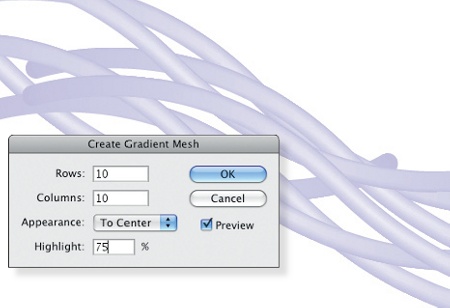
02 You now have the option of specifying the number of rows and columns that will make up your mesh, whether you would like to use one of Illustrator's default appearance settings and the strength of the highlight. Remember that the more rows and columns you have, the more complex the mesh will be.
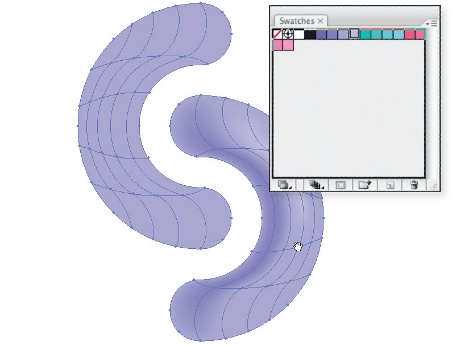
03 Although the default appearance settings can offer some pleasing results, you may wish to have a little more control over your gradient. In the above example I have selected 'Flat' from the Appearance panel when creating my mesh. I am now simply able to drag and drop colours from the Swatches palette straight onto the points of the mesh, giving me complete control over the tonal areas of my object.
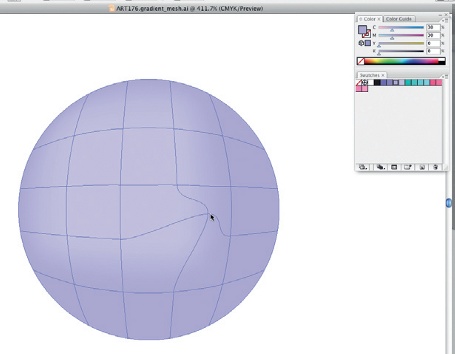
04 As well as dragging and dropping swatches onto your mesh, you also have the option of colouring a number of points in one go by holding Shift and the points using the Direct Selection tool. Then simply choose the desired colour from the Swatches palette. It is also possible to distort your mesh by dragging points using the Direct Selection tool.
Daily design news, reviews, how-tos and more, as picked by the editors.
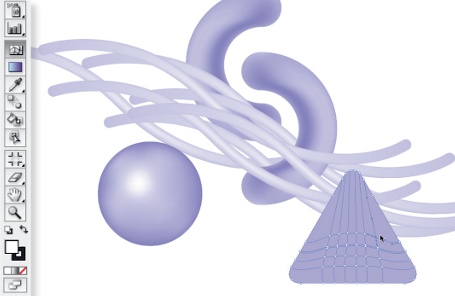
05 Finally, if you wish to add additional points to your mesh or want to create your own from scratch, you can do that by using the Mesh tool found in the Tools panel. With the Mesh tool selected, simply click in the area of your object where you would like the mesh points to appear, and edit them as before. This is probably the best route to take if you want to create very specific areas of tonal detail.

The Creative Bloq team is made up of a group of art and design enthusiasts, and has changed and evolved since Creative Bloq began back in 2012. The current website team consists of eight full-time members of staff: Editor Georgia Coggan, Deputy Editor Rosie Hilder, Ecommerce Editor Beren Neale, Senior News Editor Daniel Piper, Editor, Digital Art and 3D Ian Dean, Tech Reviews Editor Erlingur Einarsson, Ecommerce Writer Beth Nicholls and Staff Writer Natalie Fear, as well as a roster of freelancers from around the world. The ImagineFX magazine team also pitch in, ensuring that content from leading digital art publication ImagineFX is represented on Creative Bloq.
