How to embed web fonts into your site with Typekit
With hundreds of fonts on offer from some of the world’s leading foundries, Typekit lets you add weight to your websites with high-quality web fonts.
Daily design news, reviews, how-tos and more, as picked by the editors.
You are now subscribed
Your newsletter sign-up was successful
Want to add more newsletters?

Five times a week
CreativeBloq
Your daily dose of creative inspiration: unmissable art, design and tech news, reviews, expert commentary and buying advice.

Once a week
By Design
The design newsletter from Creative Bloq, bringing you the latest news and inspiration from the worlds of graphic design, branding, typography and more.

Once a week
State of the Art
Our digital art newsletter is your go-to source for the latest news, trends, and inspiration from the worlds of art, illustration, 3D modelling, game design, animation, and beyond.

Seasonal (around events)
Brand Impact Awards
Make an impression. Sign up to learn more about this prestigious award scheme, which celebrates the best of branding.
For a professional designer there's no comparison to using the expertly designed typefaces found on Typekit. You have access to the highest calibre of web fonts from foundries including the likes of Adobe, FontFont, P22, Typodermic, and Veer - and of course, it's tightly integrated into your Creative Cloud workflow. Here's how to get started in nine simple steps.
01. Sign in
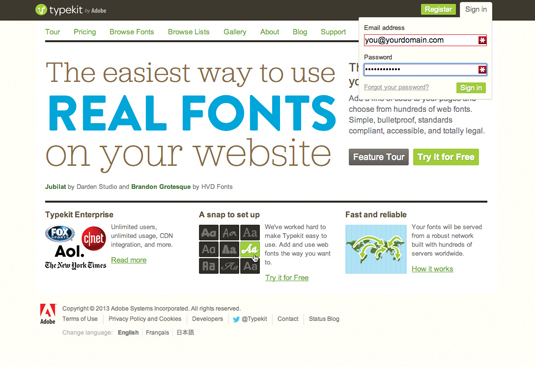
If you're a subscriber to Creative Cloud, you've already got a subscription to Typekit at the Portfolio plan level. Simply visit www.typekit.com and sign in using the Adobe ID you use to sign into Creative Cloud. Then you can start accessing the service and using web fonts.
02. Browse the library
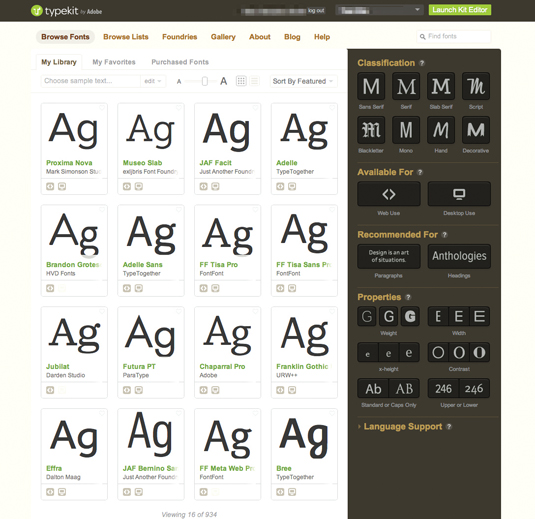
The Typekit library includes nearly one thousand different fonts, each categorised according to their characteristics, usage and weight. Have a quick browse around to see the full selection of fonts available. Once you're ready to start picking fonts for your site, continue to the next step.
03. Create a new kit
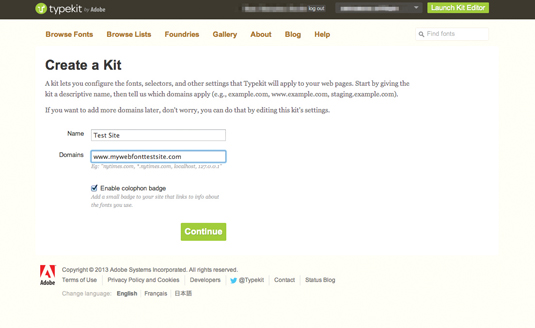
Click on the dropdown menu at the top-right of the page, and choose the Add New Kit button to create a kit that will work on your chosen domain name. Next, enter the details of the domain that you’re going to use, and click the Continue button to generate the kit.
04. Install the JavaScript
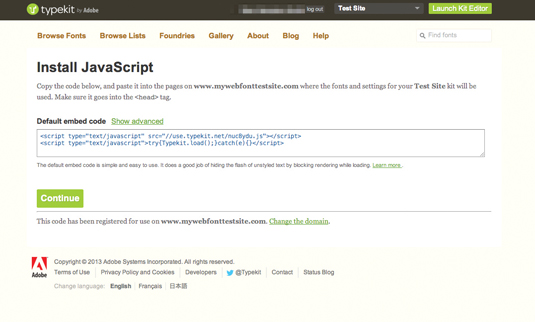
Typekit provides two lines of JavaScript that need to be installed onto every page in your website that will use web fonts. Add these in the <head> section of your page, rather than within the <body> area – the JavaScript needs to be loaded as early in the page load as possible.
05. Select a font
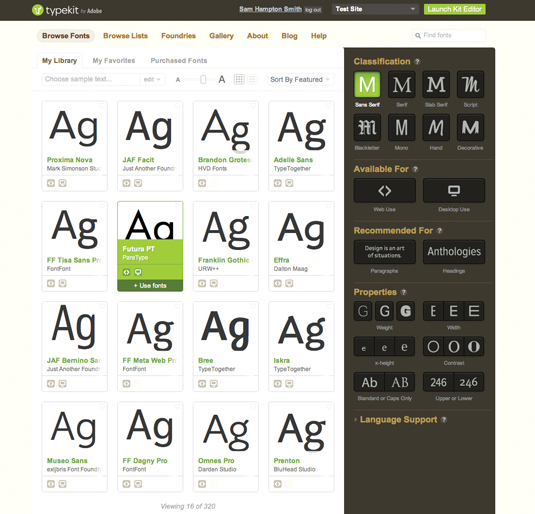
Once you've chosen a font you would like to use on your website, hover over the preview to see the different ways in which you can use your selection. Some fonts are also available for desktop use once you've signed up to the beta. Click on the Use Fonts link to continue.
06. Add to your kit
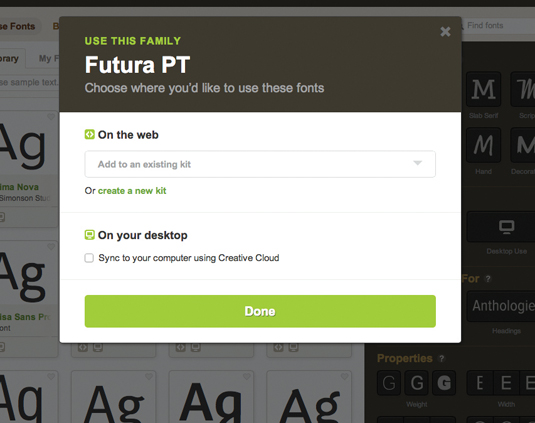
From the pop-up modal dialog, choose the kit you would like to add the font to. You can also check the tick-box to send compatible fonts to your desktop for use in InDesign, Photoshop and Illustrator as well as other desktop apps. Choosing an existing kit will open a new window.
Daily design news, reviews, how-tos and more, as picked by the editors.
07. Choose a subset
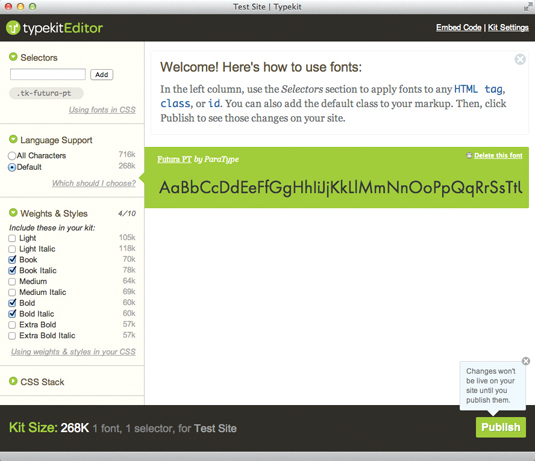
When you use a font on the web, you're sending the contents of that font to every website visitor. This can get quite heavy if you’ve got the full set of weights and characters. Typekit enables you to choose a subset of weights and characters, reducing the download for each user.
08. Add classes and font stacks
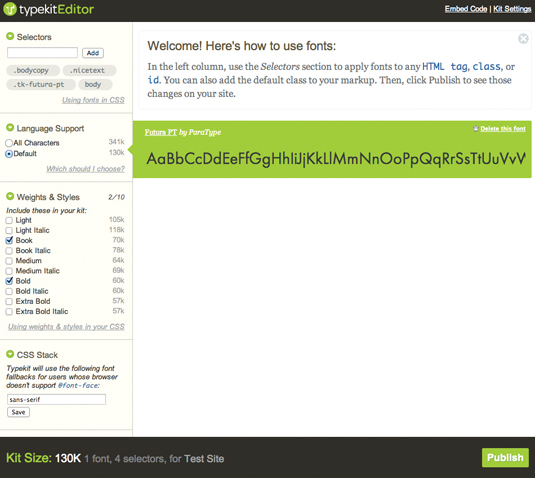
By default, Typekit will set you up with a CSS classname you can apply to elements so they render type in your chosen font. You can add your own classes using the field in the top-left corner of the kit editor. You can also specify fallback fonts in the CSS font stack by completing the form at the bottom-left.
09. Publish and go
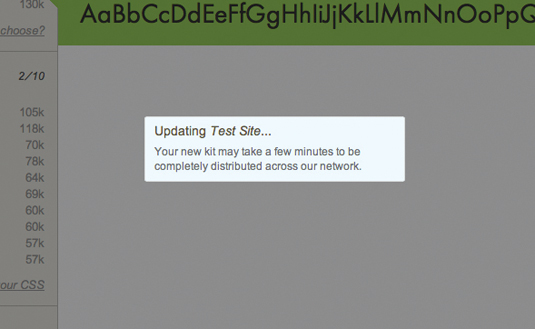
Once you're happy and you've added any extra typefaces you would like to use on your website, click the Publish button to send your kit out onto the web for use. It can take a couple of minutes for your kit to become available, after which you'll see your site rendering beautiful Typekit-powered text.
This article was originally published in The Ultimate Guide To Adobe Creative Cloud.
Now read these:
- Designers speak out about Adobe's Creative Cloud
- New tools in Adobe Creative Cloud: 12 revealing videos
- Free Photoshop actions to create stunning effects

The Creative Bloq team is made up of a group of art and design enthusiasts, and has changed and evolved since Creative Bloq began back in 2012. The current website team consists of eight full-time members of staff: Editor Georgia Coggan, Deputy Editor Rosie Hilder, Ecommerce Editor Beren Neale, Senior News Editor Daniel Piper, Editor, Digital Art and 3D Ian Dean, Tech Reviews Editor Erlingur Einarsson, Ecommerce Writer Beth Nicholls and Staff Writer Natalie Fear, as well as a roster of freelancers from around the world. The ImagineFX magazine team also pitch in, ensuring that content from leading digital art publication ImagineFX is represented on Creative Bloq.
