10 tips for Photoshop Elements beginners
From painting tools to art theory, here's 10 tips to make the most of Photoshop Elements.
06. Cropping
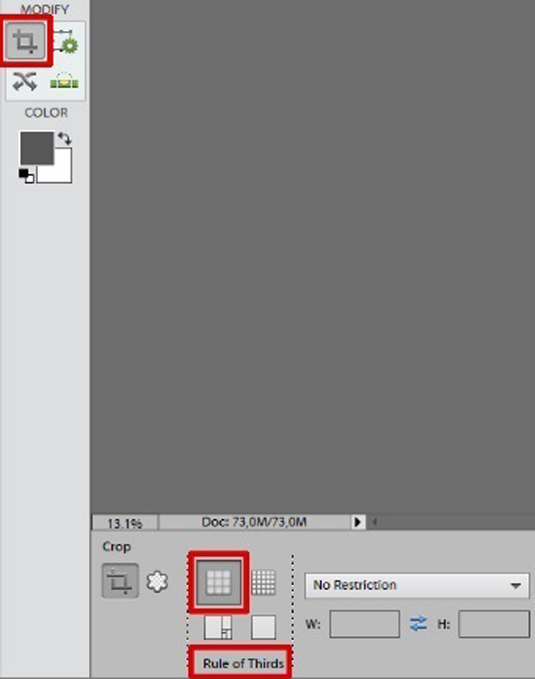
"Use the Crop tool to delete unused space," David Alvarez advises. "If you check along the bottom toolbar, you can select the Rule of Thirds option to activate a useful set of composition guidelines that will verify the correct placement of the elements in your scene."
07. Unity
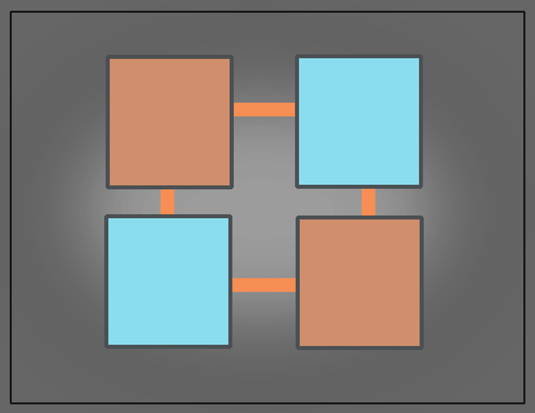
"The concept of unity, or unifying an image, simply means that all parts of your composition must be somehow linked, or part of the same visual group," says Christopher Peters.
"You should keep this concept in mind when composing your images. In order to unify your image, you need to make sure to keep an order within your composition and that you don't let any objects stray out of it."
08. Performance tweaks
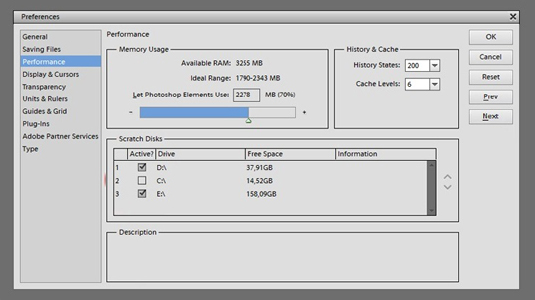
Simon Roberts says: "Raising Photoshop Elements' History panel to 200 can be a life-saver. This also means you have 200 'Undos' at your disposal.
"This is especially useful at the beginning when you don't feel too confident about the decisions you're making.
"To change the History settings, go to Edit>Preferences>Performance. I recommend changing your History States to a minimum of 100 – I always use 200, but this can vary depending on your machine."
09. Flipping the image
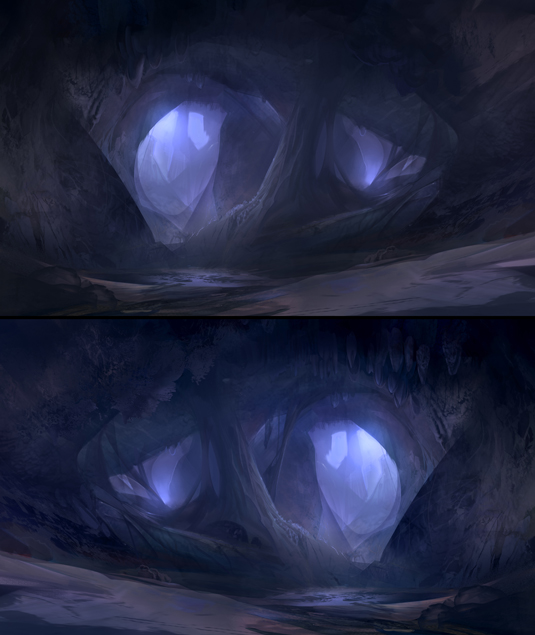
Eric Spray says: "A good trick to help give you a fresh eye on your painting is to flip the canvas horizontally.
Daily design news, reviews, how-tos and more, as picked by the editors.
"With traditional media, you have to go old school and hold up a mirror to see the flip, but with Photoshop Elements it's super convenient to be able to work on the painting from both orientations."
10. Refining the image

"You might still have lots of areas where the photo textures and sharp outlines are too dominant," says Benita Winckler
"Check out these lovely tools to help you get better results – don't overuse them, though. The one that looks like a finger is the Smudge tool (R). The Clone Stamp (S) allows you to clone and stamp parts of your image elsewhere in the scene.
"To use the Clone Stamp tool, hit Alt+click to define the source point for the cloning, then you can stamp away. The source area will be stamped to the new area."
3DTotal was founded in 1999 as a simple 3D resource website. Over the last decade the site has evolved into one of the premier CG art websites in the world.
Like this? Read these!
- The secrets to becoming a successful street artist
- Make 3D prints using your own photos for free
- The art book that gives artists a piece of the pie

The Creative Bloq team is made up of a group of art and design enthusiasts, and has changed and evolved since Creative Bloq began back in 2012. The current website team consists of eight full-time members of staff: Editor Georgia Coggan, Deputy Editor Rosie Hilder, Ecommerce Editor Beren Neale, Senior News Editor Daniel Piper, Editor, Digital Art and 3D Ian Dean, Tech Reviews Editor Erlingur Einarsson, Ecommerce Writer Beth Nicholls and Staff Writer Natalie Fear, as well as a roster of freelancers from around the world. The ImagineFX magazine team also pitch in, ensuring that content from leading digital art publication ImagineFX is represented on Creative Bloq.
