12 Nintendo Switch tips and tricks you probably didn't know (but really should)
Sign up to Creative Bloq's daily newsletter, which brings you the latest news and inspiration from the worlds of art, design and technology.
You are now subscribed
Your newsletter sign-up was successful
Want to add more newsletters?

Five times a week
CreativeBloq
Sign up to Creative Bloq's daily newsletter, which brings you the latest news and inspiration from the worlds of art, design and technology.

Once a week
By Design
Sign up to Creative Bloq's daily newsletter, which brings you the latest news and inspiration from the worlds of art, design and technology.

Once a week
State of the Art
Sign up to Creative Bloq's daily newsletter, which brings you the latest news and inspiration from the worlds of art, design and technology.

Seasonal (around events)
Brand Impact Awards
Sign up to Creative Bloq's daily newsletter, which brings you the latest news and inspiration from the worlds of art, design and technology.
However long you've had your console, some Nintendo Switch tips and tricks may have passed you by. We'll aim to put that right in this article, summing up some of the features that have improved our own experience with the device.
From saving battery life on the Switch to remapping buttons, saving space and even finding lost Joy-Cons, there are plenty of tricks that can help you customise your Switch or improve how you use Nintendo's fun, compact console. You might also want to consider some of the best Nintendo Switch accessories, but in this piece we're focusing exclusively on things you can do modify with Switch consoles themselves, with no need to buy anything else.
12 Nintendo Switch tips and tricks
Want to remap your buttons? Need to get more saves? Here are our top Nintendo Switch tips and tricks.
01. Turn on Nintendo Switch dark mode
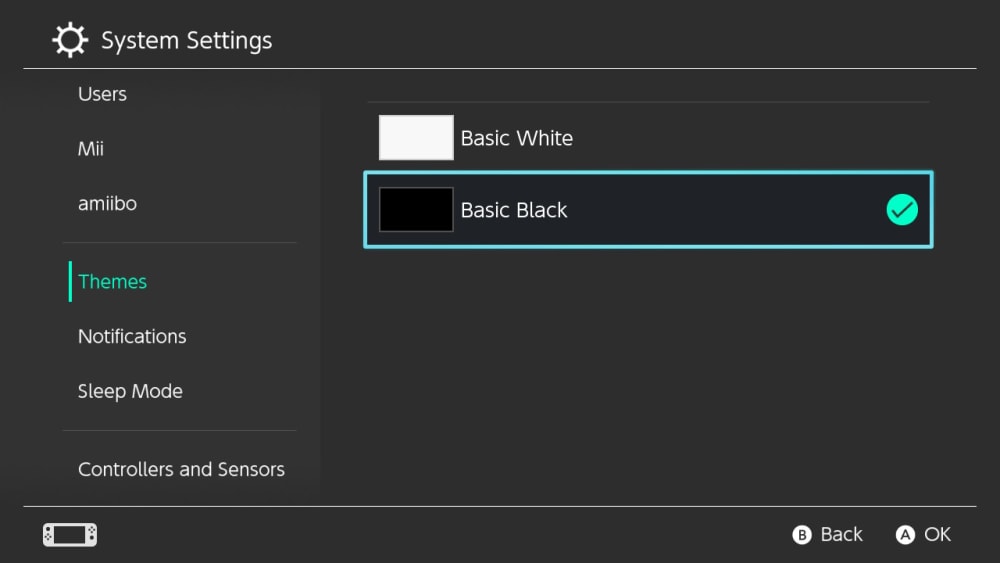
Dark mode has become very popular of late, partly because of the belief that it may help reduce eye strain and partly because people just think it looks cool. A Nintendo Switch dark mode of sorts does exist. Just go to System Settings > Themes and choose Basic Black. This will give the home screen and menu pages a black background (games won't change, however).
02. Change your Nintendo Switch profile avatar
When you get started on your Nintendo Switch, you're asked to create a profile and choose an avatar. However, you can always change your avatar later. Just go to your profile page by tapping your icon in the top-left and then going to User Settings > Edit Icon.
There are a bunch of Nintendo characters to choose from, but you can also create your own Mii (go to System Settings > Mii > Create/Edit a Mii). You can create your own Mii or choose to use a randomly generated avatar. Miis can also be used some games, and they're no longer limited to natural hair colours only.
03. Remap Nintendo Switch buttons
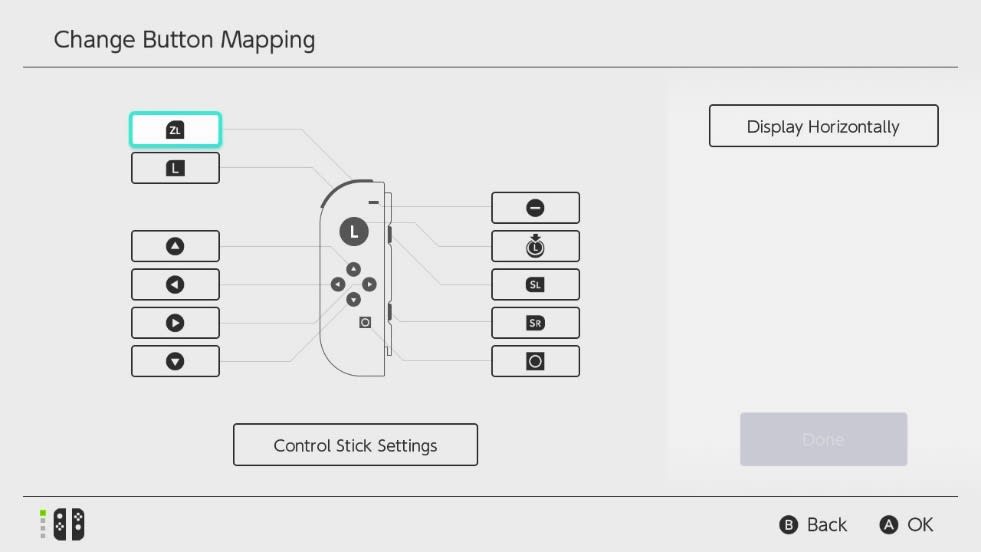
If you've had your Nintendo Switch for some time, you might not realise that you can remap the buttons on your controller since this was only enabled in an update in April 2022. Go to System Settings > Controllers and Sensors > Change Button Mapping.
Sign up to Creative Bloq's daily newsletter, which brings you the latest news and inspiration from the worlds of art, design and technology.
You can remap buttons for the Nintendo Switch for both Joy-Cons and the Switch Pro Controller. Just select a controller and you can modify each button's function or change the orientation of the joystick. The Joy-Con inputs can be modified for vertical and horizontal gaming.
04. Save Nintendo Switch battery life
The Nintendo Switch is wonderfully portable, but battery life can limit its practicality when you're on the move if you don't have a power source. A charge tends to last between three and four hours, but there are a few ways to try to stretch battery life as far as possible.
Reducing screen brightness is one of the most obvious options. This is on automatic by default. Head to the settings page to slide the brightness down to a fixed lower level. Another option is to disable controller vibration under 'Controllers and Sensors'. You can also activate flight mode and reduce volume.
If you want to keep a closer eye on battery life, you can turn on an option to display the battery percentage (System Settings > System). Of course, if you'll be using your console for a long time away from power, a portable power bank can be a worthwhile investment.
05. Find your Switch controllers
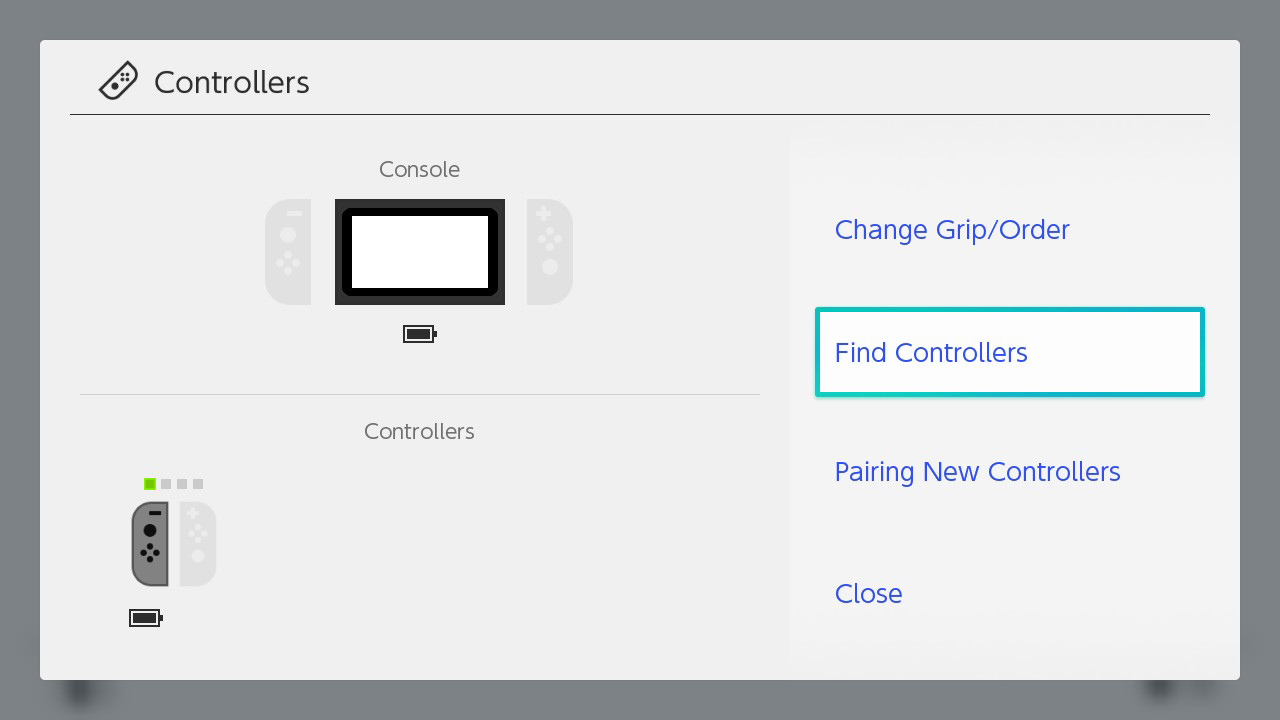
Misplaced your Joy-Cons? No problem; the Switch has a built-in tool to locate controllers (in the immediate vicinity that is, it won't work if you've left them at someone else's house). Go to Controllers > Find Controllers to see the controllers linked to your console.
Highlight the missing controller and press the L or R button on the one you have, and the missing one should vibrate, allowing you to track it down if it's fallen under the bed or behind the couch. If you've lost both Joy-Cons, tap the touch screen to make each of them vibrate.
06. Free up disc space on the Nintendo Switch
We love the Nintendo Switch, but it's hard drive space isn't exactly generous, and it can soon run short once you've built up a library of games if you're mainly using digital downloads. One solution is to archive games that you aren't currently playing. This frees up space but maintains game saves.
Just highlight the game, press +, and select Manage Software > Archive Software. You can also archive via System Settings > Data Management, selecting Quick Archive to get suggestions on what to archive, according to file size and recent playtime. Click Manage Software to choose what you want to archive.
Of course, the chances are space is still going to run low, espescially if you have the original Switch or Switch Lite, which only have 32GB of hard drive space (the OLED model doubled that to 64GB). The reality is that at some point you're probably going to want to purchase a MicroSD card. The consoles support third party options, and Black Friday is often a good time to find savings.
If you are using a microSD, you can shift game data between it and the console and microSD (System Settings > Data Management > Move Data Between System / microSD Card. Select your destination, the games you want to move and hit Move Data). Note that space limitations are one of the benefits of buying physical games, which can also often be cheaper if you find a deal at a retailer like Amazon.
07. Get more game saves on your Switch
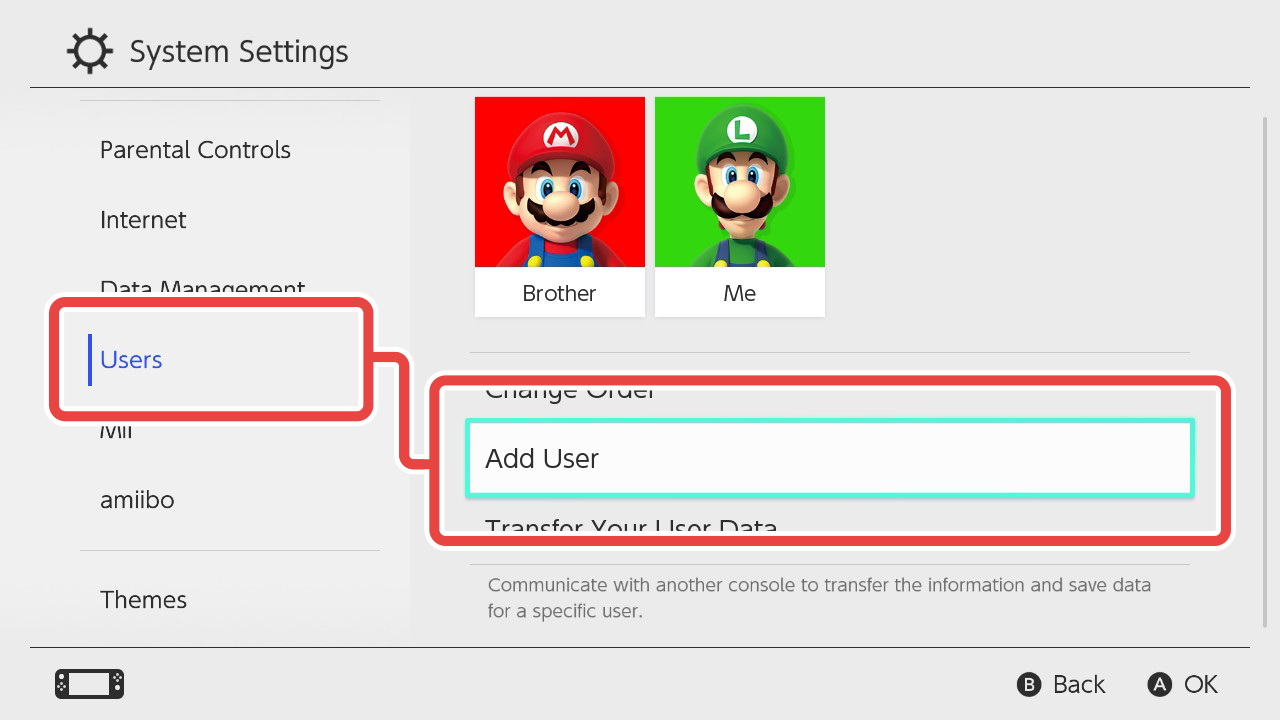
It can sometimes be frustrating to find that a game only allows one save file, which means having to delete the previous save to make a new one or start over in a game. A simple trick to get around this is to create multiple user profiles. Each profile has its own save data, so if you have more profiles you can create a save for each of them. To create a new profile, go to System Settings > Users > Add Users. After that, you'll be able to choose from your different profiles when you start a game.
08. Send Nintendo Switch screenshots to your phone
You can't record very long gameplay videos on the Switch, but you can at least take screenshots and capture short snippets of the last 30 seconds of gameplay. When it comes to sharing pictures, initially the only option was to send them to Facebook or Twitter, which was extremely limiting, but you can now send screenshots from the Switch to to your phone.
Open the screenshot on your Switch, press 'A' to get the Sharing and Editing menu, and then select Send to Smartphone. You'll have to scan a QR code with your phone to connect the devices wirelessly and then scan a second code to open a web page with your image. Once you've saved it to your phone, you can use the image however you want.
09. Make friends on Switch
Friend Codes allow you to link with other Switch users for gaming and socialising. You can find your code by opening your user profile – the 16-digit code will appear beside your icon. You'll need to subscribe to Nintendo Switch Online to be able to play most online multiplayer games, but some, like Fortnite, do not require membership. You'll need to add trusted friends to play against them directly online.
10. Buy Nintendo Switch games from other regions
The Nintendo Switch isn't region-locked, so you can buy games from anywhere in the world, not only from stores in your country. The catch is that getting a digital code from another country to work a little fiddly. You'll need to create a profile based in the country where the code is from, but this is free and isn't overly complicate.d
Go to System settings > User. Tap Add New User and choose an icon and nickname for the profile. After that, you'll have to register a new user online - just follow the instructions (you'll need to have a second email address to use for verification, and make sure you choose the right country for the profile). Once you're done, you'll be able to log into the eShop with your profile (you'll see the currency is different), and you'll be able to redeem your code using the menu on the sidebar.
Once you've downloaded the game, you'll be able to play it using any of your profiles. However, you'll lose access if you delete the new profile you created.
11. Customise your Nintendo Switch home screen
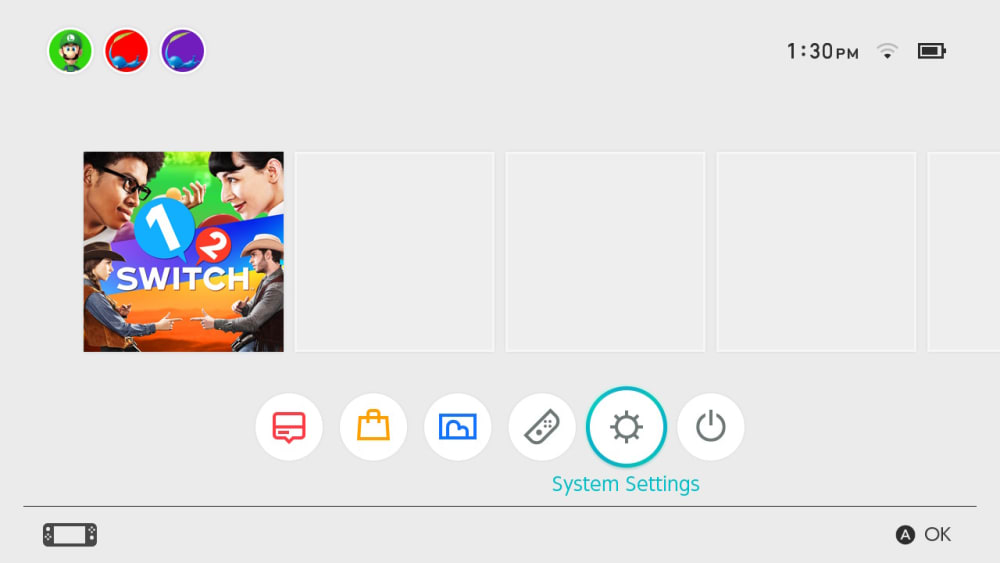
You can rearrange icons on your Nintendo Switch home screen as you please and you can add your own custom wallpapers. For the background colour, as well as the pre-made themes, you can also create your own by choosing Custom. To add a custom wallpaper, you'll need a microSD card to transfer an image to your Switch. After that, navigate to to System Settings > Themes > Change Theme. Choose Custom and select the image you want to use.
You can also organise Switch software into groups once you have more than 12 titles. From the Home Menu, scroll all the way to the right and select 'All Software'. Press the L Button to view your software by groups. 'Select Create new group', Check the titles you want to add to it, and then rearrange them as desired and choose a name. Up to 100 groups can be created with up to 200 titles each.
12. Know how to do a hard reset on Nintendo Switch
As with any electronic device, the Nintendo Switch may occasionally have a moment and freeze on you. In most cases, this can be fixed with a hard reset. Hold down the power button on the system for up to 15 seconds and the console should reset. For more drastic cases, a full factory reset can be performed by going to System Settings > System > Formatting Options > Initialize Console to delete the memory.
If you're still looking for a Nintendo Switch console, see the best prices in your region below, or check our guide to the best Nintendo Switch deals. We also have a piece on the best Nintendo Switch games.

Joe is a regular freelance journalist and editor at Creative Bloq. He writes news, features and buying guides and keeps track of the best equipment and software for creatives, from video editing programs to monitors and accessories. A veteran news writer and photographer, he now works as a project manager at the London and Buenos Aires-based design, production and branding agency Hermana Creatives. There he manages a team of designers, photographers and video editors who specialise in producing visual content and design assets for the hospitality sector. He also dances Argentine tango.
