Create clouds with FumeFX for 3ds Max
Add an extra dimension of reality to your renders with a variety of cloud effects created with the FumeFX plugin.
Sign up to Creative Bloq's daily newsletter, which brings you the latest news and inspiration from the worlds of art, design and technology.
You are now subscribed
Your newsletter sign-up was successful
Want to add more newsletters?
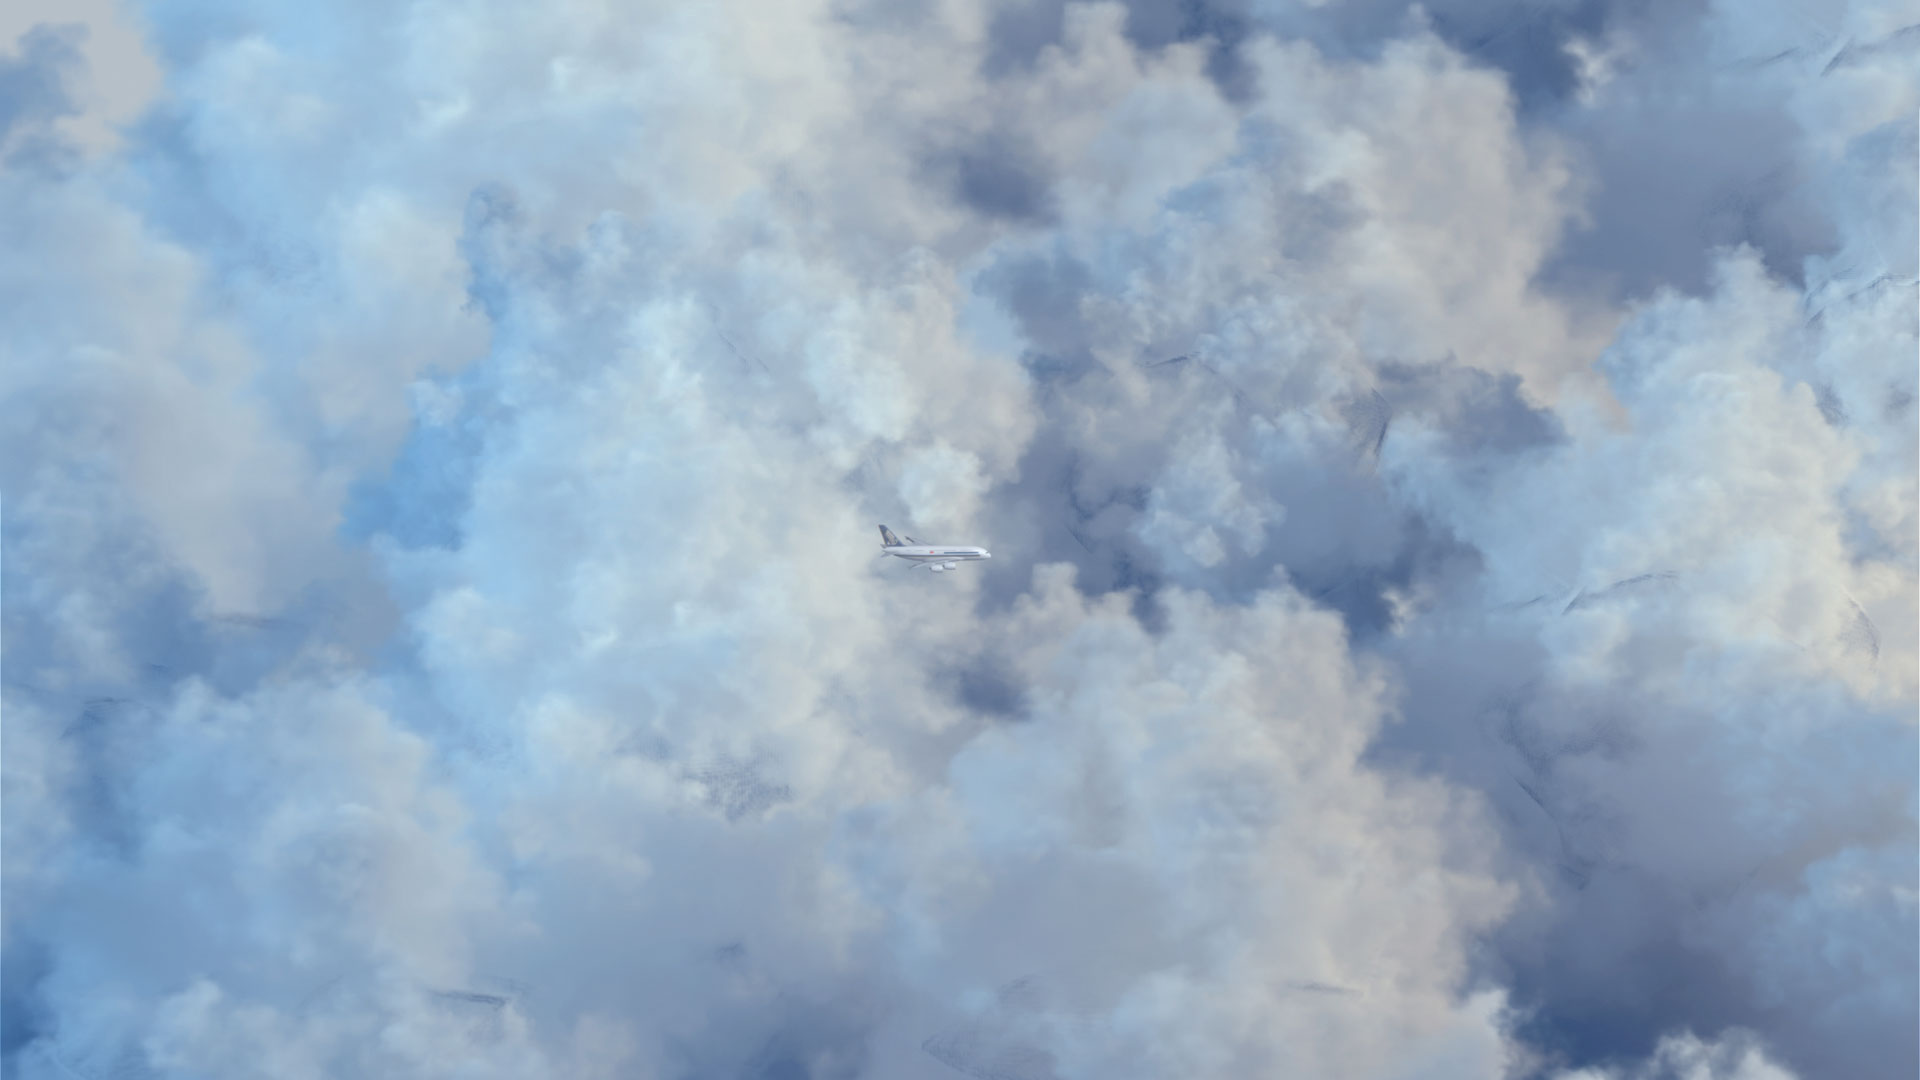
This step-by-step guide is set to reveal how to go about the creation of realistic clouds. This tutorial is ideal for 'travel through the clouds' scenes in 3D movies, for example if you are aiming to shoot an aeroplane flying through the sky. There are also a variety of different cloud effects we can build.
There are a number of different types of software and plugins that we can use to create such an effect, for example the FumeFX and Phoenix FD plugins for 3ds Max, Maya, Houdini, Cinema 4D, Vue and so on. However, many big VFX and animation studios use the FumeFX plugin in their pipeline, as this software is old, trustworthy and most importantly user-friendly.
There are different techniques you can use in order to make this effect in FumeFX, for example using Simple Source, Object Source and Particle Source, but in this case we are going to be using Object Source.
Article continues belowBefore you start working on this kind of effect, you should have a good knowledge of smoke properties. You must know about turbulence, velocity, buoyancy and so on. There are also different types of clouds you can create, including small cloud patches, lots of thick clouds (cloud bed), stormy clouds, thin cloud layers and cloud belts, and each one has different properties to consider.
I can't teach you each and every parameter of this plugin and software, as these are vast and need a lot of time to go through. So as far as the thin cloud effect is concerned, we will learn as much as is required for this particular tutorial only.
This is a very interesting subject, because you can't define one particular process for creating this effect. As you begin to work with the tools, you will find different types of effects every time. So, it very much depends on your own understanding of the techniques, as well as some creative experimentation.
Download the files for this tutorial.
Sign up to Creative Bloq's daily newsletter, which brings you the latest news and inspiration from the worlds of art, design and technology.
01. Create an object
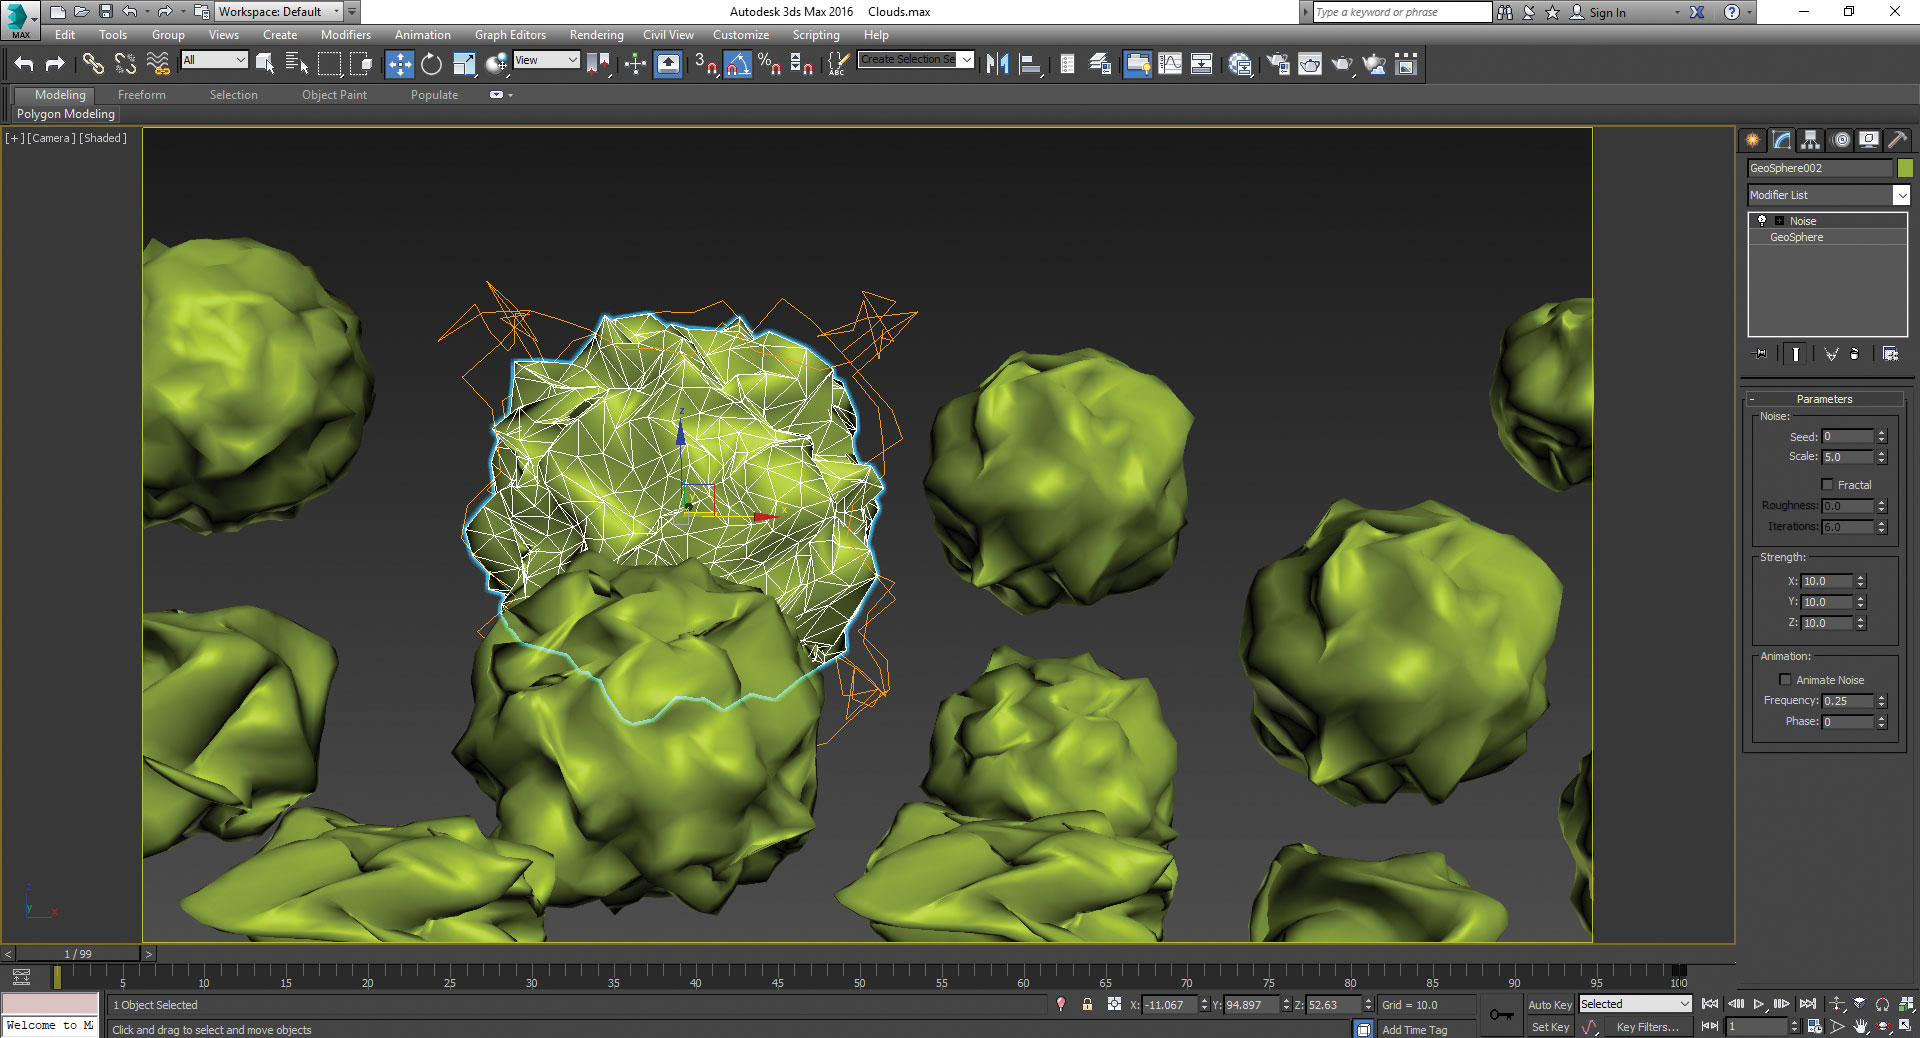
Open 3ds Max. Before we start working on our scene, remember that we are going to use Object Source in FumeFX. This means we are going to use an object to emit smoke for the clouds and for that purpose, we are going to create an object. To create an object, we will use Geosphere; go to the Create panel, then Geometry > Standard Primitives > Geosphere. Now change the parameters to Radius: 20 and Segments: 10.
Now we need to add a Noise Modifier and for that, go to the Modify panel, then Modifier List> Noise. Now change the parameters to Scale: 5.0, Strength X: 10, Y: 10, Z: 10. Now make 10 to 15 copies of the Geosphere that we have created, then scale them randomly and place as per the image shown.
02. Make FumeFx object source
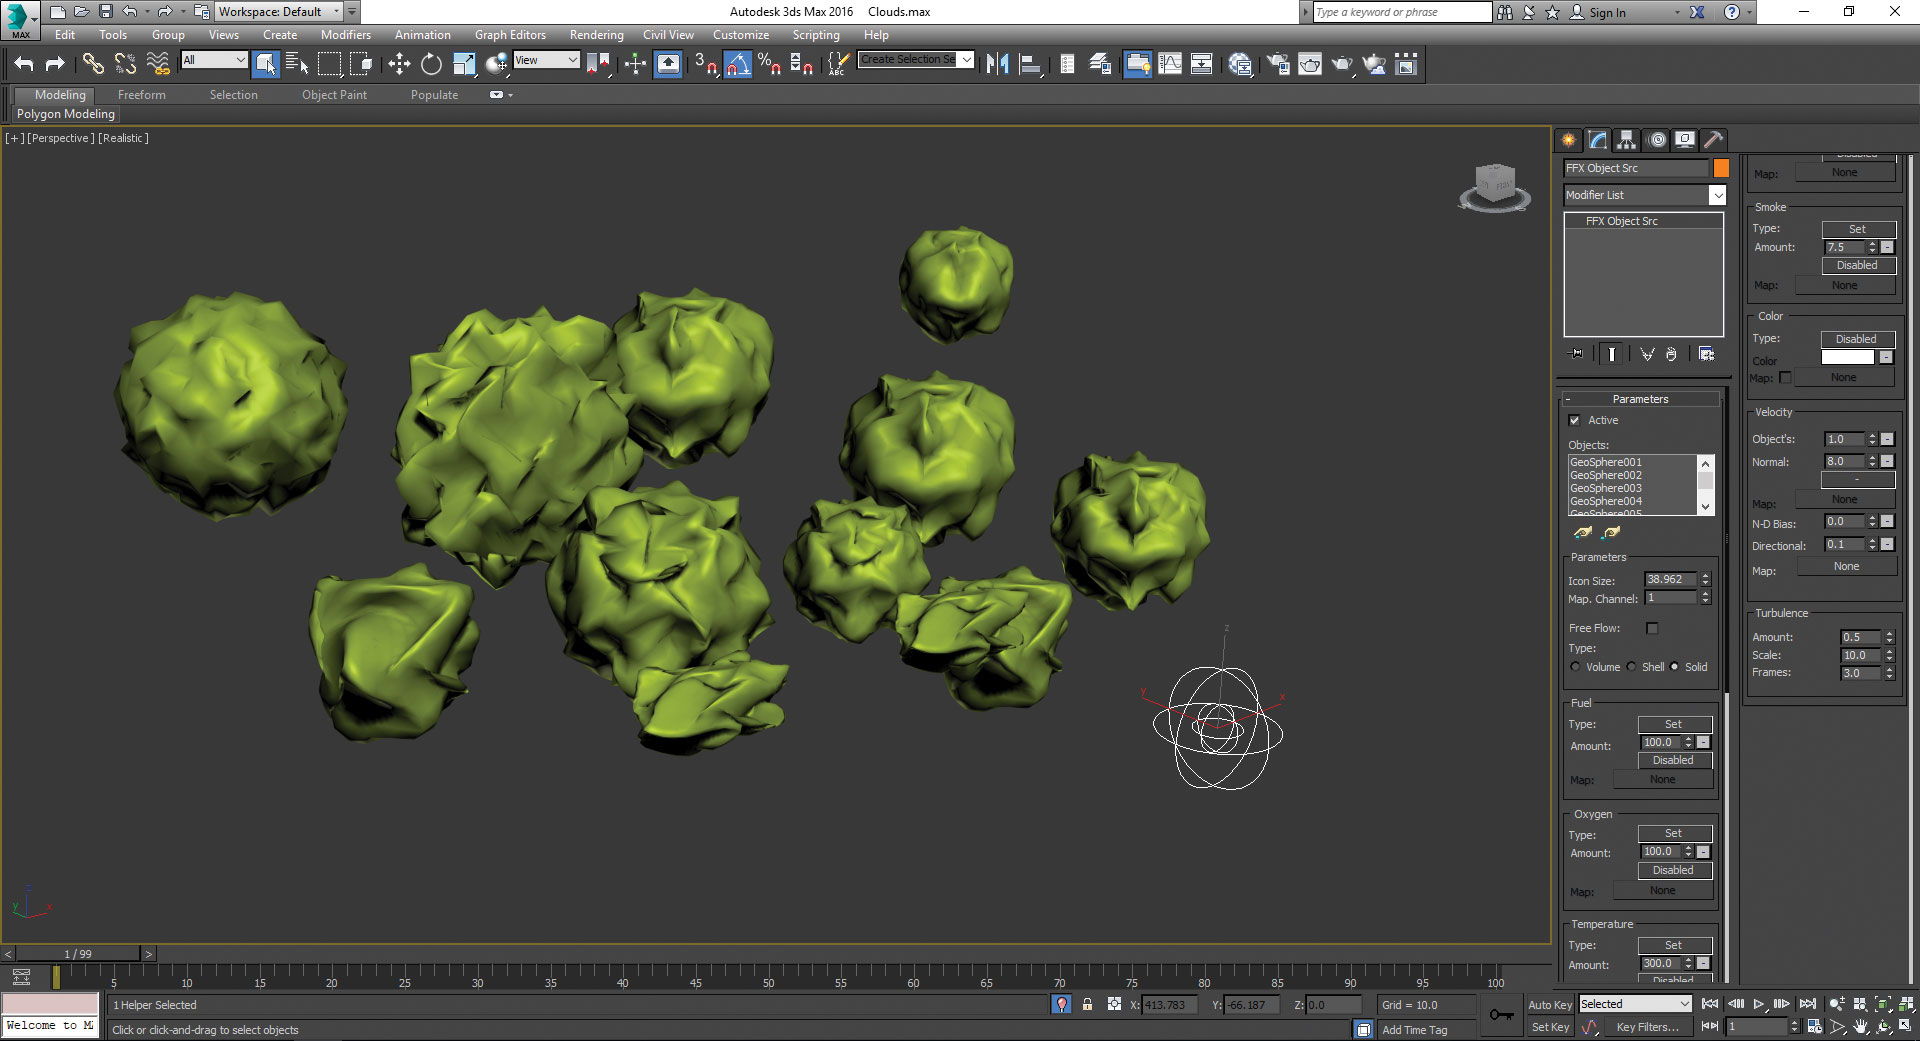
After we finish modelling our object, it's time to proceed to the FumeFX plugin. So first of all we will create a FumeFX Object Source, where we will add our object. Go to the Create panel, then Helpers > FumeFX > Object Src. Click this button and drag it to the viewport. Now go to the Modify panel and make some changes in the parameters as per the screenshot here. First add all the Geospheres into the Objects section, using the Pick Object button, then change the Object Src Type to Solid. Set the Smoke: 7.5, then go to the Velocity section and set Normal: 8.0. Keep the other parameters as they are.
03. Create FumeFx container
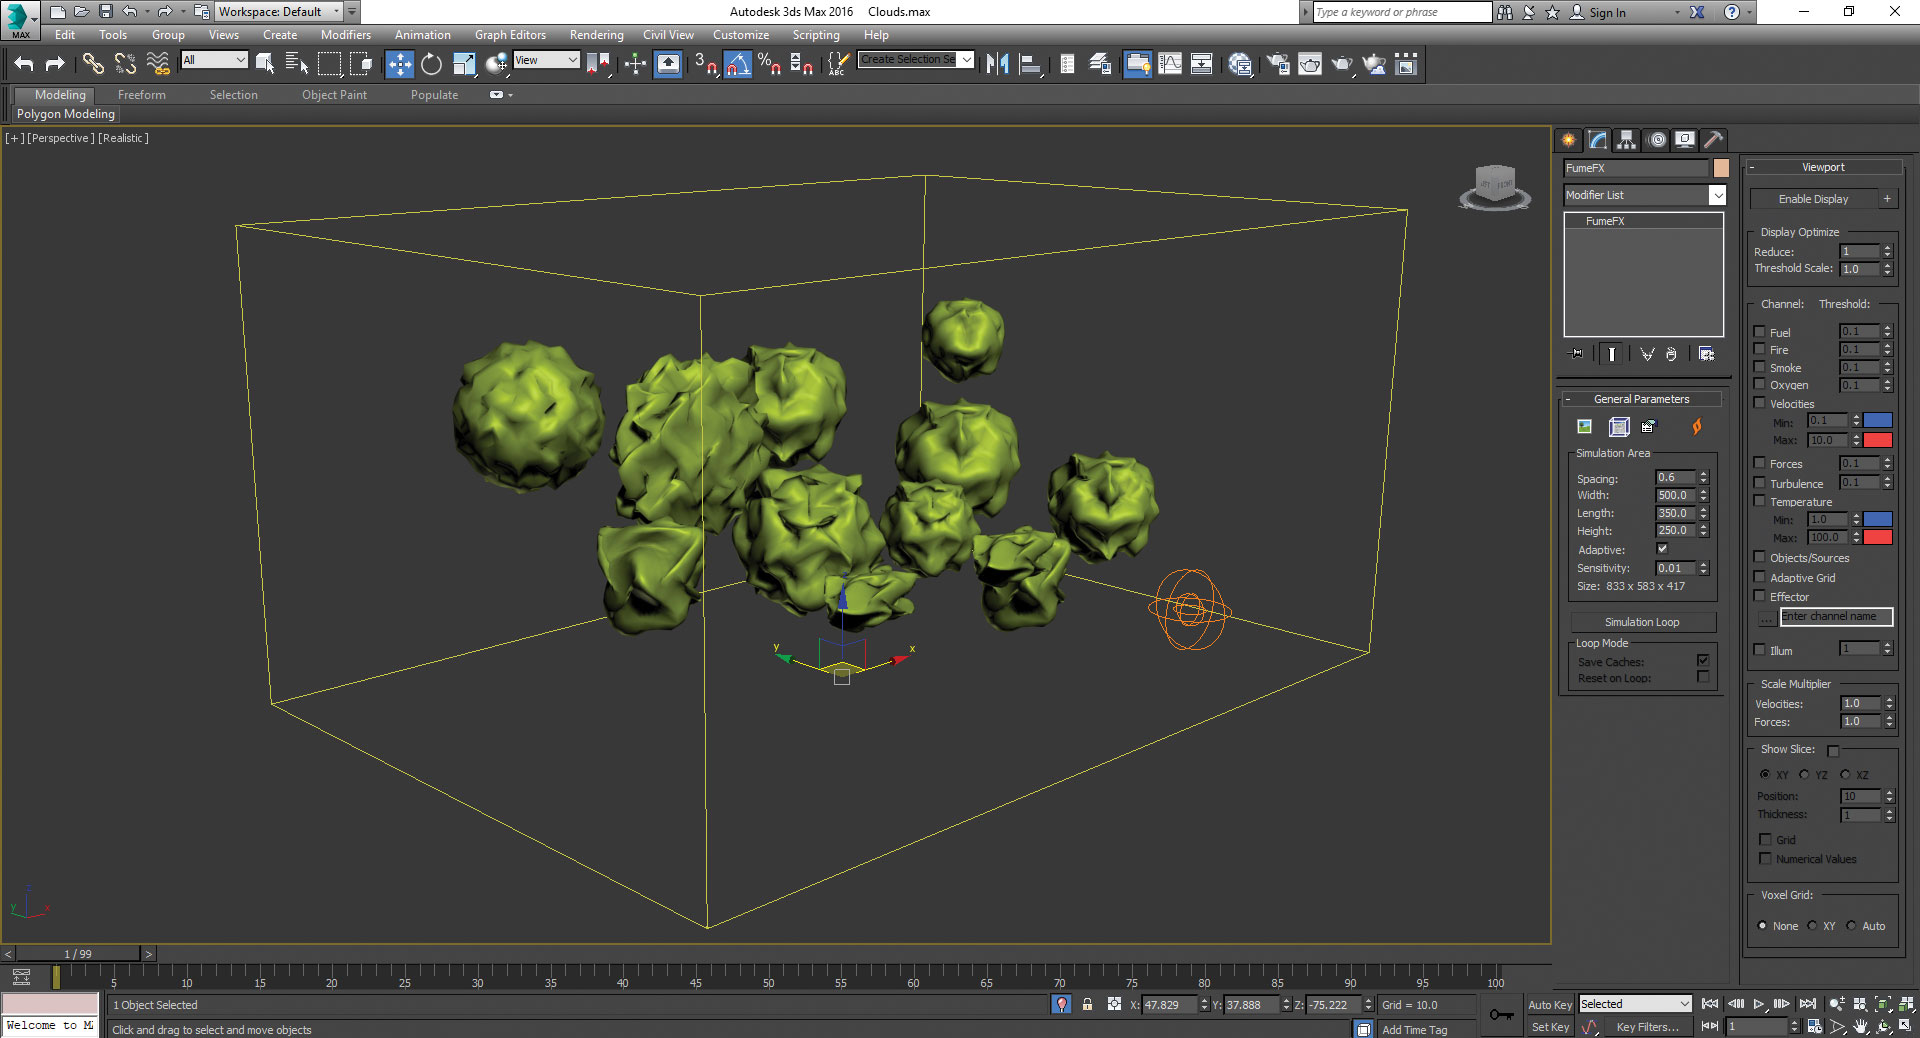
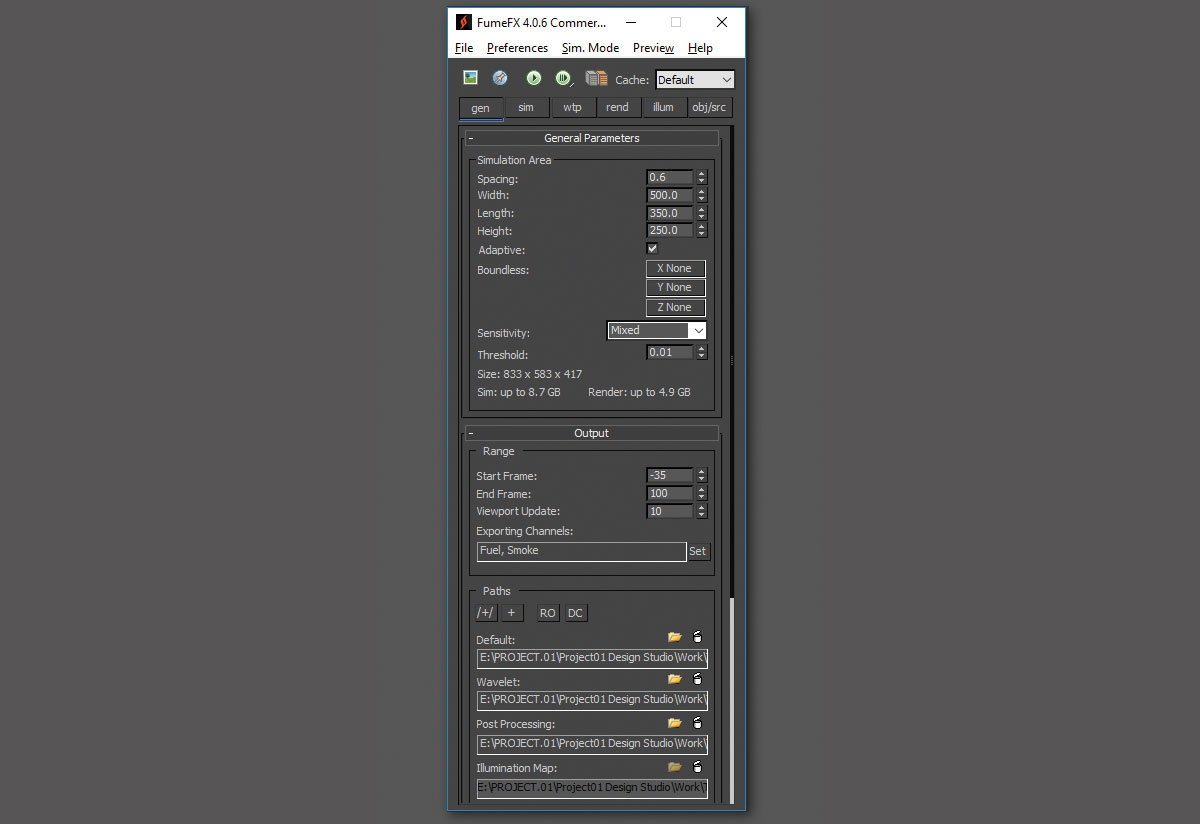
We have decided to use FumeFX for this effect, as this plugin is very simple but still has many options and parameters available to us, but we are only going to learn as much as is required for this particular tutorial. So let's start with the FumeFX Container. To create this Container go to Create > Geometry > FumeFX > FumeFX. Click on the FumeFX button and drag it into the viewport, then go to the Modify panel and set the Size and Spacing as shown. Set the Width: 500, Length: 350, Height: 250 and Spacing: 0.6. Now set the Position of FumeFX to X: 00, Y: 00, Z: 00. The Container should cover all the Geospheres, so make sure this is the case.
04. Modify FumeFx container
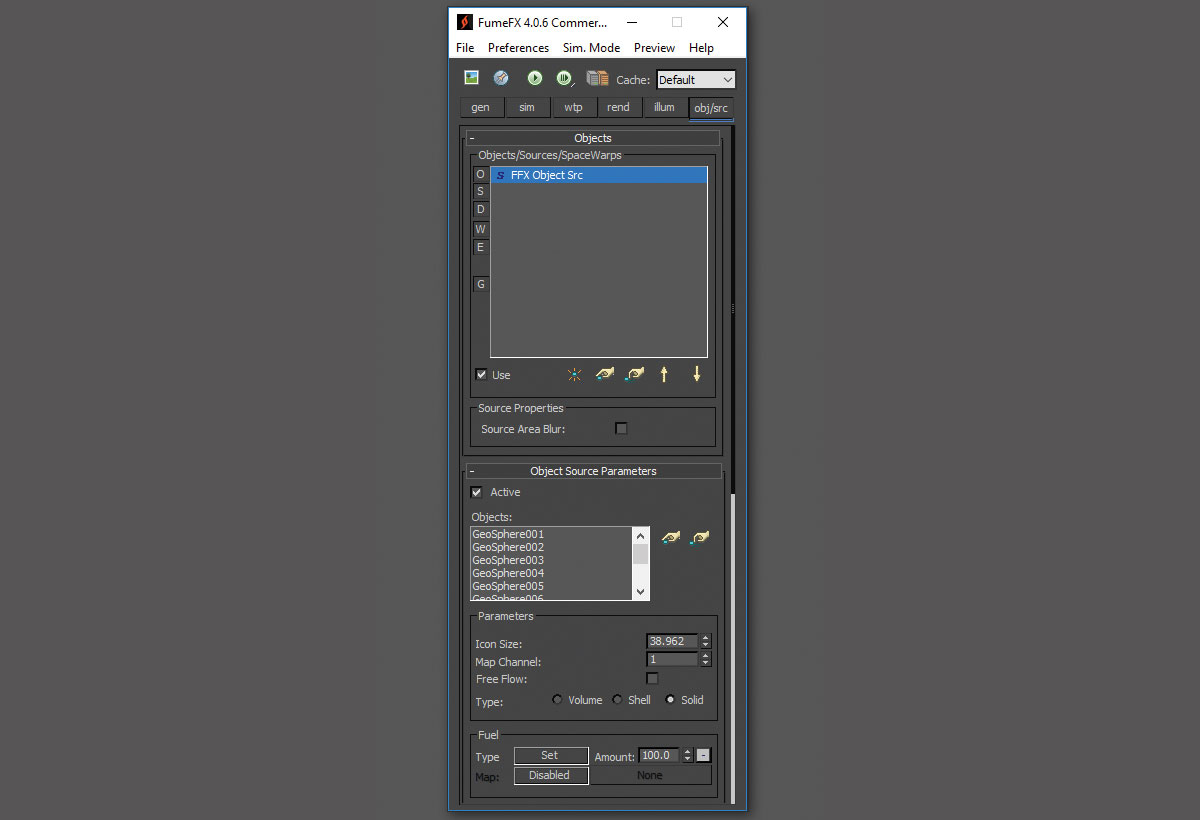
After we've set the FumeFX Container it's now time to modify the parameters. So, select the Container and go to the Modify panel. Now click on the Open FumeFX UI button, and here you can see a new window has appeared. There are six sections in this FumeFX user interface and we will modify them one by one.
So let's start with the Obj/Src section. In this section you just have to add the FumeFX Object Source that we had generated earlier. So go to the Obj/Src section and click on the Pick Object button, then select the FumeFX Object Source.
05. General section parameters
After we finish the setup of the Obj/ Src section, let's now tackle the General section. We already have the general parameters, Spacing: 0.6, Width: 500, Length: 350, Height: 250. Now move ahead to Output Range, set the Start Frame: -35, End Frame: 100, then go to Paths, where we set the FXD Files (Cache Files) path. Click the button next to Default Path and set the path as per your folder structure. Now move ahead to Playback Range and set the Play From: -35 and Play To: 100. These are the simple modifications we need to make in the General Section.
06. Simulation section
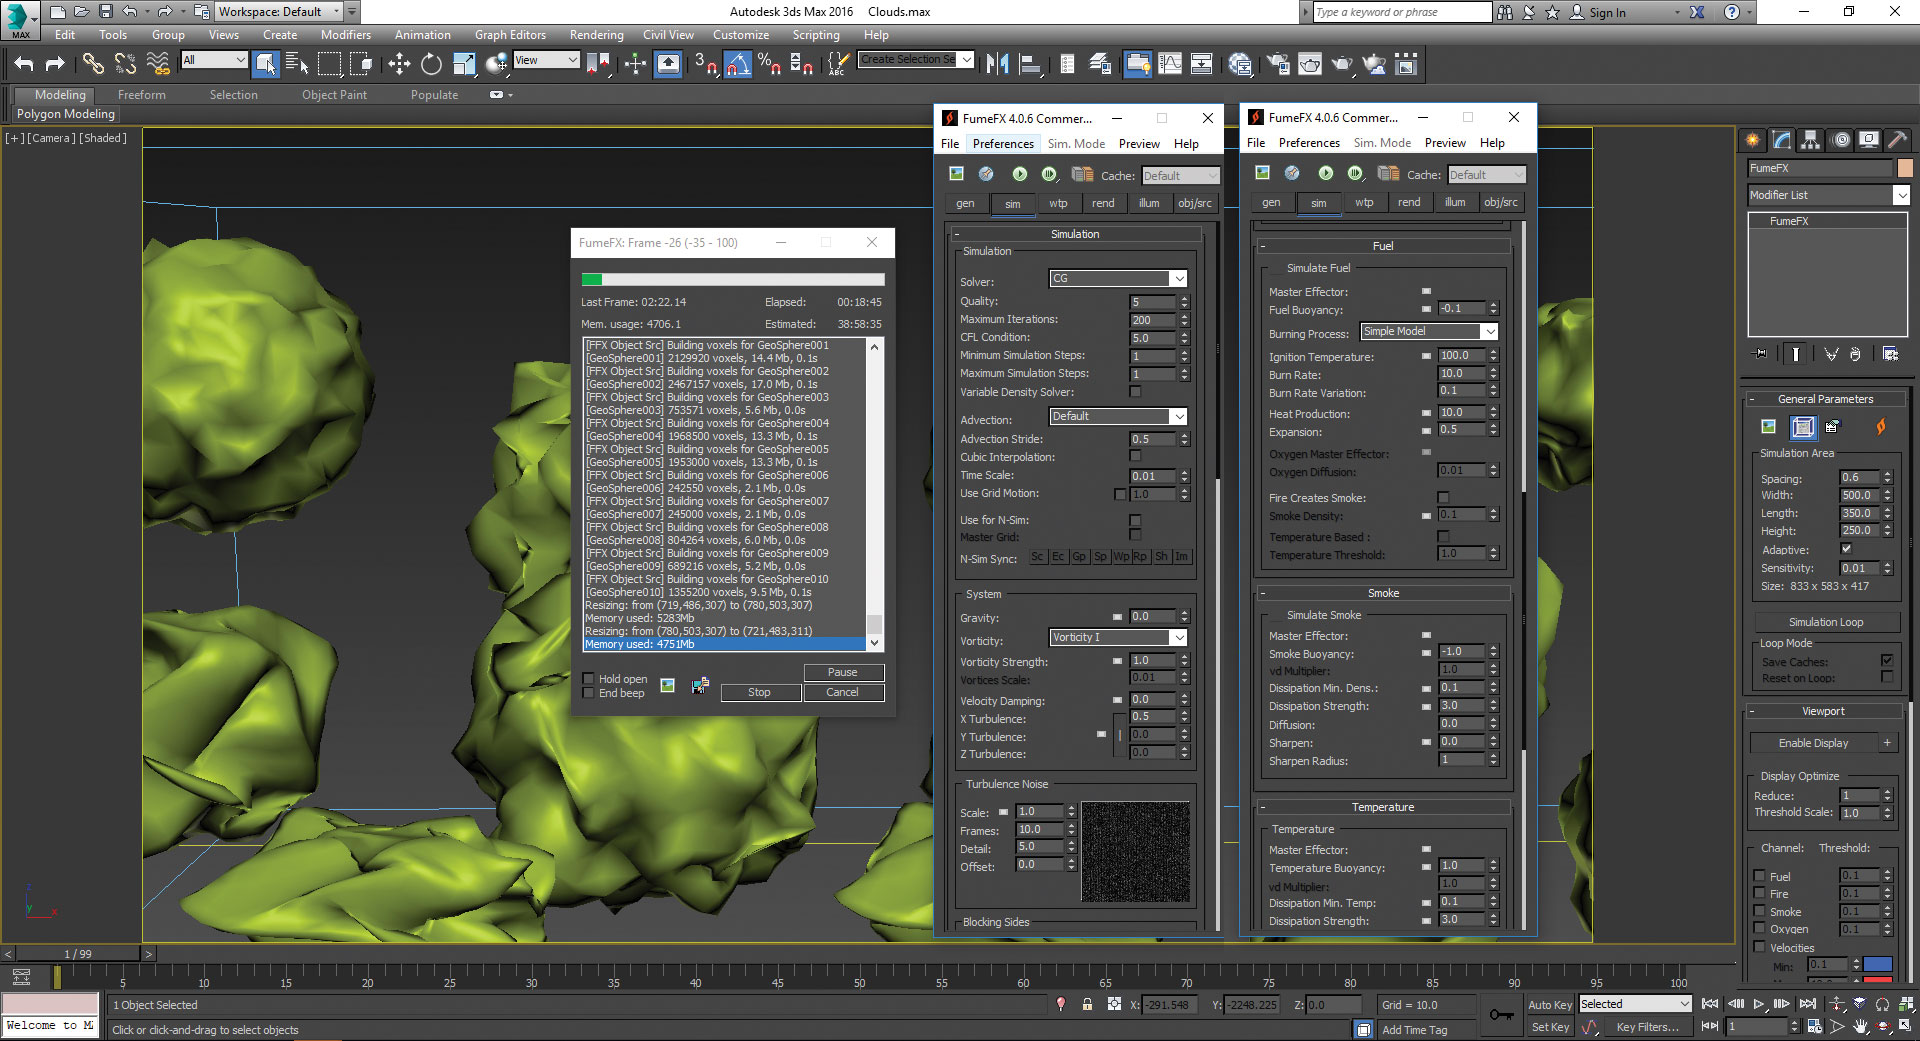
Next we need to modify the Simulation parameters. Go to the Sim section and the first parameter we are going to change is Time Scale. Initially we will create the smoke, but after certain frames we need static smoke, as it should look and behave like a cloud. So we will animate this parameter. From frame -35 to -1 Time Scale will be 1.0 and on frame 0 Time Scale will be 0.01, so animate it accordingly. Gravity: 2.5, Vorticity: 1.0, X Turbulence: 0.5. Now go to Turbulence Noise and set the Scale: 1.0, Frames: 10.0 and Details: 5.0.
Now go to Fuel and set the Burn Rate: 10 and Expansion: 0.5. Keep the other parameters as they are, and hit the Simulation button. It will take around 8-10 hours to finish.
07. Rendering settings
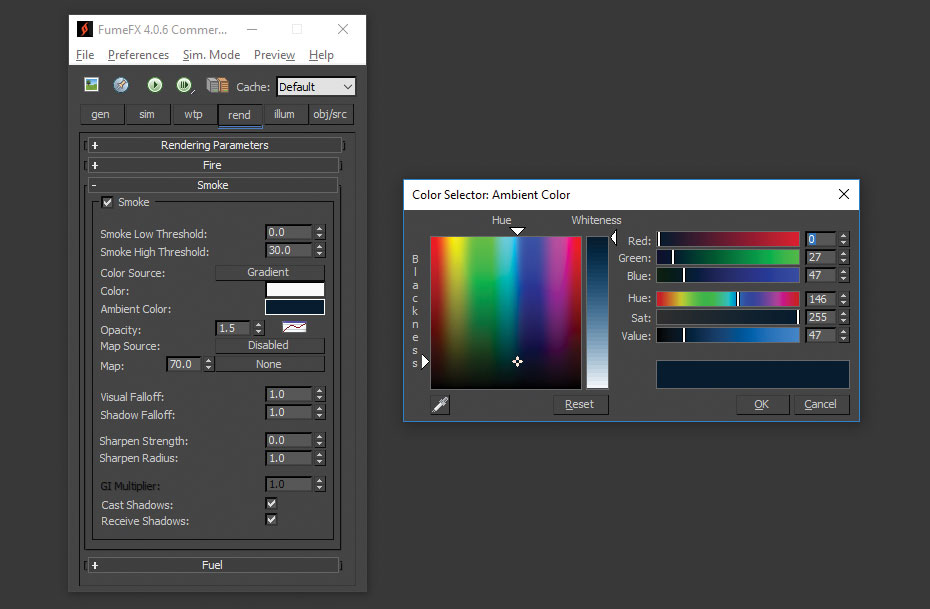
After the simulation has finished, make sure that everything is as per your requirement. Next we need to make some simple modifications in the Rendering section. First we'll set the colour of the smoke. Go to the Rendering section and then Smoke Parameters. Set the smoke colour as white and Ambient Color R: 0, G: 27, B: 47, set the Opacity: 1.5. Then turn on the Cast Shadows and Receive Shadows options, because when we add the light we should see the smoke shadow.
08. Illumination section
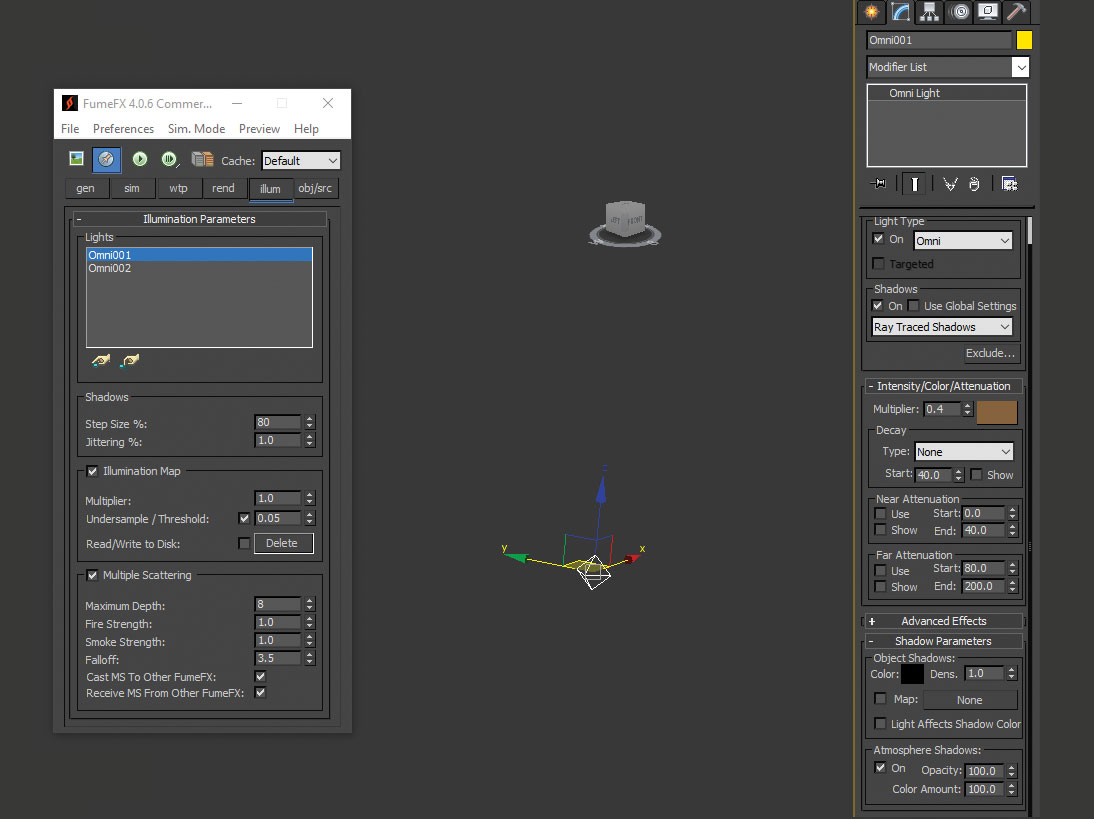
Now it's time to add light to the scene. Go to Create>Lights> Standard>Target Spot. Click on Omni Light and create two lights in the viewport. Now set the light position, Omni01, X: -790, Y: -230, Z: 280 and Omni02, X: -650, Y: -140.0, Z: 280.0. Now select the Omni01 light and go to the Modify panel, then turn on the shadow and make it Ray Traced Shadows, then set the Multiplier: 0.4 and Color R: 138, G: 98, B: 59. Now go to Shadow Parameters and turn on the Atmosphere Shadows. Make the same changes on Omni02, only set the Multiplier: 0.15 and Color R: 119, G: 194, B: 254.
After we've finished these settings, go back to FumeFX Container and then go to the Illumination section. Add these lights into the Light section by clicking on the Pick Light button. Now go to Multiple Scattering and set the Maximum Depth: 8 and Falloff: 3.5.
09. Render and post-process
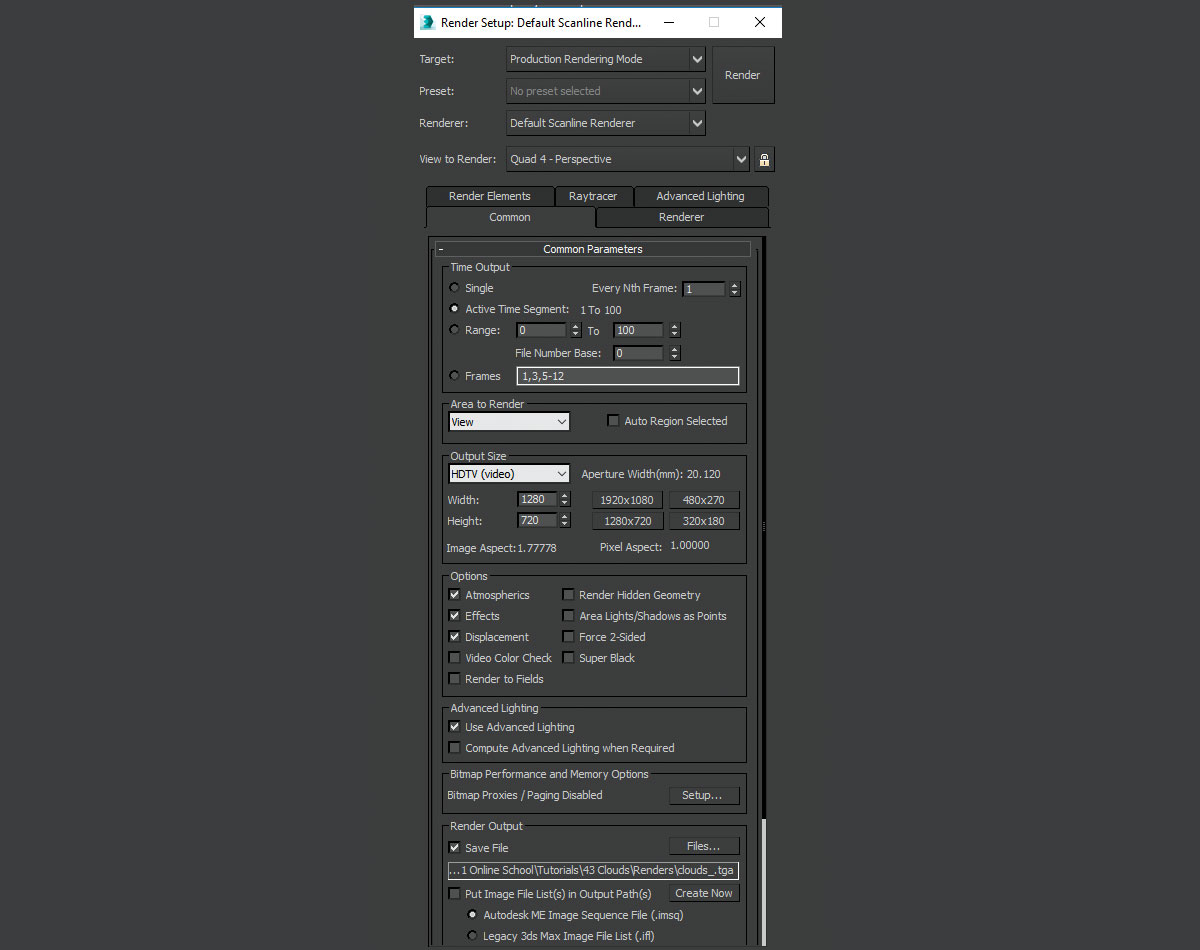
Now it's finally time to render. Go to Render Setup and set the Output Range, Output Resolution and Output Path settings. After finishing the setup just hit the Render button. It will likely take around five hours to finish rendering. After the rendering is complete import all the renders into Adobe After Effects or any compositing software that is convenient for you, and make some changes to colour or brightness. Then make the final output, and you'll get your clouds.
This article was originally published in issue 236 of 3D World, the world's best-selling magazine for CG artists. Buy issue 236 here or subscribe to 3D World here.
Related articles:
