The origins of pin-up art can be traced back to the late 19th century, but it became more widespread in the 1940s and 1950s, often appearing on posters and calendars. Defining characteristics of the artistic style include a cheerful face, a mix of humour and sex appeal, but without crossing the line into becoming provocative.

Over the years, there have been changes in character portrayal, not only in relation to style of hair and clothing, but also in how the artist has rendered pin-up art to appeal to audiences of the time. Yet modern-day pin-up art often includes many retro references.
If you want to improve your drawing skills before you get going on pin-up art, check out our how to draw post that collates the best drawing tutorials out there. Otherwise, read on to discover how to create your own pin-up art.
01. Create the initial concept

It’s a good idea to get down a few early drafts, either on paper or digitally – whatever suits your creative approach. This will help you choose a design to take forward. For this workshop, the theme is a pin-up girl, so I want the character to channel the two distinct features for this type of artwork, which is to be sweet and sexy. This is a reference to its 1950's origins.
02. Create clean sketch lines

I transfer my scanned drawing into Photoshop (get Creative Cloud here) and go to Brightness/Contrast. I choose 18 and 55, respectively, to create a clear contrast between the lines. Then I open a new layer, go to Channels and choose Cyan, then click Select > Inverse. Next, I create a new layer and go to Edit > Fill, selecting black with 100 per cent Opacity, which creates clean line art for me to use.
03. Fill the drawing with flat colour

I enjoy working directly with colour rather than in greyscale. I’m all for technology and the digital tools we have available, mainly because they enable me to save time. Yet I still use traditional media such as pencils, inks or markers, both for my initial drawings and laying down the final lines.
Here, I’m creating my lines on paper, but the process that you’ll use for colouring will be the same as if the lines were digital. So you can ignore my scanning clean-up stage.
Staying on the layer of my lines, I remove the old layer and create a new one under my lines. I select the Magic Wand tool and click the outer part of my drawing. Then I go to Select > Inverse and then Select > Modify > Contract Selection by three pixels. Staying on the layer that I’ve created, I fill in with any colour. Finally, I check that the whole drawing is filled with colour on the inside.
04. Distinguish the areas of the body

After I’ve created my colour layer, I duplicate it and fill it with a different colour. Next, I switch to the Pen tool and use this to select the areas that I want to reveal, for example just the character’s skin, and then mask off surrounding areas. Now I select the Lock Transparent Pixels option, which enables me to accurately paint in specific areas. I follow the same process for the hair, clothing and other key elements of the artwork.
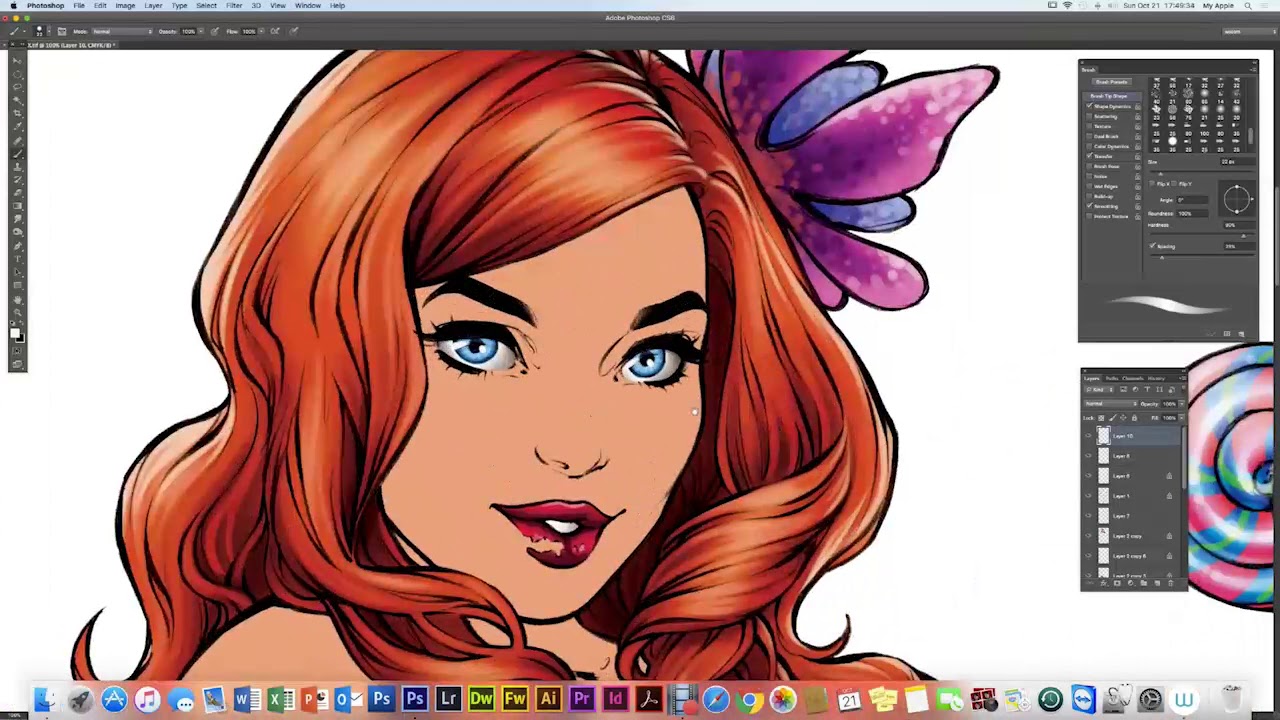
05. Generate hair volume

I select the hair layer with the Lock Transparent Pixels option checked. Next, with a default brush set to zero per cent Hardness, I colour the shaded parts of the hair, choosing which parts will be dark. I follow the same process, alternating between a darker colour and then a lighter one. The variety of colours help to give the character’s hair a sense of volume.
06. Add details to the hair

I create another layer over my coloured hair layer and I draw some details with a default Photoshop brush, increasing the Hardness to 85 per cent, which introduces a sense of lustre on the hair without going over the top. I also decide that there will be lighting on the back of her hair, so on another layer, and again with an increased Hardness setting, I create lighting that follows the direction I want the hair to have.
07. Make the flower look natural

Transparent Pixels checked, I apply a flat lilac colour to the flower and I paint the bottom part with a simple blue brush. Next, I select one of my custom brushes called marker 1 and play around with the colours – just enough to give the flower a more natural look. Then with a default Photoshop brush (see free Photoshop brushes for some ideas) set to 100 per cent Hardness, I draw small circles on the petals, also randomly.
08. Colour the clothes

I choose to make the character’s clothing blue. Still with the Lock Transparent Pixels option checked, I select a default brush with 0 per cent Hardness and paint the some areas of her clothes a dark blue. Then I paint the lighter parts of the clothes with a blue that’s a couple of shades lighter.
09. Give the clothing interesting texture

After completing the dark and light parts of the clothes, I select my custom lolo1 brush, set its size between 30 and 60px, and Hardness to 90 per cent. Then with the Other Dynamics > Opacity Jitter option checked, I start to paint using the same colours. The result is that the clothing now looks as though it’s covered with sequins. Then, using a simple brush, I draw more distinct small circles in white, to highlight areas almost randomly.
10. Refine the main facial features

Once I’m happy with the character’s clothes, I turn my attention to the face and create a new layer for the eyes, lips and teeth, so that they stand out from the base colours in each particular area. Then, after painting them, I unite them on a single layer. I select a basic medium tint for the skin that’s neither too dark nor too light.
11. Add colour, light and shadows to the skin

Now I paint the shaded parts of the face and body, using a colour that’s slightly darker than the one I have selected for the skin. I repeat the process until I’m happy with the results. Next, I again select the skin’s main colour and lighten it slightly, before painting the lighter parts of the body. This gives the face and body a 3D appearance. I take care not to overdo the lighting and shading during this stage.
12. Give the lines a smoother appearance

I select to the layer with the lines, which is the uppermost layer and in Multiply mode. With Lock Transparent Pixels checked I paint them with a simple brush, using a dark brown colour for the body lines or a dark blue colour for the clothing lines. I want to make the lines smoother.
13. Apply a tattoo

I draw the tattoo in another file, before bringing it in my main file, on a layer over the skin. I turn the tattoo layer to Multiply mode. I also add a 1px blur by selecting Filter > Gaussian Blur. Next I go to Edit > Transform > Warp, and adjust the tattoo so it matches the shape of the arm. I then create a layer mask and fade the tattoo slightly where the light hits it.
14. Make final touches

The final details usually are added on the layer that should be over the line art. On this layer, I usually paint some lustre for the hair, lips and eyes. I also add some lighting on the skin and the clothes in general, as well as some wavy lines to create the impression of separate hairs standing out.
This article was originally published ImagineFX, the world's best-selling magazine for digital artists. Subscribe here.
Read more:
