Use Paper.js to create HTML5 interactive vector animations
Paper.js is an open source vector graphics JavaScript framework built on top of HTML5 canvas and developed by the incredible Jürg Lehni and Jonathan Puckey. Dr Woohoo, Claus Wahlers and Rasmus Blaesbjerg from HAUS create an example that explores Paper.js
With new JavaScript frameworks seemly appearing on a daily basis that leverage HTML5, it is challenging to determine which one is appropriate for the project at hand. In this tutorial, we (that's Dr Woohoo, Claus Wahlers and Rasmus Blaesbjerg from HAUS) are going to look under the hood and see what Paper.js (developed by the incredible Jrg Lehni and Jonathan Puckey) has to offer us in terms of vector-based animation and interactivity that works across platforms. We will also explore how solid of a foundation it is built on and final how easy it is to pick up and understand for novice to advanced developers.

Before we jump into a bottom-top approach for the code of this tutorial, we are going to briefly look at the history of Paper.js and its predecessor, Scriptographer, as well as how the objects are organised within the framework from a top-bottom view.
History
Paper.js – publicly launched at the end of June, 2011 – was born from the efforts of Scriptographer, which is an incredible scripting plug-in for Adobe Illustrator. This is important to note because Scriptographer was introduced in 2001, giving it 10 years of robust iterative development and enhancements vs some of the other, newer vector-based JavaScript frameworks that are in existence today.
A scripting plug-in for Illustrator? If you haven’t used Scriptographer, you’re missing out on an enormous amount of fun, but more importantly, it’s a concept that is arguably a fundamental asset to the modern day designer – and that is the ability to combine code and design in order to automate the design process and extend what is creatively possible through Generative Design.
“Generative design is a design method where the output – image, sound, architectural models, animation – is generated by a set of rules or an Algorithm, normally by using a computer program.” – Wikipedia
The document object model
Paper.js uses a well thought out Document Object Model (DOM) – with a lineage to its parent, Scriptographer – to structure its objects in a manner that is easy to understand. In addition, if you are familiar with Adobe Illustrator’s ExtendScript DOM, you will be comfortable with Paper.js. If you are new to Paper.js, but have used Illustrator as a designer and know your JavaScript basics, I am willing to bet the hierarchy of the DOM will be second nature to you.

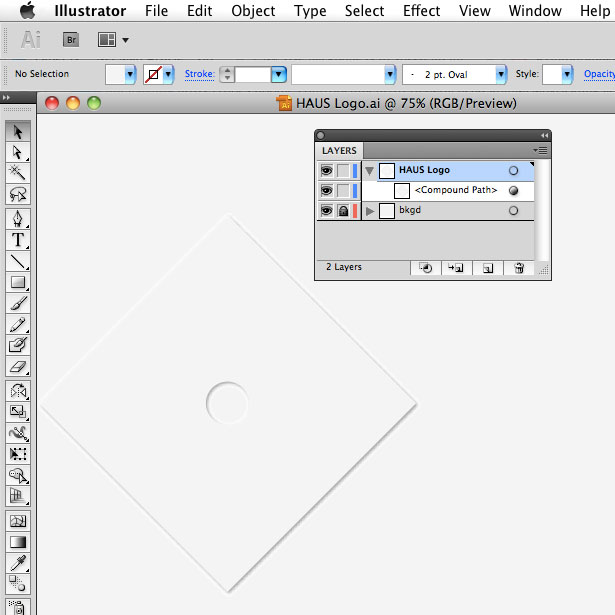
To understand the hierarchy of Paper.js’ DOM, it may be easier to use Illustrator as a metaphor.
In the image above, we have: 1) A Document open in Illustrator that has several Layers 2) On the selected (Active) Layer ‘HAUS Logo’ 3) there is a Compound Path.
The structure is the same in the DOM for Paper.js, except a Document is referred to as a Project. Therefore, the code would step through each object like so: Project.Layer.CompoundPath.
Project: ActiveLayer
I typically begin by creating variables that are references to the current items (layers, symbols, views, etc) of the project. In this case, we are only interested in the current activeLayer of the project, which we will later use when it comes time to centre the content that is contained on the layer.
Daily design news, reviews, how-tos and more, as picked by the editors.
var layer = project.activeLayer;Project: CurrentStyle
The currentStyle defines the current style. All items that are either selected or created after defining the style will use this style.
project.currentStyle.fillColor = new RGBColor(1.0, 1.0, 1.0);Creating rectangle and circle paths
If you recall in Image 1, there is a rectangle and circle that together create the Compound Path. New shaped Path Items (Line, Rectangle, RoundRectangle, Oval, Circle, Arc, RegularPolygon and Star) can be created using a variety of techniques, including defining the point and size:
// Path.Rectangle(point, size)var rect = new Path.Rectangle([200, 200], [300, 300]);Note: The point of origin of a Rectangle is in the top-left corner.
To match the HAUS logo, we need to rotate the rectangle 45º:
rect.rotate(45);Next, we create the centre circle in the logo, defining the centre point and the radius:
// Path.Circle(center, radius)var circ = new Path.Circle(rect.position, 29);Note that even though we created a new circle, it is not visible. It is actually there, however, it is the same color as the rectangle. Looking closer at Image 1, notice that the circle creates a hole in the centre of the rectangle. This is a feature of the CompoundPath.
Combining them into a CompoundPath
To create the CompoundPath, we create an instance of it and include the PathItems we previously created.
var shape = new CompoundPath(rect, circ); shape.fillColor = new RGBColor(0.95, 0.95, 0.95);The circ now creates a hole in the middle of the rectangle. Now it is time to add some of Claus’ magic highlights & shadows. Woohoo!
Shadows and highlights
There are two approaches to adding shadows and highlights to the CompoundPath: using the HTML5 Canvas Shadows API, or faking it. Claus’s first attempt was to use the Shadows API. Unfortunately, both Safari and Chrome round the shadowOffsetX and shadowOffsetY parameter values to whole integers, which lead to bumpy animations in those browsers further down the road.
To fake the shadow and highlight, we will use the clone() function, position and fillColor properties. After creating the CompoundPath, we pass this instance to the makeShadow() method, which will take the shape, clone it twice for shadows, twice for highlights, and sets position and fillColor for each of the cloned shapes. It will then take the four cloned shapes along with the original shape and return them as a group item.
function makeShadow(path){ var shadow1 = path.clone(); shadow1.fillColor = new RGBColor(0.92, 0.92, 0.92); var shadow2 = path.clone(); shadow2.fillColor = new RGBColor(0.84, 0.84, 0.84); var highlight1 = path.clone(); highlight1.fillColor = new RGBColor(1, 1, 1); var highlight2 = path.clone(); highlight2.fillColor = new RGBColor(0.97, 0.97, 0.97); return new Group([highlight2, highlight1, shadow1, shadow2, path]);}If you viewed it now, the new shadows and highlight CompoundPaths would be there; however, they would be hiding under the original CompoundPath.
To bring them out of hiding, there is another trick we need to do: offset the shadows and highlights from the original CompoundPath.
Offsetting shadows and highlights
We need to call the method adjustShadow() in order to offset the Shadow and Highlight CompoundPaths that are currently hiding underneath the original CompoundPath.
Below:
var group = makeShadow(shape);Add:
adjustShadow(group, new Point(1, 1));So after the Shadow and Highlight CompoundPaths are created, their positions are offset, so they are now visible thanks to the following method:
function adjustShadow(group, vector){ var position = group.lastChild.position; group.children[0].position = position + vector * 3; group.children[1].position = position + vector * 1.5; group.children[2].position = position + vector * -3; group.children[3].position = position + vector * -1.5;}Tool: mouse event handlers
The last bit of magic we want to add is the ability to adjust the direction of the light source based on the location of the mouse.
By adding a method for onMouseMove, we want to figure out the distance between the centre of the group CompoundPaths and the location of the mouse. Afterward, we clamp the length of the vector with a minimum and maximum. This in turn creates the illusion that we are controlling the direction of the light.
Special thanks to Jonathan for taking the time to make excellent suggestions for tightening up this article.
Additional resources
Paper.js
Scriptographer
scriptographer.org/tutorials/
Processing
Some examples for Paper.js were derived from here: processing.org/learning/topics/follow3.html
HTML5 Canvas
www.whatwg.org/specs/web-apps/current-work/multipage/the-canvas-element.html

The Creative Bloq team is made up of a group of art and design enthusiasts, and has changed and evolved since Creative Bloq began back in 2012. The current website team consists of eight full-time members of staff: Editor Georgia Coggan, Deputy Editor Rosie Hilder, Ecommerce Editor Beren Neale, Senior News Editor Daniel Piper, Editor, Digital Art and 3D Ian Dean, Tech Reviews Editor Erlingur Einarsson, Ecommerce Writer Beth Nicholls and Staff Writer Natalie Fear, as well as a roster of freelancers from around the world. The ImagineFX magazine team also pitch in, ensuring that content from leading digital art publication ImagineFX is represented on Creative Bloq.
