Create a pixel-perfect vector icon in Illustrator
Design a pixel-perfect vector icon using effects to achieve unique shapes. Jory Raphael provides the basics and introduces some core Illustrator tools.
Symbols and icons are incredibly powerful tools, and have been used by humans for over 100,000 years to tell stories and communicate ideas. Computer-based illustration tools have brought the creation of these symbols to a new level. But sometimes simple concepts, such as a wavy line, can be harder, or at least not as straightforward, to replicate on a computer than they would be by hand. Thankfully, Adobe Illustrator is packed with time-saving techniques and unique ways to implement ideas.
This tutorial will show you how to use Illustrator's built-in effects and core tools to simplify the process of drawing complex shapes. Illustrator has two types of effects: Illustrator Effects and Photoshop Effects. Both are great ways to preview styles before fully committing to them. But Photoshop Effects, once fully applied, require converting objects and shapes to raster, whereas most Illustrator Effects keep the vector data.
Bitmap world
While many icons are drawn using vectors, they're most often viewed in the bitmap world of computer monitors. Paying attention to pixel-level detail is still important. By adhering to a grid and specifying the exact placement of elements as we draw them, we can ensure that our vector icons are both crisp and pixel-perfect.
Article continues belowFollowing the steps in this tutorial, you'll create your own framed portrait icon. Let's go!
01. New document
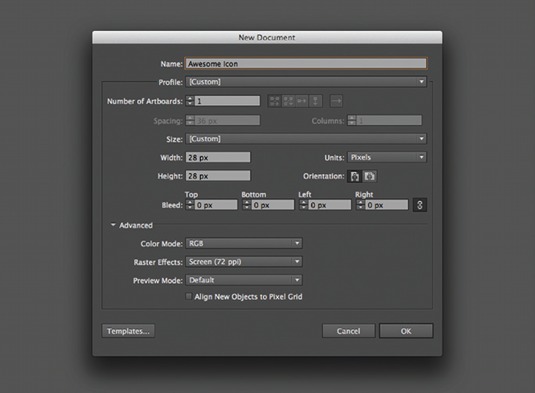
Create a new Illustrator document. Set the width/height fields to 28px. Set Units to Pixels. Click OK. Open Illustrator menu. Select Preferences and Guides & Grid… Set Gridline every: and Subdivisions: to 10px. Click OK. Open View menu. Select Show Grid.
02. Draw a line
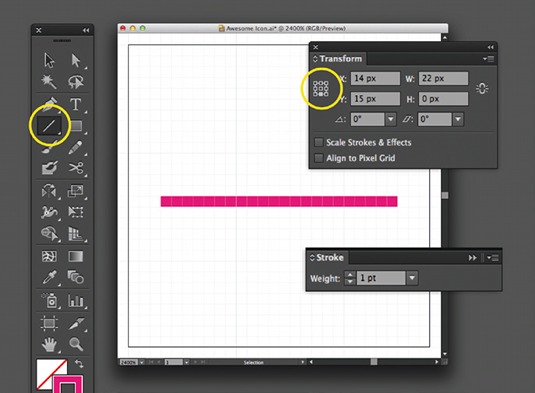
Choose the Line Segment Tool (\ on keyboard). Draw a line while holding shift. In the Transform palette, select bottom centre reference point (small grid in the palette) and set X to 14px and Y to 15px. Set width to 22px. Open the Stroke palette. Set to 1pt.
03. Use zig zags
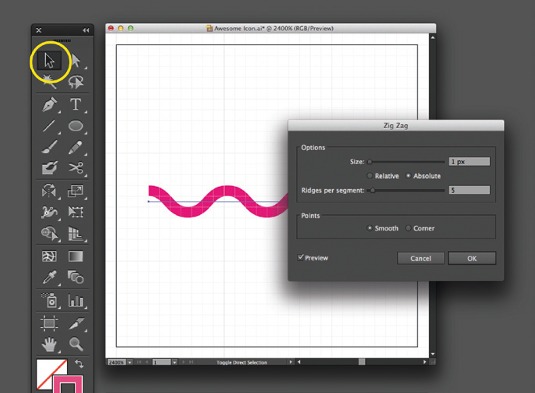
Choose the Selection Tool (V). Select the line by clicking on it (or click anywhere and drag your cursor over the line). Open the Effects menu, select Distort & Transform, then select Zig Zag…. Set 'Size:' to 1px and Ridges per segment: to 5px. Set Points to Smooth.
Sign up to Creative Bloq's daily newsletter, which brings you the latest news and inspiration from the worlds of art, design and technology.
04. Real curves
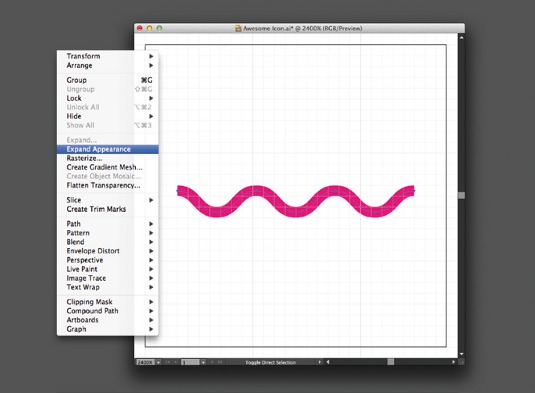
With the Zig Zag effect applied, we still technically have a straight vector line with an overlaid appearance of being curvy. For the purposes of this tutorial, we want to map the vector line to the curve we've created. Open the Object menu and select Expand Appearance.
05. Draw a circle
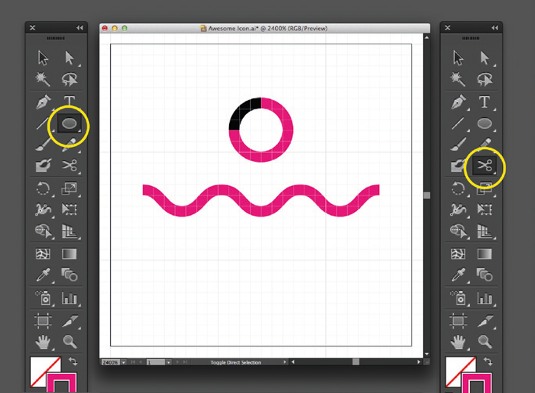
Choose the Ellipse Tool (L on keyboard). Click anywhere on the artboard. In the pop-up, set the width and height fields to 5px. Select the resulting circle and then choose the Scissors Tool (C on keyboard). Click on the top and left anchor points on the circle.
06. Align endpoints
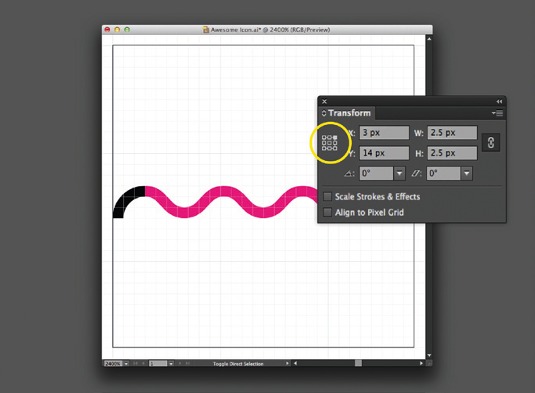
Choose the Selection Tool (V on the keyboard). Select the larger portion of the circle. Press delete. Select remaining arc and, using the Transform palette, choose the top right reference point. Set X to 3px and Y to 14px to align the endpoints in the arc.
07. Make a single line
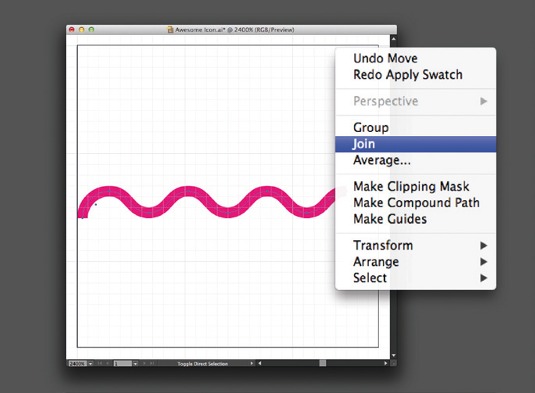
With the Selection Tool, select the arc and the line (click anywhere and drag the cursor over both pieces, or hold shift while clicking on both pieces). Open the Object menu, select Path, and then select Join. This turns the two separate paths into a single line.
08. Duplicate lines
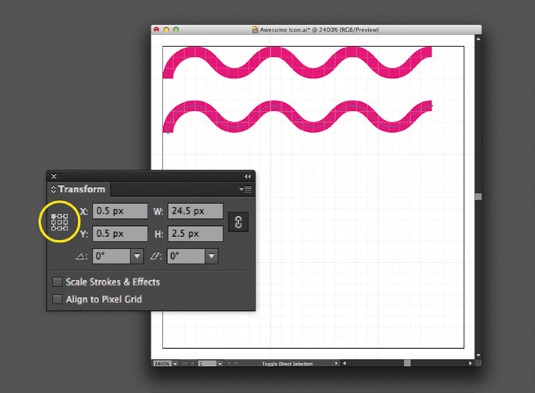
Select the new line you've just created. Then, using the Transform palette, select the top left reference point and set X and Y to 0.5px. With the line still selected, hold Option on your keyboard and move the line to duplicate it.
09. Rotate the line
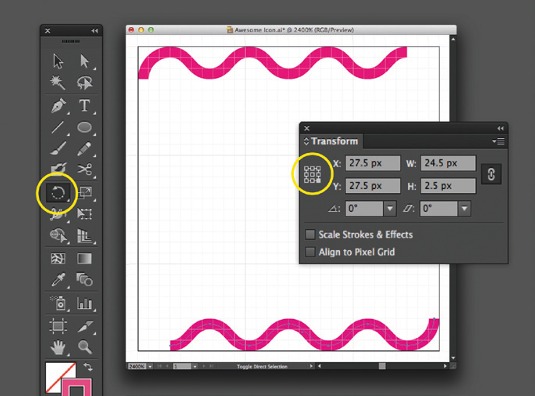
Select the new line you just created and press R to invoke Rotate, and then click enter. In the pop-up, set the angle to 180˚. Using the Transform palette, select the bottom right reference point and set both X and Y to 27.5px.
10. Join the lines
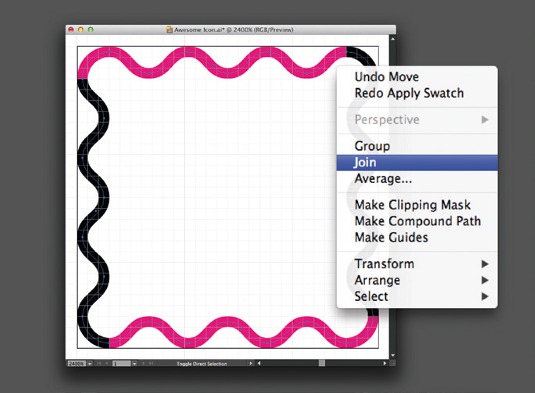
To create the full frame, select both lines, copy them (Edit>Copy), then paste them in place (Edit>Paste in Place). Press R to invoke Rotate and input 90˚. Select all four lines, open the Object menu, select Path, and then select Join.
11. Fill the colour
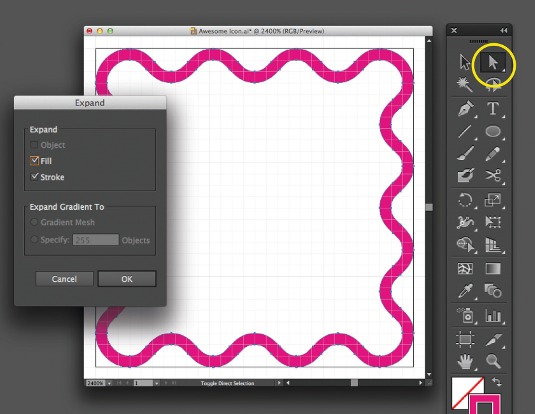
We've now made the basic outline of the frame icon. Select the new shape, open the Object menu and choose Expand. Leave the default settings in the pop-up and click OK. Choose the Direct Selection Tool (A on keyboard), click on the inside edge of the outline and press delete.
12. Build a square frame
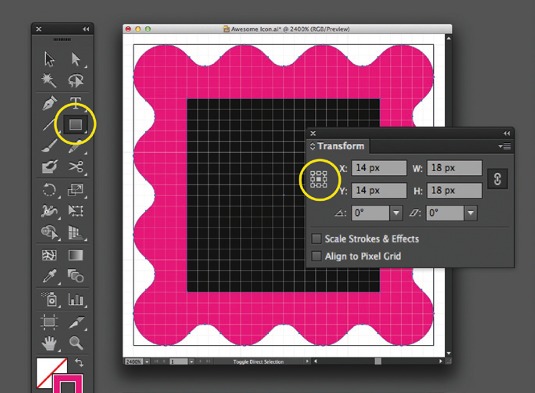
Select the Rectangle Tool (M on keyboard) and click anywhere on the artboard. In the pop-up, set width and height to 18px. Click OK. In the Transform palette, select the centre reference point and set both X and Y to 14px.
13. Make it unique
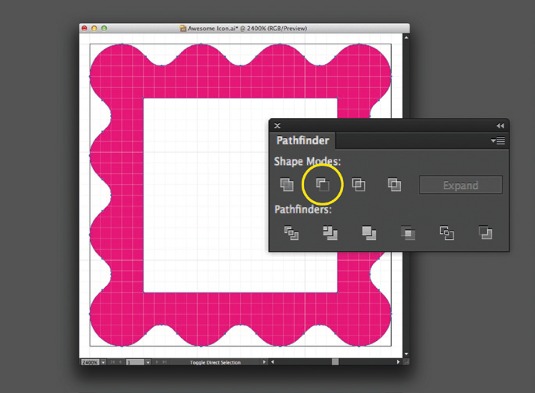
Select the outer frame and the square. In the Pathfinder palette (Window > Pathfinder), under Shape Modes, select the Minus Front. This will subtract the front-most object (the square) from the object behind it (the frame) to create a new unique shape.
14. Draw a head
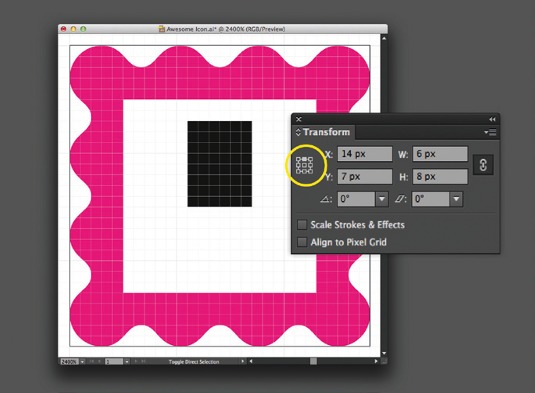
To draw the head of a figure in our picture frame, draw a 6px by 8px rectangle (M on the keyboard and then click anywhere) in the centre of the frame opening. In the Transform palette, select the top centre reference point and set X to 14px and Y to 7px.
15. Give it shape
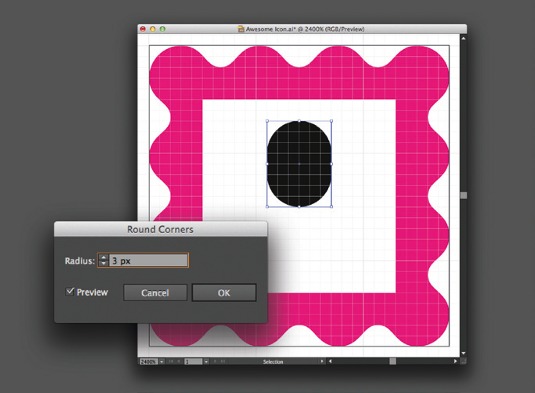
To make it look more like a head, select the new rectangle and open the Effects menu. Then select Stylize and choose Round Corners. In the pop-up, choose a radius of 3px, then choose Expand Appearance from the Objects menu to make it a single object.
16. Build the shoulders
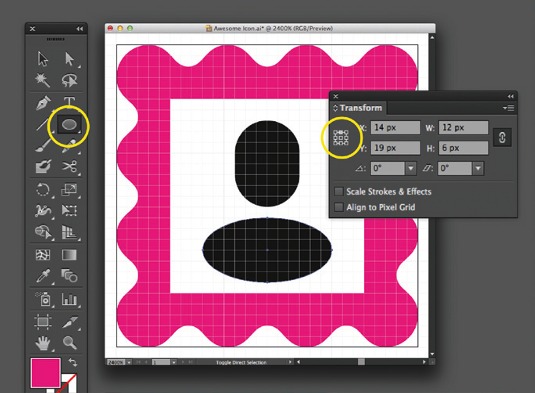
Draw an oval with the Ellipse Tool (press L and then click anywhere). In the popup, set the width to 12px and the height to 6px. Select the top centre reference point in the Transform palette and set X to 14px and Y to 16px.
17. Create the body
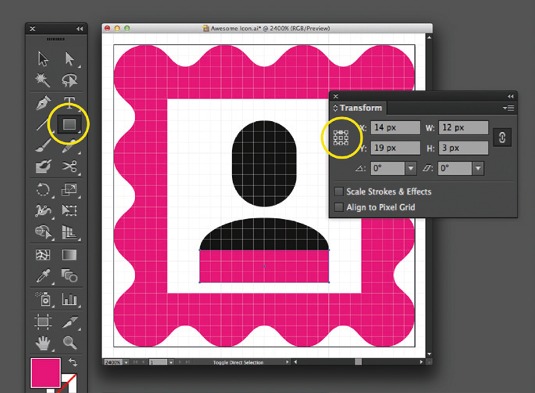
What is a set of shoulders without a body? Use the rectangle tool (Press M and click anywhere) and draw a 12px by 3px rectangle. In the Transform palette, select the top centre reference point and set X to 14px and Y to 19px.
18. Merge the shapes
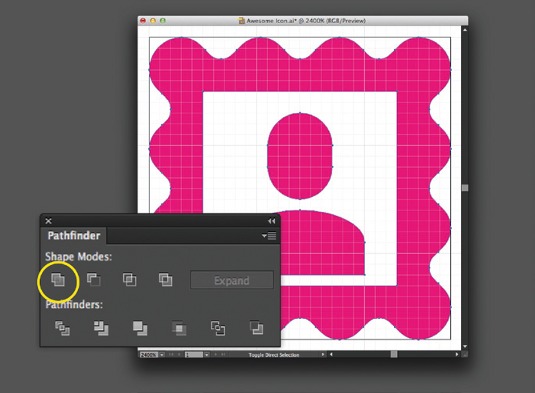
Select all of the objects on the artboard (click anywhere and drag your cursor over all pieces, or hold shift while clicking on each), and, in the Pathfinder palette, select Unite (the first Shape Mode). What once was four shapes is now a single shape.
19. Keep it crisp

And there you have it. A simple vector icon created from a crisp pixel grid. It'll stay crisp at multiples of 28px (56px, 112px, etc) and can be infinitely scaled. You may want to print it extra large and hang it on your wall. Thanks for reading!
Words: Jory Raphael
This article originally appeared in net magazine issue 240.
Liked this? Read these!
- Illustrator tutorials: amazing ideas to try today!
- The ultimate guide to logo design
- Free graphic design software available to you right now!
Any questions? Ask away in the comments!

The Creative Bloq team is made up of a group of art and design enthusiasts, and has changed and evolved since Creative Bloq began back in 2012. The current website team consists of eight full-time members of staff: Editor Georgia Coggan, Deputy Editor Rosie Hilder, Ecommerce Editor Beren Neale, Senior News Editor Daniel Piper, Editor, Digital Art and 3D Ian Dean, Tech Reviews Editor Erlingur Einarsson, Ecommerce Writer Beth Nicholls and Staff Writer Natalie Fear, as well as a roster of freelancers from around the world. The ImagineFX magazine team also pitch in, ensuring that content from leading digital art publication ImagineFX is represented on Creative Bloq.
