How to fix colours in Photoshop
It’s relatively easy to spice up your photos in Photoshop. But how about taking it one step further? The key to success is to fix your colours and enhance them. That way you’ll be sure to achieve eye-catching results.
Sign up to Creative Bloq's daily newsletter, which brings you the latest news and inspiration from the worlds of art, design and technology.
You are now subscribed
Your newsletter sign-up was successful
Want to add more newsletters?

Five times a week
CreativeBloq
Sign up to Creative Bloq's daily newsletter, which brings you the latest news and inspiration from the worlds of art, design and technology.

Once a week
By Design
Sign up to Creative Bloq's daily newsletter, which brings you the latest news and inspiration from the worlds of art, design and technology.
Once a week
State of the Art
Sign up to Creative Bloq's daily newsletter, which brings you the latest news and inspiration from the worlds of art, design and technology.

Seasonal (around events)
Brand Impact Awards
Sign up to Creative Bloq's daily newsletter, which brings you the latest news and inspiration from the worlds of art, design and technology.
- Software: Photoshop
- Project time: 1.5-2 hours
- Download the support file here
Okay, so you’ve grasped the techniques, but you need more than that if you’re to produce a range of original eye-catching work. Don’t underestimate the power of composition or the importance of balance.
This tutorial will teach you to create stunning effects using glows, loads of Colour Dodge, and lots and lots of neon - hot pinks and lemon yellows are prominent here. You’ll also learn how to utilise white in all the right places, so that white areas look less like negative space and more like the result of added energy and light.
The finer details are very important, too. The small glowing dots used throughout this image may be small, but they add so much. Always pay attention to detail in anything you create - simplicity is good but there are always details that, when added, make all the difference.
This tutorial stresses the importance of strong colour. The background of this piece contains a faint floral pattern, which is key, but very subtle. It does not call your attention or stand out on its own. Rather, it serves its purpose as a background correctly. In addition, another dimension is added using flowers and scanned imagery, giving the image a truly organic feel. So keep in mind the importance of strong colours and solid composition in all your work and you’ll see instant results.
Step 01
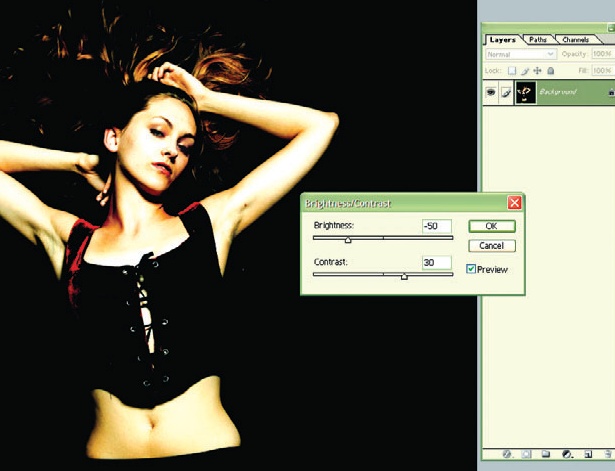
Open Model1.tif from the support files. Adjust the Brightness/Contrast to -50 and +30, respectively. Now go to Filter>Sharpen> Sharpen to ensure that the whole image appears as crisp as possible.
Step 02
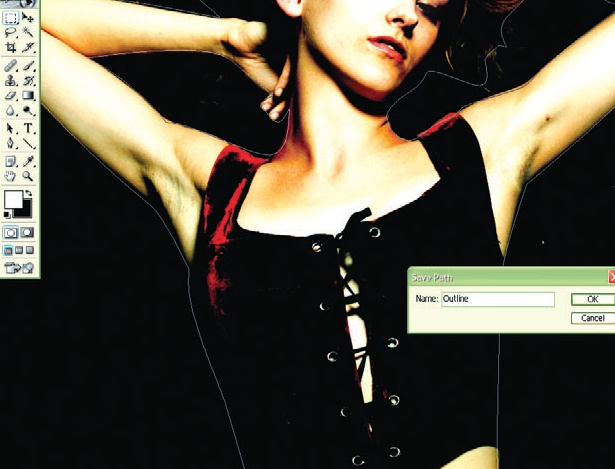
Using the Pen tool, draw an outline around the girl’s body. Do not worry about the finer details around the hair, but do make sure that you outline inside the area where her arms bend upwards. Save this Path and label it “Outline”.
Step 03
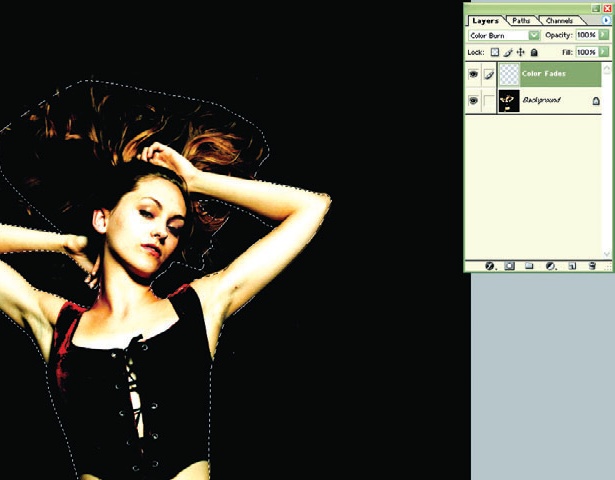
Create a new layer named Colour Fades. Set the Blending style to Colour Burn. Select the Path you made in step two and click on Load Path as a Selection.
Step 04
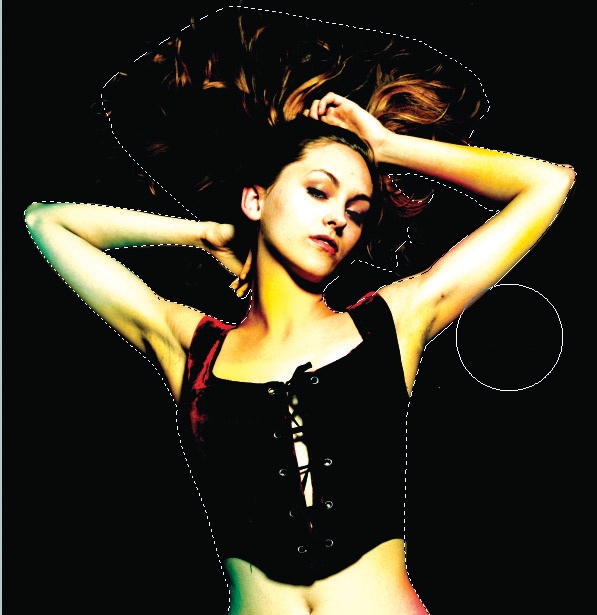
Now select a default circle-shaped Brush with soft edges and make the size roughly 550. Using bright pinks, yellows, greens and blues, brush lightly on the girl’s skin using single clicks to add subtle colour to the shadows already present.
Step 05
Make a new layer and label it Colour Fades Background. Again, click on Load Path as a Selection before choosing Select>Inverse. Repeat step four, but add the soft colour to the background, mostly around the girl’s body.
Step 06
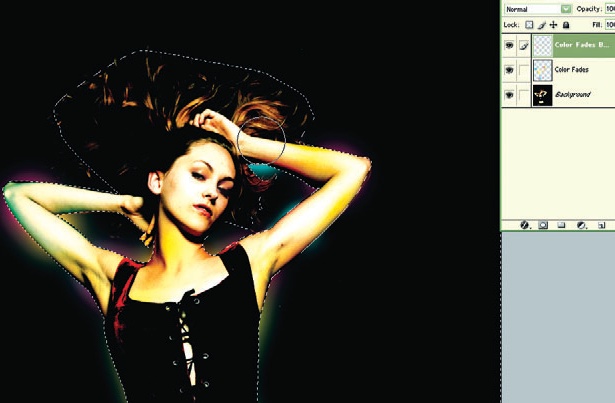
Open BackgroundDesign.tif from the support files, Select All and Copy. Go back to the main image, click on Load Path as a Selection and then choose Select>Inverse and then Edit>PasteInto. Rename this layer “Background Design”.
Sign up to Creative Bloq's daily newsletter, which brings you the latest news and inspiration from the worlds of art, design and technology.
Step 07
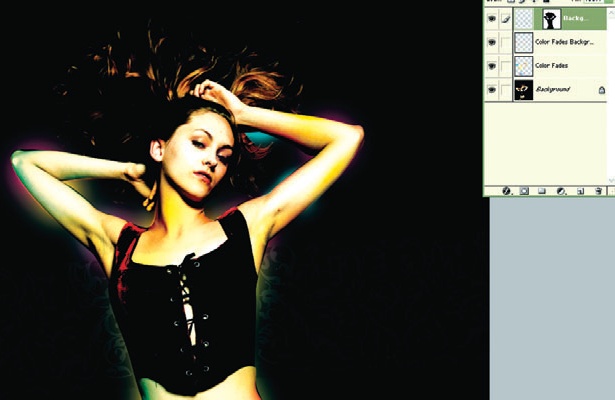
Duplicate and move the Background Design layer until you have enough to fill the background. Then merge all of these duplicated layers into one and again label it “Background Design”. Finally, set the Opacity to about 15-20 per cent – whatever looks good to you.
Step 08
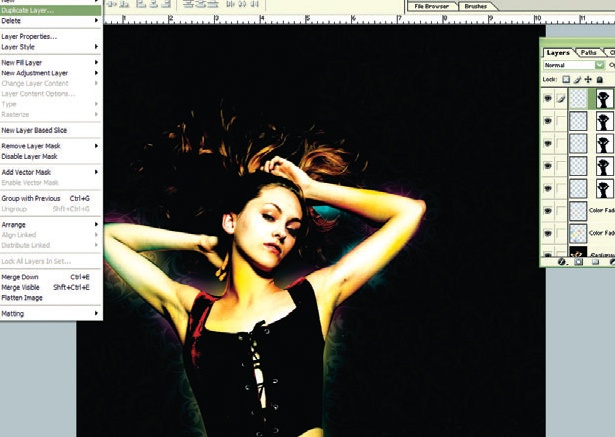
Next, make a new layer and label it “Diagonal Lines”. Using the Polygonal selection tool, create diagonal lines going from the middle of the left edge to the middle of the top edge. Then, with the Brush tool, paint inside using the same technique as you did on the girl, using pink and yellow.
Step 09
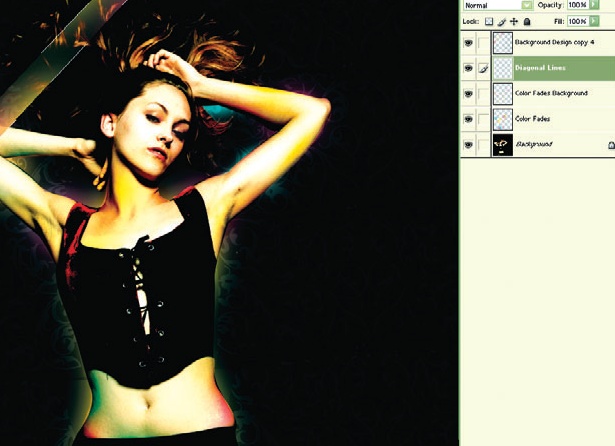
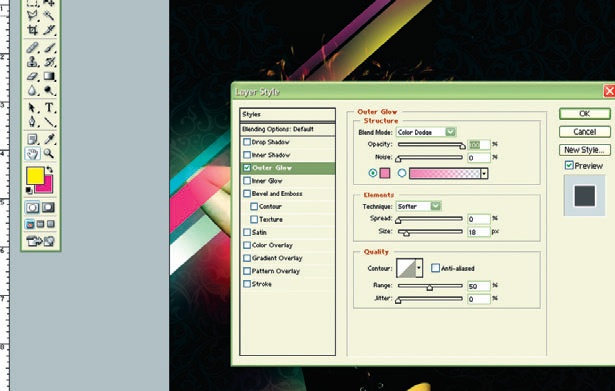
Create a new layer and label it “Stars, Wires”. Next, choose Layer>LayerStyle >OuterGlow. Set the Blend mode to Colour Dodge, the Opacity to 100 per cent, noise to 0 per cent, and use a solid pink colour (#F19AC2). Ensure that Technique is set to Softer, Spread to 0, and Size to 18.
Step 10
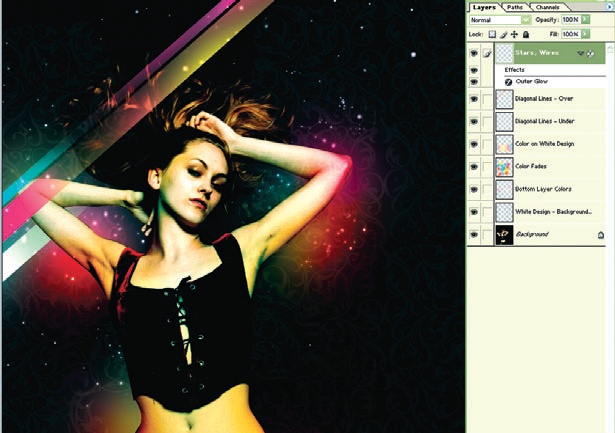
Choose a default soft edge circle Brush with the Airbrush turned on at or around size 12. Click randomly all over the background to create a galaxy of stars. Try clicking and holding to utilise the Airbrush feature and create a larger star.
Step 11
Using the same brush, make long strokes across the girl’s body, working from the bottom left to the top right to create the wires/lines. Repeat this process until you have dozens. You could change the size of the brush to produce a thicker wire.
Step 12
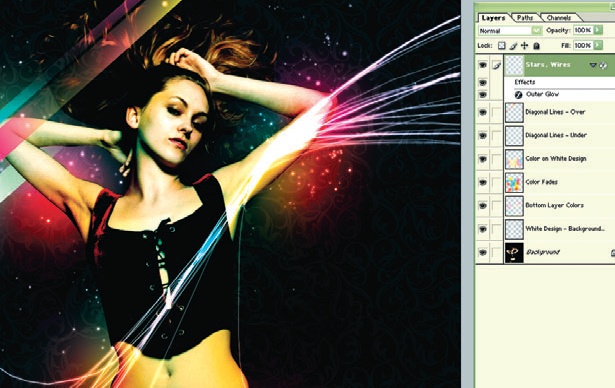
Create a new layer named “Wires Behind”. Select the Outline path, click Load Path as a Selection and then Select>Inverse. Use the technique used in step 11 to make the wires again, only this time you should make them behind the subject. This adds dimension to the image.
Step 13
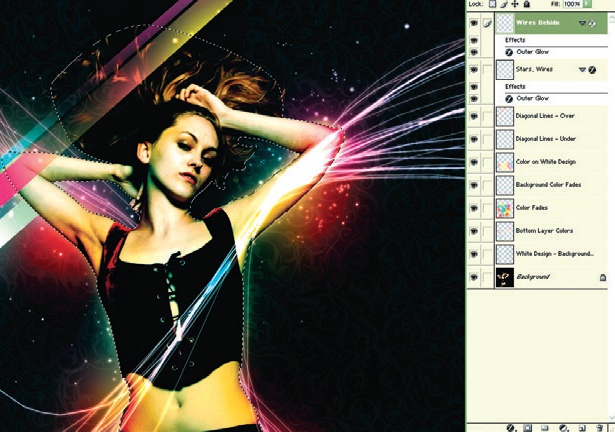
Open Design.tif from the support files, Select All and then Copy. Paste this into the main image and rotate it to fit accurately into the curve of her arm. Move to her chest, and set the Layer to Screen.
Step 14
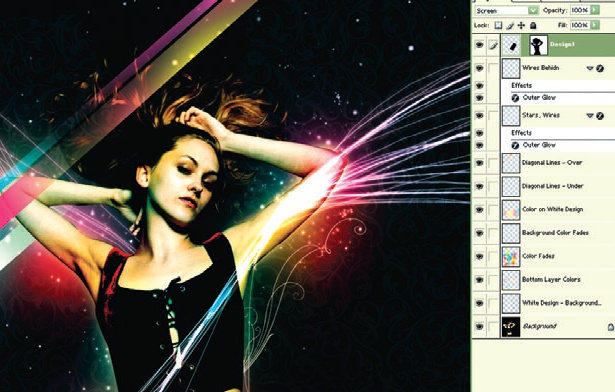
Duplicate this Layer before choosing Edit>Transform>FlipHorizontal. Move the Layer to her left-hand side so that it aligns correctly with the first and, finally, set this layer to Screen.
Step 15
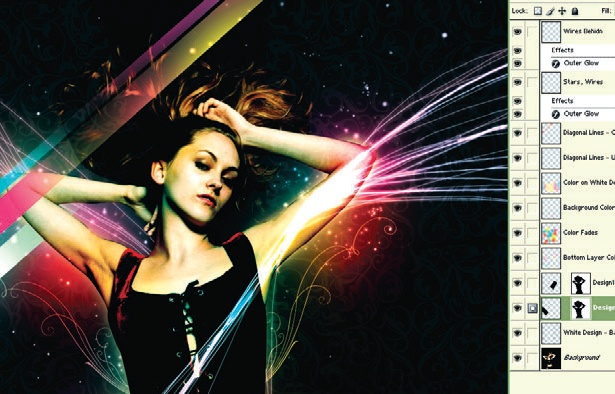
Open Flowers1.tif from the support files and then Copy and Paste it into the main image. Set the Blending mode to Screen and place it on the left-hand side, near her right arm, as shown.
Step 16

Duplicate that Layer. Next, choose Edit>Transform>FlipHorizontal and then Edit>Transform>Scale and make it a little smaller, ensuring that you keep it in proportion. Place this alongside her other arm.
Step 17
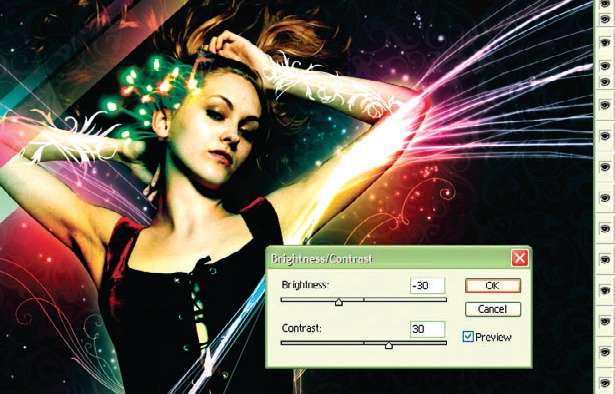
Open Fireworks.tif from the support files and Copy and Paste it into the main image. Set the Blending mode to Lighten, the Brightness to -30 and the Contrast to +30. Position the fireworks near her ear.
Step 18
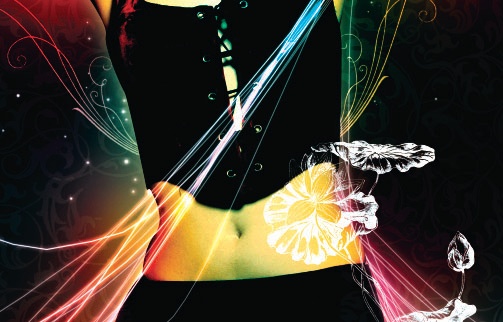
Now open Flowers2.tif and again, Copy and Paste into the main image. Set the Blending mode to Screen. Move these flowers to the bottom-middle area near the girl’s hip so that the stems follow the curve of her body.
Step 19
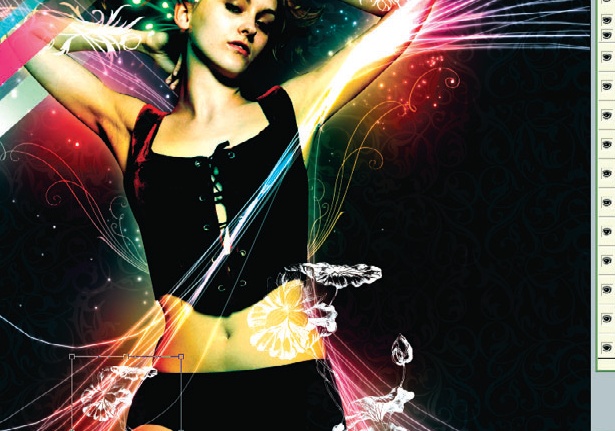
Duplicate this Layer. Choose Edit> Transform>Flip Horizontal and then Edit>Transform>Scale and make the new layer about one-third the size of the first. To balance the composition, place this on the left-hand side, next to her other hip.
Step 20

Go back to the “Stars, Wires” layer, right-click on it and select Copy Layer Style. Create a new layer named “Beauty”. Right-click this new Layer and choose Paste Layer Style. Now, using the default soft-edge Brush tool at size 10, write the word “Beauty”.
Step 21
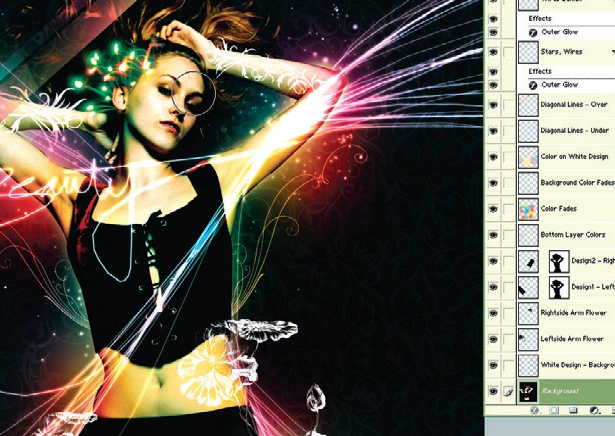
On the main Layer, the original photo, use the Burn tool on the Shadows at 100 per cent and go over the girl’s face once with a size 100 soft-edge Brush. This adds great shadow and definition to her face.
Step 22
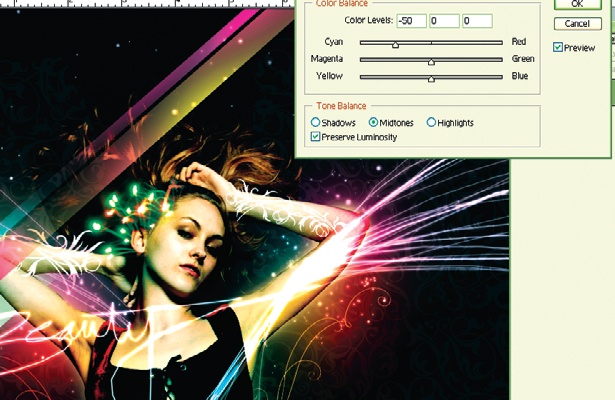
Finally, flatten the image so that you have just one Layer and go to Image> Adjustments>ColorBalance. Set Cyan to -50 to remove the hot colours and give it a crisper feel. You can now adjust any of the other colours until you reach your desired hues.
Liked this? Read these!
- Free Photoshop brushes every creative must have
- Free Photoshop actions to create stunning effects
- Create a perfect mood board with these pro tips
- The best Photoshop plugins

The Creative Bloq team is made up of a group of art and design enthusiasts, and has changed and evolved since Creative Bloq began back in 2012. The current website team consists of eight full-time members of staff: Editor Georgia Coggan, Deputy Editor Rosie Hilder, Ecommerce Editor Beren Neale, Senior News Editor Daniel Piper, Editor, Digital Art and 3D Ian Dean, Tech Reviews Editor Erlingur Einarsson, Ecommerce Writer Beth Nicholls and Staff Writer Natalie Fear, as well as a roster of freelancers from around the world. The ImagineFX magazine team also pitch in, ensuring that content from leading digital art publication ImagineFX is represented on Creative Bloq.
