Combine colour with monochrome in Photoshop
Get creative with colour, learn how to create a wider tonal range, and create classic images with added impact in six simple steps!
Daily design news, reviews, how-tos and more, as picked by the editors.
You are now subscribed
Your newsletter sign-up was successful
Want to add more newsletters?

Five times a week
CreativeBloq
Your daily dose of creative inspiration: unmissable art, design and tech news, reviews, expert commentary and buying advice.

Once a week
By Design
The design newsletter from Creative Bloq, bringing you the latest news and inspiration from the worlds of graphic design, branding, typography and more.

Once a week
State of the Art
Our digital art newsletter is your go-to source for the latest news, trends, and inspiration from the worlds of art, illustration, 3D modelling, game design, animation, and beyond.

Seasonal (around events)
Brand Impact Awards
Make an impression. Sign up to learn more about this prestigious award scheme, which celebrates the best of branding.
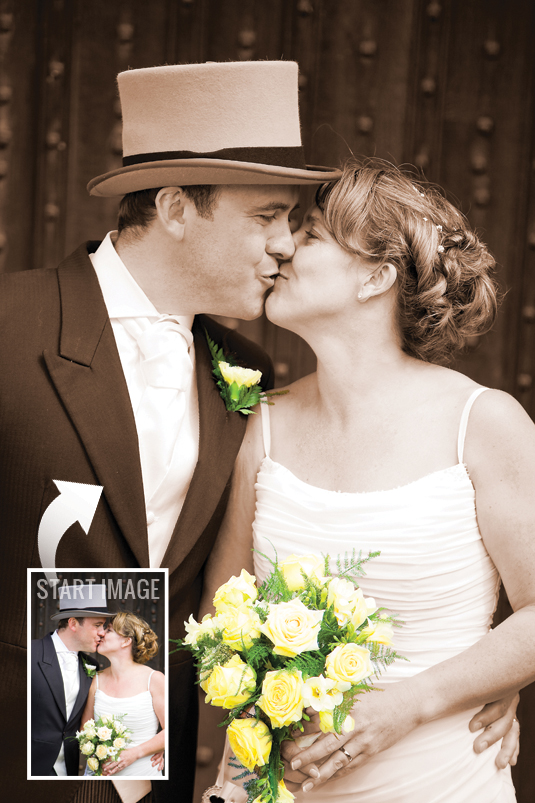
We tend to take the presence of colour for granted, but by converting a colour photo to monochrome you can make a shot stand out from the crowd. Take this a step further - by preserving colour in a particular area of a mono shot - and you can draw attention to specific objects. When faced with a predominantly black-and-white image, the eye automatically darts to any colour content it can find.
In the following walkthrough we’ll show you how to use Adjustment Layers to add a wash of monochrome sepia to our wedding portrait. This old-fashioned colour tint gives the whole image an instant retro makeover, which suits the content and the subjects’ clothing. We’ll then demonstrate a technique that highlights the flowers in the photograph by restoring them to full colour with help from the selection tools, the Brush tool and masks. The bride’s flowers are overexposed, so suffer from blown-out highlights that bleach out their natural colour. Therefore, we’ll also show you how a combination of the Brush tool and layer blends enable you to paint colour back into this area.
Read on to find out how it’s done with Photoshop CS6 (you can use any version of CS or even Elements) - there's a sample image for you to use below.
Click here to download image
01. Add a tint
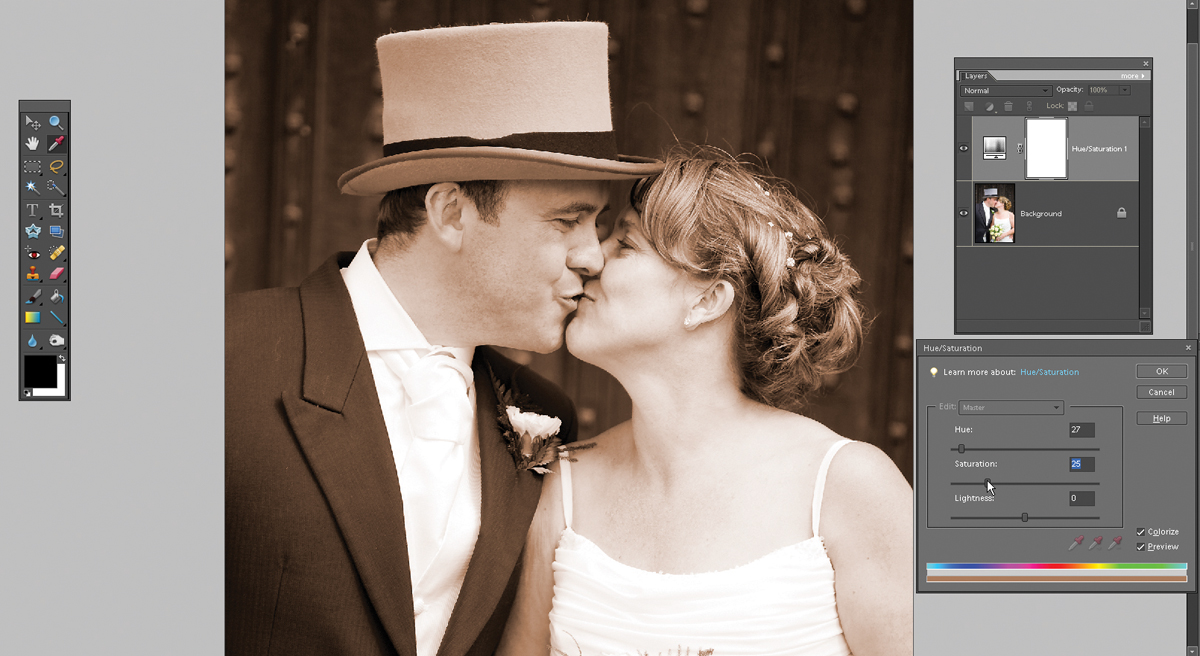
Open the file desat_start.jpg and open the Layers palette (Window>Layers). Click on the Create Adjustment Layer icon at the top of the Layers palette and choose Hue/Saturation from the menu. Tick the Colorize box. Drag Hue to 27 to give the shot a sepia tint, and set Saturation to 25 for a subtle mono look. Click OK if needed.
02. Select the flowers
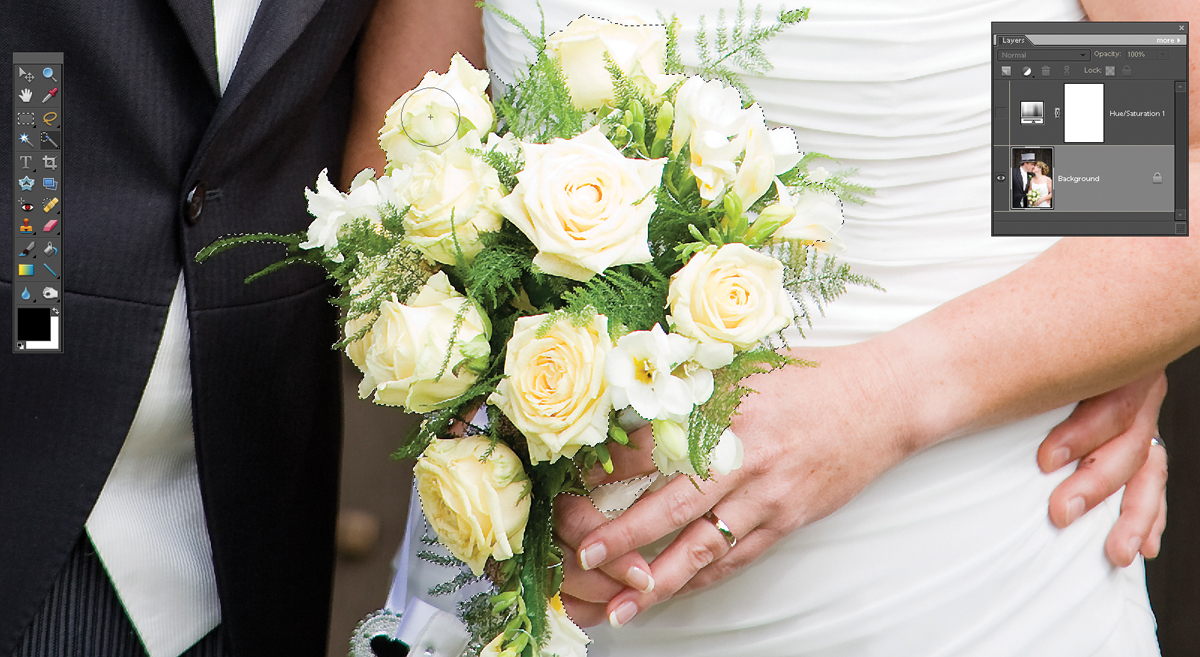
Temporarily turn off the Adjustment Layer by clicking on the eye icon to its left. Target the ‘Background’ layer by clicking on its thumbnail in the Layers palette, then use the Quick Selection tool with a Brush Size of around 150 pixels to select the yellow flowers and the green fronds. Don’t worry if you can’t select every petal or frond, because you can fine-tune the selection using masks later.
03. Fill the selection
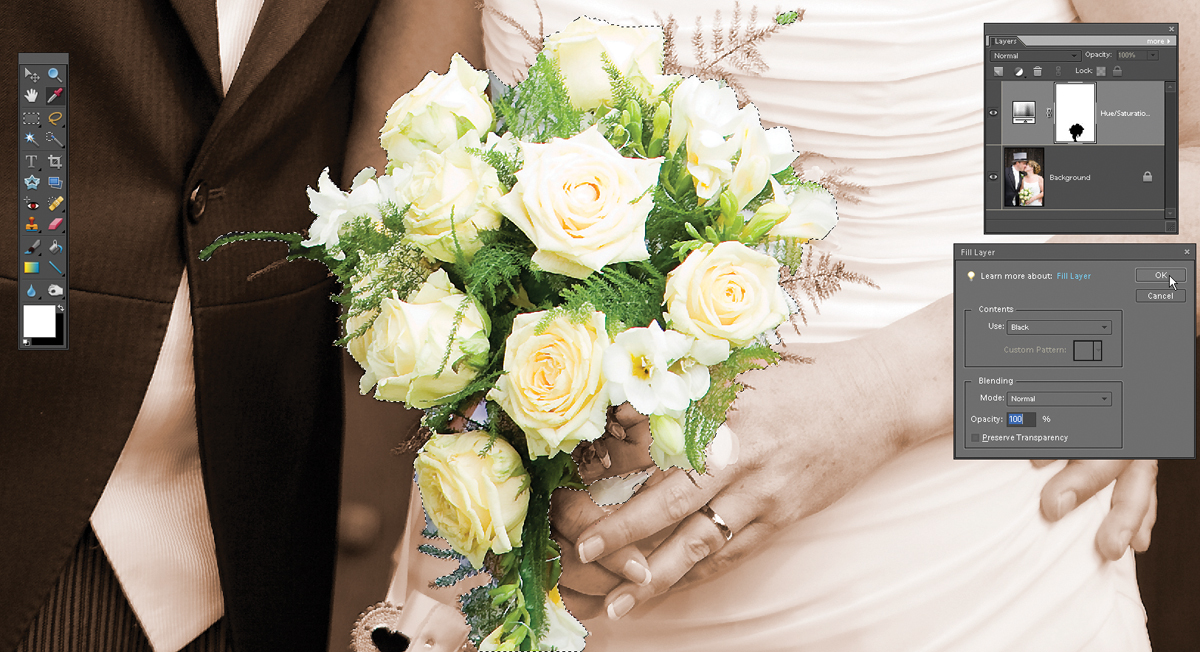
Turn the Hue/Saturation Adjustment Layer back on, then click on its white mask. Choose Edit>FillSelection and set Contents to Black. Click OK. The selected mask areas will turn black. These areas stop the layer below being altered by the Adjustment Layer, revealing the flowers’ colours. You can use the mask to fine-tune the selective colour effect.
04. Adjust the mask
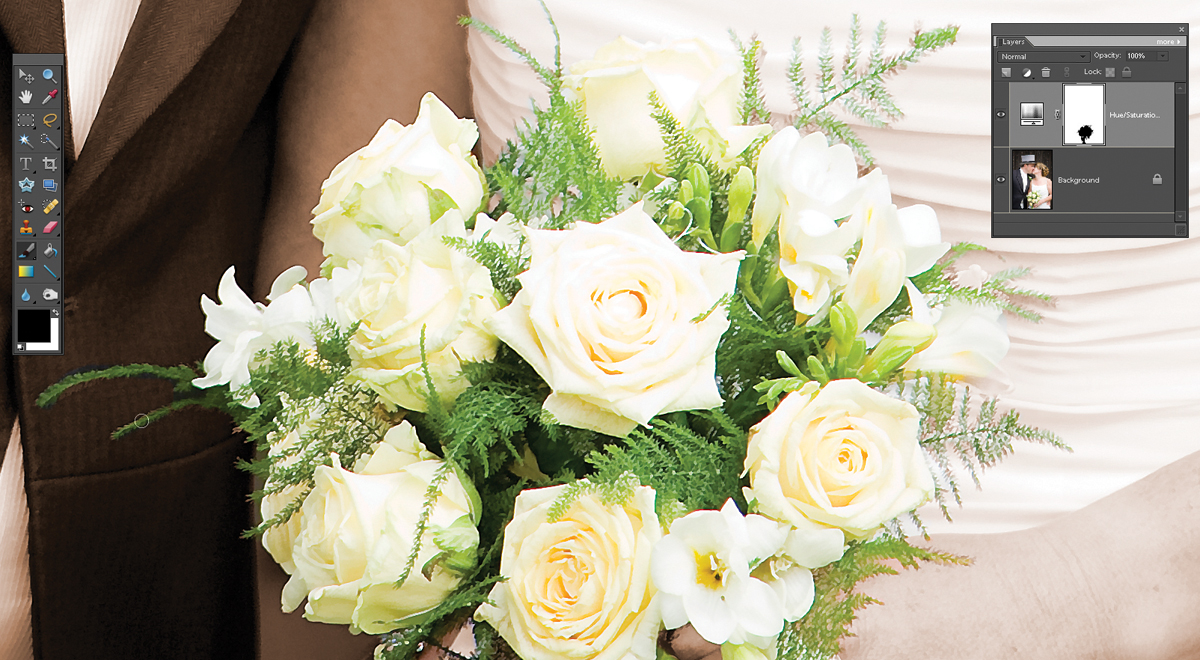
Press Ctrl+D to deselect the selection marquee. Some items will have been missed and so will still be sepia. To colour them, grab the Brush tool and press X to set the foreground colour to black. Click on the mask to target it. Spray an object to restore its colour. To turn an area sepia, set the foreground colour to white and spray.
Daily design news, reviews, how-tos and more, as picked by the editors.
05. Boost the colour
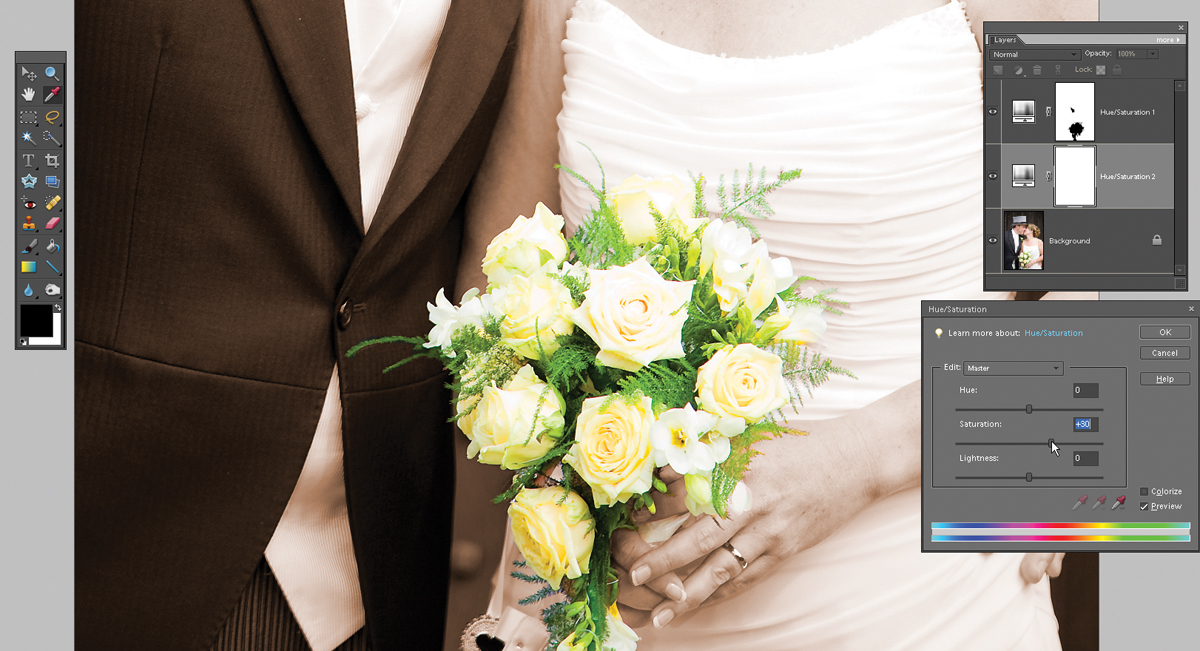
Create a new Hue/Saturation Adjustment Layer. Drag the new ‘Hue/Saturation 2’ Adjustment Layer below the sepia Adjustment Layer (‘Hue/Saturation 1’) in the Layers palette. Double-click on ‘Hue/Saturation 2’ to re-open the command window. Drag the Saturation slider to +20 to boost the colour of the flowers. Click OK if needed.
06. Restore clipped colour
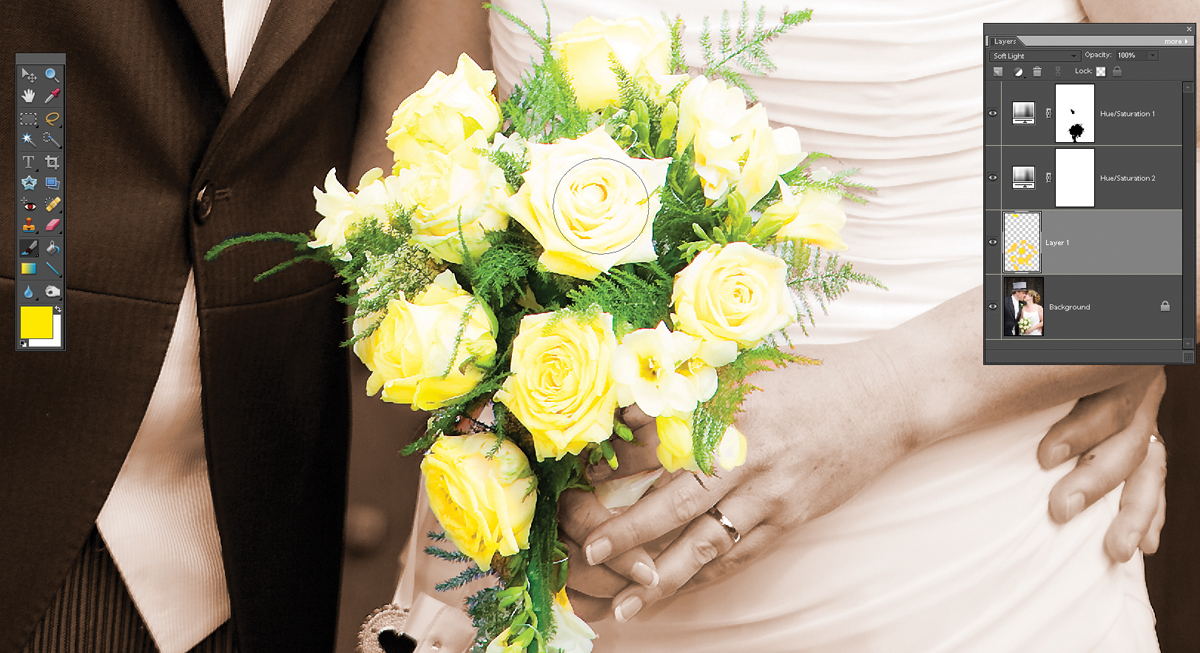
Some of the flowers’ overexposed highlights have no colour. Create a new layer, then drag it below the two Adjustment Layers and set its Blending Mode to Soft Light. Select the Brush tool, Alt-click (an Eyedropper appears) to sample some yellow from a petal and spray over the flowers to restore colour to the clipped areas and boost midtone saturation. Set the layer’s Opacity to 80% for a more subtle effect.
This tutorial first appeared in Portrait Photography Made Easy - a bookazine from the makers of PhotoPlus.
Now read:
- 30 free Photoshop brushes every creative must have!
- 101 Photoshop tutorials
- 20 best Photoshop plugins

The Creative Bloq team is made up of a group of art and design enthusiasts, and has changed and evolved since Creative Bloq began back in 2012. The current website team consists of eight full-time members of staff: Editor Georgia Coggan, Deputy Editor Rosie Hilder, Ecommerce Editor Beren Neale, Senior News Editor Daniel Piper, Editor, Digital Art and 3D Ian Dean, Tech Reviews Editor Erlingur Einarsson, Ecommerce Writer Beth Nicholls and Staff Writer Natalie Fear, as well as a roster of freelancers from around the world. The ImagineFX magazine team also pitch in, ensuring that content from leading digital art publication ImagineFX is represented on Creative Bloq.
