Get started with Sinatra
Ruby is a trendy programming language among Silicon Valley startups. Tim Millwood demonstrates how to build a small web application in Ruby using the Sinatra framework
This article first appeared in issue 239 of .net magazine – the world's best-selling magazine for web designers and developers.
Most famous for Ruby on Rails, Ruby is fun, easy to use, easy to understand and easy to learn. Sinatra is a very different framework, which is written in under 2,000 lines of Ruby and doesn’t enforce model-view-controller (MVC) or ship with different tools, configuration files or scaffolding.
Sinatra applications are often a single file that contain just enough to get the job done. The framework is best suited for smaller web applications, but if a large web app requires an API or web interface for some secondary functionality, then Sinatra is ideal.
To get started, make sure you have Ruby installed (it’s preinstalled on most modern Macs). For those who have used Ruby before, you’ll know that what makes it powerful is the library of packaged Ruby applications, called gems. Sinatra is installed as a gem so you’ll also need to make sure you have RubyGems installed. Once this has been done, open up your terminal and run the following command:
- gem install sinatra
This will install Sinatra and enable you to access it within your Ruby application. Create the file hello.rb containing the following code:
- require 'sinatra'
- get '/' do
- "Hello World!"
- end
First, the Sinatra framework code is required to load. Then, configuring a domain route, we call get because this is the HTTP method we’re interested in for the domain route /. Within this method we add “Hello World!” as the text to be returned when the route is loaded. Back in your terminal window, try running ruby hello.rb to start your Sinatra application. This will load a web server using the default port 4567. Navigate in the browser to http://localhost:4567 and you should see, “Hello World!”. (Press Ctrl+C to kill the web server).
To the bottom of hello.rb, add the following code:
- get '/hello/:name' do
- "Hello #{params['name']}"
- end
Run ruby hello.rb to start the web server again and navigate to http://localhost:4567/hello/Tim. This should now return “Hello Tim” in your browser.
Through the rest of this tutorial we will cover how to create a simple to-do list app. This app will use SQLite for the database and allow adding, marking as done and deleting of to-do items. The first step is to connect to the database. Sinatra doesn’t ship with database tools or object-relational mapping (ORM) so again install a couple of gems. Run the following commands in your terminal to install these:
Daily design news, reviews, how-tos and more, as picked by the editors.
- gem install dm-sqlite-adapter
- gem install data_mapper
This installs DataMapper, which is a Ruby ORM and the SQLite adapter for DataMapper. Other adapters can be used if you’re working with different databases such as MySQL or PostgreSQL.
Now we can start creating the app. Create a directory for your app called something like todo_list. In here, start a new Ruby file for the Sinatra app called web.rb. Start this file with the following require lines:
- require 'sinatra'
- require 'data_mapper'
This short instruction will add Sinatra and DataMapper to the application. Under it, add the following code in order to create the SQLite database, tables and schema:
- DataMapper::setup(:default, "sqlite3://#{Dir.pwd}/todo_list.db")
- class Item
- include DataMapper::Resource
- property :id, Serial
- property :content, Text, :required => true
- property :done, Boolean, :required => true, :default => false
- property :created, DateTime
- end
- DataMapper.finalize.auto_upgrade!
First of all, this code calls the DataMapper set-up to create a SQLite database connection – todo_list.db. The model is then defined to create a to-do list Item, which comprises an id, content, a done marker and the created date. The last line will finalise the DataMapper model while auto_upgrade! creates the table and also adds new columns (if they are ever added).
Now we have the database, we can add some routes too:
- get '/' do
- @items = Item.all(:order => :created.desc)
- redirect '/new' if @items.empty?
- erb :index
- end
Like some of the early examples, to create the root route we’re calling the get method with a route parameter of /. Inside this, run a query on the database using the Item class, which was generated earlier in the DataMapper model. From the database we request all items ordered by the created date. This is then set to the @items variable. If this is empty, the user is redirected to the /new route (which we will create soon) to prevent the index view loading.
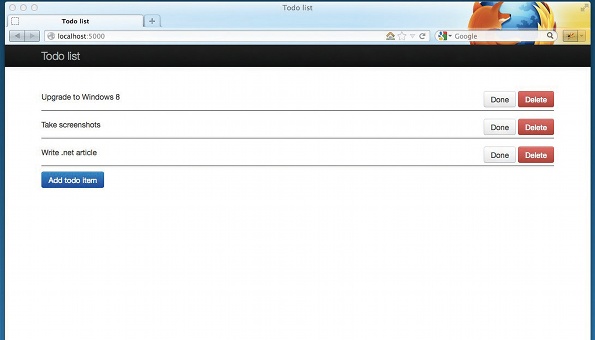
Although Sinatra isn’t strictly MVC, it does allow for the use of views. These can make use of many different template languages. In this example we’re using erb and wish for the view index.erb to be loaded. Views, by default, are stored in the views directory. Create the directory and create index.erb inside it:
- <ul id="todo-list" class="unstyled">
- <% @items.each do |item| %>
- <li id="<%= item[:id] %>">
- <span class="item">
- <%= item[:done] ? "<del>#{item[:content]}</del>" : item[:content] %>
- </span>
- <span class="pull-right">
- <a href="#" class="btn done"><%= item[:done] ? "Not done" : "Done"%></a>
- <a href="/delete/<%= item[:id] %>" class="btn btn-danger">Delete</a>
- </span>
- </li>
- <% end %>
- </ul>
- <a href="/new" class="btn btn-primary">Add todo item</a>
In this view, the basic HTML is created for the content output. The erb tags allow bits of Ruby to be injected into the layout. @item.each is used to loop through all to-do items. Inside it, the different elements of the to-do item are returned using erb expression tags.
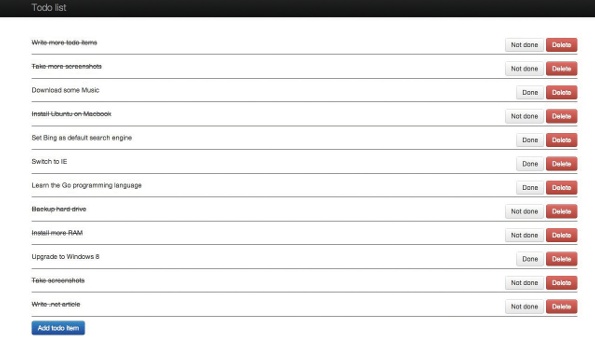
To denote that a to-do item is done, HTML <del> tags are added to the item content and the ‘done’ button text is changed to ‘not done’, which allows a done item to be undone. In order to implement this, a ternary operator is used. This creates the different states depending on whether the to-do item has been marked as done.
The reason that we have so little HTML in this view is because most of it is in the layout. Sinatra enables you to create a view called layout – followed by the extension of the template language being used – in this case, layout.erb. This file is then loaded for all views.
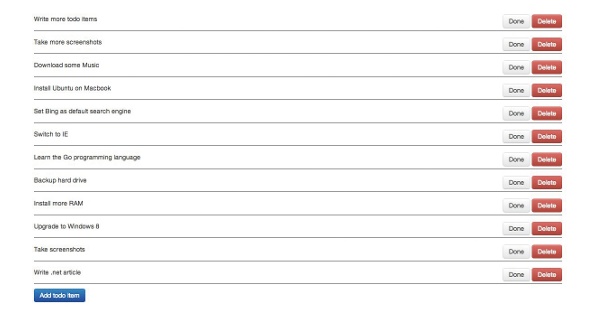
The layout must contain the yield variable, which is where the main view content is displayed. For example:
The full layout.erb used is available on GitHub, and was built using Twitter Bootstrap.
The homepage route redirects to /new if the database doesn’t contain any to-do items. This route needs to be generated:
- get '/new' do
- @title = "Add todo item"
- erb :new
- end
- post '/new' do
- Item.create(:content => params[:content], :created => Time.now)
- redirect '/'
- end
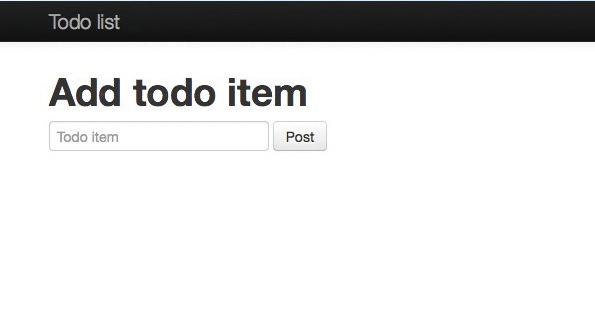
There are two elements to this: a get and a post. The get will be used to render the form to add new to-do items, and the post will handle the post request that comes from this form.
There is no logic needed to render the form. We set a @title variable that is returned within the <h1> tags of the layout view, and then we call the new.erb view.
The post needs to create the to-do item in the database. DataMapper can handle all this with the create method. We pass in params[:content], which is the text from the form and also a timestamp using Time.now. After this a redirect is done, back to the homepage that will show the newly added to-do item.
The form in new.erb is a very standard – and very basic – HTML form:
- <form action="/new" class="form-inline" method="POST">
- <input type="text" placeholder="Todo item" name="content">
- <button type="submit" class="btn">Post</button>
- </form>
Marking and deleting items
Now that we can add new items to this list, it’s very near to being functional – but we also want to be able to mark items as done and delete them. To give an example of two methods of doing this, one will be done via Ajax and the other will have a traditionally loaded confirmation page.
Starting with marking items as done, the Ajax request will need somewhere to post to. For this, create another post method just like we did for /new. In this case it will be /done:
- post '/done' do
- item = Item.first(:id => params[:id])
- item.done = !item.done
- item.save
- content_type 'application/json'
- value = item.done ? 'done' : 'not done'
- { :id => params[:id], :status => value }.to_json
- end
In this code, we’re using the DataMapper method to fetch the to-do item from the database, based on the id given by the Ajax call. The done element in the database is then set to the opposite of what it previously was: so if it was “done” it’s set to “not done”; if it was “not done”, “done”. This is represented in the database as Boolean: “true” or “false”.
Finally, the item is saved back to the database. We now need to return confirmation of what has been done using JavaScript Object Notation (JSON). The content type header needs to be set to JSON, and, based on the done element in the database, the value is set.
The id and value are both added into a hash, which is converted to JSON using the to_json method. The to_json method is made available as part of the JSON gem. Therefore, install it using the command gem install json. It also needs requiring at the top of the file using the syntax require json.
The JavaScript for this can be added in a file todo_list.js. File types such as JavaScript, CSS and images go into a ‘public’ directory in Sinatra. Sinatra checks here for a file before looking for the route within the application. The JavaScript file todo_list.js can then be referenced within the layout view.
- $(document).ready(function() {
- $(".done").click(function(e) {
- var item_id = $(this).parents('li').attr('id');
- $.ajax({
- type: "POST",
- url: "/done",
- data: { id: item_id },
- }).done(function(data) {
- if(data.status == 'done') {
- $("#" + data.id + " a.done").text('Not done')
- $("#" + data.id + " .item").wrapInner("<del>");
- }
- else {
- $("#" + data.id + " a.done").text('Done')
- $("#" + data.id + " .item").html(function(i, h) {
- return h.replace("<del>", "");
- });
- }
- });
- e.preventDefault();
- });
- });
jQuery is utilised for this Ajax call. You will notice that it’s a fairly standard Ajax POST call to the /done route. The to-do item id is fetched from the <li> tag and passed as JSON in the post request. After the Ajax call has come back as done, the data that’s sent back from Sinatra is used to change the name of the button and add or remove the <del> tags from the text as required.
The delete button for each to-do item links to /delete, which is appended with the item id. For example, to delete to-do item one, the delete button links to /delete/1. The code for this is as follows:
- get '/delete/:id' do
- @item = Item.first(:id => params[:id])
- erb :delete
- end
- post '/delete/:id' do
- if params.has_key?("ok")
- item = Item.first(:id => params[:id])
- item.destroy
- redirect '/'
- else
- redirect '/'
- end
- end
The first part of the code uses the get method with an :id parameter to find the to-do item id from the URL. The first item from the database with the matching id is then loaded. The final element of the get method calls the view delete.erb.
The second part of the code is the post method, and this is used as the action for the delete confirmation form built in delete.erb. The method checks that the OK button has been pressed – rather than the cancel button – and then subsequently locates the first to-do list item in the database, based on the id in the URL, and destroys it before redirecting back to the homepage.
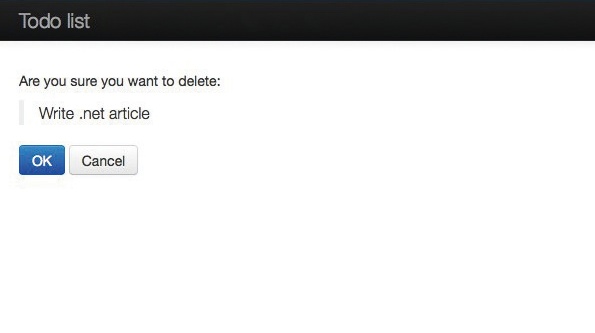
Much like new.erb, delete.erb features a basic HTML form, but you’ll see it has a hidden value – _method – to enforce the delete method. It also returns the to-do item contents before the form, to confirm the correct item will get deleted.
For example, confirmation is requested:
- <p>Are you sure you want to delete:</p>
- <blockquote><p><%= @item.content %></p></blockquote>
- <form action="/delete/<%= @item.id %>" method="POST">
- <input name="_method" type="hidden" value="delete" />
- <button type="submit" class="btn btn-primary" name="ok">OK</button>
- <button type="submit" class="btn" name="cancel">Cancel</button>
- </form>
Once all of this has been put together, you’ll have a complete to-do list application built in Sinatra. This can be run using the command ruby web.rb, and the application will be accessible at http://localhost:4567.
In order to improve this application further, authentication could be added – which would allow user-specific to-do lists. There’s a gem called sinatra-authentication that will do most of the authentication for you. You could also build in some extra validation and error handling to form submissions.
It’s additionally worth mentioning that security hasn’t really been discussed in this article. Sinatra has rack-protection enabled by default, which will defend your application against common and opportunistic attacks.
Thanks to Konstantin Haase for his peer review
Words: Tim Millwood
Tim is a client advisor at Acquia and freelance web developer, and an active member of the Drupal community.

Thank you for reading 5 articles this month* Join now for unlimited access
Enjoy your first month for just £1 / $1 / €1
*Read 5 free articles per month without a subscription

Join now for unlimited access
Try first month for just £1 / $1 / €1

The Creative Bloq team is made up of a group of art and design enthusiasts, and has changed and evolved since Creative Bloq began back in 2012. The current website team consists of eight full-time members of staff: Editor Georgia Coggan, Deputy Editor Rosie Hilder, Ecommerce Editor Beren Neale, Senior News Editor Daniel Piper, Editor, Digital Art and 3D Ian Dean, Tech Reviews Editor Erlingur Einarsson, Ecommerce Writer Beth Nicholls and Staff Writer Natalie Fear, as well as a roster of freelancers from around the world. The ImagineFX magazine team also pitch in, ensuring that content from leading digital art publication ImagineFX is represented on Creative Bloq.
