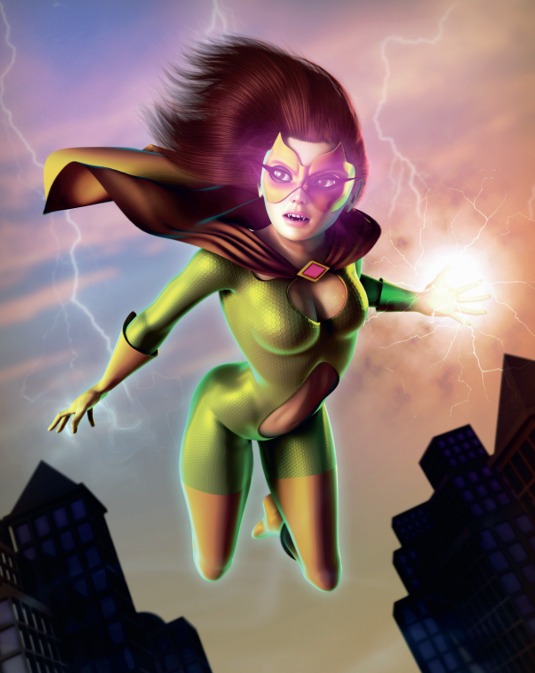
Breathe life into a 3D character with Maya's cloth and hair tools
Antony Ward shows you how to create a sense of movement using Maya's dynamics toolsets.
Sign up to Creative Bloq's daily newsletter, which brings you the latest news and inspiration from the worlds of art, design and technology.
You are now subscribed
Your newsletter sign-up was successful
Want to add more newsletters?
These days, almost all 3D applications have some degree of dynamics simulation included. Be it particles, hair, fur or cloth, the mere thought of straying into the simulation world can strike fear into many a traditional 3D artist's heart. But the use of dynamics can be rewarding, and open up many new avenues to your artwork and animation.
I admit that phrases like 'soft bodies' and 'Nucleus calculations' can seem quite intimidating, but once you get over the initial set-up process, playing with these simulations can be fun and almost intuitive. What I hope to do here is introduce you to the basics, and show you that setting up and manipulating cloth and hair in Maya doesn't have to lead to frustration (see our Maya 2013 review for more on the software).
You'll see that you can achieve professional results in a few simple steps, and once you've mastered the fundamentals, the world's your oyster. When you've completed the tutorial, continue to play with your new-found toys and see where you can take them. Used wisely, you'll find that dynamics simulations can even speed up your workflow.
Article continues below- Download the support files for this tutorial
01. Prepare the figure
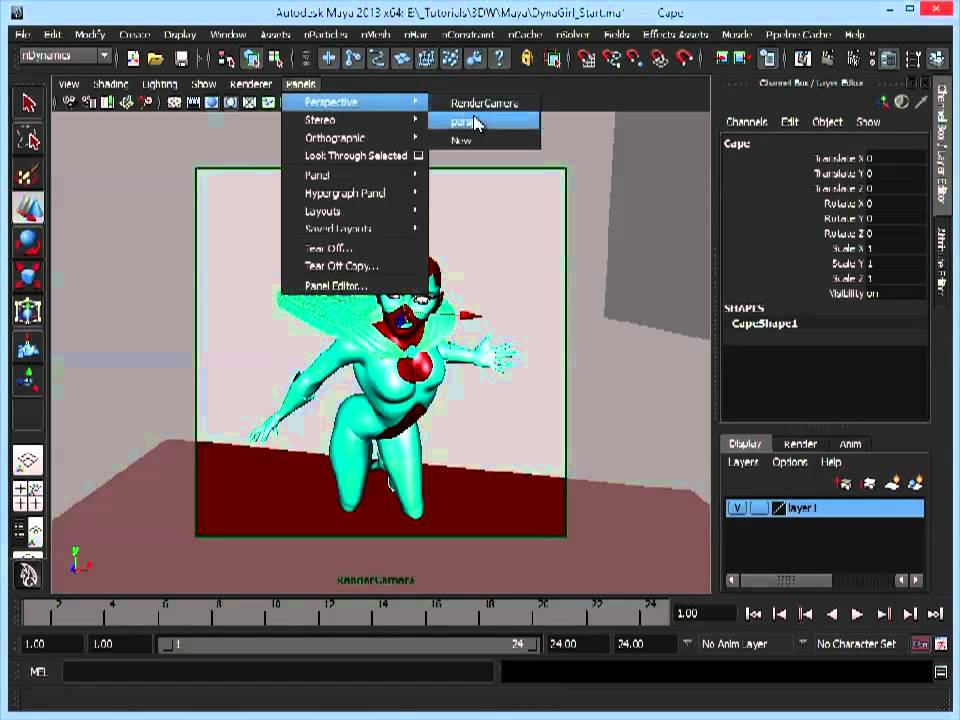
Before you can begin to play with any cloth or hair simulation, you need some geometry to work with. For this scene you have a pre-built character in the scene files, with lighting and render settings all ready to go. All she needs is some hair and a little work on her cape, which currently resembles a stiff board rather than flexible cloth.
The creation of the character was quite a simple task because she began life as a pre-made base mesh that was adjusted and posed to fit the concept and style. Her suit was created by simply duplicating, extruding and adjusting the body model, because it needed to be skin-tight.
Dynamic
With the character created, it's time to prepare the elements that are destined to be dynamic. For the cape you can use the geometry as it is. You can see that it's been created to have the correct shape and a few folds included, which gives you a head start.
When you grow your hair, though, you can't just apply it to the model. This will give you hair, but all over the character. Instead, you need to duplicate the top of the head around the scalp area, and use this as your starting point.
Sign up to Creative Bloq's daily newsletter, which brings you the latest news and inspiration from the worlds of art, design and technology.
02. Define the cloth
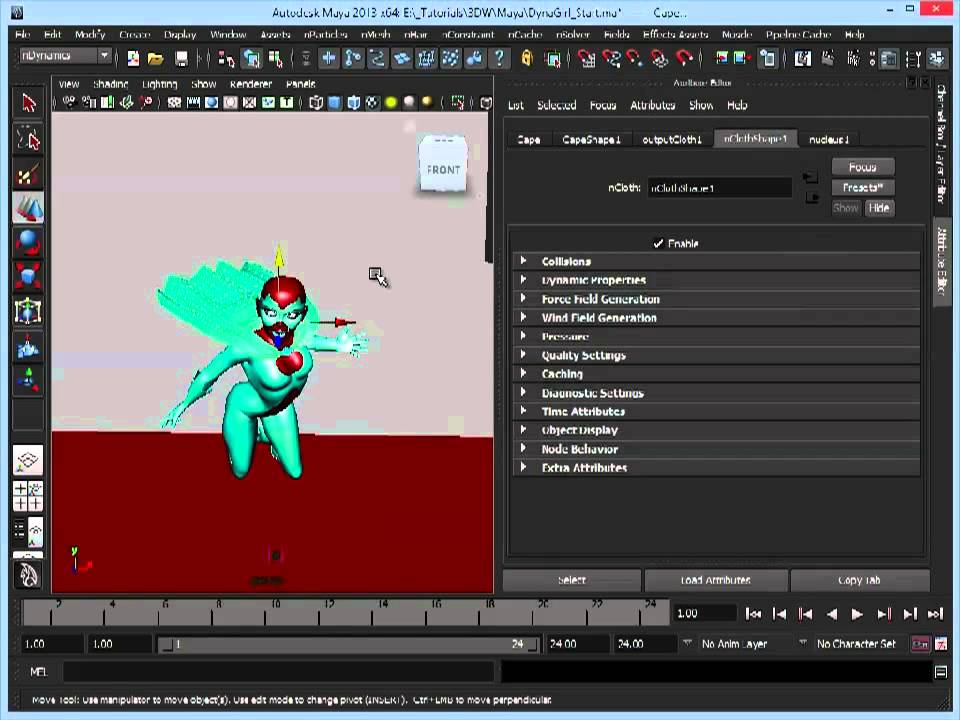
With the base geometry ready, let's focus on the cape first, because this will ease you gently into the tutorial and get you familiar with the systems. Select the cape model and go to nMesh > Create nCloth. Just use the default settings for now. This will convert your model into an nCloth mesh, and will also attach a nucleus1 node - I'll tell you a little more about this later.
When you play the animation you'll see two things. First, if you're using the default settings, the animation will end abruptly. So I recommend setting the end frame in the Time Slider to a ridiculously large number, such as 10,000 frames, so you can leave the animation to run and run. You should also see that the cape model simply falls through the character. This is because gravity is the only influence at the moment. There's no drag, wind or major resistance defined, so the cloth is simply falling towards, and then through, the floor.
03. Lock the key points
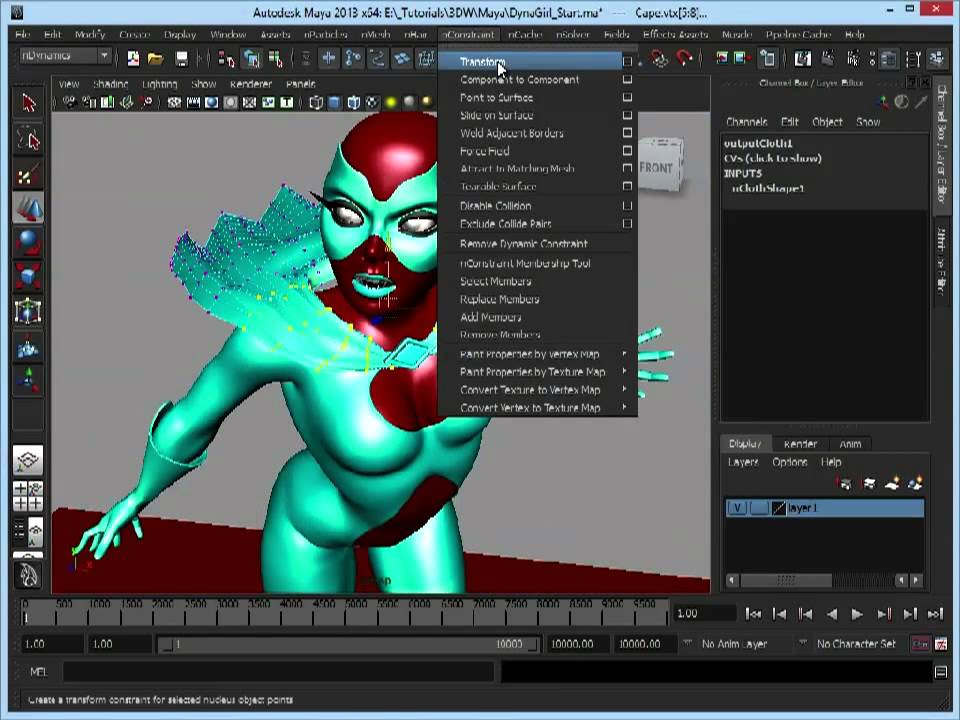
You now need to define a few areas that will be locked in place - pinned, for want of a better word. There are many different types of constraints that you can use to lock and manipulate cloth components, and all these can be found under the nConstraint menu.
At present all you're interested in is the Transform constraint. Ideally, you'd pin a few select vertices, and trust in collision models to help define where your cape falls, and hope it's not through her shoulders. But you're actually going to cheat a little here. Because this is a static pose, you can skip setting up collision models: instead, you can simply lock the whole upper section of the cape.
Select all the vertices of the cape that cover your model's shoulders, and go to nConstraint > Transform to create a Transform Constraint node. This time, rather than pressing play to watch the simulation, go to nSolver > Interactive Playback. Not only does the cape fall and hang from the pinned vertices, but using Interactive Playback also allows you to select the Transform Constraint node and interactively pull the cape around, with the simulation updating in real time. This is a great way to see the simulations in action as you adjust the vast array of attributes, and it gives you instant feedback.
04. Adjust the gravity and wind
Play the simulation again and you'll see that the cape falls as you want, but it's still almost lifeless. You want a more dynamic feel to this image, so let's add some gentle wind.
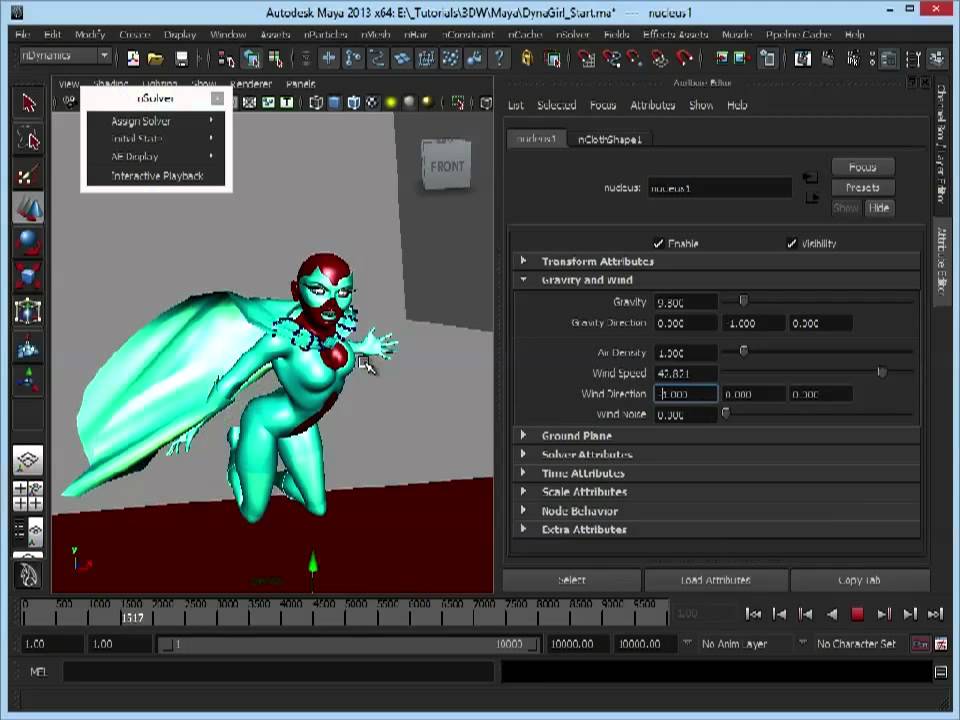
Select the cape, rewind to frame 0, and activate Interactive Playback once again. Now click the nucleus1 node in the Attribute Editor. This is where the main calculations will be performed, and where you can apply some global effects to the scene.
Under the Gravity and Wind Tab, adjust the Wind Speed slider and watch the effect it has on the cape. By default, the wind will be blowing from the right, so edit the Wind Direction values to something like -1, 0.2 and -1 so that the cape is blowing behind, and to the left of your character.
This is looking better, but it's still a little lifeless. Turn up the Wind Noise slider to 5 to add some much needed turbulence.
05. Edit the cloth properties
The cape is now blowing well in the breeze. Remember that all its attributes can also be animated, so the wind doesn't need to remain in one constant direction. Now you have the geometry pinned, you can focus more on tweaking the actual properties of the cloth. At present it may feel a little thin, or perhaps the simulation is causing it to collapse in on itself, so let's address those issues.
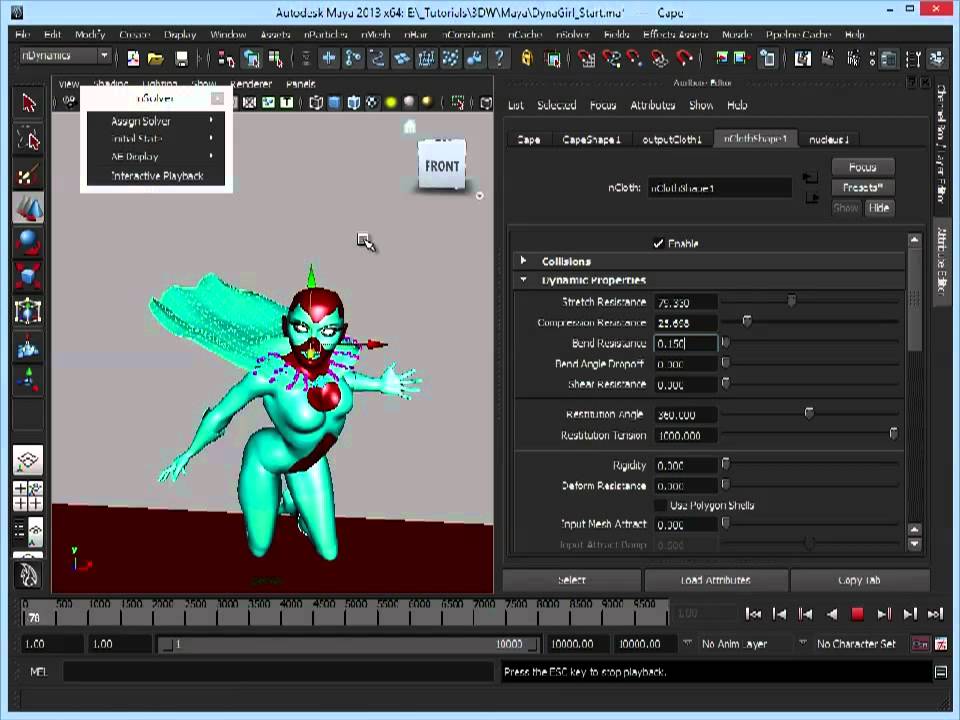
Select the cape, and in the Attribute Editor, move along to the nClothShape1 tab. This is home to all the main properties of the cloth. But for now, shift your focus down to its Dynamic Properties tab.
It's here that you can adjust and fix any of the issues mentioned above. If the cloth is too loose, adjust the Bend Resistance; too elasticated, edit the Stretch Resistance. You can even make the cloth heavier by increasing its Mass. I could go on to explain what each attribute does, but that would be a tutorial in itself, and this is just an introduction. However, I cover more in the accompanying video.
Now you have the basic cape set up and working, spend some time just playing around with the values and sliders. I find that this is the best way to get a good feeling for what each attribute does, and how it affects the simulation.
06. Grow the hair
That's the basics of cloth creation covered. Now let's move on and give this girl some hair. This time select the Scalp model I mentioned earlier, go to nHair > Create nHair, and open the Options window.
nHair works from Follicles, which in turn have their own Clump and a guide curve. The more Clumps you have, the more control you have, but the trade-off is that there will be more curves to edit and adjust. Fortunately, I won't be focusing on guide curves or start and rest poses in this tutorial.
Setting U Count and V Count to 20 should give you a nice even spread of Follicles, while also keeping the scene manageable. If you click Apply now, though, the hair will seem sparse, so set Passive Fill to 1. This will add dummy follicles, which simply fill in the blank spaces by mimicking what the surrounding Follicles and Clumps are doing.
Click Apply to create your initially spiky hairstyle. If at this stage the hair is too short, or maybe too long, just use the nHair > Scale Hair Tool to quickly adjust its length.
07. Add turbulence and motion
If you play the simulation now, you'd expect that the hair would simply fall, just like the cape. But it doesn't. Because you already have a nucleus node in the scene, Maya cleverly picks up on this and tells the hair to use it too - which is good for you, because it means both elements will be influenced by the same wind settings. Using the nucleus also means they could interact if you wanted.
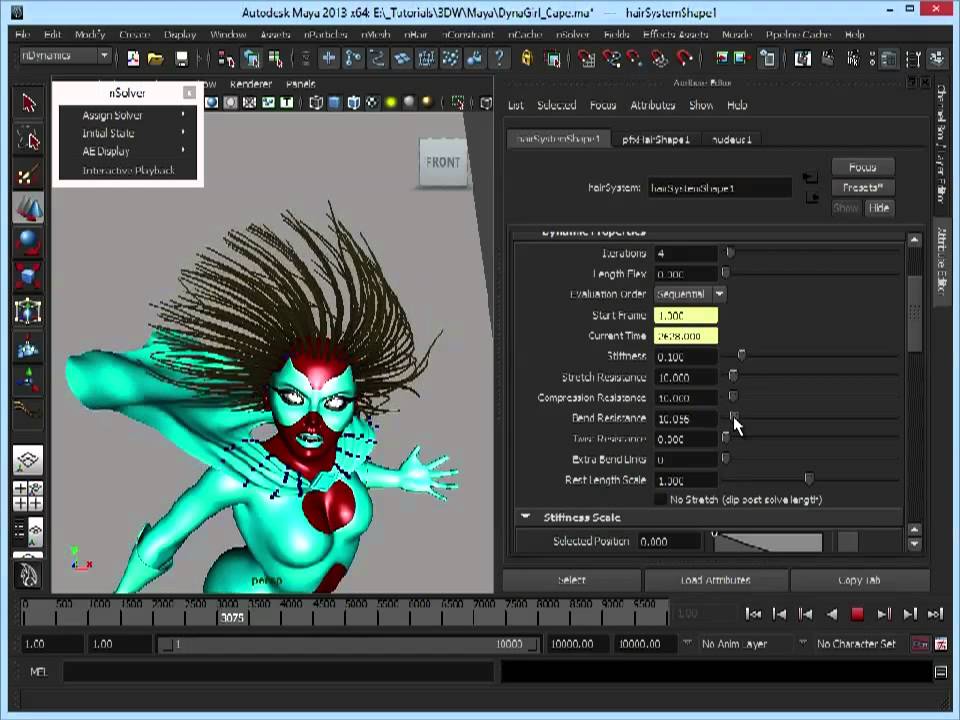
Just like the cape, the hair is a little lifeless, but you can quickly add some spice to make it more interesting. Open the attributes on the hairSystemShape1 node and scroll down to the Turbulence tab. Adjusting the Intensity creates some turbulence, which gives the hair more movement and energy. You can refine this further by also editing its Speed and Frequency.
If you now open the Dynamic Properties tab, you'll see that we have even more settings to play with. For now though, we should just concentrate on the Bend Resistance, which will effect how much the hair bends, allowing it to fall closer, or indeed further away from the head itself.
08. Adjust the Clumps
With these slim Clumps of hair in motion, you now need to create more of a style. You'll also need to fill out the head, and make the hair as a whole look a bit more interesting. To do this, you need to start adjusting the default Clump properties to better suit the look you're after.
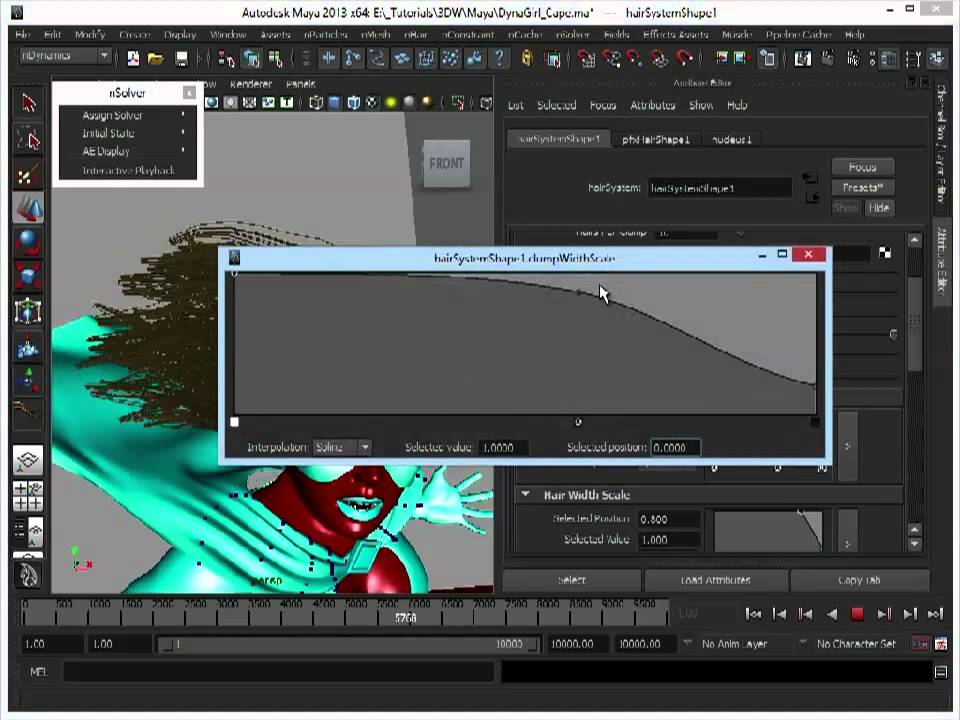
To begin with, open the Clump and Hair Shape tab, and initially adjust the Clump Width to a value of around 1.5. This will widen each Clump, filling out the top of the head nicely and naturally. You can now go further and edit the Clump Width Scale spline found just beneath. These splines are connected to most attributes, and enable you to adjust how they act as they follow the length of each Clump.
So in this case, the Clump begins wide and then tapers to a point. Adding new points into the spline will give you the ability to change this. So for example, the Clumps could begin slim and widen towards the middle, before tapering off again at the tip.
As you scroll down the Attribute panel you'll notice lots of other attributes that will add different effects to the Clumps. For instance, you can make them curl, or you can flatten them out, forming hair strips rather than round clumps. Another important tab to mention is the Displacement tab. Here you'll find a selection of attributes geared towards varying the hair so that it doesn't appear quite so linear. Adding noise, slight curls and clumping helps reduce the hair's linear, digital look.
09. Prepare for rendering
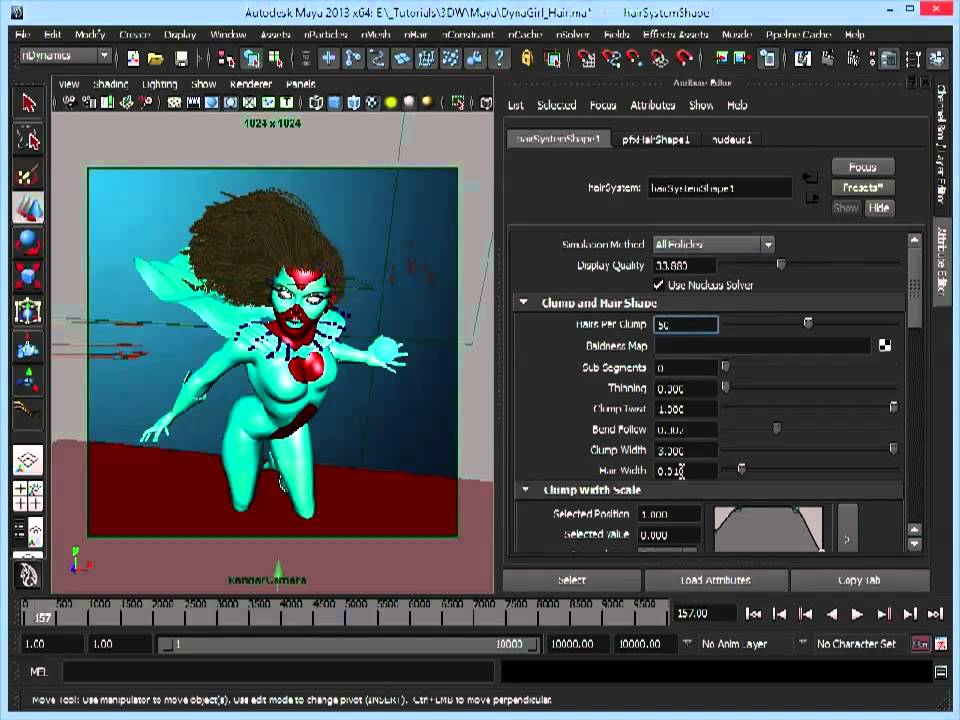
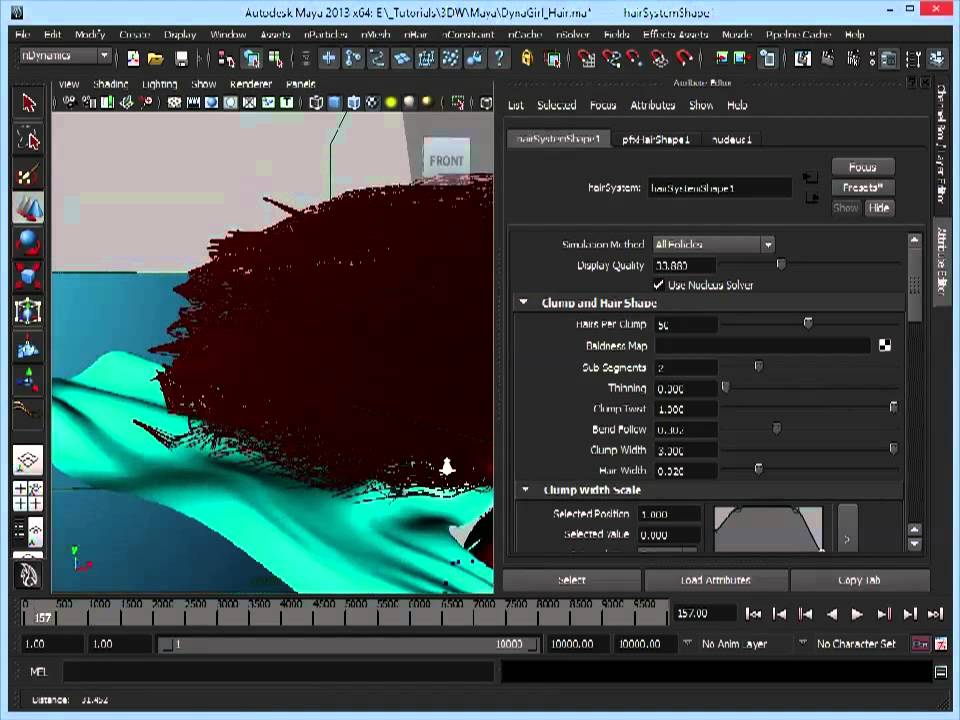
The hair is now modelled and styled up, but as you can see from the image on the left, there's still work to be done. Until you've set up the render, your preview reverts to the skeletal guides, so now it's time to adjust it for rendering. First, let's thicken it up and get the correct look before you start to play with the colour and opacity. The first element to adjust is the Hairs per Clump attribute. By default this is set to 10, which is why you have a frail head of hair. So turn this up to 50 to add more hairs to each Clump. Editing this will have an impact on performance, so reduce the Display Quality to a workable level. Sticking in the same tab, also increase the Sub Segments, which will smooth out the flow of each Clump.
The Hair Width attribute affects the thickness of each hair, so be careful when editing this, but turning it up a touch will thicken the appearance. You can also edit the Hair Width Scale spline to thin out each hair as it moves away from the head.
Two more attributes to consider adjusting are Thinning and Multi Streaks. Thinning will thin the hair's appearance, which may seem counterproductive when you've just spent time giving the hair more volume. The problem is that the Clumps are very uniform in density, so when rendered they will all have the same thickness towards the tip. Adding an element of Thinning will soften the tips and give you a more natural, wispy feel. Multi Streaks, on the other hand, will simply multiply each hair at render time, again thickening the appearance.
10. Colour the hair
If you render the hair now you'll see that it has much more volume, and looks more interesting. But you probably don't want it to be the slightly dull default brown. Now I come to the final touches where you can play around with the actual appearance of each hair.
Jump down to the Shading tab and you'll find a simple colour slider that enables you to dictate the hair colour - nothing too taxing about that. Moving further down reveals the Hair Color Scale tab, with a few more toys to play with. It's in here you can adjust the hair's Opacity, Translucence, Specular Color and Specular Power. So, just like editing a basic shader, you can work on each of these individually to achieve the perfect look.
Once you've set the colour with the slider, begin with the Opacity setting, lowering it so each hair is more transparent. This will work especially well if you have light behind the character, because the outer hairs will catch it nicely. The Specular options work much the same as in any shader, so pick a suitable colour B , and remember that the higher the Specular Power, the tighter the shine.
Introduce collisions
Up to now, you haven't really had much cause to use collisions in this tutorial. But they are an important element of dynamics in Maya, so I thought it would be useful add a final section about their use here, just to give you an insight into how to use them. Collisions do exactly what you would expect them to do. They replicate the actions that two objects would make if they came into contact with each other. Of course, it doesn't have to be a violent collision, such as with a car crash. The term can just as easily refer to the way a lock of hair meets a shoulder, and the way all the different elements interact.
So, define an object as a Passive Collider by selecting it and going to nMesh > Create Passive Collider. Now, any dynamics systems using the same nucleus will collide with that object. This is good if your hair is passing through the head model, because making the head a collision object will cause the hair to wrap around it. As you would expect though, having lots of collisions in the scene will have an impact on the simulation speed.
You're probably thinking that this brief description makes it sound too easy, but in actual fact, it is. Obviously, like the rest of this tutorial, there's another layer of depth I could cover on cloth, hair and collisions, but the idea was to introduce you to these elements so you have the confidence to play around and experiment!
Words: Antony Ward
Antony Ward has been provoking pixels since the early 1990s. He has worked for some of today’s top studios.
This article originally appeared in 3D World issue 167.
Liked this? Read these!
- The best 3D movies of 2013
- Download free textures: high resolution and ready to use now
- Discover what's next for Augmented Reality
Got any questions? Ask away in the comments!

The Creative Bloq team is made up of a group of art and design enthusiasts, and has changed and evolved since Creative Bloq began back in 2012. The current website team consists of eight full-time members of staff: Editor Georgia Coggan, Deputy Editor Rosie Hilder, Ecommerce Editor Beren Neale, Senior News Editor Daniel Piper, Editor, Digital Art and 3D Ian Dean, Tech Reviews Editor Erlingur Einarsson, Ecommerce Writer Beth Nicholls and Staff Writer Natalie Fear, as well as a roster of freelancers from around the world. The ImagineFX magazine team also pitch in, ensuring that content from leading digital art publication ImagineFX is represented on Creative Bloq.
