Create 3D type in 10 simple steps
Make your type stand out: Alex Gill reveals how to quickly create 3D type using Photoshop and Illustrator.
The relationship between type and image is widely regarded as the foundation of effective graphic design. No matter how good an image is, this relationship will make or break a piece of work. However, it's often overlooked. If you want to communicate with your audience, why not make your message really stand out?
In this walkthrough I will show you how to use a combination of basic tools and techniques in Photoshop and Illustrator to create 3D type with real impact. We'll also look at some subtle lighting techniques to create extra depth within the type, which you can then experiment with in your own work.
I find it's very important to stay organised when working. Keyboard shortcuts, folders and clearly named layers will help to improve your workflow and, ultimately, save you a lot of time.
Article continues below- Software: Photoshop and Illustrator CS4 or later
- Project time: 1.5-2 hours
- Skills: Combine Illustrator's 3D capabilities with Photoshop work, Manage your layers efficiently, Add subtle lighting techniques
- Support file
Step 01

First, we need to create the two elements of 3D type that we're going to eventually work on in Photoshop. Open up a document in Illustrator - a landscape A4 page is fine. Pick a suitable phrase or word and your desired font, but try to keep it relatively simple. I'm going to use ITC Serif Gothic and the phrase 'Give it some depth'.
Step 02

Arrange the type as desired, and adjust the kerning and leading to enable each letter to breathe. We now need to turn our type into paths. Select it and go to Type>Create Outlines. With the elements still selected, group them into one object. Change the colour to a mid to dark grey - I'm using hex code #7A7A7A.
Step 03
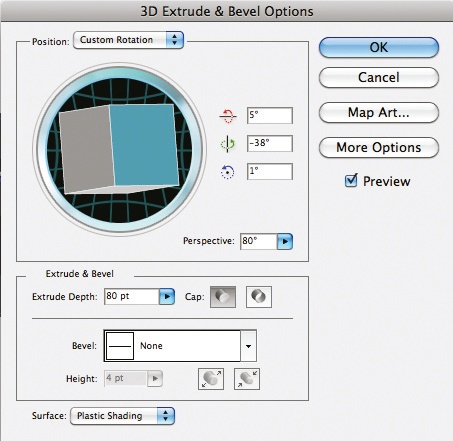
Select the outlined text and go to Effect>3D>Extrude & Bevel. You can use the settings pictured here or experiment with your own. To enable us to edit the type further, navigate to Object>Expand Appearance. Take the Direct Selection tool and, holding down Shift, select the face of the type only, cut it (Ctrl/Cmd+X) and create a new layer named 'Face'. Then go to Edit>Paste in place, group it and lock that layer.
Step 04
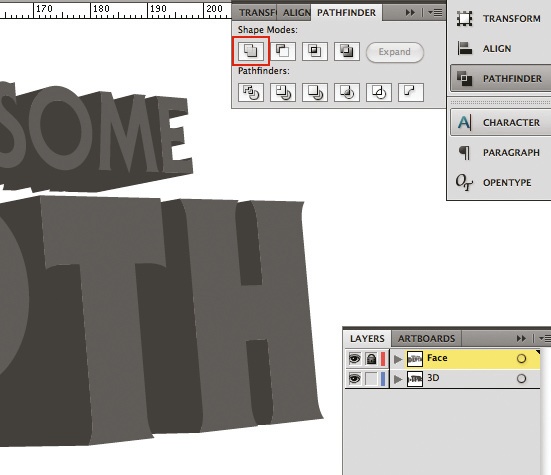
While the Face layer is locked, select the 3D elements of the text and use the Pathfinder panel to unite them into one element. We now have what we need to take into Photoshop, so open background.psd. Copy the Face layer from Illustrator, paste it into your Photoshop canvas as a smart object and label the layer. Repeat this with your 3D layer and position it below the Face layer. The layers may be slightly out of line, so zoom in and adjust accordingly.
Sign up to Creative Bloq's daily newsletter, which brings you the latest news and inspiration from the worlds of art, design and technology.
Step 05
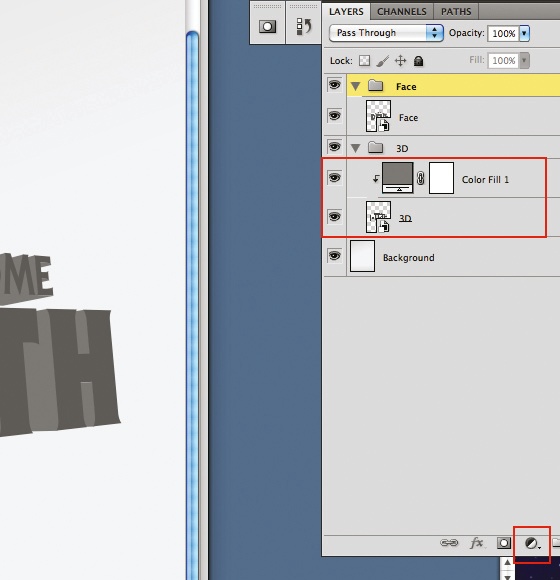
Drag your 3D layer to the folder icon at the bottom of the Layer panel and name the group '3D'. With your 3D layer selected, click the 'Create new fill or adjustment layer' icon in the Layer panel, select Solid Colour and use #303030. Next, hover between the colour fill and 3D layer, hold Alt/Opt+click. Your colour fill should now only affect the layer below it.
Step 06
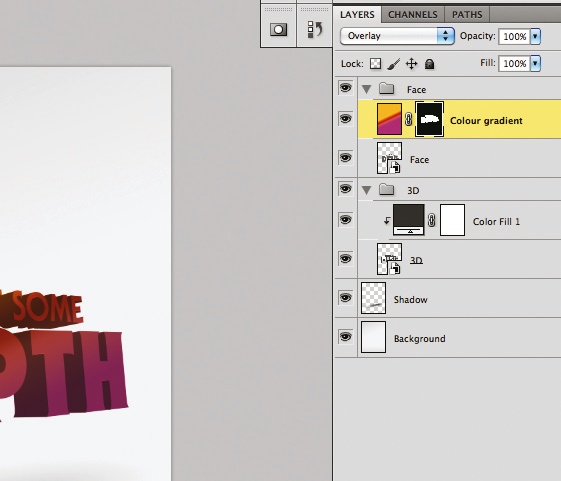
Moving into the Face folder, create a colour gradient of your choosing above your type. With this layer selected, hold Ctrl/Cmd+click the thumbnail of your Face layer. Click the Layer Mask icon to create a mask on your gradient in the shape of your type. With your new mask now selected, Ctrl/Cmd+click the thumbnail of your 3D elements and fill them with white. Turn the gradient layer's blending mode to Overlay.
Step 07
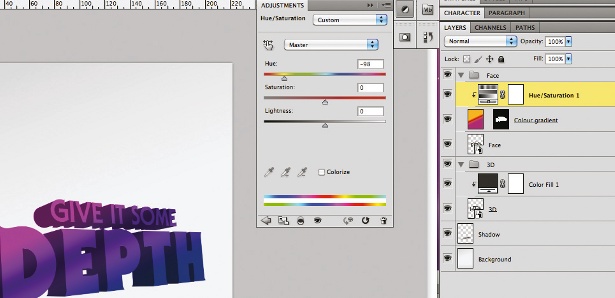
Create a new Hue/Saturation adjustment layer above your gradient, hold Alt/Opt+click between the layers to apply it to the gradient layer. By moving the Hue slider you can create some interesting alternative colours. I'm going to settle on -98. We're now going to add some shine and other effects. Ctrl/Cmd+click on the face thumbnail again. Go to Select>Modify and set Contract to 5px, then create a new layer named 'Shine' and fill it with white.
Step 08
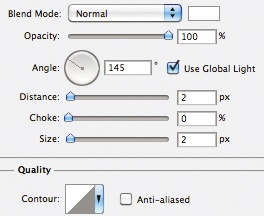
Select the Shine layer, click the New Path icon in the Paths tab, and draw a wave shape with the Pen tool over the top and bottom line of type. Ctrl/Cmd+click the thumbnail of your new path and go back to the Shine layer. Delete the lower white sections and set the blending mode to Overlay. Select the Face layer and go to Layer>Layer Style>Inner Shadow. Set Blend Mode to Normal, Opacity to 100%, Angle: 145°, Distance and Size to 2pt and tick Use Global Light.
Step 09
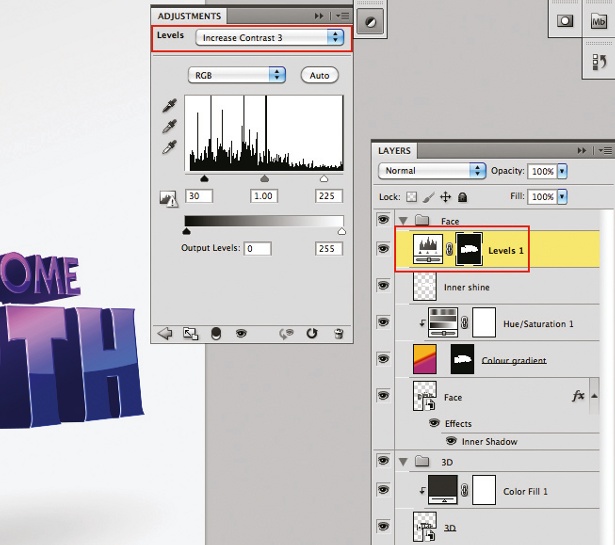
Create a new Levels adjustment layer above your Shine layer and mask it so that it only affects your type. Select Increase Contrast from the drop-down menu in the Adjustments panel or change to your preference. Create a new layer, 'Noise', go to Edit>Fill and set Use to 50% Gray. Then go to Filter>Noise>Add Noise>8%. Hit OK and set the Noise layer blending mode to Soft Light. Apply the type mask as you did with the levels.
Step 10
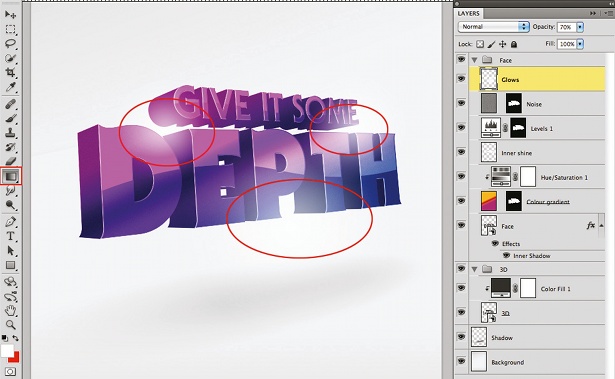
Create a new layer called 'Glows', select the Radial Gradient tool and set it from white to transparent. Hold Shift and draw, say, three radials where light will break between the letters. When you're happy, set the opacity of the Glows layer to 70%. Then select all the layers apart from the background, duplicate them, merge them and label them 'Soften'.
Now duplicate your Soften layer, rename it 'High Pass' and turn it off for a moment. Select your Soften layer, and add a Gaussian Blur at 50px and hit OK. Set the layer blending mode to Soft Light and its opacity to 50%. Select your High Pass layer and desaturate it. Go to Filter>Other>High Pass>40px, set the layer blend to Overlay and you're done.
Words: Alex Gill
Liked this? Read these!
- Download the best free fonts
- Free graffiti font selection
- Free tattoo fonts for designers
- The best free web fonts for designers

The Creative Bloq team is made up of a group of art and design enthusiasts, and has changed and evolved since Creative Bloq began back in 2012. The current website team consists of eight full-time members of staff: Editor Georgia Coggan, Deputy Editor Rosie Hilder, Ecommerce Editor Beren Neale, Senior News Editor Daniel Piper, Editor, Digital Art and 3D Ian Dean, Tech Reviews Editor Erlingur Einarsson, Ecommerce Writer Beth Nicholls and Staff Writer Natalie Fear, as well as a roster of freelancers from around the world. The ImagineFX magazine team also pitch in, ensuring that content from leading digital art publication ImagineFX is represented on Creative Bloq.
