Animate a logo reveal in Cinema 4D
3D animation meets graphic design as Tim Clapham shows you how to animate and composite a pro-quality logo sequence.
31. Add colour tints
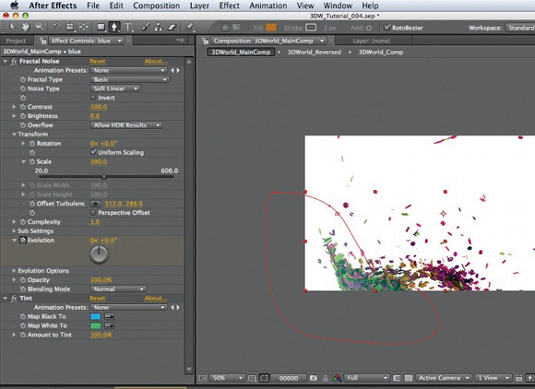
Next, set up some colour tints. Create a blue-green masked area to the left of the screen and a magenta area to the right. Keyframe both masks so they affect only the edges of the logo as it animates. Reduce their Opacity values to suit. Follow the video from 1:22:57 for the full workflow.
32. Add camera lens effects
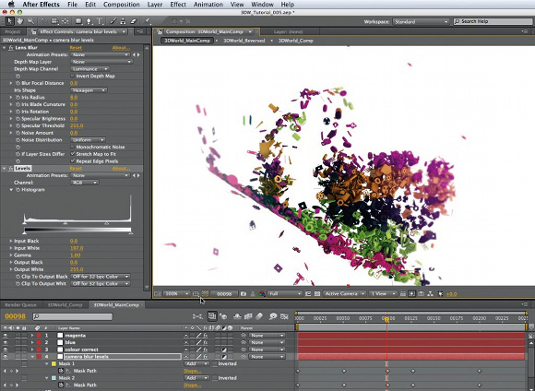
Using a similar procedure, set up two masks to add a touch of lens blur to the foremost and rear parts of the logo, and keyframe the masks to track the logo’s movements. Follow the video from 1:28:57 for the workflow. To overexpose the blurred areas, add Effects > Color Correction > Levels, then set Input White to around 200.
33. Add a coloured vignette
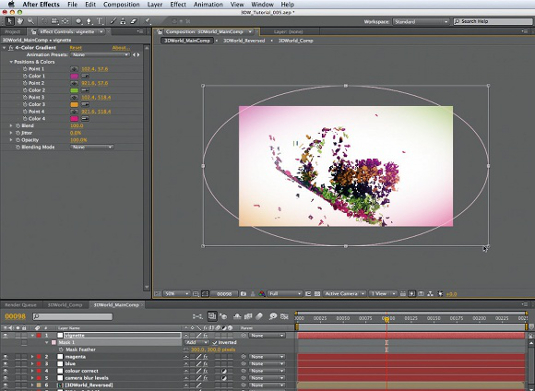
For a subtle vignette, add a white Solid to the top of the timeline, then select Effect > Generate > 4-Color Gradient. Hide the layer, then pick colours from the Comp window to set Color 1 through 4. Make the layer visible, then double-click the Ellipse Tool to add a mask. Press [M] to reveal the Mask controls and tick Inverted. Press [F] and set Mask Feather to 300. Double-click the mask and scale it up, then reduce the layer Opacity to suit.
34. Add background details
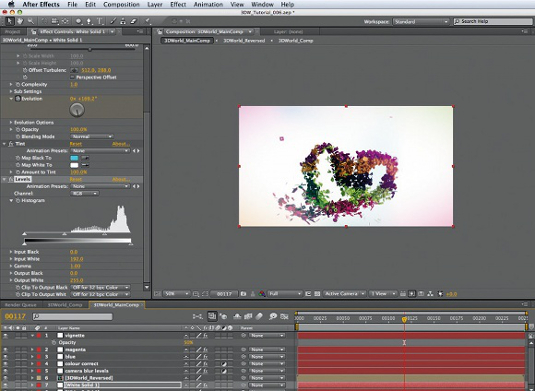
Add a white Solid above the bottom layer. Select Effect > Noise > Fractal Noise; set Complexity to 1, Scale to 350. At frame 0, keyframe Evolution, then set Evolution to 1x at frame 249. Select Effects > Colour Correction > Tint. Choose a cyan hue for Map Black To. To soften the effect, select Effects > Color Correction > Levels, then set Input White to around 200.
35. Add motion blur
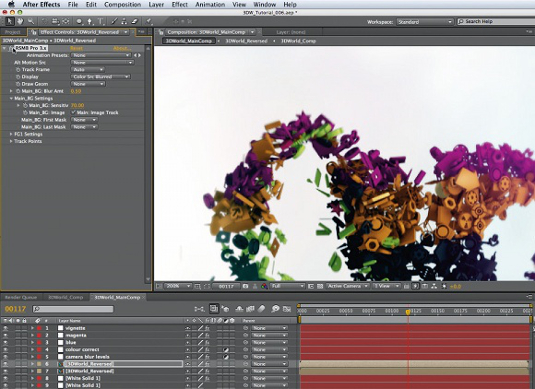
Duplicate 3DWorld_Reversed, then reveal the settings for the lower of these two layers. Scale the layer up to around 300 and reduce Opacity to about 20% to add detail to the backdrop. A good option at this point is to add some motion blur to the 3DWorld_Reversed layer. For my animation, I used ReelSmart Motion Blur. Alternatives might be CC Force Motion Blur or even Echo, if used with subtlety. Both are found under Effect > Time.
36. Render the final animation

The animation is now ready for rendering. Select the 3DWorld_Main composition in the project window and choose Composition > Add to Render Queue. In the render queue, select an appropriate output module such as QuickTime Animation. Choose an appropriate Render Setting, most probably Best Settings. Then hit Render and wait for the fruits of your labour to be output.
In the animation in the project files, you’ll notice that I use several different camera angles. To make the project run smoothly, you can output a hardware render in Cinema 4D of the whole animation from each camera, then edit the piece together using these hardware renders. Once you are happy with the edit, you can then do a full render from Cinema 4D, using only the frame range needed for each edit. Give yourself a few frames of padding so you can make minor adjustments to the edit if needed. If you do render several different camera angles, you’ll probably want to place these in an intermediate comp in After Effects before colour correction. This way, you can colour-correct all the clips with each adjustment layer, rather than applying the same changes to every clip’s individual comp.
Daily design news, reviews, how-tos and more, as picked by the editors.
Words: Tim Clapham
Tim Clapham is company director at Luxx in Sydney, and is a multi-disciplinary animator and compositor.
Delivered in conjunction with ZED!
This content was produced in collaboration with HP & Intel as part of ZED - a Pop-Up Studio for the Creative Community held in Soho, London. For more information about ZED and any future events see here.

The Creative Bloq team is made up of a group of art and design enthusiasts, and has changed and evolved since Creative Bloq began back in 2012. The current website team consists of eight full-time members of staff: Editor Georgia Coggan, Deputy Editor Rosie Hilder, Ecommerce Editor Beren Neale, Senior News Editor Daniel Piper, Editor, Digital Art and 3D Ian Dean, Tech Reviews Editor Erlingur Einarsson, Ecommerce Writer Beth Nicholls and Staff Writer Natalie Fear, as well as a roster of freelancers from around the world. The ImagineFX magazine team also pitch in, ensuring that content from leading digital art publication ImagineFX is represented on Creative Bloq.
