Export skinned characters from Modo to Unity
Getting characters out of modo and into Unity can be a pain, but Wes McDermott’s here to help smooth out the process.
Sign up to Creative Bloq's daily newsletter, which brings you the latest news and inspiration from the worlds of art, design and technology.
You are now subscribed
Your newsletter sign-up was successful
Want to add more newsletters?
When importing skinned characters into Unity, you’ll want to be sure that your rig hierarchy is as clean and optimised as possible. You’ll also need to make sure that your rig has enough bones to convey proper deformations, and be mindful of how bone count can affect performance. Each bone in the hierarchy needs to recalculate the transform back to the root, so the larger the hierarchy, the more impact it will have on performance.
The other issue to consider is the number of bones affecting a vertex: Unity supports no more than four bones per vertex. The speed of transforming the vertices is directly related to the number of bones affecting the vertex being transformed. When binding your character in modo, you’ll want to set the Limit Weights option to 4 or lower. You can also adjust the quality of the blend weights in Unity via the Quality setting on the skinned mesh renderer.
With that said, the biggest issue with exporting skinned characters from modo comes down to transforms: modo 601 doesn’t have an Export Selected option. When you export your skinned mesh, you’ll often find a rather messy transform hierarchy in Unity. Pretty much any locator in modo will be imported into Unity. The modo FBX preferences allow you to disable lights and cameras from export, but unticking Save Locators will result in your bones not being exported. Bones in modo are simply locator item types, defined positions in 3D space that are parented with a drawn connection shape. Also, any groups you create in the Item List are also exported as a transform in Unity. The numbers of transforms can build up quickly, and make a mess of your character’s hierarchy.
Article continues belowThere isn’t a perfect workflow for getting your characters out of modo. I’ve found that it really comes down to some old-fashioned manual cleaning up. The first thing I do after creating my character’s base skeleton is to duplicate the bone hierarchy. I do this before the actual rigging stage, and it gives me two skeletons to work with.
I use one skeleton for the bind joints – these are joints that actually affect the vertices, and this is the hierarchy that will be exported to Unity – and I use the other skeleton for rigging, such as being constrained to controller items and using IK. I can then link the bind joints to the rig joints by adding a position and rotation constraint to each of the bind joints.
This is as tedious as it sounds, but it provides some advantages: To get through the setup quickly I open two Item List viewports, using one viewport to select the bind joints and the other to select the rig joint to constrain to. The first advantage is that having a separate set of bind joints allows me to limit the number of joints that are actually affecting my mesh. So for instance, my rig hierarchy might have deformation controllers such as arm roll bones. These extra bones can help to drive my rig during animation, but I don’t need them added to the hierarchy that I will actually export. My bind joints are linked to the key rig joints, and not to extra controllers such as roll bones.
The second advantage is that when the time comes to export, I can bake my bind joints, which will effectively bake the animation from the rig joints. From there, I delete the rig joints and all rig controllers used in the animation. This leaves me with a clean and optimised scene that contains only my mesh and the bind joints. I also remove all texture locators and groups, because they aren’t needed in my Unity scene. So, working with two skeleton hierarchies in modo can be tedious, but the extra work is worth it to export a clean hierarchy.
Sign up to Creative Bloq's daily newsletter, which brings you the latest news and inspiration from the worlds of art, design and technology.
Take your modo characters into Unity
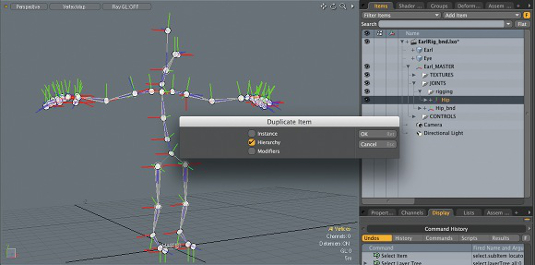
Create a duplicate of your skeleton hierarchy

Double-click the root joint, right-click and choose Duplicate Hierarchy from the context menu. At this point, you can rename the duplicated joints.
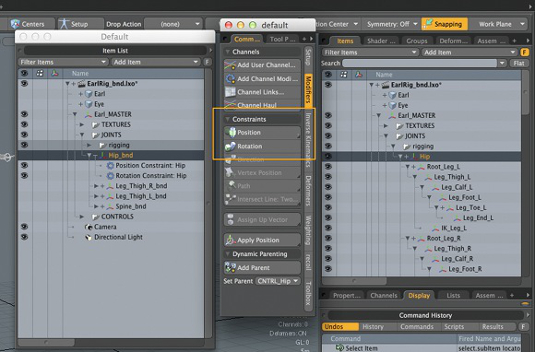
Add position and rotation constraints to the bind joints

To link the bind joints, you need to add a position and rotation constraint from the bind joint to its corresponding rig joint. Ensure you bind the joints to your mesh.
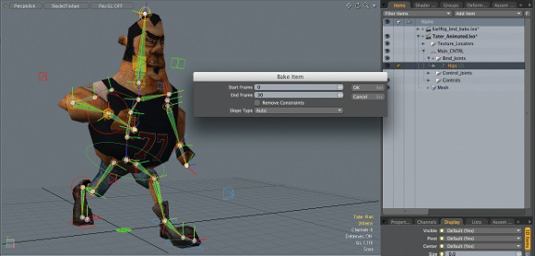
Bake the bind joints

Once you’ve finished animating, you can double-click the root joint in your bind joint hierarchy to select all joints. Next, go to the Animate menu, select Bake and choose the length of the animation. I untick the Remove Constraints button because it doesn’t actually remove the constraints. Now the bind joints have been baked, you can delete the rig joints and constraints.
Wes McDermott is a 3D artist and multimedia developer. He’s the author of Real World modo and the CameraMan for Maya iOS app
Discover 20 top free 3D models to download now

The Creative Bloq team is made up of a group of art and design enthusiasts, and has changed and evolved since Creative Bloq began back in 2012. The current website team consists of eight full-time members of staff: Editor Georgia Coggan, Deputy Editor Rosie Hilder, Ecommerce Editor Beren Neale, Senior News Editor Daniel Piper, Editor, Digital Art and 3D Ian Dean, Tech Reviews Editor Erlingur Einarsson, Ecommerce Writer Beth Nicholls and Staff Writer Natalie Fear, as well as a roster of freelancers from around the world. The ImagineFX magazine team also pitch in, ensuring that content from leading digital art publication ImagineFX is represented on Creative Bloq.
