The origin of miniature painting stretches far back to the medieval age, when miniature artists painted exquisite portraits in watercolour on vellum and ivory. They used fine detail and painting techniques such as stippling and hatching to create layers of colour, in paintings measuring no larger than 6 x 4.5 inches.
Many miniature artists today are still painting in the traditional way, but now miniatures can be of any subject and in a variety of mediums – oil, watercolours and acrylics, to name but a few. Vellum is still chosen as a painting surface, but now more artists are choosing to use newer products such as ivorine, polymin, smooth card or paper, or board.
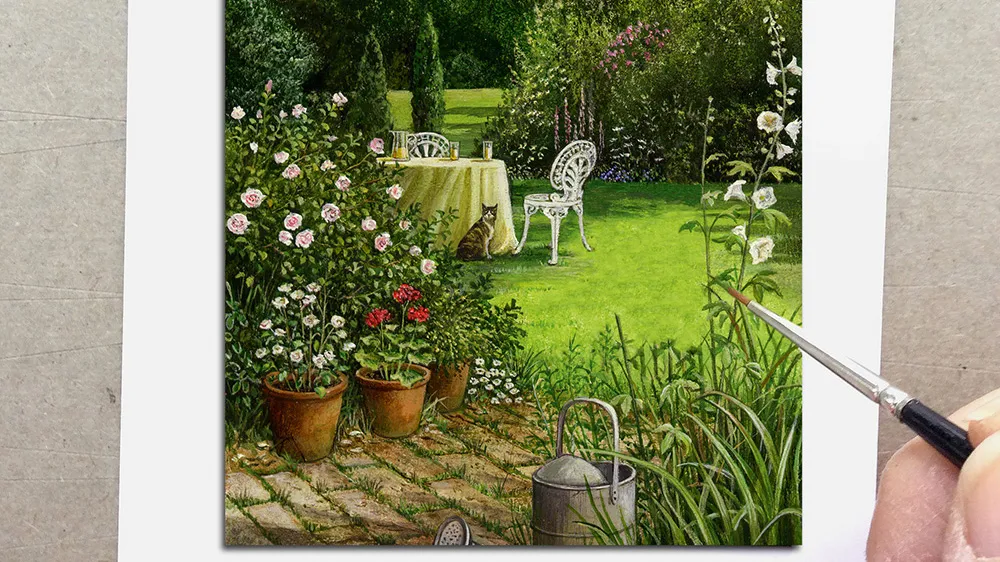
I’m going to show you how you can paint your own miniature using acrylics. These are versatile and rich in colour. Mistakes can be easily painted over, thus making them ideal for beginners.
Painting a miniature requires a steady hand and lots of patience. It's also important that you're familiar with the consistency of the paints, so practice painting straight thin lines on the back of an old photograph before starting your work. For more miniature art, see these awesome nail art designs.
01. Plan your drawing

Hardboard or MDF board when primed with about five coats of white watercolour acrylic gesso, and sanded to a smooth finish, make a wonderful surface to paint on. I used a board cut down to 3 x 3.75 inches, primed with Daler Rowney Simply Acrylic Gesso.
Plan out your drawing onto the prepared board using tracing paper or drawing freehand. You can download my sketch here, or draw your own composition. Do not draw all the flowers in the foreground too soon, as they will be covered by paint and your drawing will be obscured.
02. Add sky, trees and hedges

A good brush is essential for fine detail and I prefer to use Pro Arte Connoisseur brushes, which are a blend of sable and synthetic prolene and maintain a good point. For texture, I use an old oil bristle brush – it’s ideal for stippling.
Daler Rowney System 3 Acrylic paints are wonderful for miniature painting. They have a creamy texture and do not lose their opacity when diluted for fine line detail. They dry quickly so are marvellous for glazing and dry brush techniques.
Using a no. 4 round brush, take a small amount of Titanium White acrylic and add a tiny touch of Ultramarine. Use only a small amount of water and mix the required colour to a creamy consistency. Apply to the sky area.
In order to achieve texture in the background trees, use a dry old bristle brush. Take a little neat Sap Green and a touch of black to the tip of the brush. Stipple the colours onto a practice sheet (the back of an old photograph is ideal) without mixing until you’ve got your desired colour and texture and apply.
To highlight, with a clean, dry brush take a little Lemon Yellow, Sap Green and a touch of white on the tip of the brush and carefully stipple to shape and highlight trees and bushes. A touch of blue or Yellow Ochre can be added to the trees if you want to vary the shades. Finish the bushes with a fine no. 000 brush to define the foliage.
03. Paint the grass

Use a half-inch flat brush and mix Lemon Yellow and a little Sap Green with water to make a thin wash for the lawn areas. For the tablecloth, use a no. 2 brush, a little water, and add a touch of black to Lemon Yellow to paint the folds in the tablecloth.
When dry, use a no. 4 brush and glaze with a thin wash of yellow and water over the whole cloth. Use white for highlights.
04. Create underpainting

Use a no.4 brush and mix Sap Green and Mars Black with a little water to block in the dark background for the flowers in front of the table. Draw in pencil the outline of the pots and flowers on to the dark green. Use a no. 000 brush with white and a little water and carefully define the shapes of the flowers, leaves and pots.
The dark background will cause the white paint to look dull. Paint over the areas again that you wish to lighten, leaving the darker areas untouched. This will create more contrast. Other plants and flowers in the garden can also be painted in white.
05. Enrich the colours

When the white paint is dry, use a no. 0 brush to mix washes of pure colour (adding no white) and test the consistency of colour before applying. Use Sap Green with a little water and carefully glaze colour over foliage. Add a little yellow to the green for the geranium leaves.
Use a wash of Crimson for the roses, Cadmium Red for the geranium flowers and Burnt Sienna with a little Yellow Ochre for the pots. Repeat the glazes if needed to enrich colours. All the foliage in the back of the garden can also be painted this way.
Shadows on the lawn can be created by using a wash of Sap Green and black using a no. 4 brush. A final glaze of yellow and green over the whole area can brighten the lawn.
06. Add details

I paint the chairs using a fine no. 000 brush in white mixed with a little water to a smooth consistency; I use a touch of black to define their shape. I outline the glasses and jug in white, leaving a little white at the bottom. Add a touch of yellow and Cadmium Red for the orange juice.
Outline the shape of the cat in black and for its fur, add Yellow Ochre and white mixed with black. For the patio, make a thin wash using Burnt Sienna and a little black. Dab with a tissue for a mottled look.
07. Paint the patio and hollyhocks

Use a no. 000 brush with a mix of Sap Green and black to define the bricks and the grass between. Add shadows to the bricks using a no. 2 brush with a wash of Burnt Sienna and black. You can add dropped petals and little stones for more interest.
Outline the hollyhocks in white using a no. 000 brush. Mix white with a little Yellow Ochre and black for shading the petals. Carefully glaze with a thin wash of Crimson or leave white and use a dab of neat yellow for the centre of the flower. Paint the leaves carefully with a mix of green and black and highlight them with white and yellow. Finish with a green glaze to the leaves.
Paint the outline of the watering can in black and use varying tones of grey for blocking in. To complete the painting, carefully paint a few leaves in green in the foreground.
08. Varnish and frame it

Winsor & Newton Professional Satin or gloss varnish will seal and protect your work when dry. I prefer to use a spray varnish to avoid brush marks, and I hold the can about 10 inches away from the painting, carefully spraying in short bursts about four or five times to achieve an even finish. When dry, your miniature painting is ready to frame without glass.
For more art tutorials, see our oil painting for beginners tips and watercolour techniques.

