Work image mask magic with Houdini
Use the suite of CSS APIs to work wonders with your web designs.

Sign up to Creative Bloq's daily newsletter, which brings you the latest news and inspiration from the worlds of art, design and technology.
You are now subscribed
Your newsletter sign-up was successful
Want to add more newsletters?

Five times a week
CreativeBloq
Sign up to Creative Bloq's daily newsletter, which brings you the latest news and inspiration from the worlds of art, design and technology.

Once a week
By Design
Sign up to Creative Bloq's daily newsletter, which brings you the latest news and inspiration from the worlds of art, design and technology.

Once a week
State of the Art
Sign up to Creative Bloq's daily newsletter, which brings you the latest news and inspiration from the worlds of art, design and technology.

Seasonal (around events)
Brand Impact Awards
Sign up to Creative Bloq's daily newsletter, which brings you the latest news and inspiration from the worlds of art, design and technology.
If you're interested in learning more about Houdini, make sure you attend generate New York (April 24-25). At the conference, you can catch Sam Richard, enterprise partner engineer at Google, discussing how Houdini can greatly improve the flexibility, power, performance and maintainability of design patterns. To book your ticket to this award-winning conference for web designers, visit generateconf.com.
As developers, we sometimes take CSS for granted. By changing a couple of properties, we can change the look of an entire website. Browser vendors are doing a lot of work on our behalf to get to that point.
But as new CSS features come out, it can be a while until we get to use them for production sites. Users with old browsers will be stuck with a downgraded, progressively enhanced set of styles that do not look as good as those in modern browsers.
Houdini is set to change all that. It is a collection of draft specifications that gives developers access to some of the behind-the-scenes magic provided by CSS. Once all the specifications are complete, developers will be able to use JavaScript to determine how aspects such as layout and style calculations are performed.
What is Houdini capable of?
Houdini is a collection of APIs and specifications designed to decrease the friction between JavaScript and CSS. By exposing some of the magic that browsers perform to developers, we are able to make adjustments to the page that work best for our specific use-case.
Fixed in the middle of these advancements is the concept of a worklet – a lightweight, highly specialised class focused on specific actions such as animations. They are similar to Web Workers, which execute away from the main thread and keep the page responsive. These can be expanded upon in future as the needs of developers evolve.
While some of these APIs are still in their early stages, several have now landed in both Chrome and Opera, as of v66 and v53 respectively. The CSS Paint API enables developers to create images in JavaScript for use wherever an image would normally be used in CSS, while the CSS Typed Object Model exposes CSS objects to your JavaScript, rather than just strings. Support in Safari for these APIs is currently in development, several more APIs are on the way in Chrome and Houdini’s various APIs are working their way through the W3C specification process, with the Paint API having already reached Candidate Recommendation.
Sign up to Creative Bloq's daily newsletter, which brings you the latest news and inspiration from the worlds of art, design and technology.
The draft APIs are constantly changing and those present at the moment may not resemble what eventually lands in browsers. Keep an eye on ishoudinireadyyet.com to stay ahead of the latest improvements.
Want something simpler? Try a website builder. Either way though, your web hosting service needs to work for you.
Use Houdini to reshape image masks
For the time being, even just Houdini’s CSS Paint API is capable of achieving a great deal. For example, we can combine it with image masks to reshape elements on demand.
To show how this might work, navigate to FileSilo to access the relevant files (also, make sure your files are readily accessible in the right cloud storage).
01. Apply masking CSS

Before we start creating the worklet, set up a local server. Then we need to set the mask on each image. While the CSS property needed is mask-image, it is still prefixed in Chrome. This means we also need the Webkit prefix alongside it.
Open up styles/mask.css and update the styles for the masked class. Part of the effect is to fully reveal the image when the user hovers over it. Add a reveal custom property to the element in that instance.
.masked {
  […]
  -webkit-mask-image: paint(mask);
  mask-image: paint(mask);
}
.masked:hover, .masked:focus {
  --mask-reveal: true;
}
02. Apply mask shape property
Custom properties do not need to be on the root element to be picked up by the API. They can be applied to the element being painted to, which will override any selectors with a lower specificity.
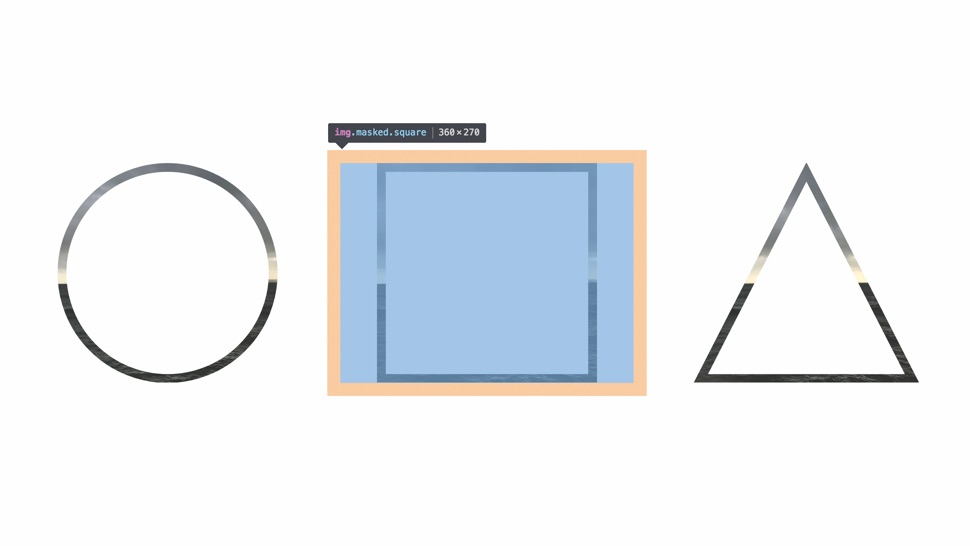
Now we’re going to apply a special mask-shape custom property to three shape classes. This tells the worklet which shape to render.
.masked.square {
  --mask-shape: square;
}
.masked.circle {
  --mask-shape: circle;
}
.masked.triangle {
  --mask-shape: triangle;
}
03. Define which shape to use
Open scripts/mask.js. This has already been filled out with some of the logic to create the shapes. We still need to tie it together with the classes we just wrote.
The mask-shape custom property defines the shape that’s going to be used. We have a circle, a square or a triangle to choose from. If someone chooses a different shape or no shape at all, default to a circle shape. Trim off any spaces left by CSS formatting.
let shape = ‘circle’;
if (properties.get(‘--mask-shape’) &&
  [‘square’, ‘triangle’, ‘circle’]
  .includes(properties.get(
  ‘--mask-shape’).toString().trim())){
  shape = properties.get(
  ‘--mask-shape’).toString().trim(); }
04. Decide whether to reveal
By default, the masks provide the outline of the defined shape. When the user hovers over them, the reveal custom property becomes true, so that should fill the shape in.
Custom property types are coming at a later point, which means for now a true value will be passed as a string. Match against the string and set a new variable if it is set.
let reveal = false;
if (properties.get(‘--mask-reveal’) &&
  properties.get(‘--mask-reveal’)
  .toString().trim() == ‘true’) {
  reveal = true; }
05. Find the smallest length
Finally, we want the shapes to have sides of equal length. This means we need to find the smallest of either the width or height of the image and use that length to calculate the shapes.
Define the maxLength variable to tell the rest of the code what size to make the shapes. Set the line width of the context to a proportion of this size in order to keep things to scale.
const maxLength =
  Math.min(geom.width, geom.height);
ctx.lineWidth = maxLength / 25;
This article was originally published in creative web design magazine Web Designer. Subscribe to Web Designer.
Want to pick up more Houdini tricks?

Interested in learning more about how Houdini can add more oomph to your designs? Sam Richard, enterprise partner engineer at Google will be giving his talk Design System Magic with Houdini at generate New York on April 25, in which he will teach you how it can help you solve common design system problems and greatly improve the flexibility, power, performance and maintainability of these patterns.
Generate New York runs from April 24-25 – get your tickets now!
Related articles:

Matt Crouch is a front end developer who uses his knowledge of React, GraphQL and Styled Components to build online platforms for award-winning startups across the UK. He has written a range of articles and tutorials for net and Web Designer magazines covering the latest and greatest web development tools and technologies.
