How to sculpt and texture a demonic bust in Blender and Substance 3D Painter
Build a fearsome character with artist Elena Leonteva.
Daily design news, reviews, how-tos and more, as picked by the editors.
You are now subscribed
Your newsletter sign-up was successful
Want to add more newsletters?

Five times a week
CreativeBloq
Your daily dose of creative inspiration: unmissable art, design and tech news, reviews, expert commentary and buying advice.

Once a week
By Design
The design newsletter from Creative Bloq, bringing you the latest news and inspiration from the worlds of graphic design, branding, typography and more.

Once a week
State of the Art
Our digital art newsletter is your go-to source for the latest news, trends, and inspiration from the worlds of art, illustration, 3D modelling, game design, animation, and beyond.

Seasonal (around events)
Brand Impact Awards
Make an impression. Sign up to learn more about this prestigious award scheme, which celebrates the best of branding.
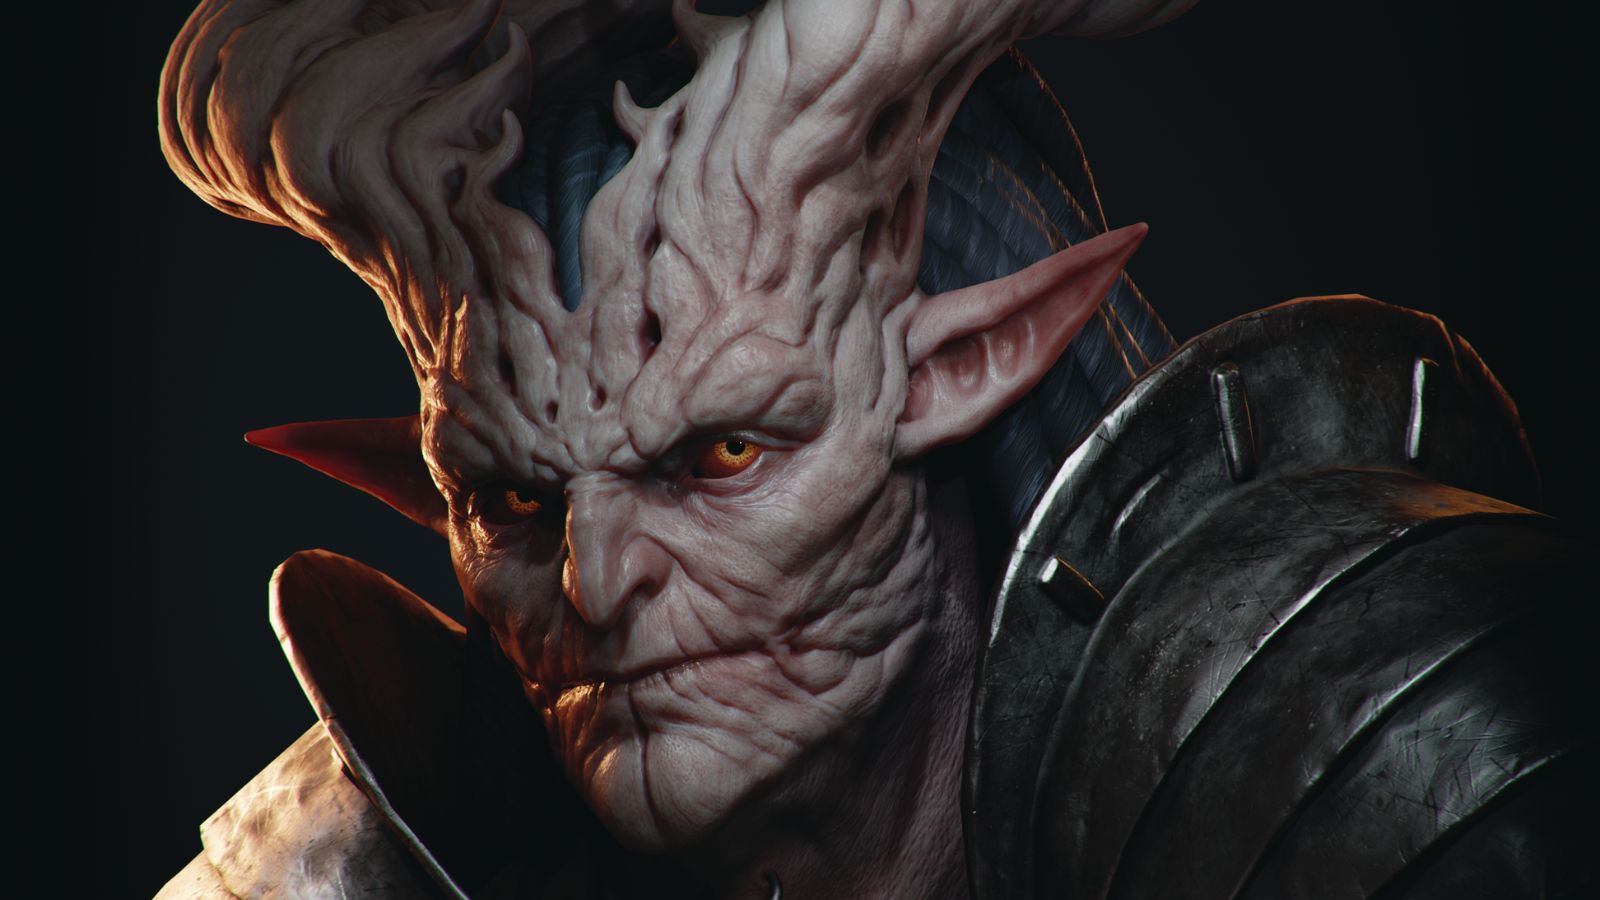
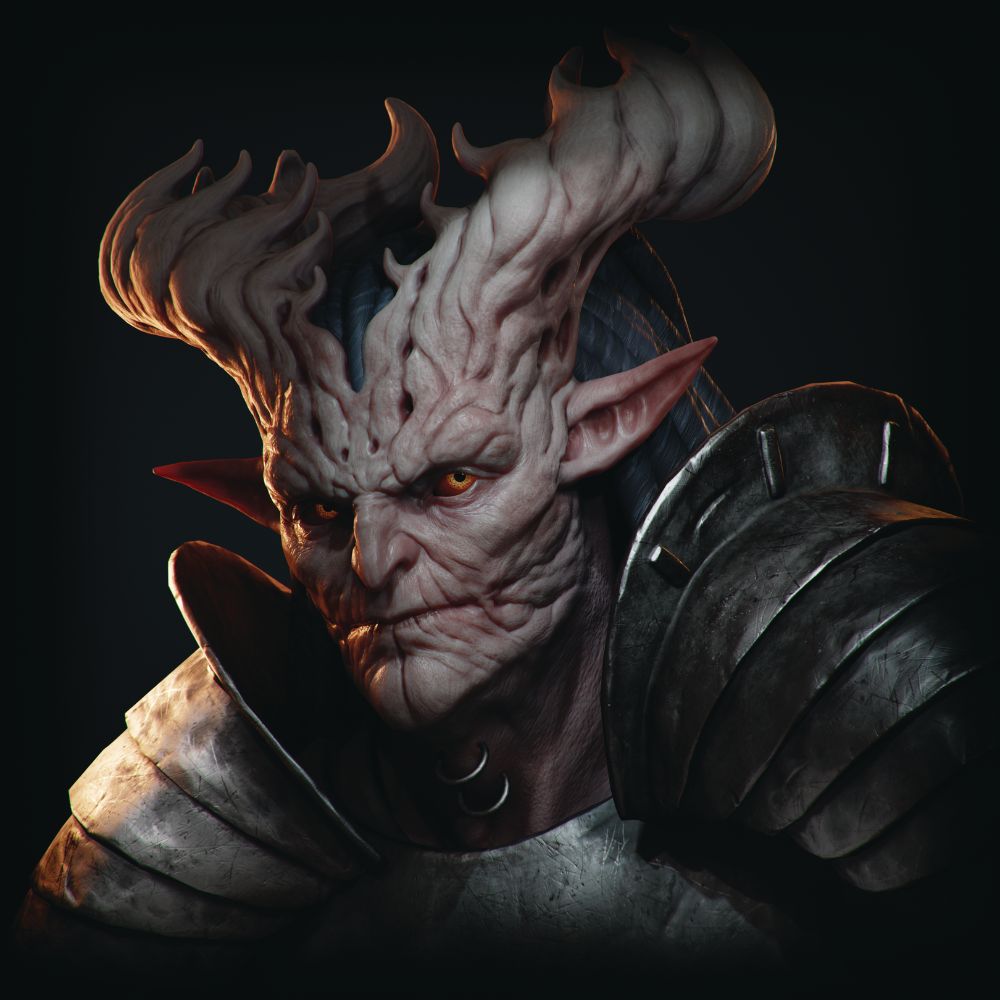
When I set out to make this demonic character bust, my main goal was to create a detailed, real-time 3D portrait that looked as close as possible to the original concept art made by Veronika Kozlova. It also gave me the chance to test out Blender’s capabilities for high-poly sculpting, which I’ve been eager to try for a while now, and check on how its real-time EEVEE render engine performs.
In this tutorial, I’ll guide you through my process creating the bust. We'll start off by sculpting in Blender, before retopologising and unwrapping the textures. With that done, we’ll create PBR textures in Substance 3D Painter. Next, I’ll show you how to set up a scene in Blender and make the final render in the EEVEE engine, and we’ll also do some small post-processing with compositing in Blender for the final image.
For more on the software we'll be using, check out our complete rundown of Blender: everything you need to know. We also have more on Adobe's Substance tools in our Adobe Substance 3D Modeler review and if you're inspired, read our guides to the best drawing tablets and the best laptops for 3D modelling to get started yourself.
How to sculpt a demonic character in Blender
Here's my step by step process for this tutorial, from initial blocking right the way through to the final image.
01. Blocking out the primary forms
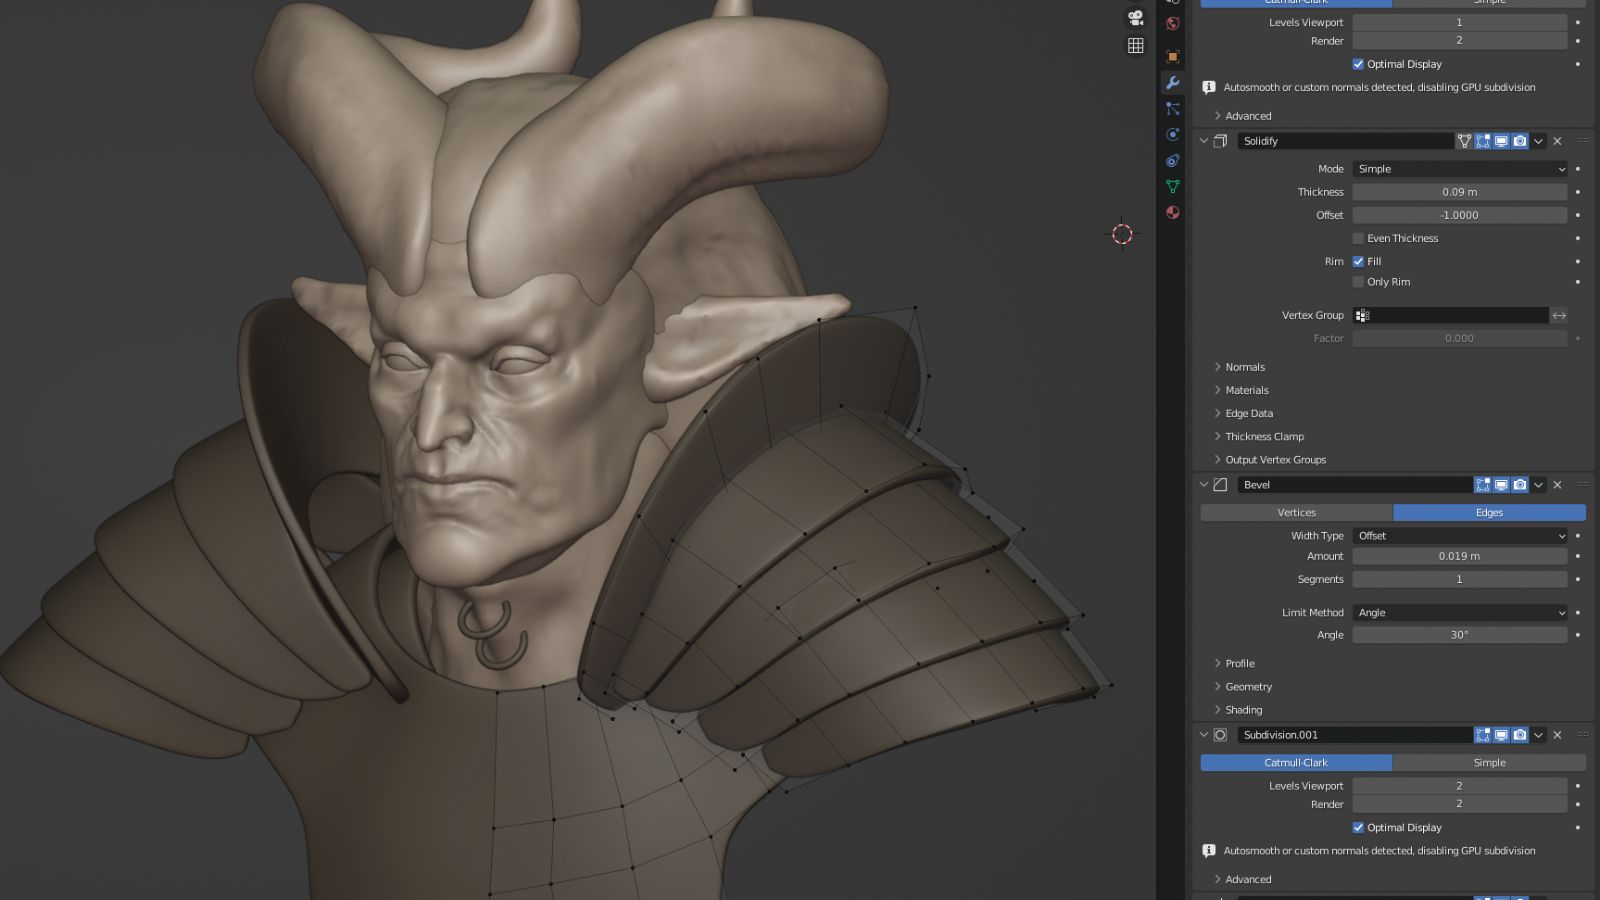
First you need to do the blocking of the main shapes. It’s necessary to create all the main volumes of objects without venturing into any great detail. We’ll make the horns, head, ears and the basic shape of the hair out of spheres using the Grab, Clay Strips and Smooth brushes, also periodically using the Remesh tool.
At this stage, we want to make the armour elements from planes using a set of modifiers. Start off with the modifiers for Mirror, and Subdivision set at Level 1, then Solidify to increase the thickness, Bevel, another Subdivision modifier set at level 2 to give us better smoothing of the shape, and finally a Weighted Normal for improved shading.
02. Refining the shapes and adding details
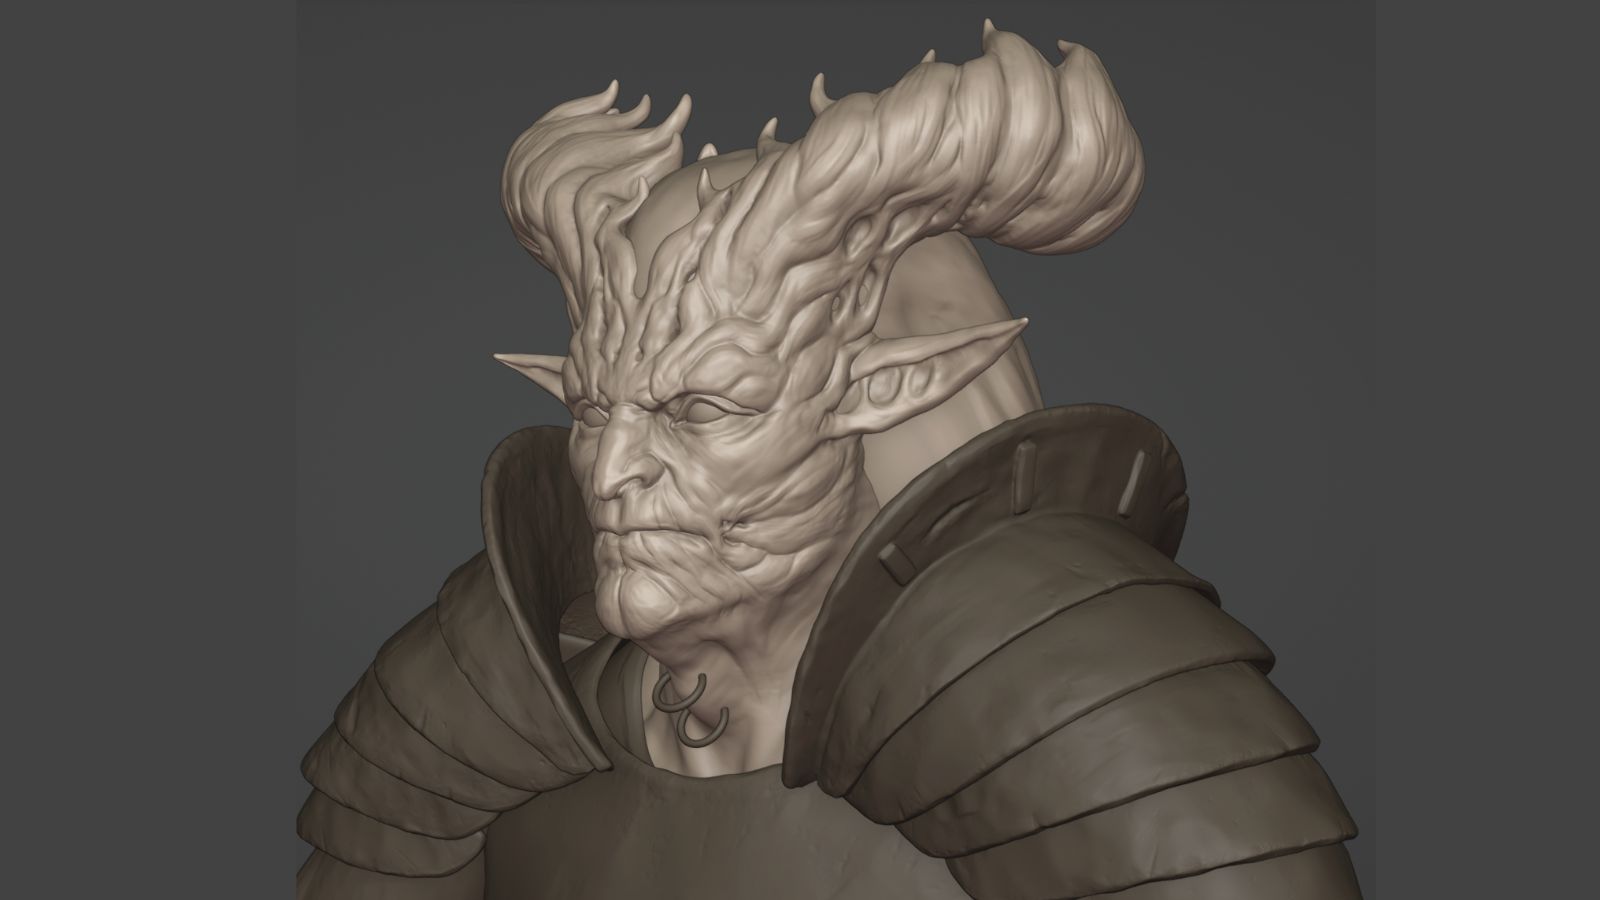
The next step is to add detail to the objects in accordance with the concept. The head, horns and ears need to be combined into one object, then you need to detail the shapes, adding large wrinkles, basic shapes, and more intricate touches to the horns.
We must also apply modifiers for the demon’s armour, so make a Remesh with a Voxel Size of 0.005m and work out the details. Combine the side of the lining and the first plate into one object, smooth out the transition, and add chips, scratches, bruises and abrasions for a lived-in feel.
03. Retopologise the head and armour
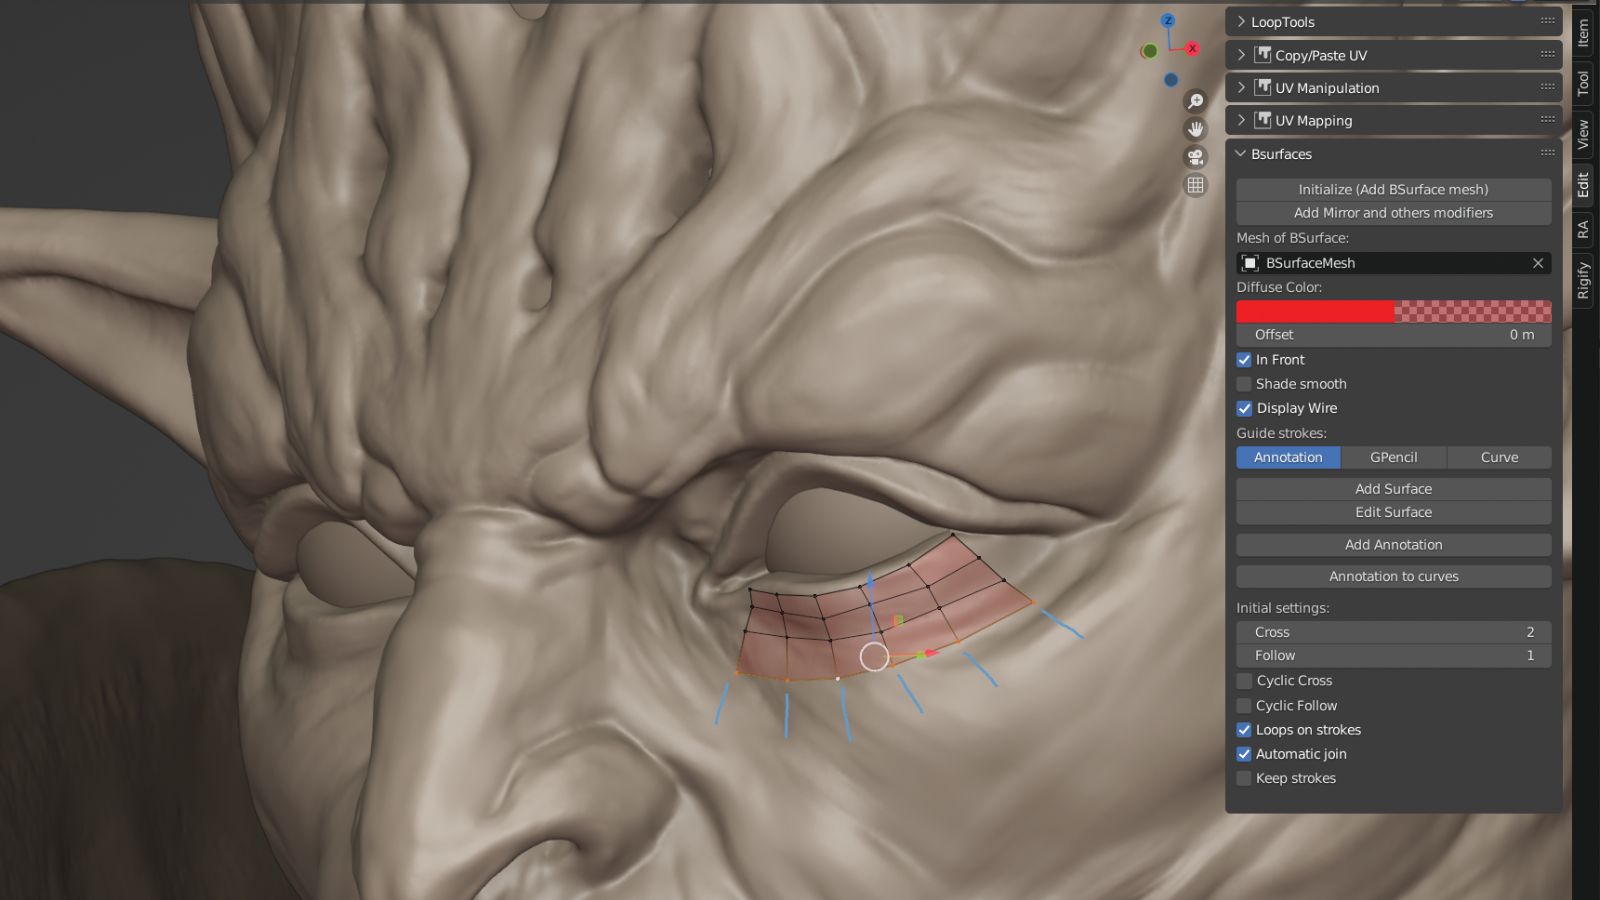
I used the BSurfaces add-on for the retopology work, which is already built into Blender. Using this add-on you can significantly speed up the retopology process. With BSurfaces you need to draw polygons using the Grease Pencil and convert them to geometry.
To start, select the object that needs to be retopologised and click Initialise. After this, we draw annotative strokes with the pencil and click Add Surface. This way we quickly create the retopology of the head and armour.
04. Detailing the head with Multiresolution
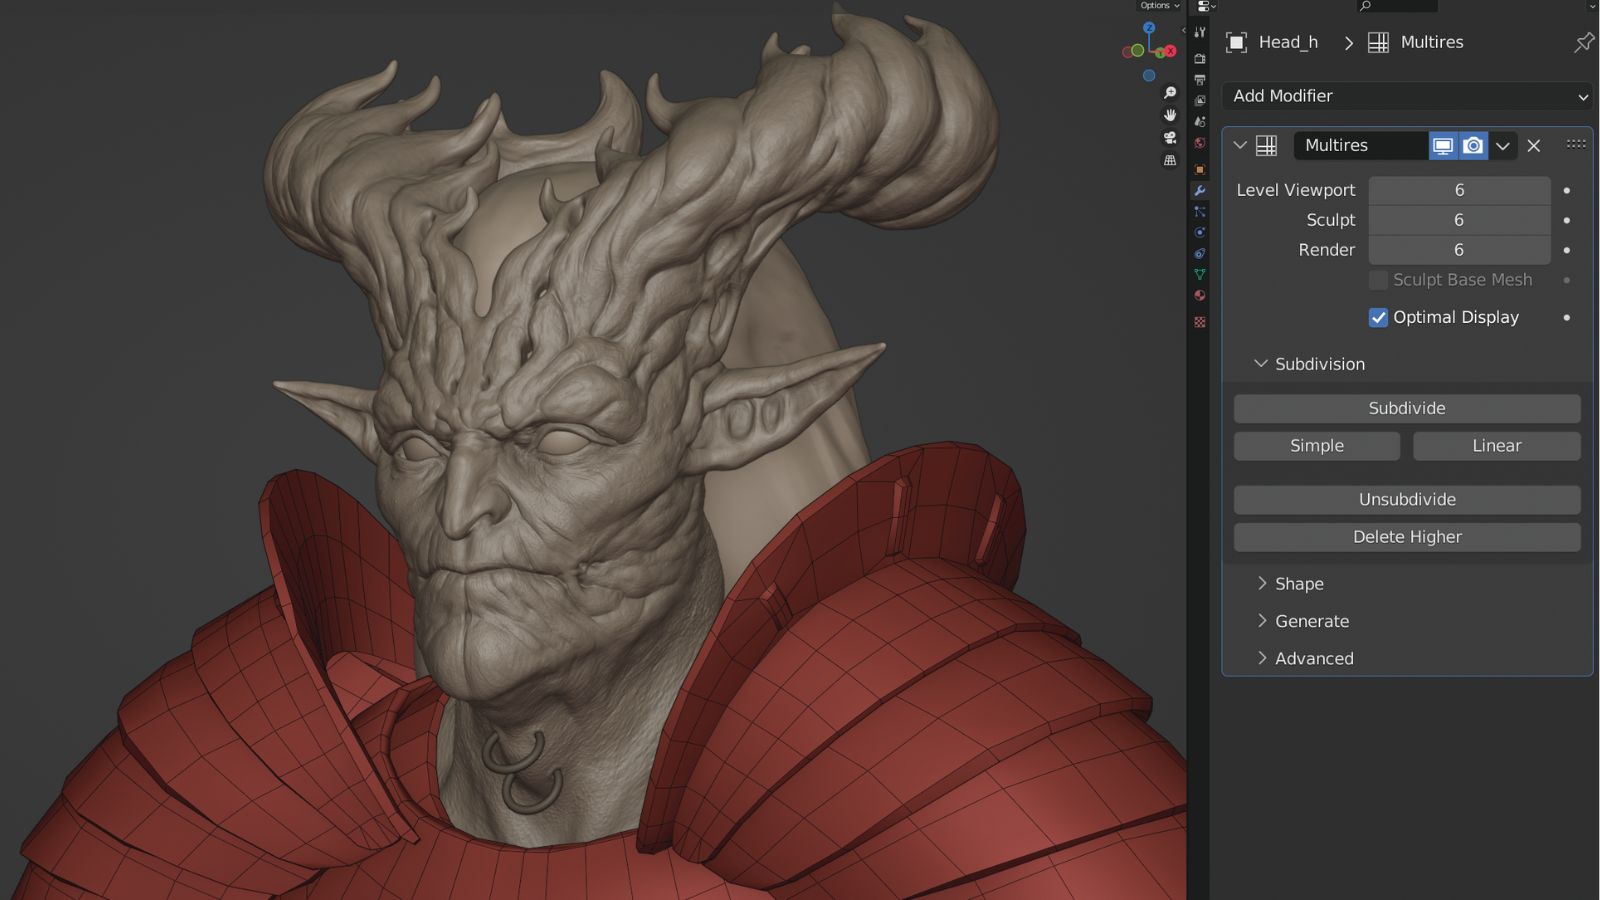
With the retopology of the head sorted, add the Multiresolution modifier to the mesh and choose the Shrinkwrap modifier, selecting our high-poly sculpt as the target object. In the Multiresolution modifier we take the Subdivision Level to 6, after which we apply the Shrinkwrap modifier. You can now refine the remaining details in Sculpt mode. If necessary, you can always use lower Subdivision Levels in the Multiresolution menu and modify larger forms.
At this stage, we’re finalising the basic features of the face and horns, adding small wrinkles and pores. Here I decided to slightly raise the tips of the horns, as their position didn’t match up with the original concept.
05. Creating the hair
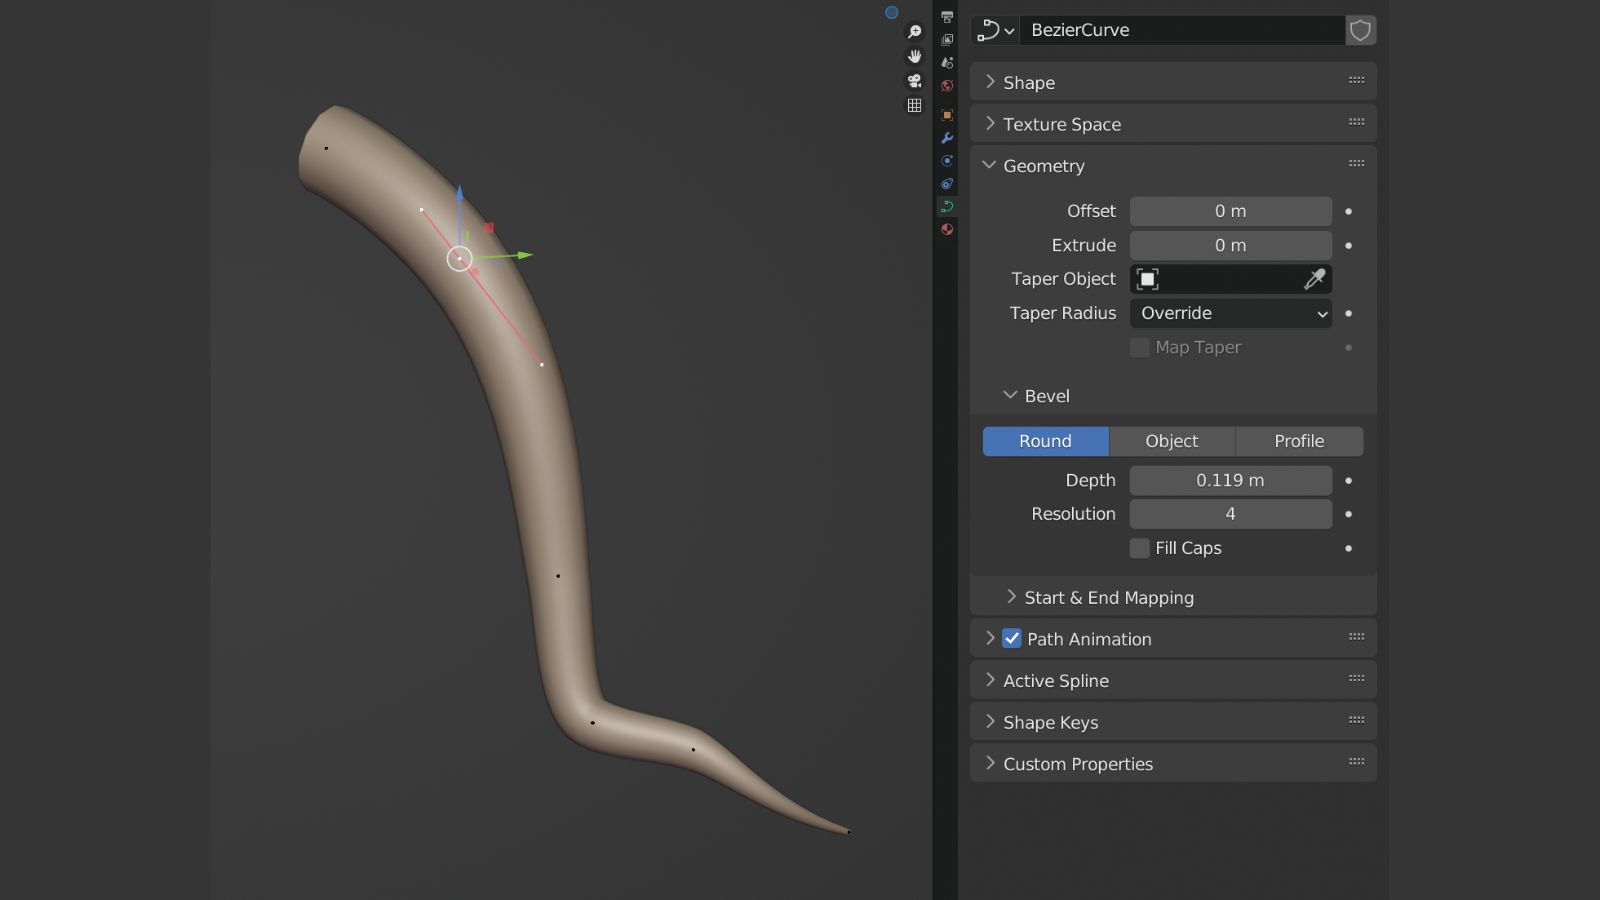
Since this character’s hair is made up of dreadlocks, I shaped it using regular bezier curves. To do this, create a curve and align it along the surface of the head, then adjust the thickness using the Bevel Depth setting; the dreadlocks should be thicker at the base and taper towards the tips. When all the dreadlocks are ready, we can convert them into meshes so we’re able to unwrap them and add textures.
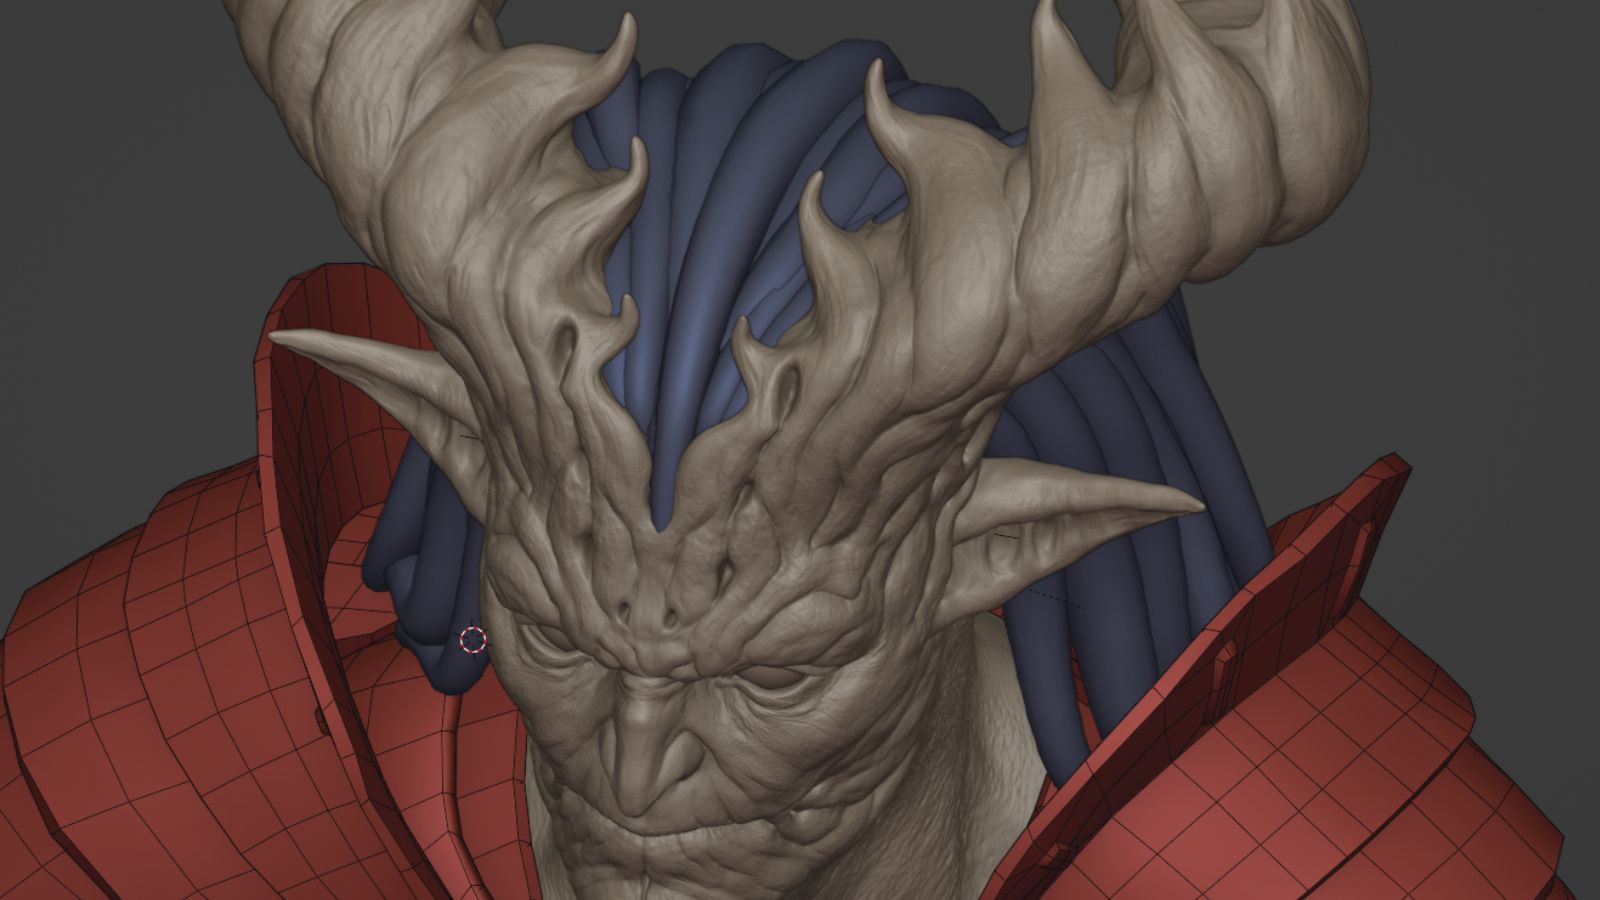
06. Creating the UV mapping
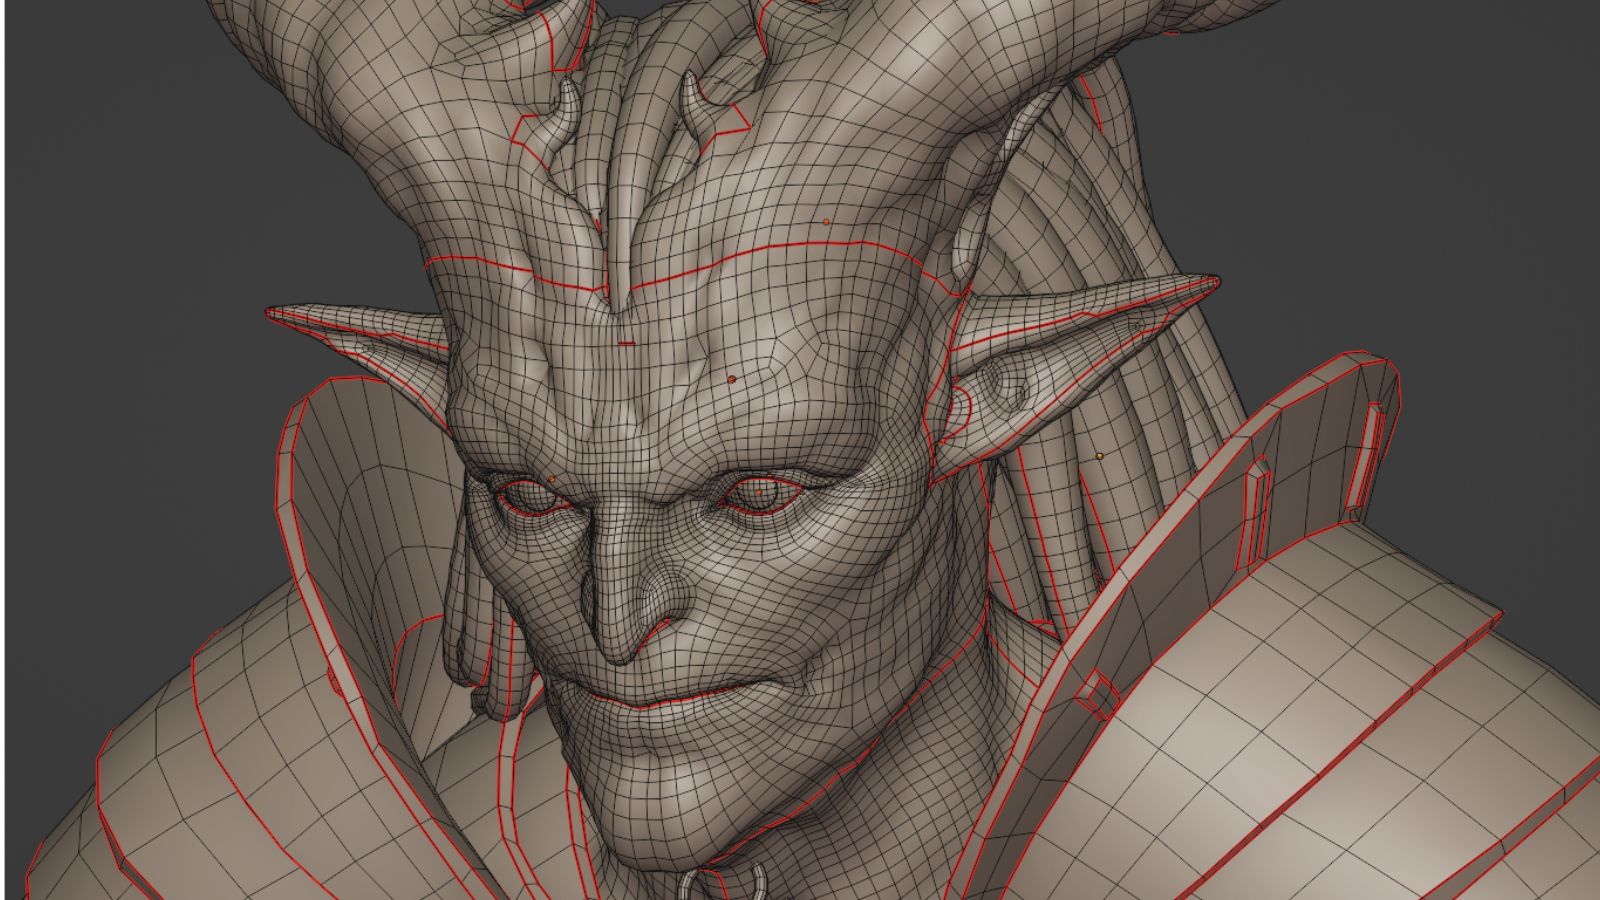
Now we need to duplicate the head and hide it in a separate collection, as it will be used as a high-poly mesh for further texture baking. For the remaining copy of the head, set the Multiresolution modifier to 1 and apply it. This will be the mesh we’ll unwrap.
I’d recommend putting your seams in inconspicuous places, while it’s also helpful that the final shells turn as evenly as possible without much stretching. Given that the demon’s horns have a complex shape, additional seams will need to be created on the spikes as well.
When it comes to the armour, however, everything becomes much simpler, as we can just add seams on the edges. For the hair, you need to add one seam to each dreadlock and lay the shells so that they all lie parallel to each other. Doing this will then help us at the texturing stage.
07. Preparing the object for export
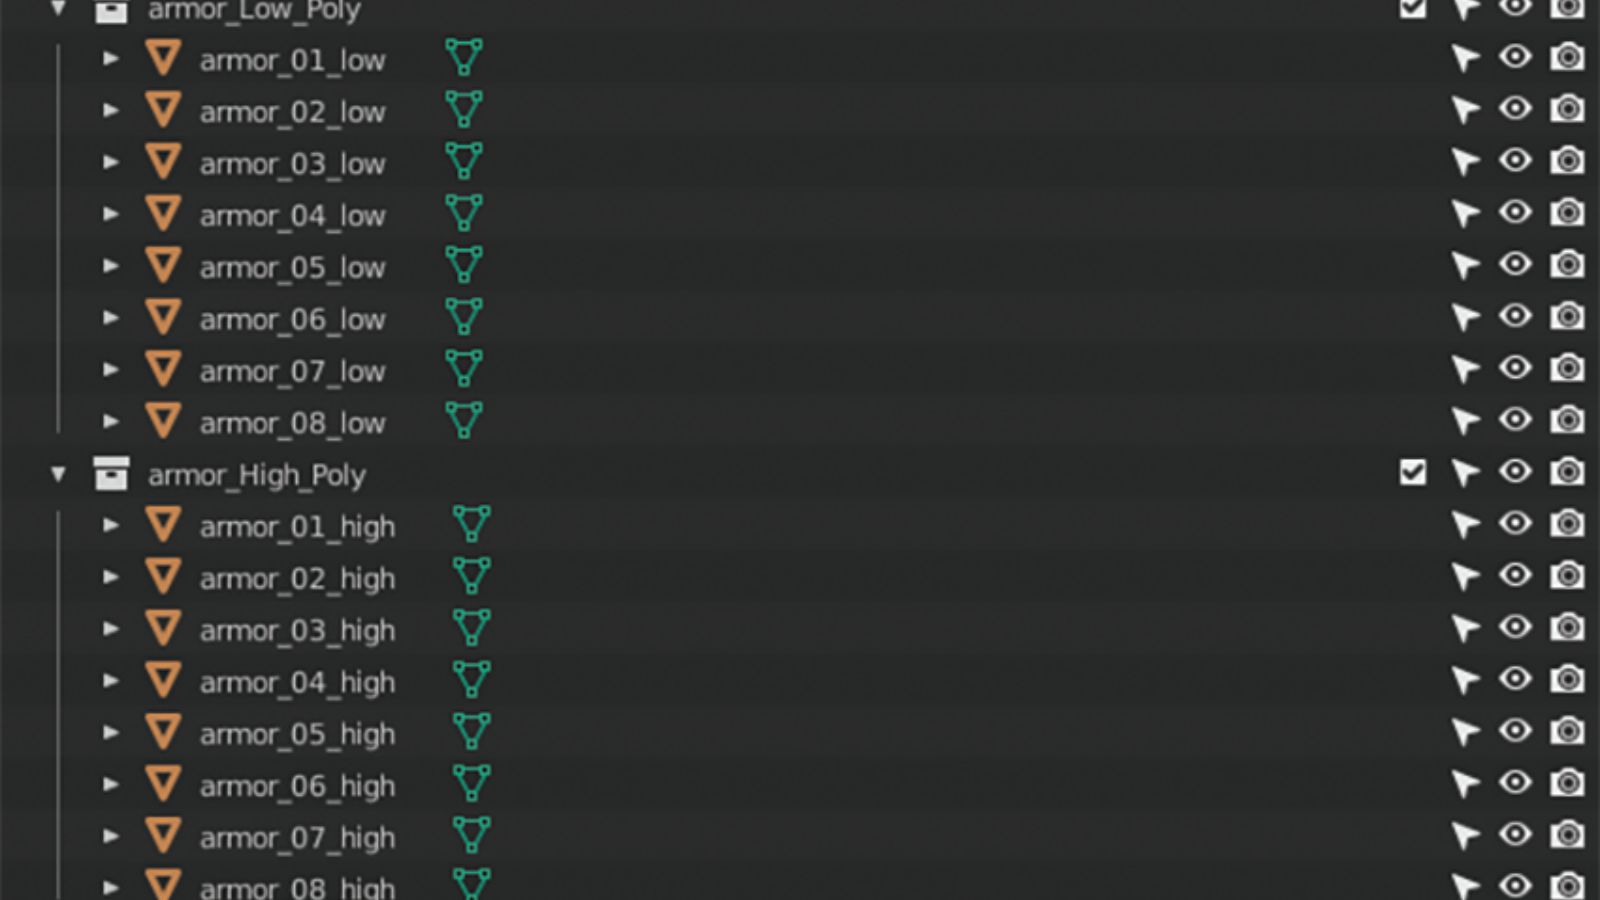
Now we need to export high-poly and low-poly objects to work in Substance 3D Painter. Before exporting the armour, we’ll give each low-poly segment name the suffix ‘_low’, and each of the high-poly segments the suffix ‘_high’, for example ‘armor_01_low’ and ‘armor_01_high’. This is necessary for baking the objects individually and will help us avoid artefacts.
For the high-poly head mesh, set the Multiresolution to 6, apply the modifier, and add and apply the Decimation modifier with a value of 0.35. The resolution of the head mesh will decrease from 30 million triangles to 12 million, but important details, including the pores, will be preserved. After this, we export all the high-poly objects of the portrait in a single file, and all the low-poly objects in another file
08. Designing the head's textures
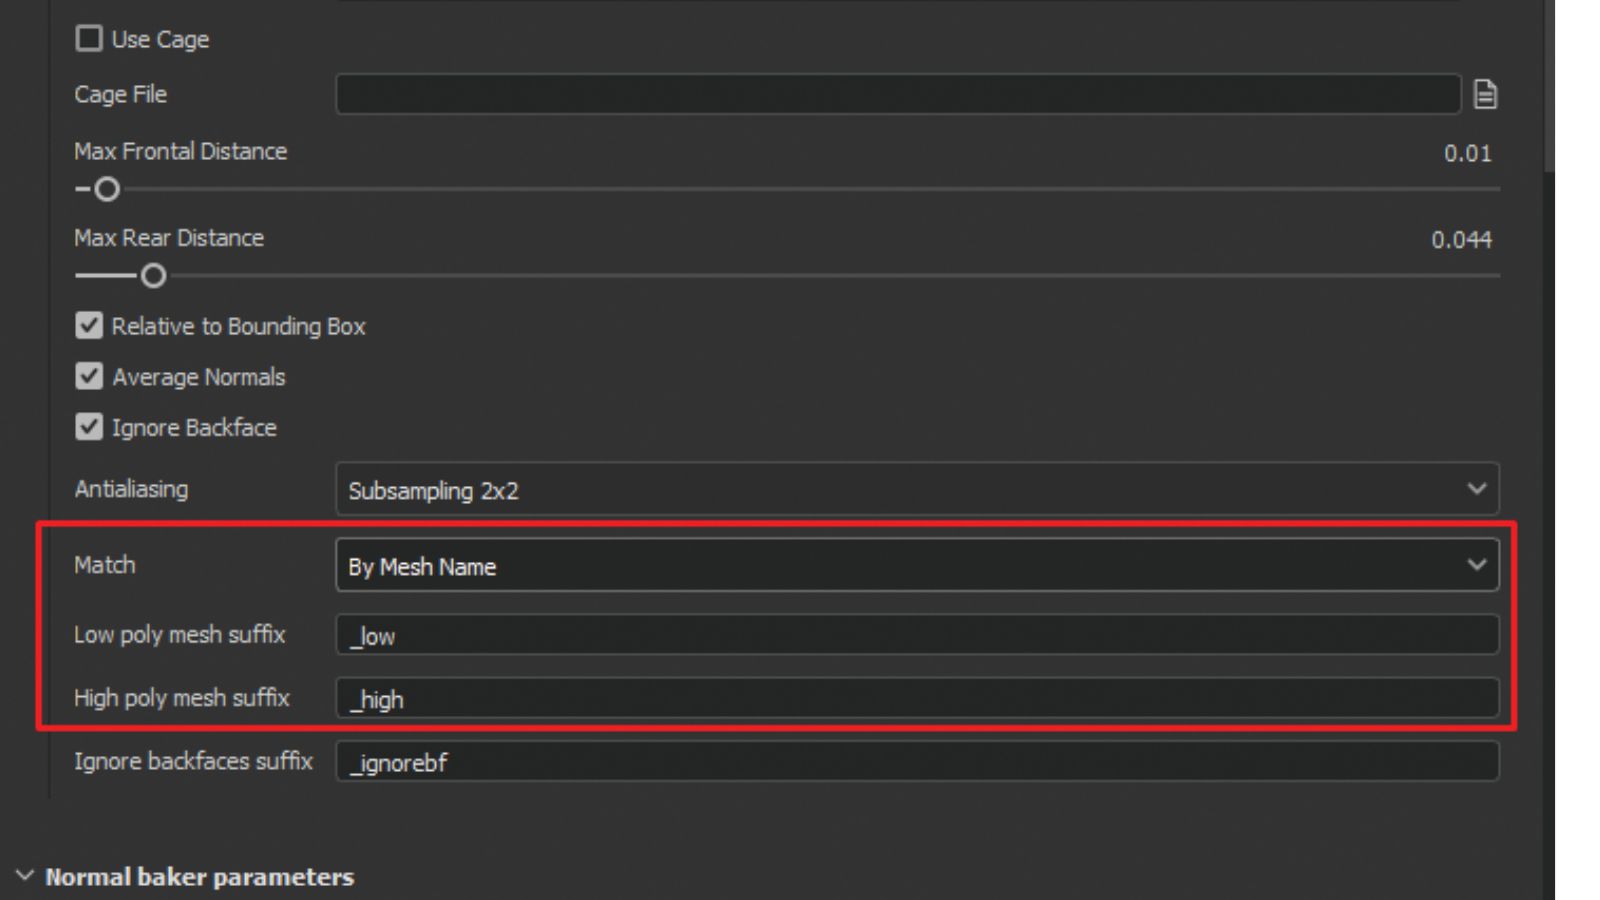
Now let’s bake the textures using high-poly meshes. In the Match field select ‘By mesh name’ to ensure the armour elements will be baked correctly.
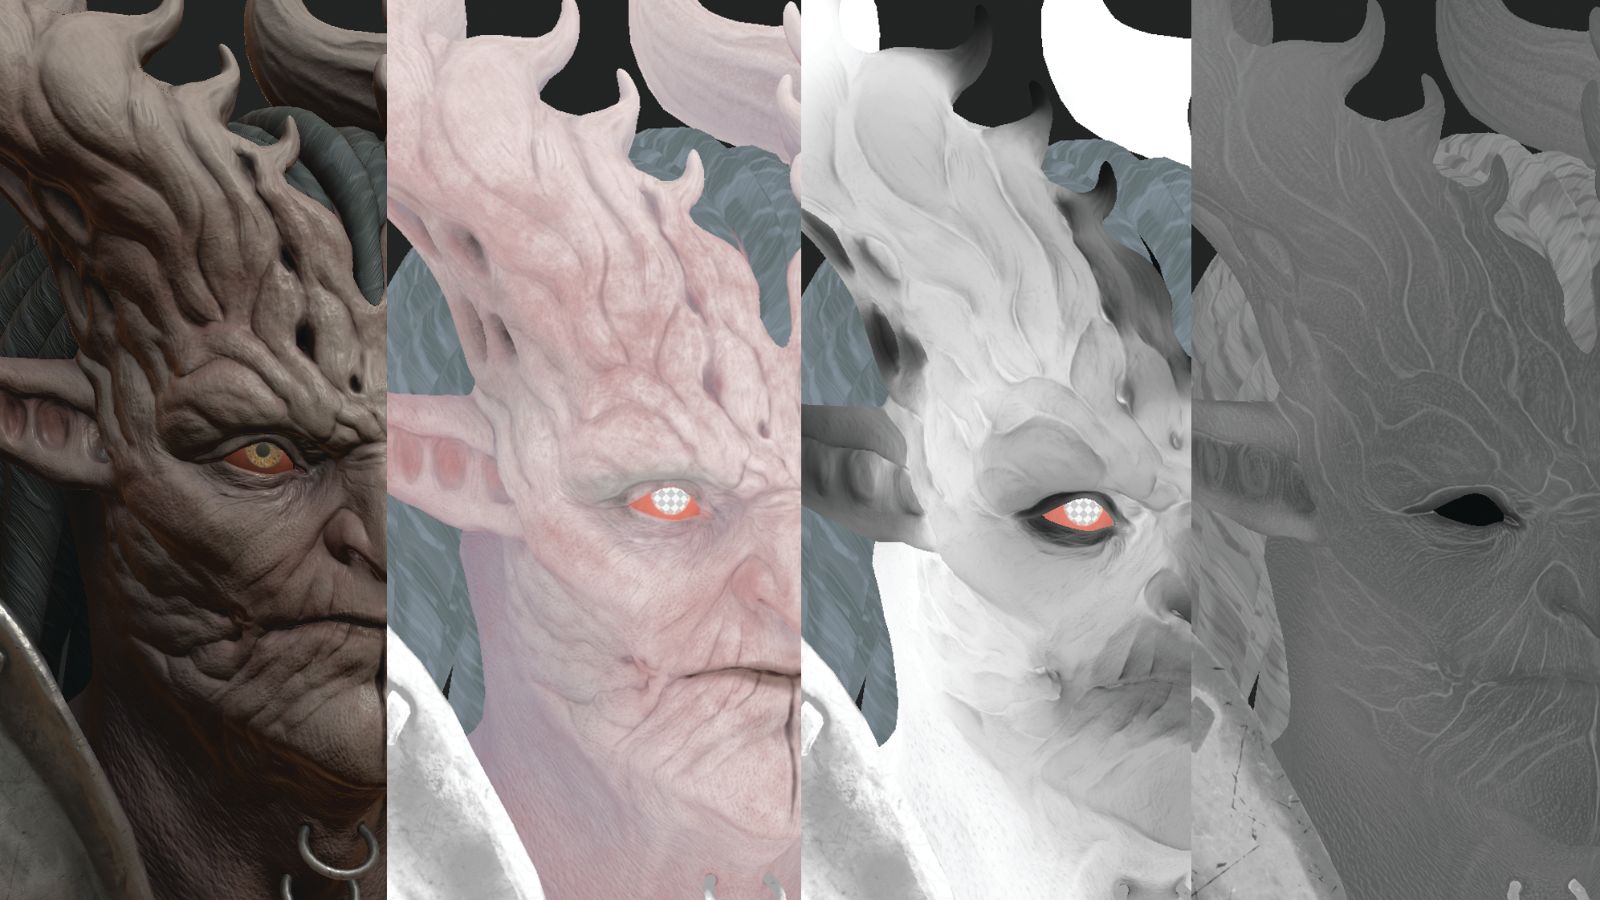
Next it’s time to paint the textures. Create a Base Fill Layer for the head with a base colour and base level of Roughness. Use blue for the shadows, red for the character’s nose and ears, and white for both the cheekbones and forehead. Meanwhile, it’s also necessary to randomise the skin colours for added realism.
Create the pores and wrinkles on a new dark Fill Layer using a mask and inverted curvature. For subsurface scattering you’ll need a Thickness texture. We also want to add in a Roughness map using curvature and manually add smoothness to the eyelids, nose, lips and ears.
09. Making the armour textures
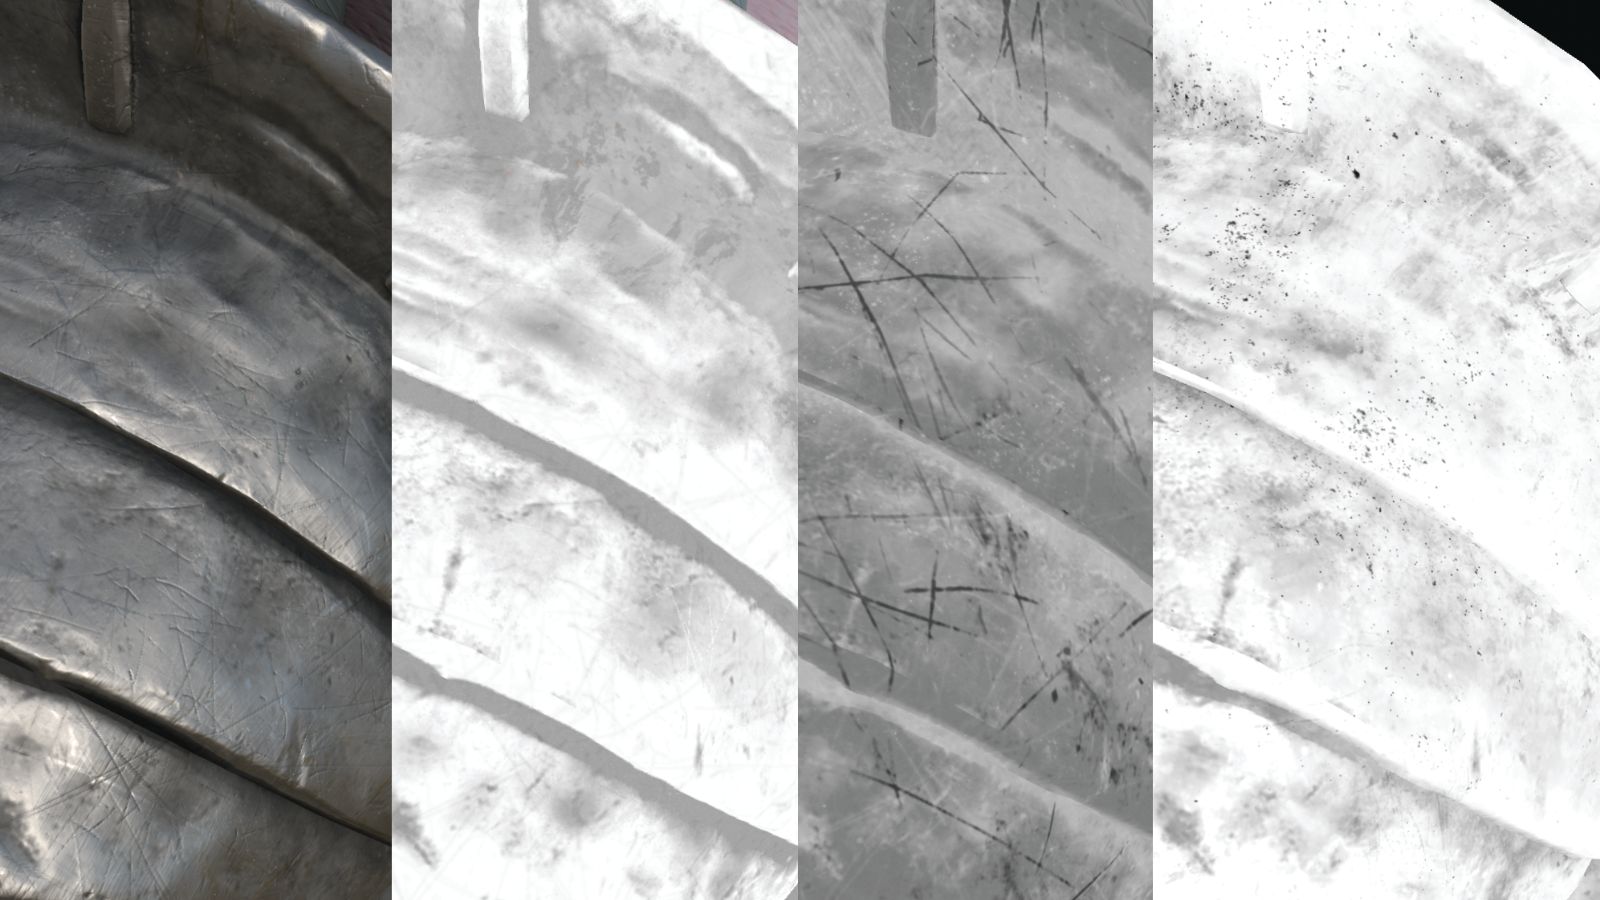
Moving on to the armour, use the standard Steel Dark Aged smart material as a base. Now we need to add in a layer of Roughness to provide the effect of dust, dirt and scuffs. Also add a Contrast Luminosity filter to lighten the overall colour of the armour. For the sake of realism, I used a lot of small scratches thanks to the Directional Scratches texture. To finish up here, we’ll remove the Metallic from the dustiest parts of our creature’s armour.
10. Creating the eye and hair textures
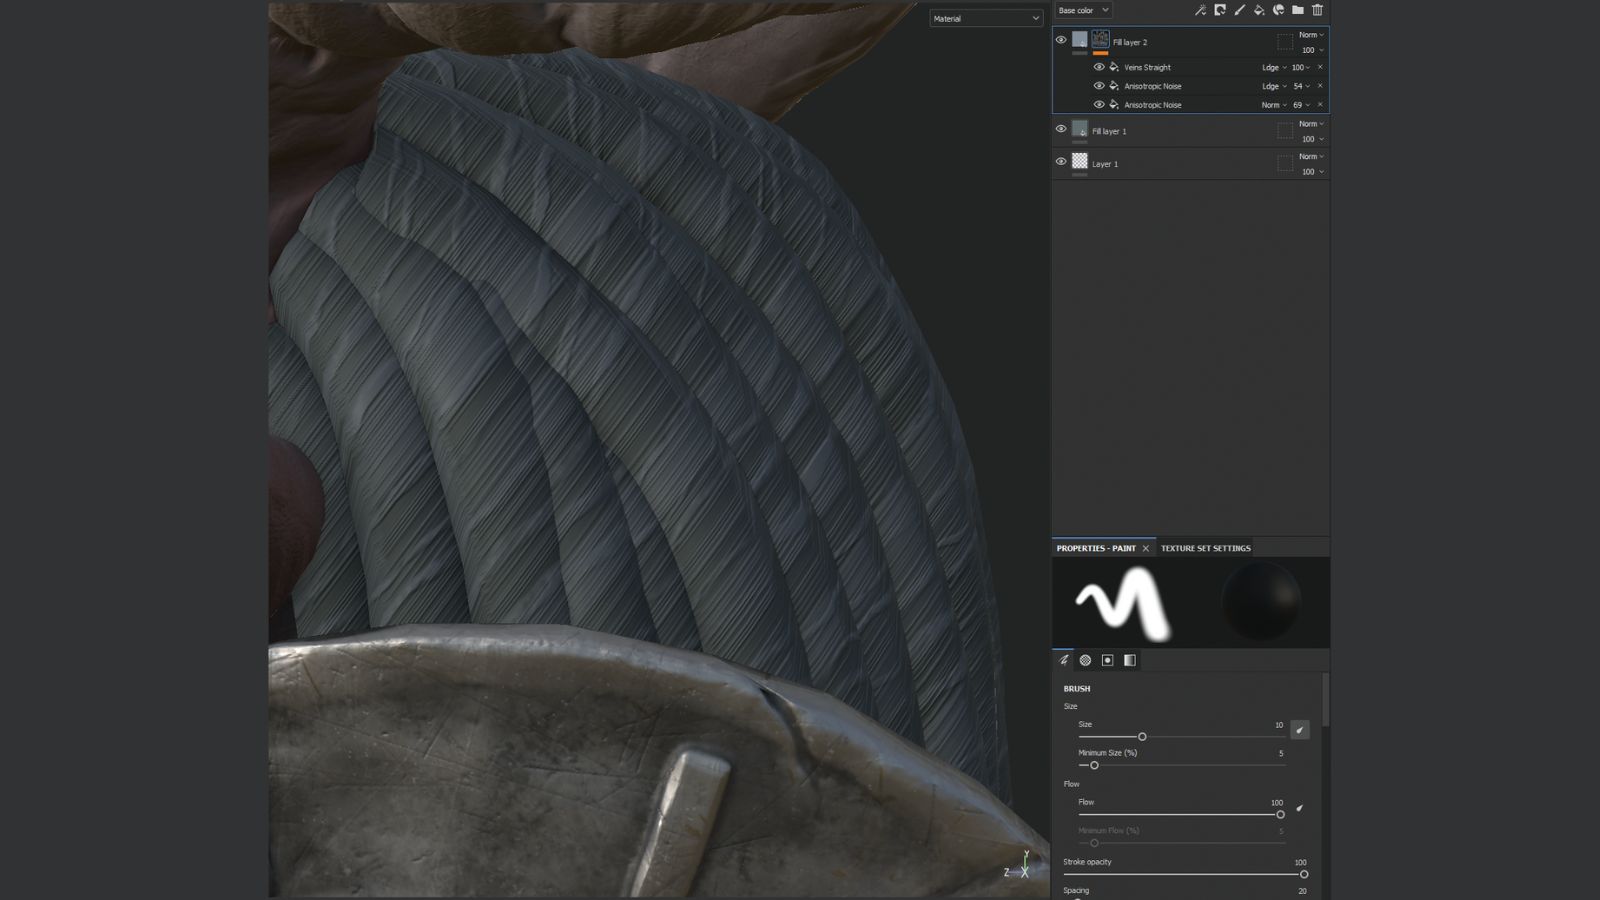
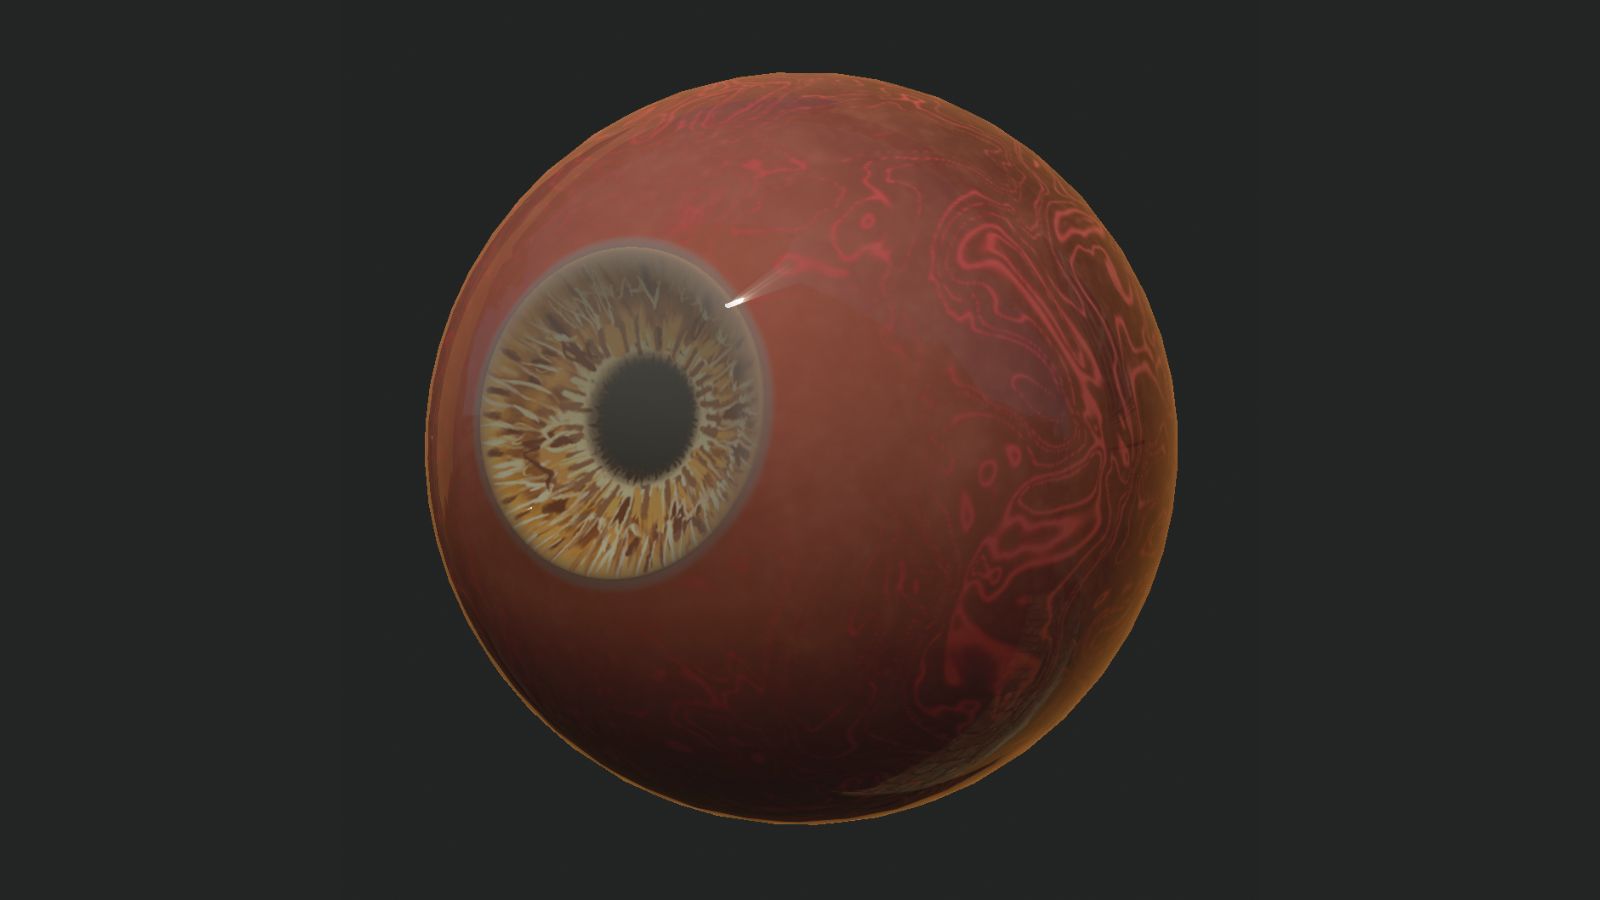
The process for the hair is simple. We’ll make a Fill Layer with a Base Color, and add another Fill Layer with a texture. In the texture’s Layer Mask use two fills with an Anisotropic Noise texture that uses different scales and triplanar projection, and also add a fill with the Veins Straight texture. For the eyes, colour the iris in orange and yellow tones following the reference. The eyeball is a muted red with brighter red veins.
11. Setting the scene
After all the textures are ready, export and connect them to materials in Blender. We use a three-point lighting setup with an orange rim light, a white key light coming from above for dramatic shadows, and a pale fill light. Arrange the light so half of the character’s face is in shadow and illuminated by the rim light, as this will give the render more contrast.
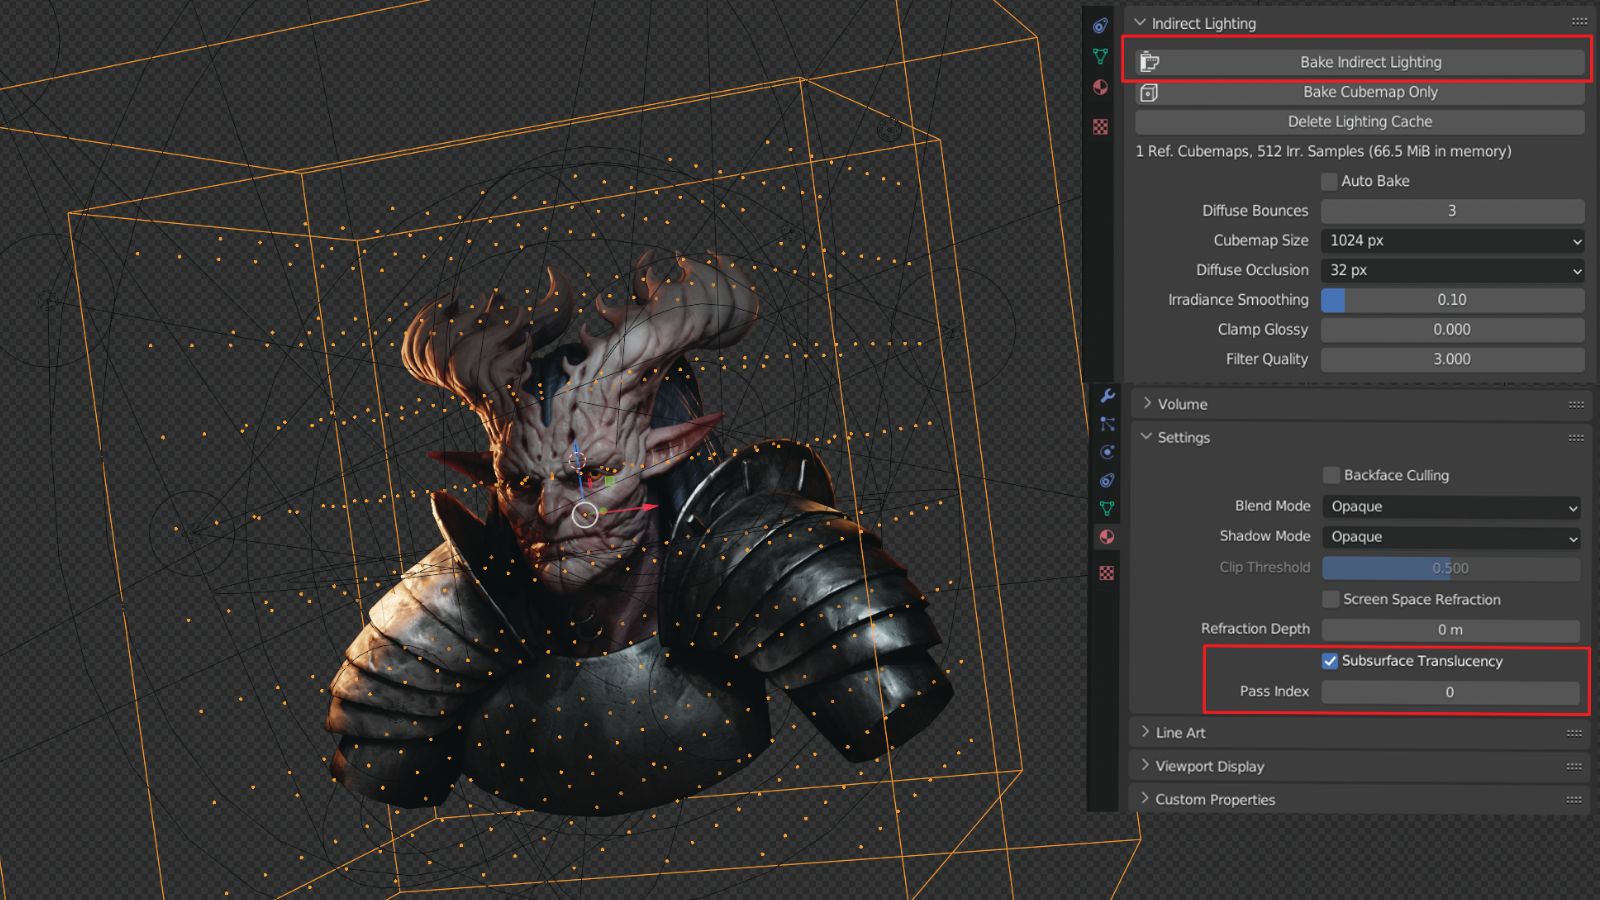
To get better lighting you can add an Irradiance Volume and a Reflection Cubemap, and bake the light into the scene. For the subsurface scattering to work in your scene, you’ll need to check the Subsurface Translucency box in the Material settings.
12. Posing and composing your bust
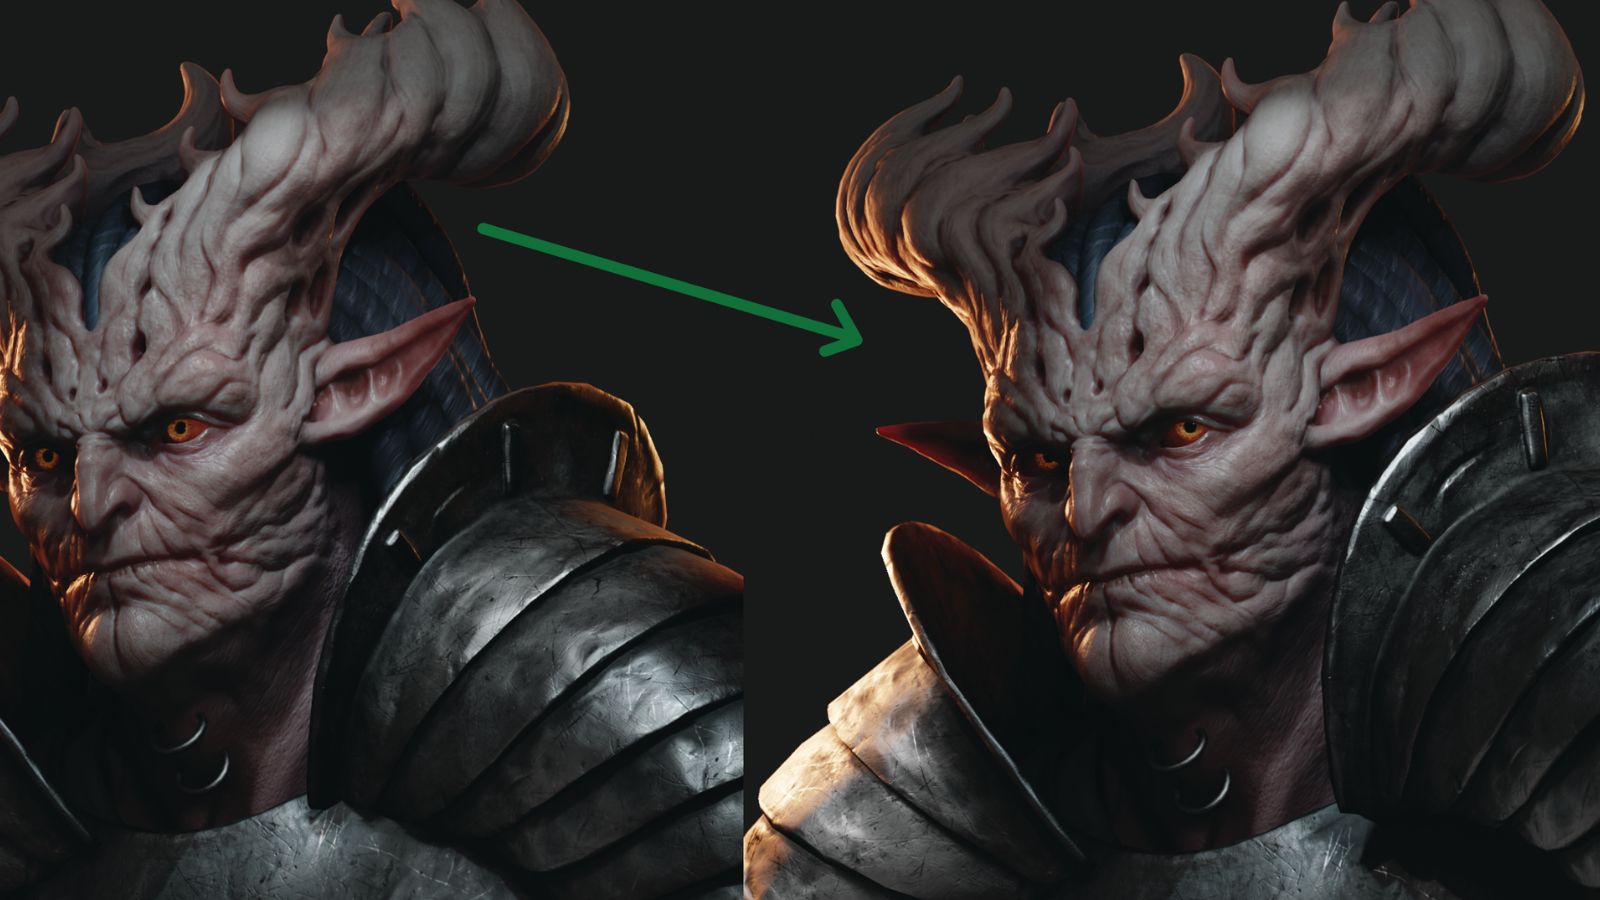
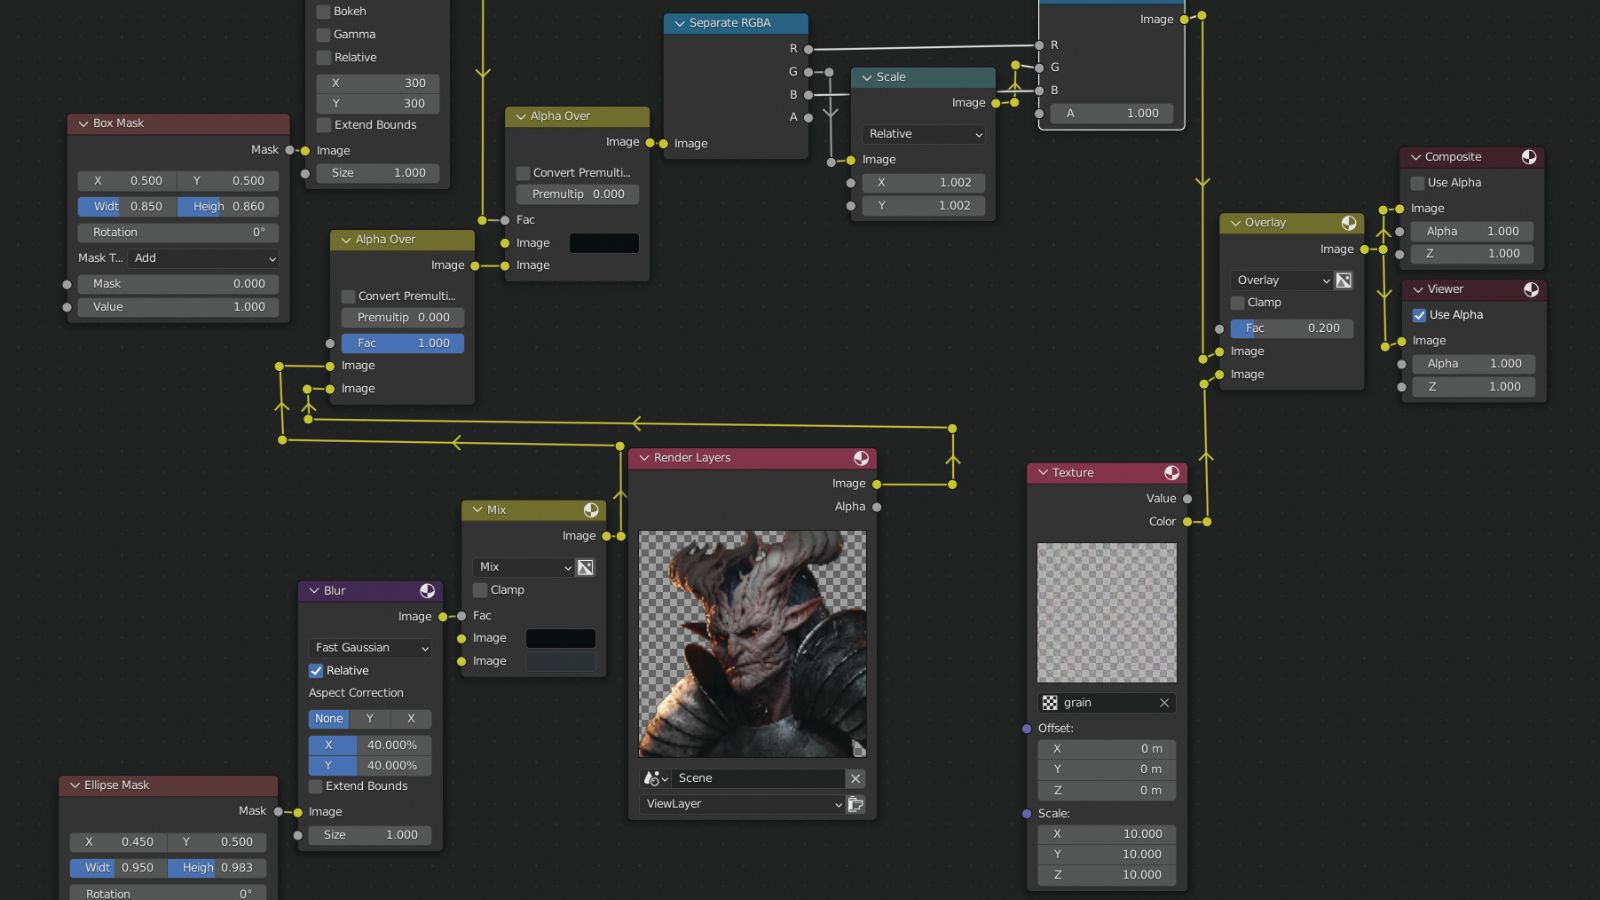
A little posing will complete the project. Set the rotation of the eyes so the character’s look is similar to the concept art, and slightly change the position of the left shoulder. Compositing can also be done in Blender. First add two black vignettes at the edges and a muted blue background. Next bring in a grainy effect with the Color Cloud texture and add chromatic aberration by scaling the green channel.
How to sculpt a demonic character: quick tips
Here are few quick tips to keep in mind for this kind of digital sculpting project:
Eye creation
For the eyes, you need to create two objects: a sphere with a bulging cornea and a disk for the iris with a pupil in the centre.
Streamlined performance
When working with a high-poly mesh in Blender, you might run into a lack of RAM at the decimation stage and when exporting in FBX format. I have 32GB of RAM, which my computer used up and then froze for several minutes. If you have the same or less RAM, I’d advise you close your browsers and other applications when working with high-poly meshes.
Get more software tutorials in 3D World
This content originally appeared in 3D World magazine, the world's leading CG art magazine. 3D World is on sale in the UK, Europe, United States, Canada, Australia and more. Limited numbers of 3D World print editions are available for delivery from our online store (the shipping costs are included in all prices). Subscribe to 3D World at Magazines Direct.
Daily design news, reviews, how-tos and more, as picked by the editors.
Elena has been working as a 3D artist in the game development field for over five years. In her spare time, she likes to make fantasy characters and creatures.
