How to create a volume light effect
James Cutler explains how to generate volume light using V-Ray and 3ds Max.
Sign up to Creative Bloq's daily newsletter, which brings you the latest news and inspiration from the worlds of art, design and technology.
You are now subscribed
Your newsletter sign-up was successful
Want to add more newsletters?
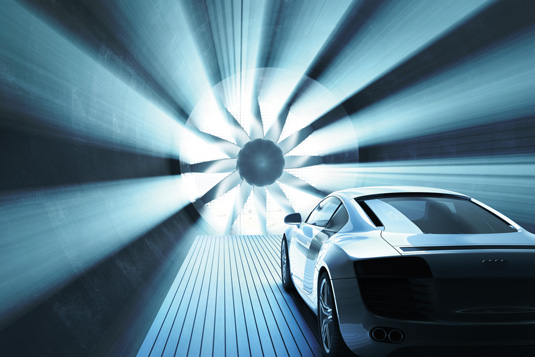
To generate volume light, you must use a direct light source. 3ds Max standard directional lights work well – but you can also use V-Ray plane lights by increasing the directional parameter.
Start by adding a target directional light into your scene and position the light source and the target so that the light passes through the opening or window. The target must go beyond the floor or wall so that the volume light continues throughout. Avoid angling the direct light towards the camera otherwise you may end up with a washed out render due to the volume light covering the camera.
The volume light will be contained within the direct light’s hotspot beam and falloff field. If you set the falloff field to be much greater than the hotspot beam, the volume light will start to lose density quite rapidly and fade out the further it travels from the centre of the light. If you want an even distribution of light, it is best to keep the falloff field value close to the hotspot beam value.
Article continues below 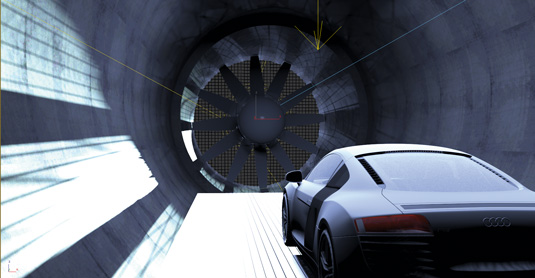
By default, 3ds Max standard lights do not have any attenuation applied, so the light has continuous luminosity. This is incorrect. Light should start to lose luminosity by dispersing the further it travels away from the source. Within the decay parameters, set the type to Inverse Square. If the light decays too fast, you can tweak this by adjusting the Start Parameter.
3ds Max standard light multipliers do not behave in the same way that V-Ray lights do. When using Inverse Square falloff, the multiplier must be set to a very high value in order to appear within the scene. A good value to start from is 800, as this roughly equals a standard V-Ray light. The multiplier is also affected by the start decay parameter. The lower the decay, the lower the multiplier needs to be. You may end up setting the light multiplier up in the thousands to get the correct illumination in accordance to the decay.
Under shadow parameters, turn on atmosphere shadows and area shadows. This softens them as the shadow moves further away from the casting object. Increasing the subdivisions here will also improve the shadow quality and reduce noise.
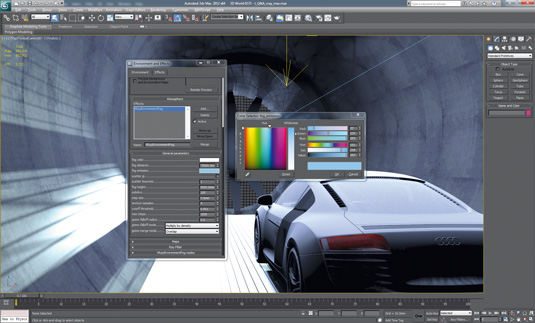
Go to Environment Effects and add a V-Ray Environment Fog to atmosphere effects. Under V-Ray Environment Fog nodes, add the Direct Light. Turn off Use All Lights so the volume light effect is only applied to the lights you choose.
Sign up to Creative Bloq's daily newsletter, which brings you the latest news and inspiration from the worlds of art, design and technology.
In the general parameters, you can either set the fog colour here or within the Directional Light. You cannot mix the colours, so one must remain white to be inactive. The Fog Distance controls the length the volume light will travel along the direct light, so set this distance to be the light’s entire length.
The fog height also affects the visibility. Therefore this setting must cover the entire height of the light. If the light is positioned 9,000mm above the floor, then this must be your minimum value. A good way to determine the value is to draw a rectangle that covers the height and length of the scene.
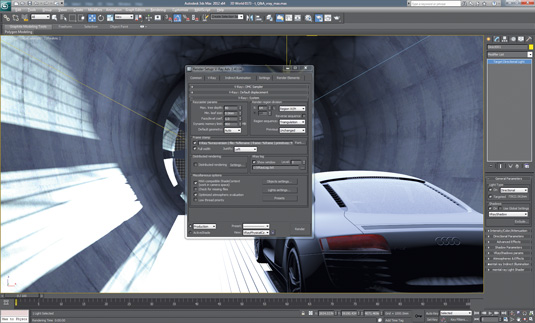
V-Ray Environment Fog is an atmospheric effect that is calculated during rendering using a brute- force method. Therefore it is important to optimise the settings so that the render times are not too high. The subdivisions parameter controls the noise level. Lower values produce more noise, whereas higher values produce less at the cost of longer render time. Start with a value of 16 and increase in increments of 8 until you are satisfied with the results. Usually 50 subdivisions are adequate, but you may need to go up to 100 depending on the scene.
If the scatter GI parameter is enabled, the volume light will scatter throughout your scene, via Global Illumination illuminating surrounding objects. In addition to just direct light, this will add further realism but it can render very slowly. You may find that after a certain value the results are the same; try setting this to 8 and then 16. If not, then a value of 8 would be adequate.
James Cutler runs MintViz Workshop, a resource for any CG artist, designer or generalist looking to develop their skills.
This article orginally appeared in 3D World issue 173
Liked this? Read these!
- Top free 3D models
- Best 3D movies of 2013
- Blender tutorials: ways to create cool effects

The Creative Bloq team is made up of a group of art and design enthusiasts, and has changed and evolved since Creative Bloq began back in 2012. The current website team consists of eight full-time members of staff: Editor Georgia Coggan, Deputy Editor Rosie Hilder, Ecommerce Editor Beren Neale, Senior News Editor Daniel Piper, Editor, Digital Art and 3D Ian Dean, Tech Reviews Editor Erlingur Einarsson, Ecommerce Writer Beth Nicholls and Staff Writer Natalie Fear, as well as a roster of freelancers from around the world. The ImagineFX magazine team also pitch in, ensuring that content from leading digital art publication ImagineFX is represented on Creative Bloq.
