Knowing how to draw muscles in motion will add fluidity and movement into a still image. This tutorial will study the male back and arms, exploring the natural rhythm of the muscles, and the expressiveness they display when they work in union and counter-balance to propel the body with grace and style.
It's a beautiful thing to observe for someone who loves anatomy, but it opens a whole new world of possibilities for an artist – flowing shapes, lines and rhythmic tones. Mastering how to convey that in a piece will enhance your work.
If you would like to further extend your anatomy drawing capabilities with more tutorials, check out our posts on figure drawing, how to draw an arm, and our roundup of the best how to draw tutorials.
Read on for Patrick J Jones' in-depth tutorial on how to draw muscles.
Click on the icon at the top-right of the image to enlarge it.
The challenges of anatomy

Before we begin the tutorial, a word on anatomy. Anatomy is basically the same for everyone in a non-action pose, but the moment we move, the muscles change shape and affect each other as they jostle and push against each other. In other words, muscles are shape-shifters. Add to the fact that we're all different shapes and sizes with different personalities and degrees of expression, and we end up with unlimited chances for expression using the human figure.
Look at the way a boxer moves compared to a ballerina and you’ll see a world of difference in expression of line and tone within what is basically the same human anatomy. Of course, studies by nature are a notoriously slow affair, with a studied drawing usually ending up on the stiff side.

To identify the muscles and their interactions, reference the photos shown here against the Tug-of-War study sheet at the end of the article. My first book, , was initially all study sheets documenting my knowledge of anatomy, but then became a more voluminous book. Taking those first notes and learning anatomy memory clues and basic structural shapes gradually fed my subconscious and freed me up to draw gesturally.
Unfortunately, I’d not drawn for a month before this assignment. I’d been in the US for the wonderful IX show on imaginative realism, where I was giving a lecture on my latest book, , which is about the gesture of anatomy. On that note, the best way to counter stiffness borne of outrageous rust is to draw lots of gestural drawings beforehand. Okay, with that said, let’s get started…
01. Find the motion in stillness

In this photo, the rhythm of life in muscle movement is evident – when we learn to see it. Note the waves created when the rib-cage bites into the side obliques, and the rolling hills running from the shoulder across the raised arm. Here, the body suggests motion even in stillness.
02. Search for simplicity

Using my two-finger-wide sharpened charcoal piece, I draw in the simple shapes to begin with. The male figure is notoriously blocky and I need to find as much gesture as I can. By finding simplicity we can uncover gesture, even in blocks. Remember that gesture is king. If we work only with structure in mind, then our drawings will be stiff. Keep lines long and loose whenever possible.
03. Work the pinch

I work on the ‘pinched’ side of the body first because the distances between forms is shorter and easier to judge than on the wider, longer stretch side of the body. This is a tip I learned from master draftsman, Steve Huston. As usual I’m working with simple shapes first, which makes it easier deal with the complexities ahead.
04. Get down the shapes of the muscle blocks

With the block-in stage mostly complete, I once again employ the help of gesture to regain some fluidity. By working from one muscle to another it becomes apparent that they share similar shapes at their borders. It’s time to dance and to chase the rhythms of muscle and flesh.
05. Draw with rhythm

Continuing down the model’s left arm, I continue the dance by drawing from one side to the other in rhythm. Note the natural flow of things, and how the forearm bulges are higher on the outside, like much anatomy such as the calves of the legs. I’m chasing rhythms here: left to right, high to low…
06. Engage the great motivator

I title the art, The Pearl Fishers, after a piece of opera I first heard as a young boy. To get into the mood I play the music as I work and find it a great motivator with its similar echoes of rhythm and gesture. Next up is Madame Butterfly, to really get the passion flowing!
07. Render with rhythm

With the rhythms taken care of, I dust the drawing back with tissue to achieve a softer undercoat that I can work the darks and lights out of. I begin rendering the forearm and hand – an area so complex that it’ll have its own workshop – and up into the upper arm, rendering with the same rhythm as before.
08. Realise the ripples and echoes

Laying in the darks reveals the nature of muscles pushing into flesh to create ripples. See how the scapula pushes into the rhomboid muscles, creating wave-like echoes all the way down the spine to the sacrum dimples of the hips. All this poetry leads me to draw a sensitive face, such is the power of rhythm.
09. Avoid getting stuck in Render Hell

We could call the drawing finished because the more we render, the stiffer a drawing becomes. But as this is a study I’ll continue to draw the minutiae and see if Render Hell raises its ugly head. I’ve also drawn a thicker rope than I posed with in the reference, for added authenticity.
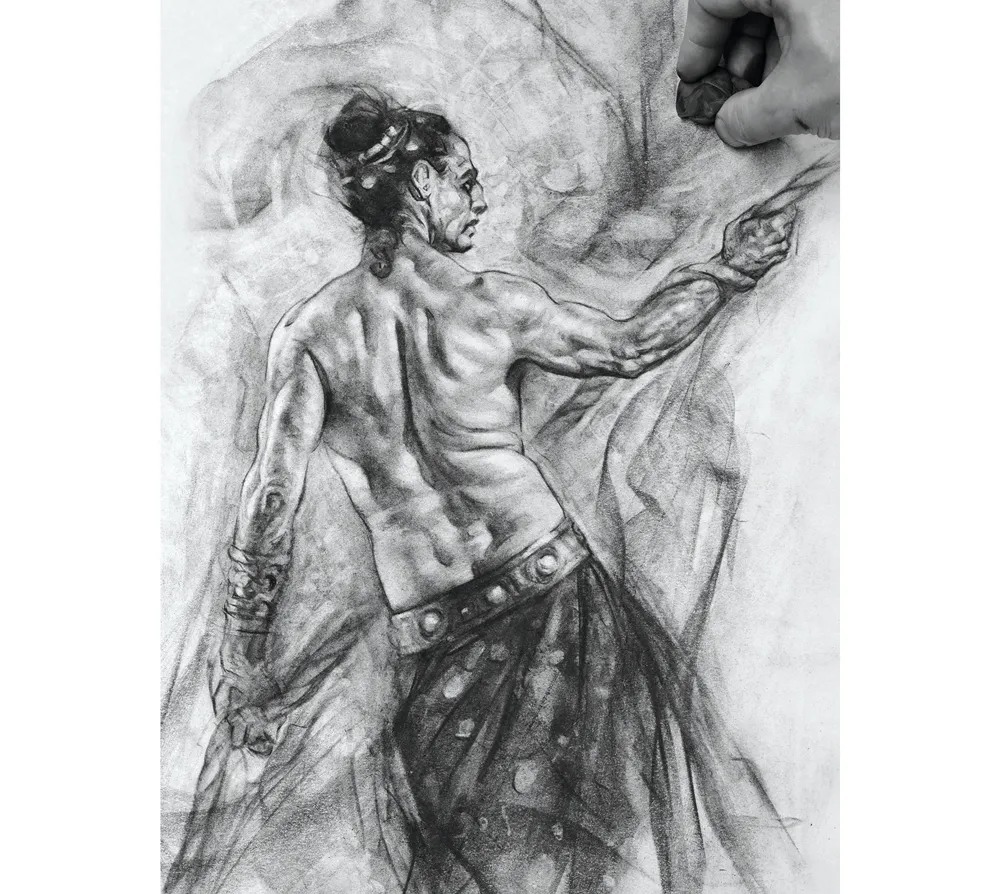
10. Feel the clammy touch

Drawing the arm bracelet leads me into a stiff corner and feeling the clammy touch of Render Hell, I take a piece of compressed charcoal and engage my gestural hand again. I also add some abstract shapes in the background with willow charcoal for added movement.
11. Add detail to the sarong and adjust the face

I add ‘gold’ spots to the fisherman’s Lavalava sarong with an eraser, which feels a touch feminine for a fisherman, but I like the spots too much to let them go. To counter this, I draw a rugged face. This may not be an improvement, but nothing kills creativity more than the fear of failure, and so I blaze ahead regardless.
12. Admire the beautiful antagonist

I continue highlighting with erasers and detailing with pencils. Note the beautiful antagonistic nature of the triceps and biceps of the raised arm as they work in sync. The triceps are lengthening to enable the bicep to contract and shorten. The opposite is happening on the straight arm.
13. Play the long game

As I suspected, the continued rendering has killed a lot of the gestural energy of the earlier stages. However, experimentation wins out when playing the long game, and I’m all in as far as art goes. I swirl around some abstract storm clouds to see what happens. There are no mistakes in art. You just have to think of every stroke as a learning experience, regardless of the finished drawing.
14. Behold the shape-shifters

I work an oily sheen into the flesh by contrasting the darks and lights more. I’m left with a drawing more rendered than I would like, but I’ve cemented further knowledge of how muscles work and shape-shift into my subconscious, and that makes it all worthwhile.
15. Tug-of-war study sheet

With studies, I go into great depth identifying muscle landmarks and shapes and in this particular study I’m interested in how all that knowledge flows into gesture. If we learn our anatomy well enough it’ll embed itself into our subconscious and enable us to draw gesturally.
This article was originally published in issue 170 of ImagineFX, the world's best-selling magazine for digital artists. Subscribe to ImagineFX.
Read more:

