Quickly create a city scene using textures
Concept artist Donglu Yu explains how to build a collection of custom shapes to pull together strong compositions quickly.
Sign up to Creative Bloq's daily newsletter, which brings you the latest news and inspiration from the worlds of art, design and technology.
You are now subscribed
Your newsletter sign-up was successful
Want to add more newsletters?

Five times a week
CreativeBloq
Sign up to Creative Bloq's daily newsletter, which brings you the latest news and inspiration from the worlds of art, design and technology.

Once a week
By Design
Sign up to Creative Bloq's daily newsletter, which brings you the latest news and inspiration from the worlds of art, design and technology.

Once a week
State of the Art
Sign up to Creative Bloq's daily newsletter, which brings you the latest news and inspiration from the worlds of art, design and technology.

Seasonal (around events)
Brand Impact Awards
Sign up to Creative Bloq's daily newsletter, which brings you the latest news and inspiration from the worlds of art, design and technology.
Despite continuous innovations in digital painting software, textures have always played an important role. If I were only able to choose two textures for a specific project, I’d choose one organic texture, such as that of a rock or tree; and a geometric texture made up of building elements or mechanical parts. By creating a custom shape in Photoshop, I can then use those two simple textures to create endless possibilities of shape combinations.
Hone your Illustrator skills with these brilliant tutorials
This quick way of generating a strong composition is especially useful during a hectic production phase. Within a couple of hours, you would be able to show your art director dozens of useful thumbnails.
In the following walkthrough, I’ll explain the technique of creating custom shapes in detail. Then you’ll be able to come up with your own sets of custom shapes by extracting diverse textures from your collection of photo references.
Here, I’ve chosen two photos from some cityscapes and one photo of a tree texture that I took in Texas. The main elements in each photograph are all clearly defined, which makes the selection procedure that much easier.
01. Extract the main element
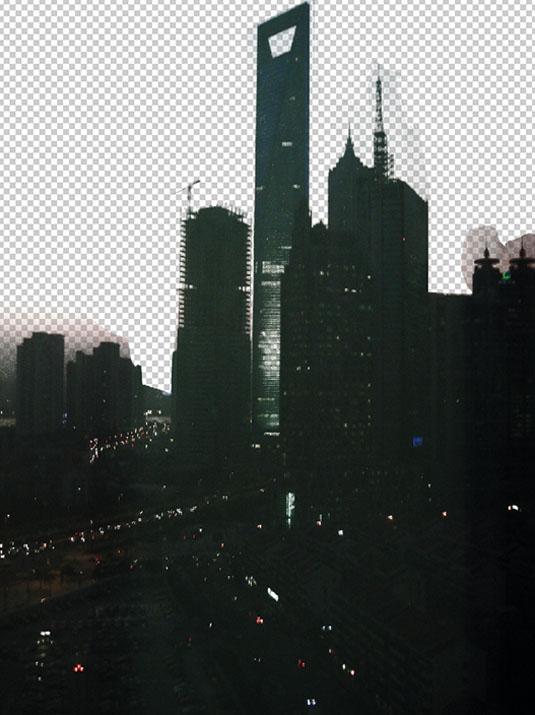
I take the main element out of its original background. You can use any selection tool that you feel happy with. The Lasso and Extract tools can isolate the relevant elements. You can also combine two selection methods, which often works for me: I mask the rough part first, then select the details with the Lasso tool. This approach gives me much more control.
02. Adding complexity
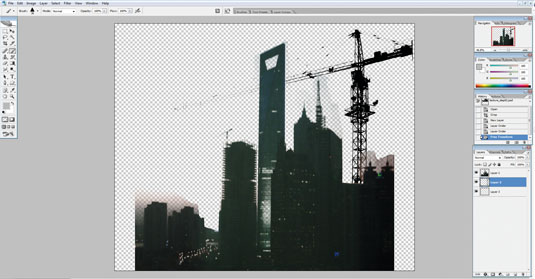
For adding complexity to the cityscape texture, I take a crane element from another photo and combine it with my art. Its shape is clearly recognisable, and it makes the scale easier to read for both the viewers and the production artists such as modellers or level artists. I’m always thinking about the needs from other artistic departments to speed up the production process.
Sign up to Creative Bloq's daily newsletter, which brings you the latest news and inspiration from the worlds of art, design and technology.
03. Photoshop fun
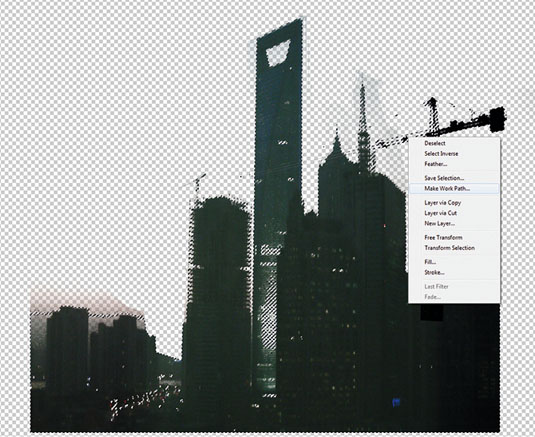
Now that the preparation stage is complete, the Photoshop fun begins! Select the texture, press M and then right-click your mouse. From the pop-up menu that appears select the Make Work Path… option. To achieve a precise path type 0.5 in the Pixel Tolerance box, but be sure to try out different tolerance settings to generate a range of path results.
04. Ready-made cityscape
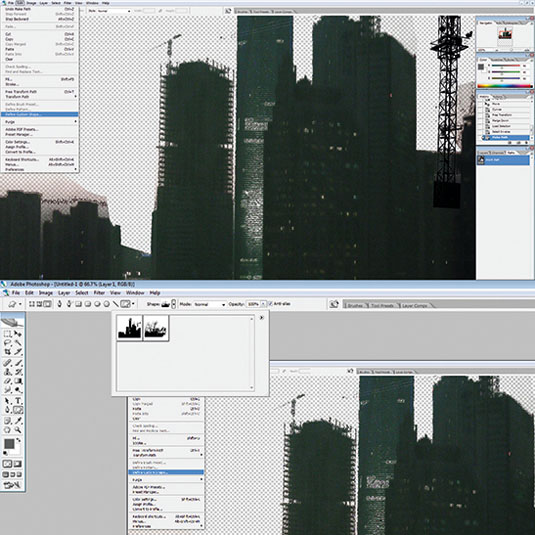
Go to the Edit tab, click Define Custom Shape... and give a name to your shape. You can manage your custom shapes the same way as you manage your brushes. Now if you pick the Shape tool, you can see your shapes in the drop-down menu. Select any of them and then start to drop and drag freely on your canvas to create your fantasy compositions!
Words: Donglu Yu
Donglu is a concept artist working in the video games industry. She's worked on Deus Ex: Human Revolution and the Assassin's Creed franchise. This article originally appeared in ImagineFX magazine issue 110.
Like this? Read these...
- Great examples of doodle art
- Brilliant Wordpress tutorial selection
- Free tattoo fonts for designers

The Creative Bloq team is made up of a group of art and design enthusiasts, and has changed and evolved since Creative Bloq began back in 2012. The current website team consists of eight full-time members of staff: Editor Georgia Coggan, Deputy Editor Rosie Hilder, Ecommerce Editor Beren Neale, Senior News Editor Daniel Piper, Editor, Digital Art and 3D Ian Dean, Tech Reviews Editor Erlingur Einarsson, Ecommerce Writer Beth Nicholls and Staff Writer Natalie Fear, as well as a roster of freelancers from around the world. The ImagineFX magazine team also pitch in, ensuring that content from leading digital art publication ImagineFX is represented on Creative Bloq.
