How to light your basic games environment
Andrew Finch explains how best to set up nighttime lighting in your video game environment, in part five of our six-part series.
03. Secondary lighting: 1

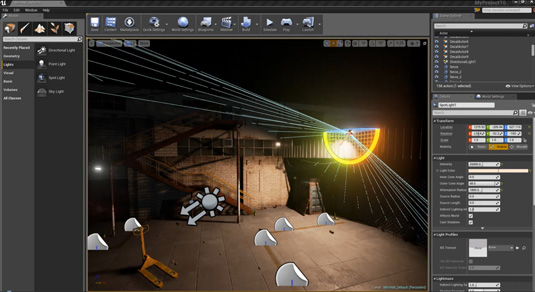
There are two spotlight meshes in the scene, one above the garage door and one on the metal bridge-like structure. I place a spotlight slightly below these assets to give the illusion of the light being cast from the light meshes. I rotate the bridge spotlight to cast light against the back wall and staircase, for interesting shadows across the wall. The settings are: Intensity 26000; Attenuation Radius 1800; Outer Cone Angle 68; Colour warm orange.
04. Secondary lighting: 2

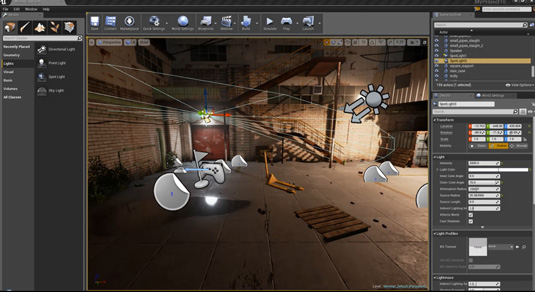
Point the spotlight above the garage mainly towards the floor, so as to cast light across the left wall and garage door. The settings used for the light are: Intensity 2000; Attenuation Radius 1000; Outer Cone Angle 70 and Colour light blue hue. Also add a Source Radius setting of 25 in order to get a softer fall off to your shadows from this light.
05. Atmospherics

Adding atmospherics, such as fog, creates mood but also has another function – adding depth and realism. Drag an Exponential Height Fog actor into the scene, somewhere in the middle. Because this is height fog, it will change the appearance depending on how high the actor is in the scene. The settings I used are: Fog Density 0.015; Fog Colour dirty dark orange; Fog Height Falloff 2.0. Move the Fog actor down until you get the desired look.
06. Improve shadow quality

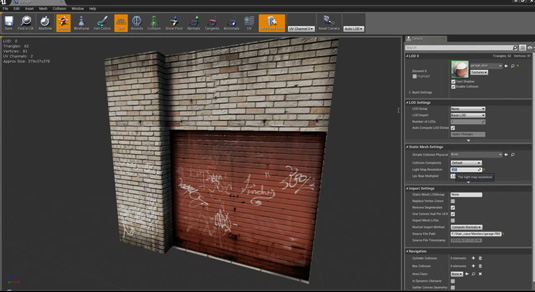
The shadow quality on the back walls isn't good, due to the lightmap's low resolution, set on a per asset basis. The walls are a good example of how a larger map would be good enough for a scene like ours. In the content browser, find an asset that needs a higher-res map, such as a wall, and double-click it for options. Under the Static Mesh settings find Light Map Resolution settings and type: 512. Now rebake the scene and the asset will have better shadows.
Low-res assets
Small assets such as bottles can stay at a low resolution, as the detail will be too small to see anyway
Expert tip: Use lower resolution maps
Keeping your lightmap resolutions low while you adjust your lighting solution is good practice, so you don't continually have to
wait ages for your lighting builds.
Daily design news, reviews, how-tos and more, as picked by the editors.
Words: Andrew Finch
Andrew Finch is a senior environment and lighting artist at Codemasters Game Studio in Birmingham. This article first appeared in issue 191 of 3D World magazine.
Like this? Read these!
- Part One of How to create a basic game environment
- Part Two of How to create a basic game environment: textures
- Part Three of How to create a basic game environment: assets and materials
- Part Four of How to create a basic game environment: Unreal Editor

The Creative Bloq team is made up of a group of art and design enthusiasts, and has changed and evolved since Creative Bloq began back in 2012. The current website team consists of eight full-time members of staff: Editor Georgia Coggan, Deputy Editor Rosie Hilder, Ecommerce Editor Beren Neale, Senior News Editor Daniel Piper, Editor, Digital Art and 3D Ian Dean, Tech Reviews Editor Erlingur Einarsson, Ecommerce Writer Beth Nicholls and Staff Writer Natalie Fear, as well as a roster of freelancers from around the world. The ImagineFX magazine team also pitch in, ensuring that content from leading digital art publication ImagineFX is represented on Creative Bloq.
