In today's creative environment, where promotional material is routinely sent in the form of a digital file via email, a handmade self-promotional book can make a cost-effective, personal and unique alternative to help you stand out.
In this InDesign tutorial, I'll explain how to bind a book in a few easy steps. We'll cover some important tips for setting up page spreads and cover templates in Adobe's InDesign, as well as the essential tools and techniques you need to bind your own books. If you need any bookbinding materials, a good source is Shepherds Falkiners. You'll also find an illustrated diagram of the sewing technique we used to make this project in the support files, to aid you as you go.
- Software: InDesign CS3 or later
- Skills: Create page templates in InDesign, perfect your binding and stitching techniques
- Download the support file here
01. Set up template
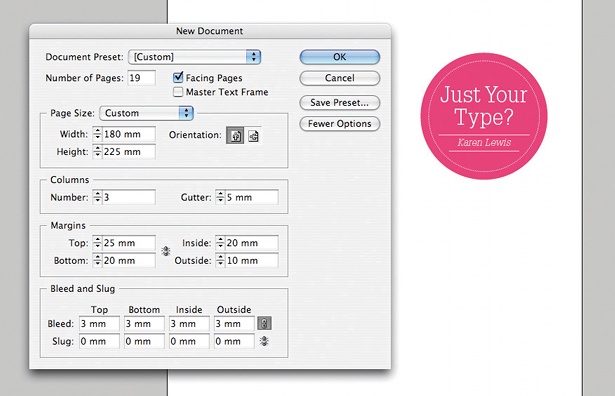
First, set up your book's page template in InDesign by creating a new document. The page size, columns and margins will depend on your preference, but remember to add an extra 10mm to the inside margin (to accommodate the stitching) and a 3mm bleed if you intend to print to the edge of the page. Also, make sure the Facing Pages box is ticked so you can view your design as a spread.
Article continues below02. Print the pages
When you're ready to print, export your document as a PDF and, under Marks and Bleeds, tick Crop Marks, and Use Document Bleed Settings. The pages need to be printed double-sided – either via your printer settings or by manually printing all odd pages, then all evens.
Experiment with paper stocks to see which works best. With the pages in the correct order, draw a line on the top page to mark the top and bottom between the crop marks, and use a scalpel to cut through the inner page crop marks closest to the spine.
Depending on the number of pages and paper stock you use, you can cut through multiple pages at a time. If you have lots of pages, divide them into sections and mark the top of each section.
03. Prepare for stitching

Draw a line from the top to the bottom of the page, 5mm in from the spine – this is where the pages will be stitched. Along that line, mark a dot 10mm from the top and one 10mm from the bottom, then put some evenly spaced dots in between these. I created three holes spaced apart by roughly 5cm, but the number of holes you need will vary, depending on the height of your page.
Tap the top of the pages against a flat surface to ensure they are flush, lay them flat and pierce through the dots carefully, using a bookbinding awl. Keep the awl as straight as possible when piercing through the pages to make it easier to sew.
04. Start stitching

To stitch the pages, use a bookbinding needle and linen thread, four times the page height. Thread your needle, piercing the thread 1cm from the end and pulling tight instead of tying a knot.
Starting at the middle hole, push the needle up through the back of your pages, leaving a 10cm loose thread remaining. Go around the spine and back up through the same hole, holding the loose thread to keep the pages tight.
Go to the next hole in either direction, thread your needle down, around and back up through, then along to the next hole. Repeat this process to the end, then weave the thread back along the length to the centre, ensuring it runs along the length of the spine on both sides.
At the middle hole, repeat this process along the second half of the book. End back at the middle hole and tie off using the loose thread. Cut off any remaining thread about 1cm from the knot.
05. Glue the spine

You're now ready to glue the spine. Place your book between two clean boards - or a couple of heavy books - to press your pages flat, making sure the spine sticks out a little. With a paintbrush, paste the spine with a fine layer of PVA glue (thinned with a dash of water) and leave it for 20 minutes to dry.
Make sure the glue doesn't collect around the edge of the pages, as this may stop them opening properly. When the spine is dry, remove it from your DIY bookpress and use the scalpel to trim off the excess paper beyond the crop marks.
Next page: the final five steps...
