Create manga-style artworks
Madeleine Rosca reveals how to give your illustration an authentic Japanese feel by adding dynamic cel-shading effects in Photoshop.
Filled with vibrant colours, wide-eyed androgynous characters and their giant robot minions, Japanese anime is sure to have graced your Saturday morning TV screens at some point. Like its animated cousin, manga artwork relies on eye-catching, dynamic action poses, expressive characters and strong, firm lines.
Although it's predominantly created using dedicated software such as Manga Studio, it's possible to achieve similar effects with Photoshop. This project will help your manga-style illustrations really pop, using a variation on the classic cel-shading technique - widely used to colour anime and manga images.
To make your creation stand out from the rest, I'll also show you a few extra effects that add depth to your coloured line art. All you need to start with is a manga sketch of your own, or if you prefer you can use the line art provided.
Article continues belowClick here to download the support files (8.22MB)
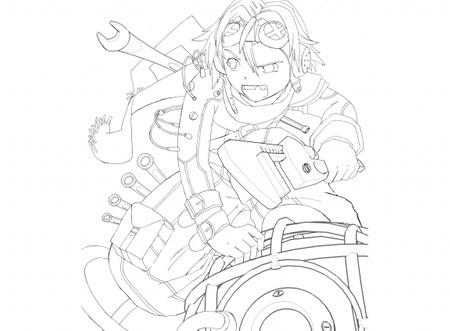
01 Draw your manga character with a pen, scan it in and open it in Photoshop, ready for some 3D elements - or open claude_lineart.jpg from the support files. Cel shading is a very bold, neat way of colouring, so artwork with strong, dark lines is best. You need the lines to be a uniform shade of black, but sometimes after scanning pen lines can look greyish and weak - that's where step two comes in.
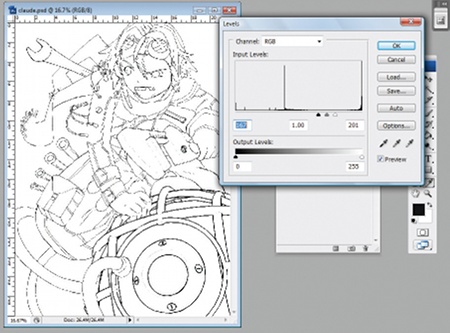
02 To achieve lovely firm lines, you need to strengthen them using Photoshop's levels. Click Ctrl/Cmnd+L to bring up the Levels option box. Under the Input Levels option, use the sliders to increase the strength of your inks by moving the black slider to the right. You can also move the white slider a little to the left, to get rid of any noise or dust spots that your art might have picked up during the scanning process.
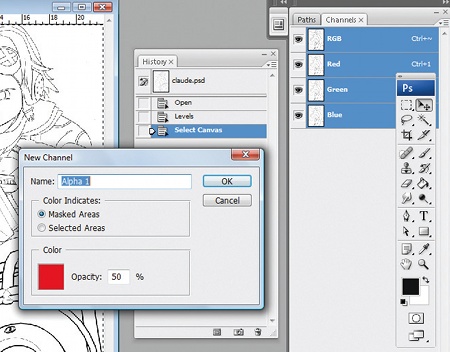
03 To colour your line art, you need it on a layer that's separate from the background so you can paint underneath it. Click Ctrl/Cmnd+A to select all, Ctrl/Cmnd+C to copy, then open the Channels palette and create a new channel. Make sure your new 'Alpha 1' channel is visible by selecting the little eye icon next to it. Click Ctrl/Cmnd+I to invert the contents of the Alpha 1 channel. Then click Ctrl/Cmnd+D to deselect everything.
Sign up to Creative Bloq's daily newsletter, which brings you the latest news and inspiration from the worlds of art, design and technology.
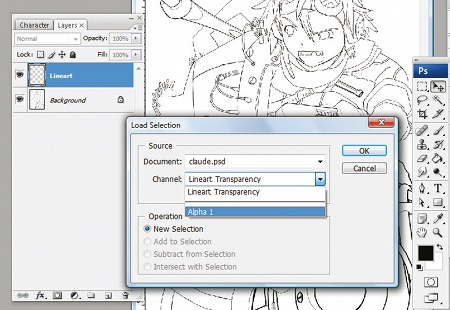
04 In the Layers palette, create a new layer over the background and give it the title 'Lineart'. In the Tools palette, make sure your foreground colour is absolute black (with the values 0,0,0). In the Photoshop menu, go to Select>Load Selection, and use the drop-down menu to select your Alpha 1 channel.
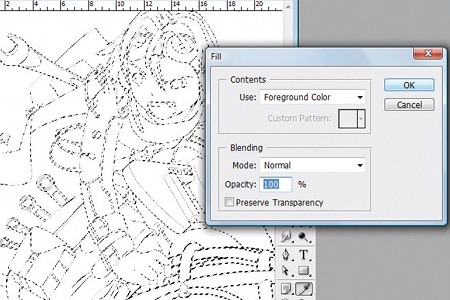
05 Go to Edit>Fill to open the Fill dialog box. Click OK, then Ctrl/Cmnd+D to deselect everything and you'll see that, using the alpha channel you created, Photoshop has put your line art on a layer of its own. Keep the original line art layer at the bottom of the layers. On top of it, create a new layer and fill it with a basic background colour: a warm yellow.
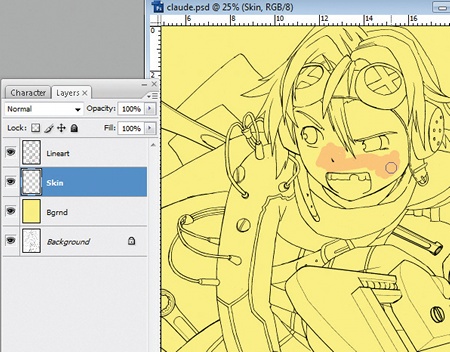
06 Now your line art is set up, you can get to work on the fun part - colouring. Putting colours and other basic elements on separate layers creates a naturally easy manner in which to select them individually later on, if need be. Create a new layer called 'Skin', and then select a flesh tone in the foreground colour palette. Select a round, hard brush from the Brushes palette at the top of the screen.
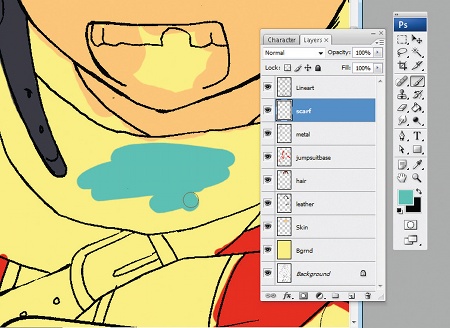
07 More nuanced cel-shading artists might choose to use a preset palette of colours, but for the purposes of keeping things simple here, choose a bright colour scheme to complement your manga hero. Select the tones you want using the Colour palette, and paint in the flat colours.
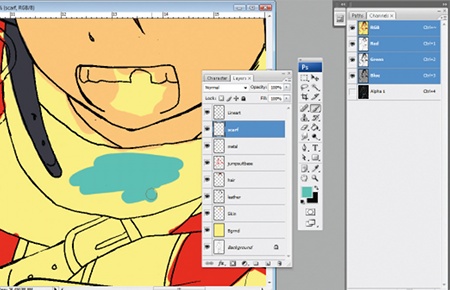
08 Now the flats are painted in, the colour of the scarf doesn't match the rest of the picture. Select the scarf's layer and click Ctrl/Cmnd+U to bring up the Hue/Saturation option box. From here, you can use all three sliders to tweak the scarf's colour - because the scarf is on its own layer, it won't affect the rest of the picture. Experiment with different hues and shades until you find the right one.
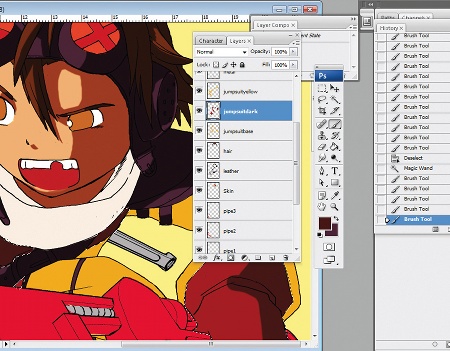
09 Now for shadows. Go to the Brush options, and take the Hardness down to 80%. Pick out a darker shade of each flat to complement the colour. Use the Magic Wand to select each colour - click outside the colour, then invert your selection to grab everything on that particular layer. The light is coming from the top-left, so the shadows come from the bottom-right. Paint your shadows directly onto each flat layer.
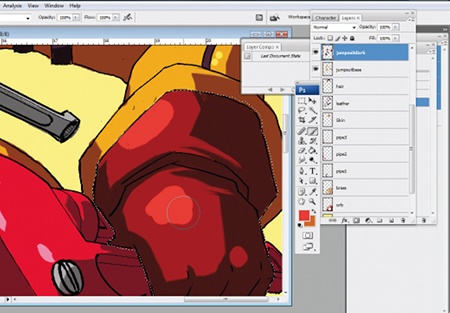
10 The highlight colours go on in exactly the same way: again, paint them onto the flat layer. If you're not used to colouring and you're nervous about picking the wrong highlights/ shadows and ruining your flat colour, add an extra layer on top. You'll end up with a lot of layers, but you'll be able to change your lights and darks easily if they look wrong.
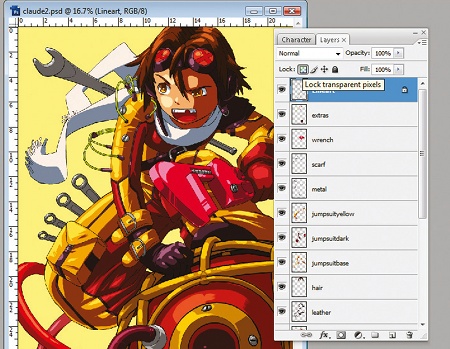
11 By this stage, you've got some bright, clean flat-colour artwork. You might choose to stop working here, especially if you're after a simpler anime-style image - alternatively, you can use the remaining steps to add some finishing touches to soften the image, and add detail so that it looks more like a picture from a manga book cover. Start by selecting the Lineart layer, and clicking the chequered box in the Layers option tab to lock the layer's transparency.
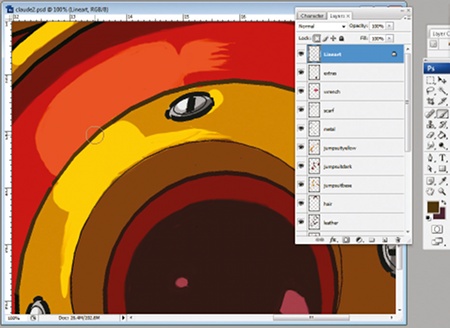
12 With the line art's transparent pixels locked, you can now colour in your lines directly. This softens the look of the image and makes it appear more three-dimensional. Pick colours for your lines that complement the dominant colours next to them. Don't make them too light, or your lines will disappear into the hues around them.
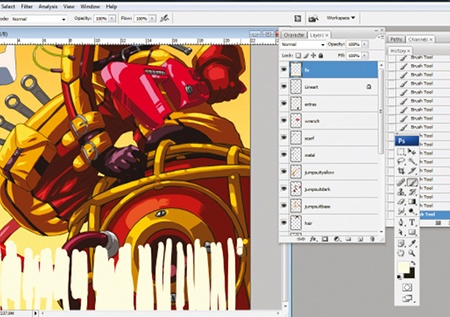
13 For a little more atmosphere, add a gradient to the background layer. To add some manga-style speed lines, create a new layer and title it 'fx'. With a big paintbrush, draw a series of large, vertical white blobs along the part of your image where you want your speed lines to go - and yes, it's meant to look messy.
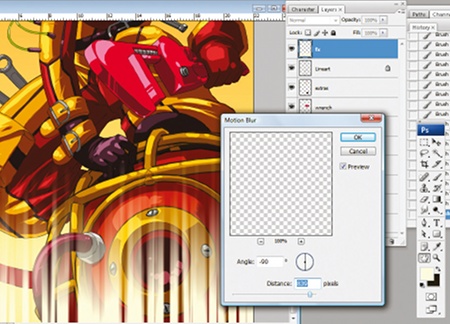
14 Select Filter>Blur>Motion Blur from the top menu. Choose the angle you want your speed lines to follow, and the distance. Click OK - you now have a set of speed lines. You could also put some white speed lines in the background above your figure, as well as some soft, pale lines over the figure with the Hard Light blend turned on. Where the foreground speed lines feel too heavy, pare them back using a large, soft eraser.
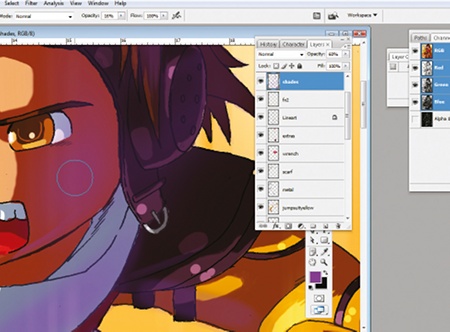
15 For even more atmosphere, create another layer on top titled 'Shade' and, using a purple brush with low opacity, gently brush in some shadowy tones in the lower-right areas to create a sense of distance. Add some extra highlights in the same way with a bright yellow brush. You can create a mask for your background area to make this process neater, but since this picture isn't too complicated I'm doing it on the fly.
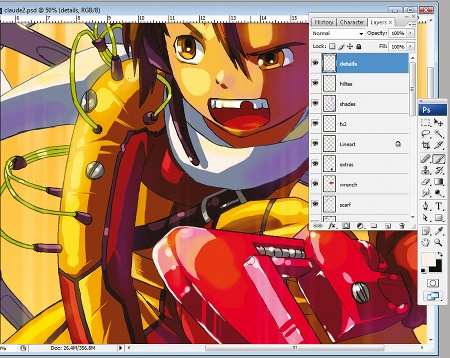
16 Now all that's left is to step back, take a look at the picture, and add a few details here and there to make the right elements stand out. Add some extra highlights on the wrench and the other metal parts, and more detail into the character's eyes - and that's it, you're finished. Your manga character is ready to save (or destroy) the world.
Madeleine Rosca
Author and illustrator of the Seven Seas Entertainment manga Hollow Fields, Rosca will have a new manga series out next year. She lives in Hobart, Tasmania. www.gomanga.com

The Creative Bloq team is made up of a group of art and design enthusiasts, and has changed and evolved since Creative Bloq began back in 2012. The current website team consists of eight full-time members of staff: Editor Georgia Coggan, Deputy Editor Rosie Hilder, Ecommerce Editor Beren Neale, Senior News Editor Daniel Piper, Editor, Digital Art and 3D Ian Dean, Tech Reviews Editor Erlingur Einarsson, Ecommerce Writer Beth Nicholls and Staff Writer Natalie Fear, as well as a roster of freelancers from around the world. The ImagineFX magazine team also pitch in, ensuring that content from leading digital art publication ImagineFX is represented on Creative Bloq.
