Create 3D clothes with realistic creases and folds
Dress your CG characters realistically with this process for creating clothes that crease and fold properly.
Sign up to Creative Bloq's daily newsletter, which brings you the latest news and inspiration from the worlds of art, design and technology.
You are now subscribed
Your newsletter sign-up was successful
Want to add more newsletters?

Five times a week
CreativeBloq
Sign up to Creative Bloq's daily newsletter, which brings you the latest news and inspiration from the worlds of art, design and technology.

Once a week
By Design
Sign up to Creative Bloq's daily newsletter, which brings you the latest news and inspiration from the worlds of art, design and technology.

Once a week
State of the Art
Sign up to Creative Bloq's daily newsletter, which brings you the latest news and inspiration from the worlds of art, design and technology.

Seasonal (around events)
Brand Impact Awards
Sign up to Creative Bloq's daily newsletter, which brings you the latest news and inspiration from the worlds of art, design and technology.
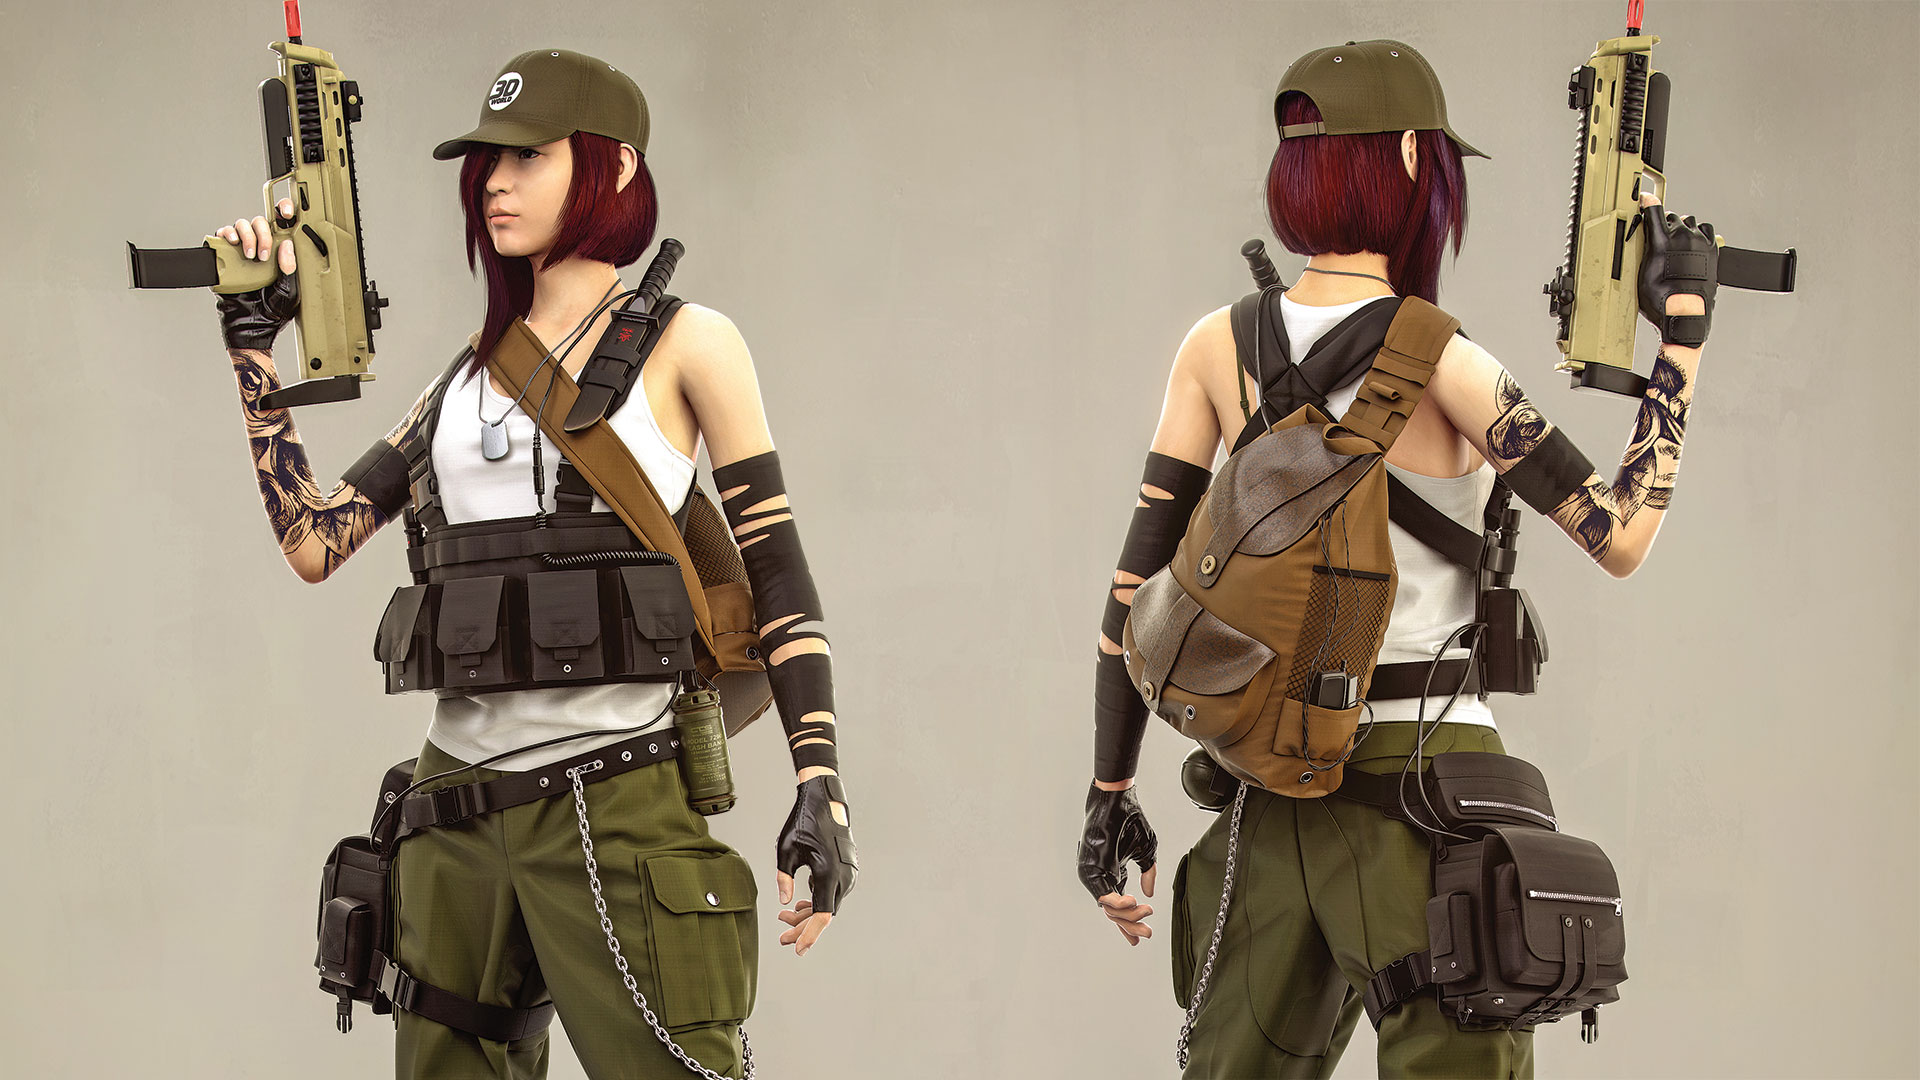
Making realistic virtual clothes is one of the most challenging tasks since the innovation of CG animation. Clothing is an extremely important aspect of 3D character development; it can transform even free 3D models and tell a story behind the character's personality. Making virtual clothes became easier because of the advanced technology we have nowadays – we can use our creative imagination with the right tools to create realistic clothes in just a few hours!
Marvelous Designer (MD) is one of the leading packages for creating and simulating virtual clothes. The technology is based on real-world sewing patterns to generate clothes, which is the standard way clothing is made in the fashion industry. The intuitive tools and the well-designed software interface make it easy for everyone in the industry to use MD.
Clothing is an extremely important aspect of 3D character development
If you are a game character artist, VFX artist, character TD or even a concept artist, Marvelous Designer is the right tool for you to create beautiful clothes with natural folds and detailed wrinkles. It also allows you to build your own library, mix and match clothes, as well as saving you a significant amount of time!
Marvelous Designer is very powerful software if you have a well-designed workflow. In this tutorial I'm going to share with you the steps you will need in order to start building your own clothing library for the next generation of computer graphics!
Download the files and video for this tutorial.
01. Plan the garment
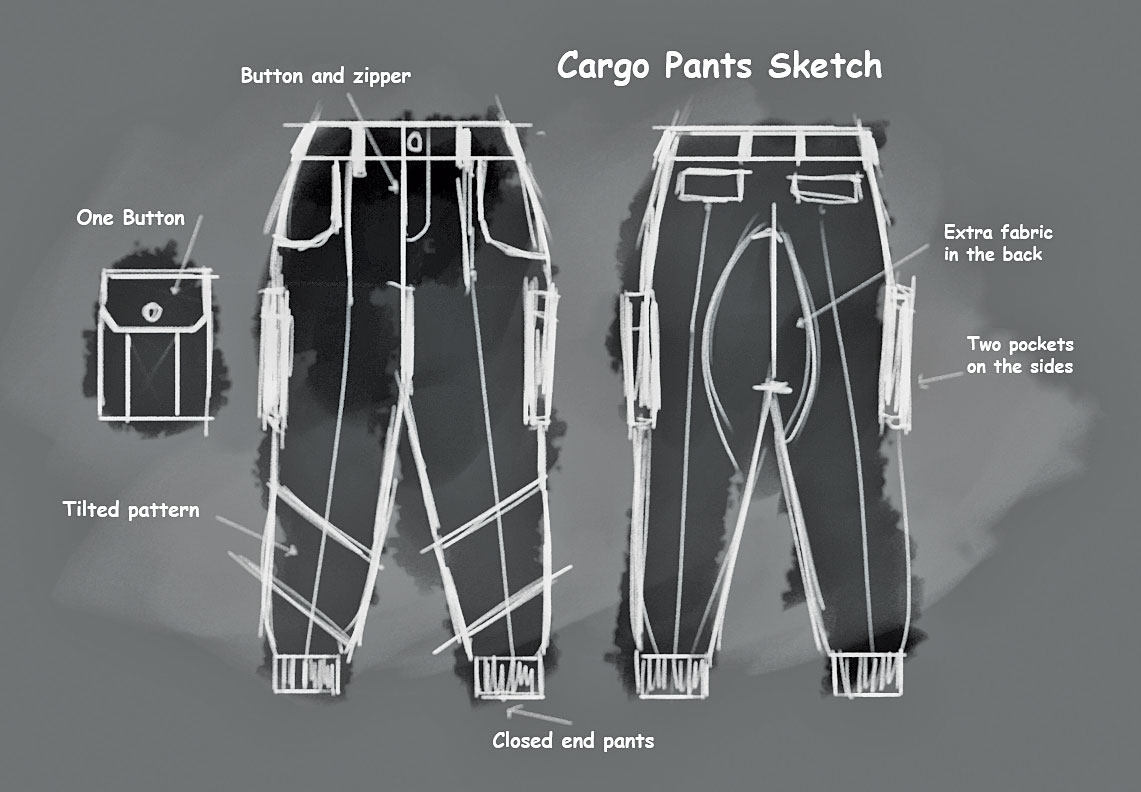
You don't have to be a fashion designer to use MD, but you should know the basics of fashion design. The most important thing to know is how to read the sewing blueprints! Go to the public library, grab some sewing books and read about the basics of sewing. Sketching clothes on paper will help you understand sewing patterns and explore ideas. Think about three major things: the main patterns that create the garment, the sewing seams and how these patterns are sewn together, and finally the other details such as pockets, zippers, buttons, and so forth.
02. Separate the garments
MD allows you to create a library of clothes and each garment you create can be modified and re-used to fit other characters. If you are dealing with very complex clothing design, you should work on each garment separately and then merge everything in one file and simulate them using the layers system in MD. This method will allow you to focus on designing one garment at a time; you will never get distracted by other garments in the scene and it will make MD simulate way more efficiently, avoiding any clothes intersects.
Sign up to Creative Bloq's daily newsletter, which brings you the latest news and inspiration from the worlds of art, design and technology.
03. Tracing a blueprint
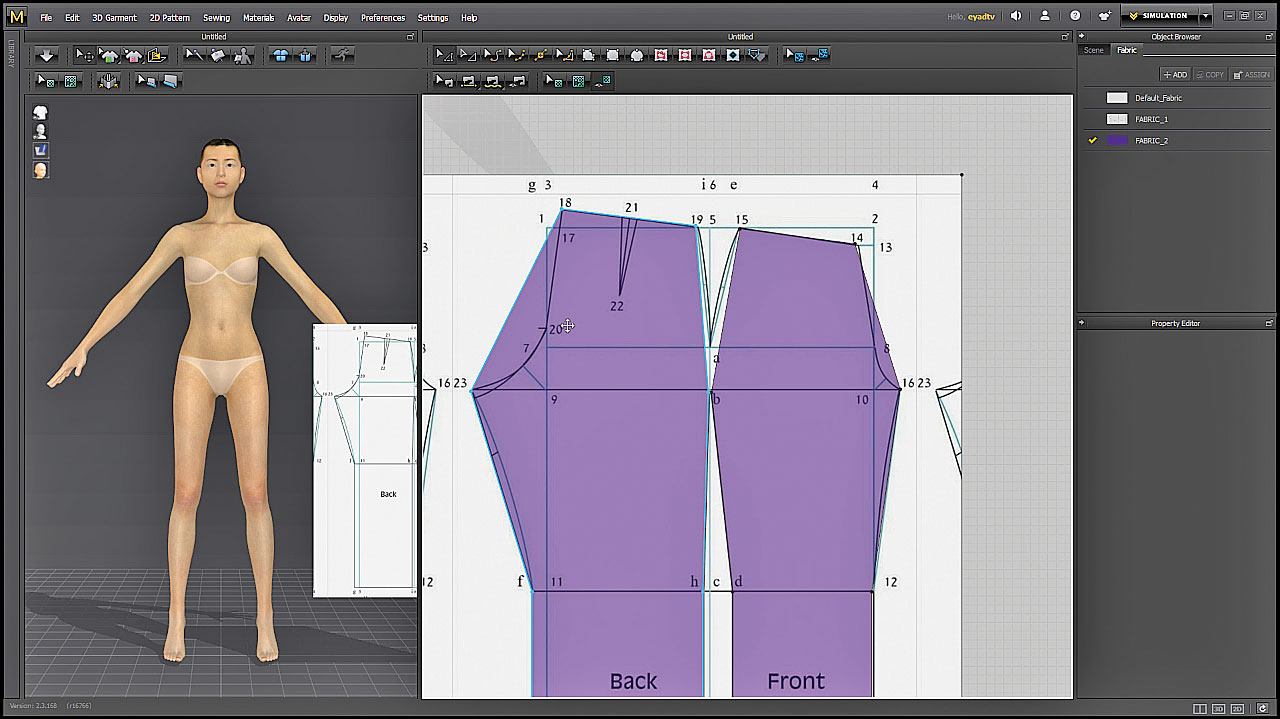
To trace a blueprint, draw a pattern using the Rectangle (S) tool in the 2D View, add a new fabric from the Object Browser, then map the sewing blueprint image as a texture from the Property Editor. Apply the fabric to the pattern, use the Edit Texture Tool to fit the blueprint inside the pattern shape. Add another fabric, change the colour to anything other than white, and change the Opacity to something around 50. You will then be ready to start drafting the patterns on top of the blueprint. (See the tracing and drafting video).
04. Drafting
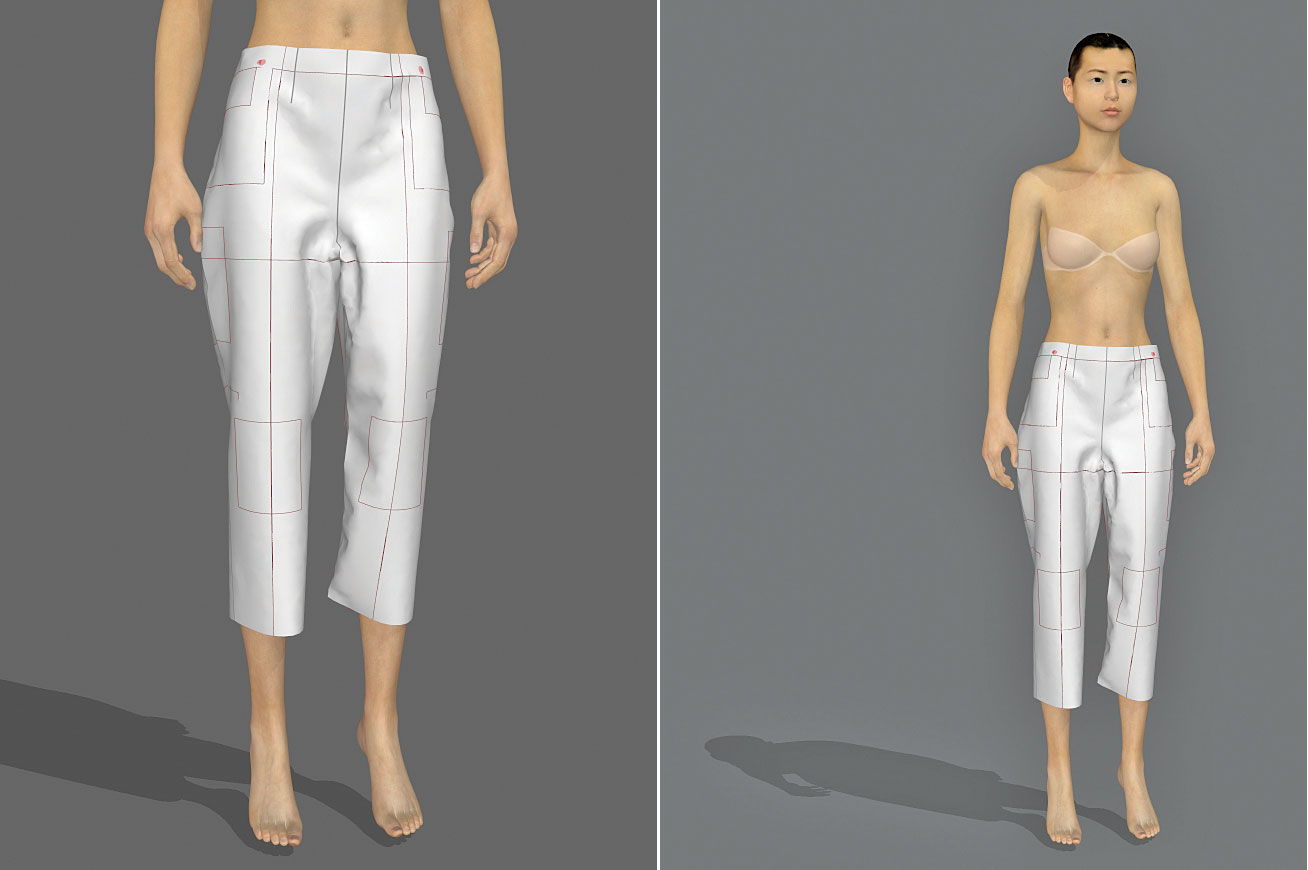
Start drawing over the blueprint patterns using the Polygon (H) tool, but just one point on each sharp corner until you close the pattern. Try to keep the patterns as simple as possible – the fewer points the better! You might need to align some points horizontally or vertically, so choose the points then right-click and choose Align. Use the Edit Curve Point (V) tool and curve all the edges until you trace the pattern. Only trace half of the pattern, then copy and paste it using the Symmetric Paste function. (See the tracing and drafting video).
05. Sewing
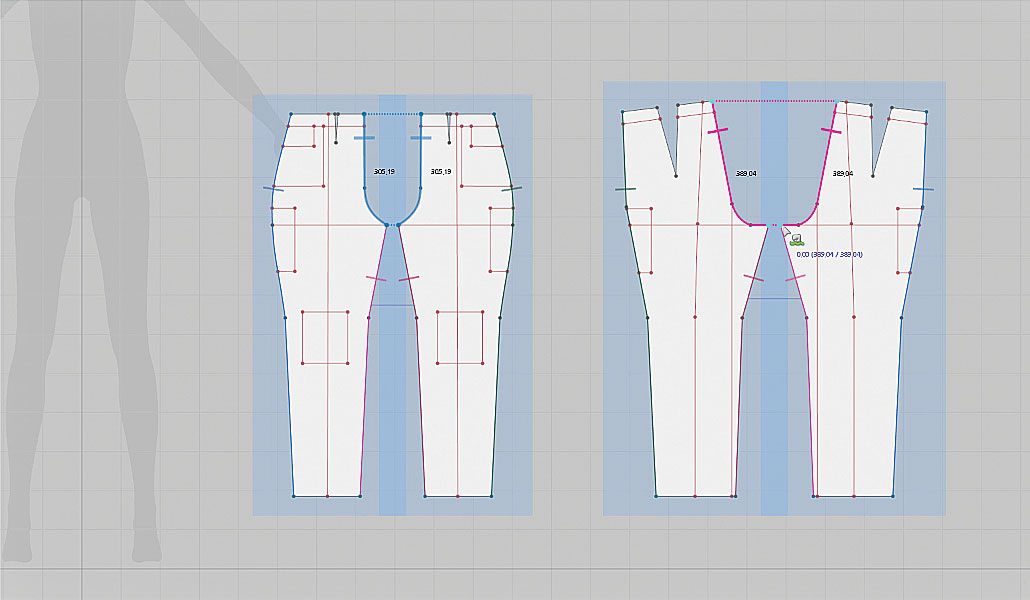
Arrange the patterns in a way that's easy for you to understand. At this point you will sew the garments the same way that fashion designers do in the real world. There are two types of sewing in MD: the Segment Sewing (N) which allows you to sew from one Segment Line (Edge) to another, and the Free Sewing (M) that allows you to sew freely from any one part of the pattern to another. If you hold down [Shift] it will allow you to sew one segment with N amount of segments. You can use the Edit Sewing Tool to flip the sewings and to edit them if needed. (See the sewing video).
06. Arrangement points
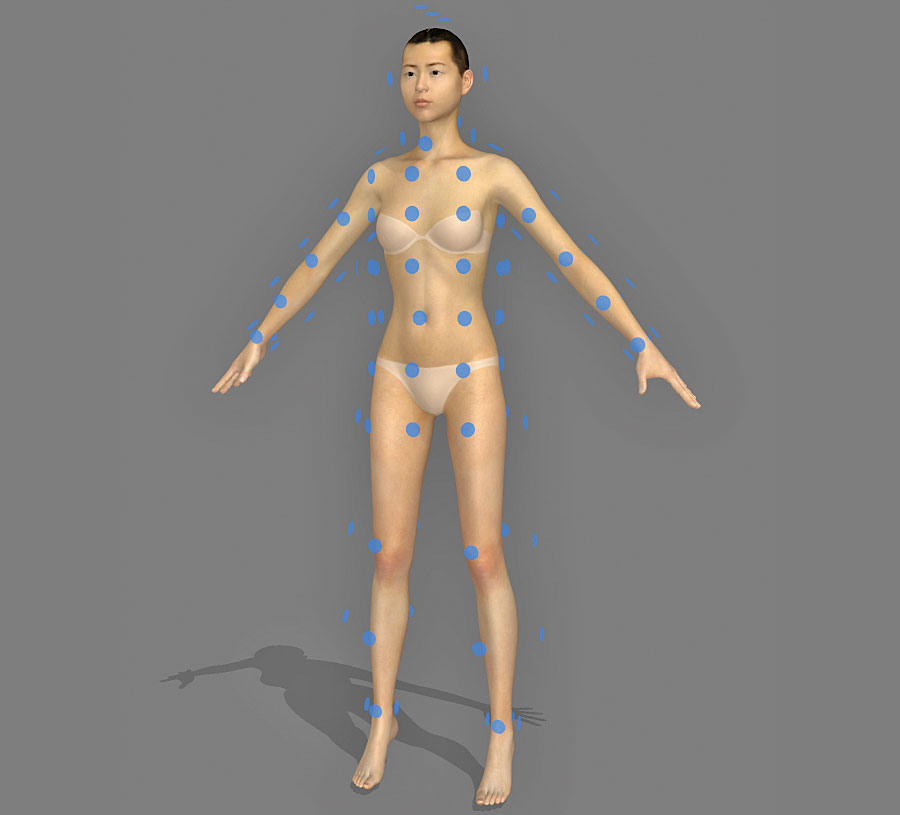
The Arrangement Points are the blue circles on the Avatar's body – you can turn them on from the side icons in the 3D View. These points are very useful for arranging the patterns on the Avatar and it will help you later on if you decide to reset the patterns. MD Avatars come with Arrangement Points by default, but if you are using your own character, you have to create your own set of Arrangement Points. You can do that by saving a default set of MD's Arrangement Points, load it on your character, then use the Avatar Editor to tweak the locations of the Bounding Volumes and Arrangement Points.
07. Arrange the patterns
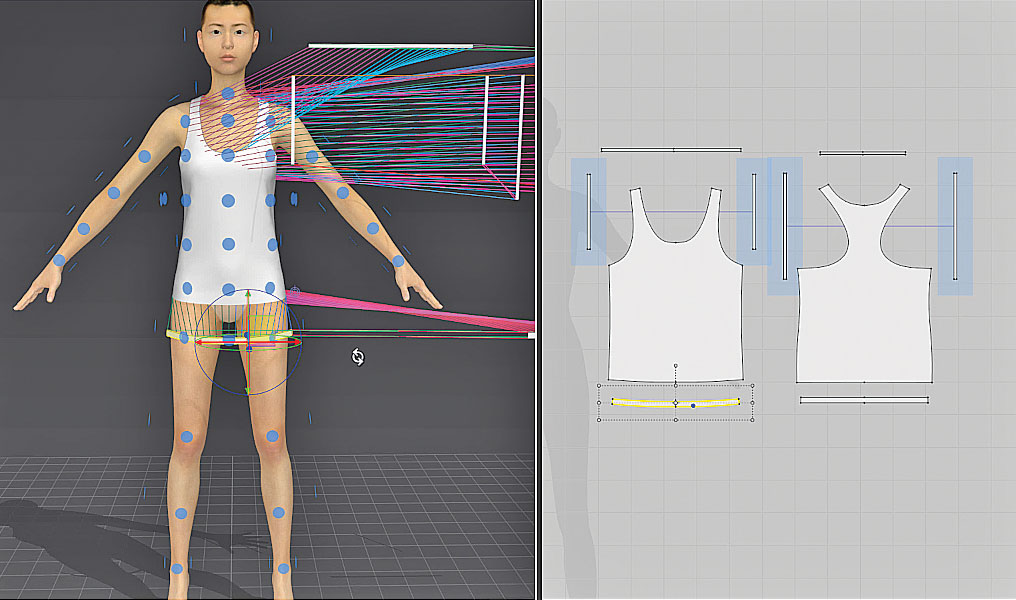
Turn on the Arrangement Points on the Avatar, then select the pattern using the Select/Move (Q) tool in the 3D View, or using the Transform Pattern (A) tool in the 2D View, and place the pattern on the arrangement point that is related to it. Move the pattern after placing it, and make it align very close to the Avatar's body to prevent it from falling down when simulating. You can use the Arrangement Offset in the Property Editor to make the pattern wrap around the Avatar. If you don't have any arrangement points, just align the patterns manually close to the character. (Download and follow the arranging and simulation video in this issue's online Vault for more detail).
08. Simulation
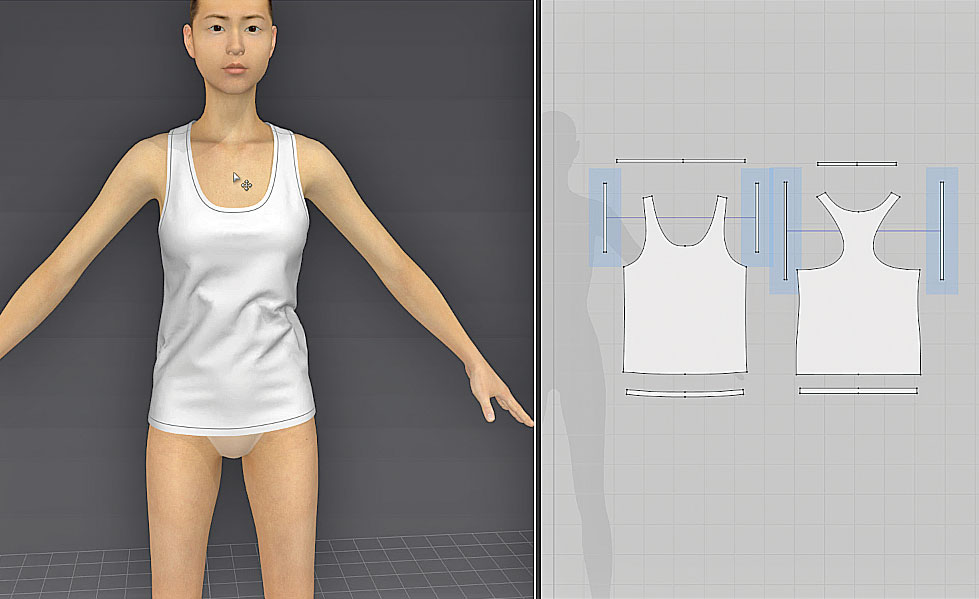
Make sure to save your file before running any simulation in MD! Double click on the Avatar and from the Property Editor set the Skin Offset (the distance between the Avatar's body and the garment) to something very low, maybe 1.00mm, or even less to make it look more realistic. Click on Simulate (Space),and the garment should fall down and start draping around the Avatar's body. While running the simulation, you can drag the patterns in the 3D view to fix the folds, or to change the location of the garments, play with the garment until you make it look good on the Avatar. (Download and watch the arranging and simulation video in the online Vault to see how to do this in detail).
09. Measurements
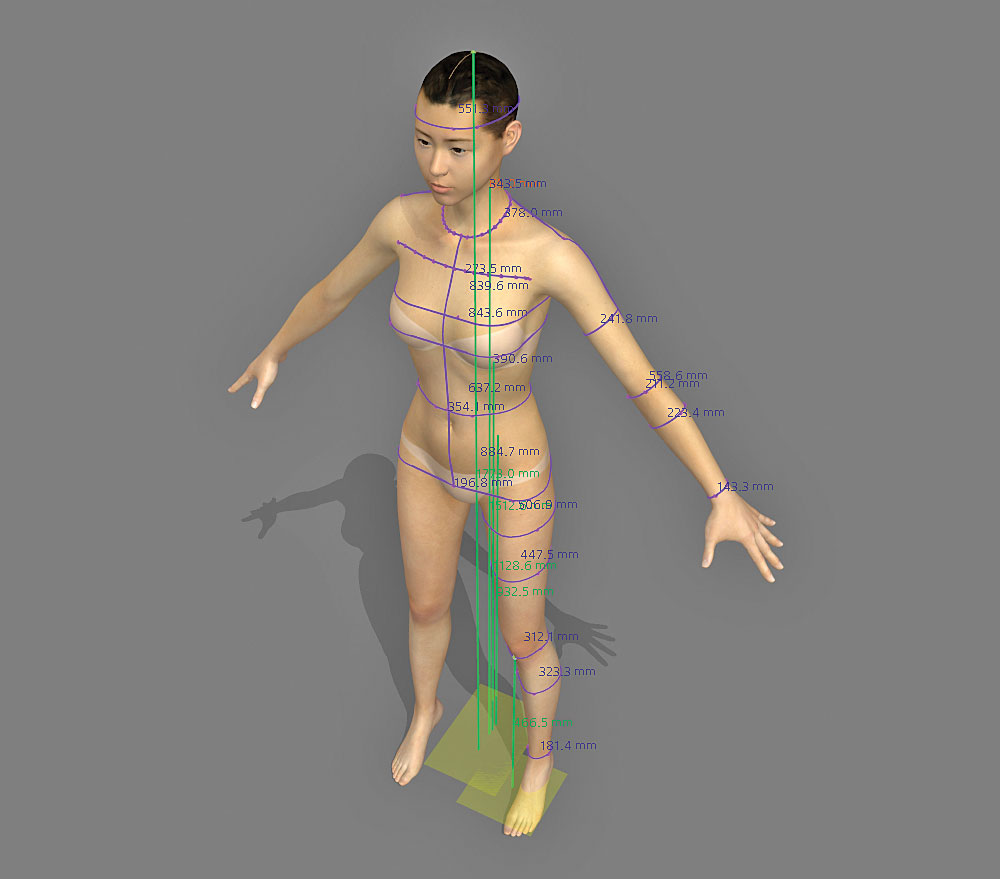
Taking measurements helps when modifying the garment patterns to make them fit the character's body. There are two main tools for taking measurements in MD: the Circumference Measurement (CM) and the Length Measurement (LM). Use the Basic CM tool to take measurements for: waist, hip, thigh, knee, calf, ankle, bust, neck base, arm hole, elbow, and wrist. Use the Height LM tool to get the heights for: bust, neck, gluteal, waistline, cervicale and leg. Then use the Surface Tape Measurement tool to get the pants and shirt lengths.
10. Fitting the clothes
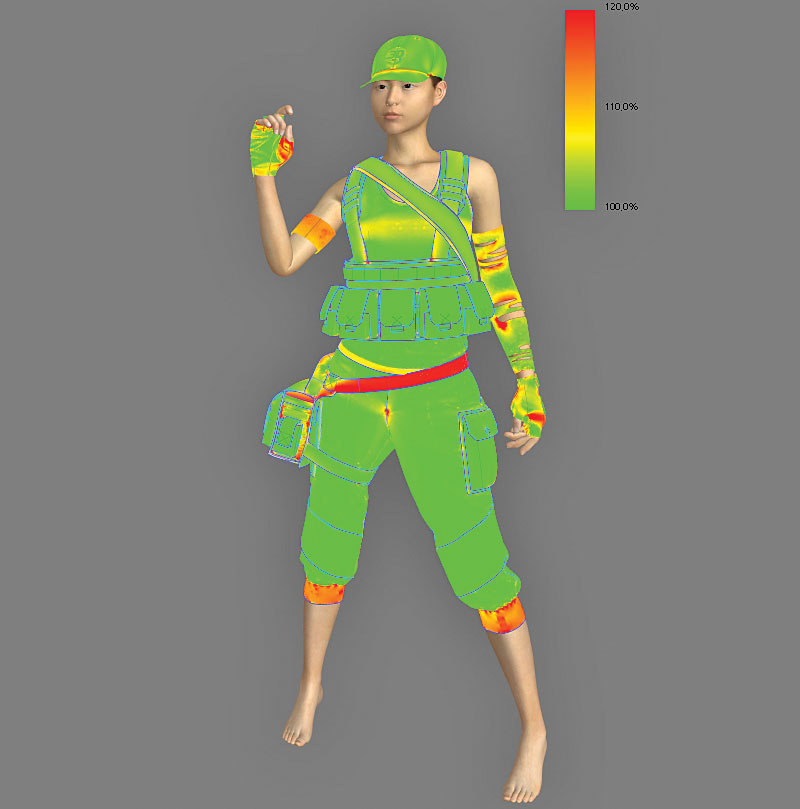
You should make sure that the clothes are not very tight on the character's body and also not very big. Turn on the Strain Map to locate the problems, check where the patterns are very tight (indicated by the red colour), edit the patterns in the 2D View and make them bigger in these areas, then run the simulation for troubleshooting. If the clothes are big, just resize them and cut the extra fabrics. Keep cleaning the patterns as much as you can, that will help you later on before detailing. If the Strain Map is a yellow/green colour that means you are on the safe side. (See the fitting the clothes video for more detail on how to do this).
11. Design the fabric
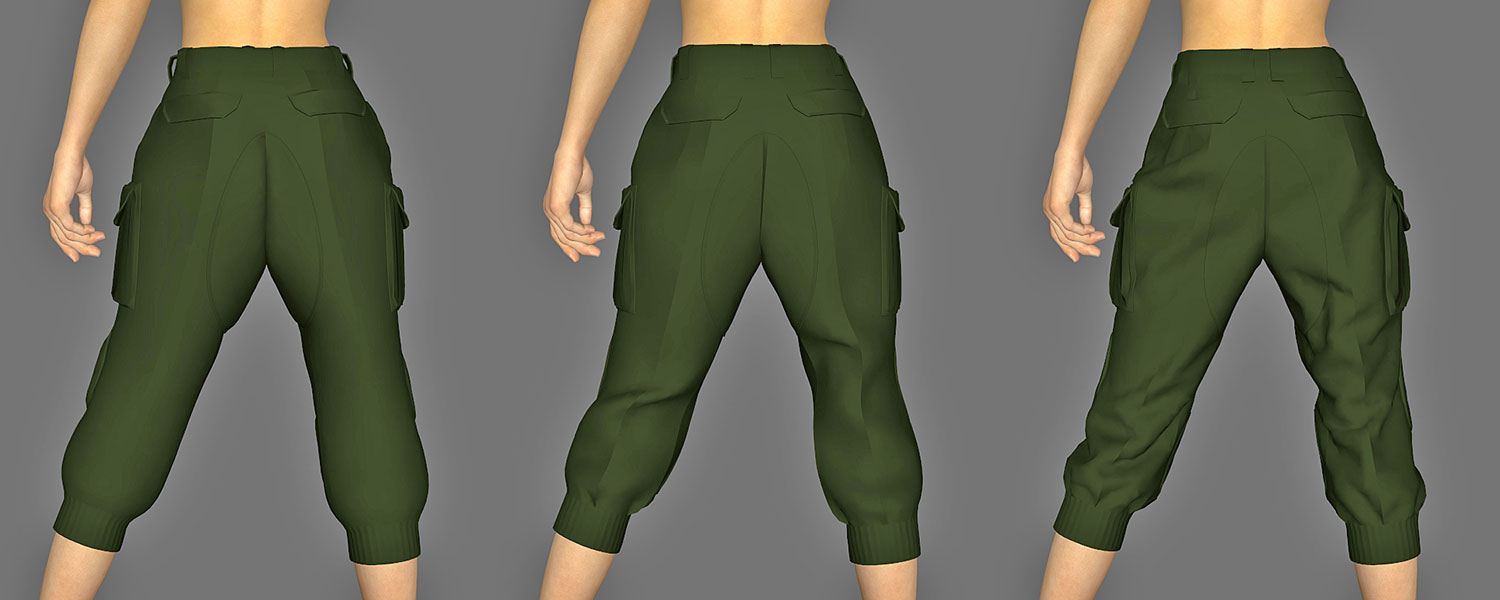
You have to design your fabrics before going any further with the detailing. MD has some good presets you can use as a starting point. Run the simulation and tweak the fabrics in real-time. Start off with cotton for soft fabrics like shirts, skirts and pants, and leather for hard fabrics like bags, belts and hats. Then tweak the physical properties to make them work with your design. Sometimes you will need to use different kinds of fabrics for a single garment.
12. Internal Lines
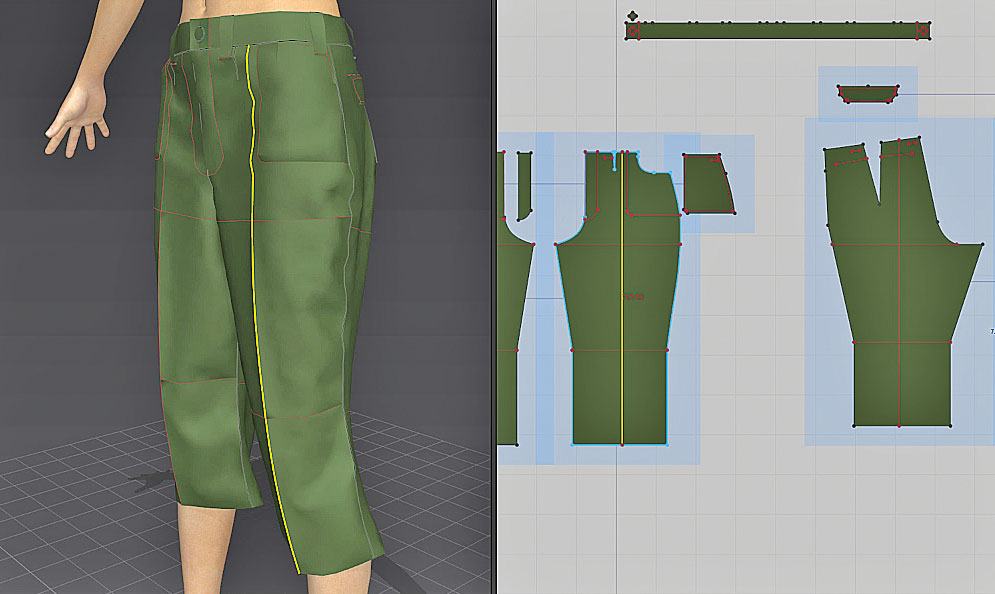
Use the Internal Lines at the beginning as guidelines for designing the garment. Mark the waist, the knees, the elbows, and divide the pattern into parts. Later on you can use them to fold the garment and to add details, such as holes and elastic! To make a fold, draw a line using the Internal Polygon/Line (G), then from the Property Editor adjust the Fold Strength and Fold Angle. If you are looking to do roll-up folds, such as sleeves and collars, select the Internal Line then use the Fold Arrangement tool and change the fold angle manually. To make a gathered fabric effect, turn on the Elastic and adjust the Intensity and Ratio values. (See the internal lines video).
13. Pocket details
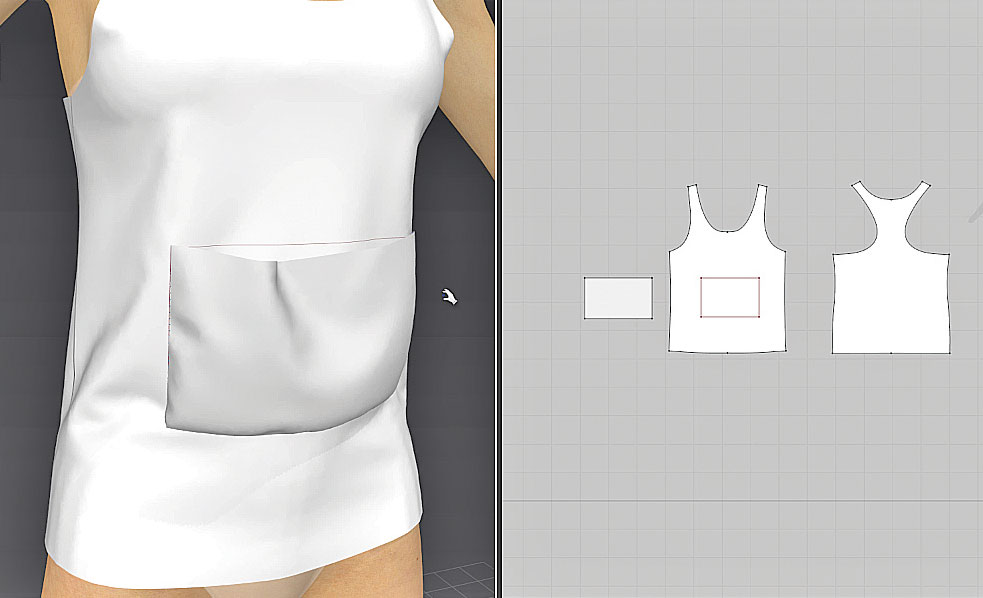
Draw the pocket shape on the garment using the Internal Lines or the Internal Rectangle Tool; select it, right-click and choose Copy As Pattern then paste it near the garment. Use the Free Sewing Tool to sew the pocket to the internal lines – mostly you will need to sew three edges and leave the top edge open. In the 3D View right-click on the pocket pattern and choose Superimpose (Over), then run the simulation. If you want to have some wrinkles on the pocket, just make the pocket pattern a little bit bigger! (See the pockets video.)
14. Holes and darts
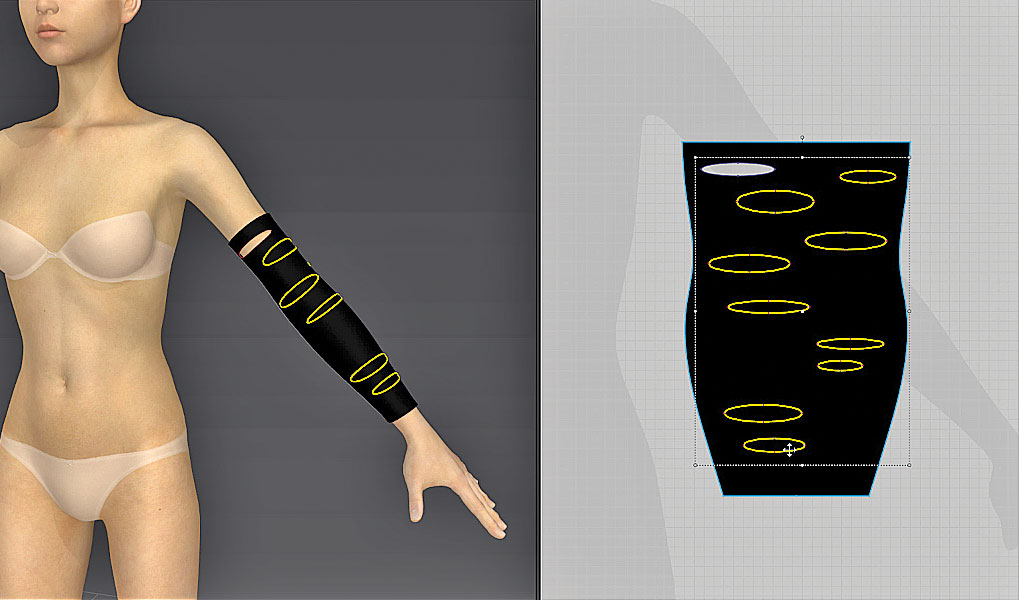
To make a hole in the garment draw a closed shape using Internal Lines. You can use the Internal Circle (R) then edit the shape, right-click on the Internal Lines and choose Convert to Hole. You can use the holes to create the pattern darts – the darts can be used to tighten the pattern without changing the overall outer shape of the pattern. I highly recommend using darts as they give extra realism to your clothes and they maintain the texture look. There is an individual tool for creating darts in MD, and it does exactly the same as creating holes. (See the holes video.)
15. Bags
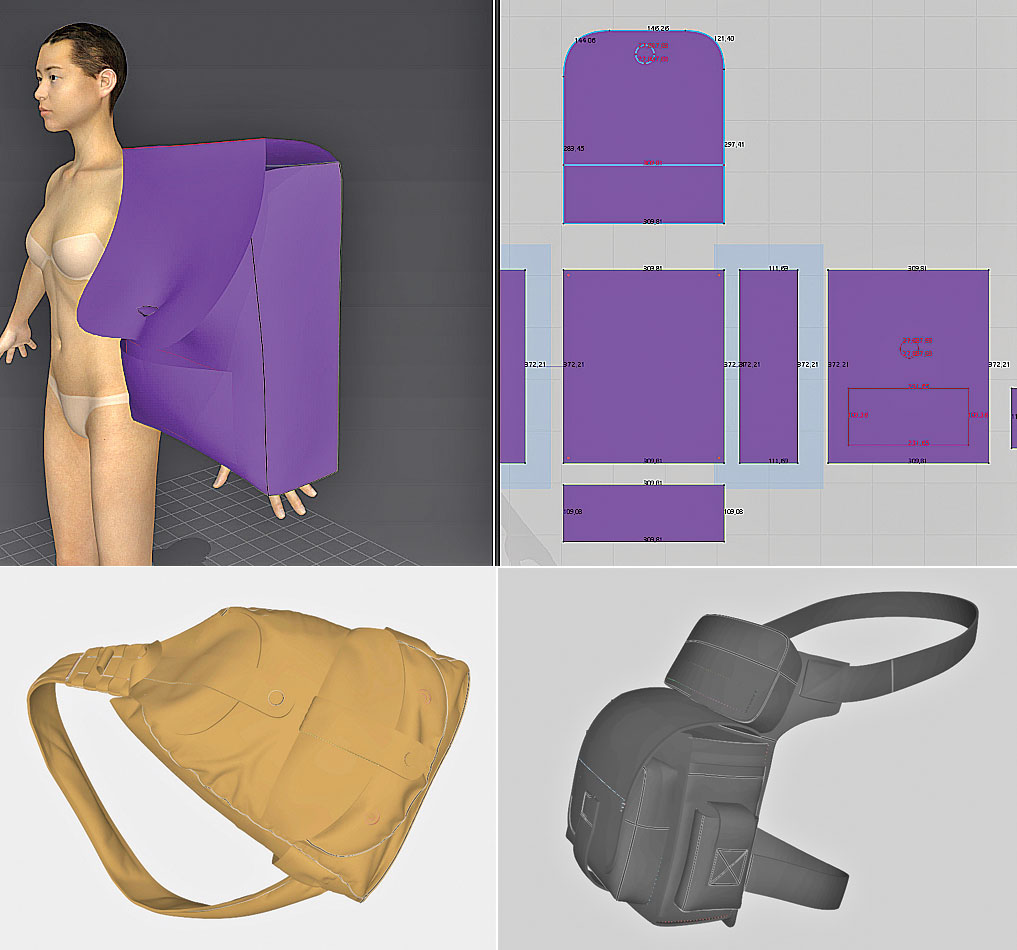
Start with the bag back pattern piece, create it and apply a hard fabric to it; I usually start with S_Leather_Belt, pin it [Shift]+[W] in the air to prevent it from moving while simulating. Add and sew the sides, the bottom and then the front, leaving the top open for now. Change the fold angles of the sewings from 180 degrees to 90 or 270, depending on the fabric's normal direction. You might need to put an inflated piece of fabric inside the bag to make it look full. Add the pockets and add all the extra details, then add the top cover pattern. (See the bags video.)
16. Posing MD Avatars
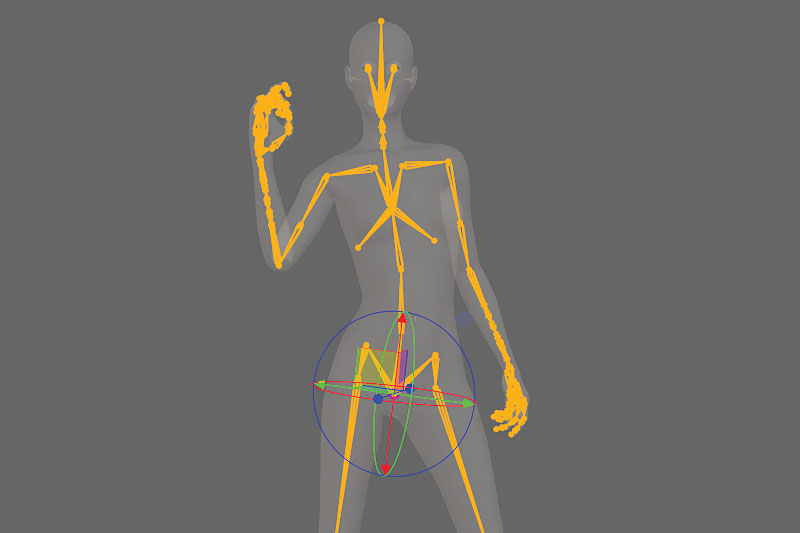
You can pose MD Avatars using the built-in joints system. Start a new scene with the clothes off, switch to the X-Ray mode by pressing [Shift]+[X] to see the joints and translate/rotate them until you hit a pose – switch between Local or World Gizmo for better rotation axis. Save your pose to the library from File>Save As>Pose. Load MD Avatar with the clothes on or add your garment to the scene, go to the library and then drag and drop the pose on to the character. Make sure that the particles distance is set to 20, then after MD finishes the simulation, adjust the Particle Distance value.
17. Pose with morph targets
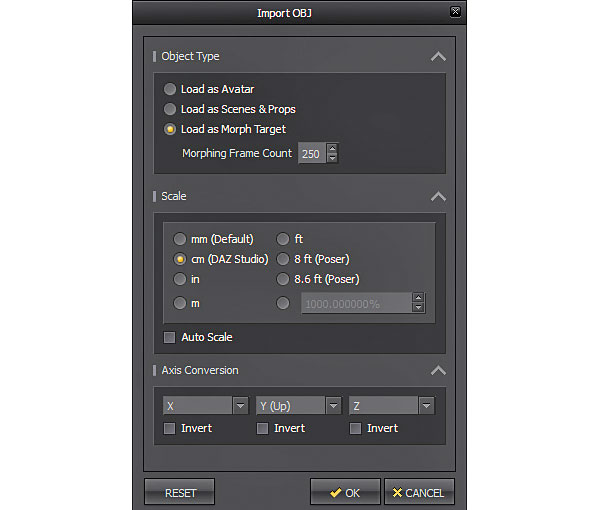
If using your own character, you can import a morph shape (blendshape) of the pose and apply it to the character. From File>Import >Obj, choose the morph file, and then select Load as Morph Target. If you have a very complex pose, set your Morphing Frame Count to something very high, around 250 frames. In some cases you will need to have inbetweens to avoid intersects. Load your first inbetween, let MD do the clothes simulation, then load the next one, and so on.
18. Mix and match clothes
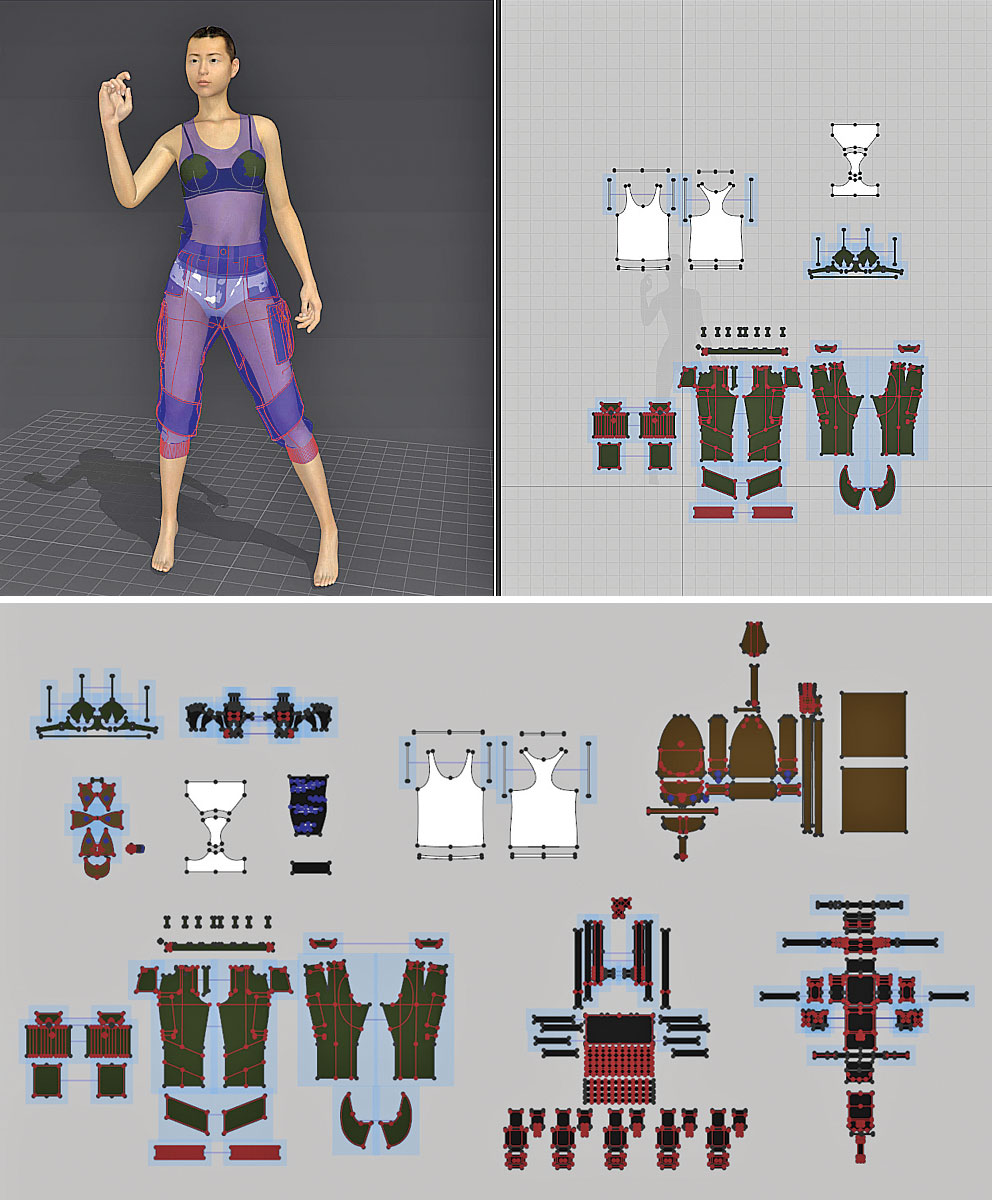
Start a new file and load your Avatar, from File>Add>Garment. Add all your garments to the scene, set the Particle Distance to 20 for everything. Select all your garments, right-click and choose Deactivate (Pattern and Sewing). Start from the underneath garments, activate it then simulate. After you've finished the simulation, right-click and Freeze the garment. Go to the next garment which should be on top, Activate it and set it to Layer to 1, then hit Simulate and Freeze. Repeat this step for all garments, and after you're done, Unfreeze everything and run the simulation again! Now raise the particles intensity gradually from 20 to 4 to increase the garment's quality and simulate each time! (See the mix and match clothes video.)
19. Exporting
You have to ask yourself questions about the output mesh! Triangulate or quadrangulate? Single object or multiple objects? Unweld or weld? Thin or thick? Generally, if you're looking to sculpt over the exported mesh, you have to convert the patterns to quads and if you're looking to simulate it in other software, you can keep it as tris! Here I convert all the patterns to quad mesh, and in the Export Options I choose Multiple Objects, Unweld, Thin and Unified UV coordinates.
20. Detailing in ZBrush
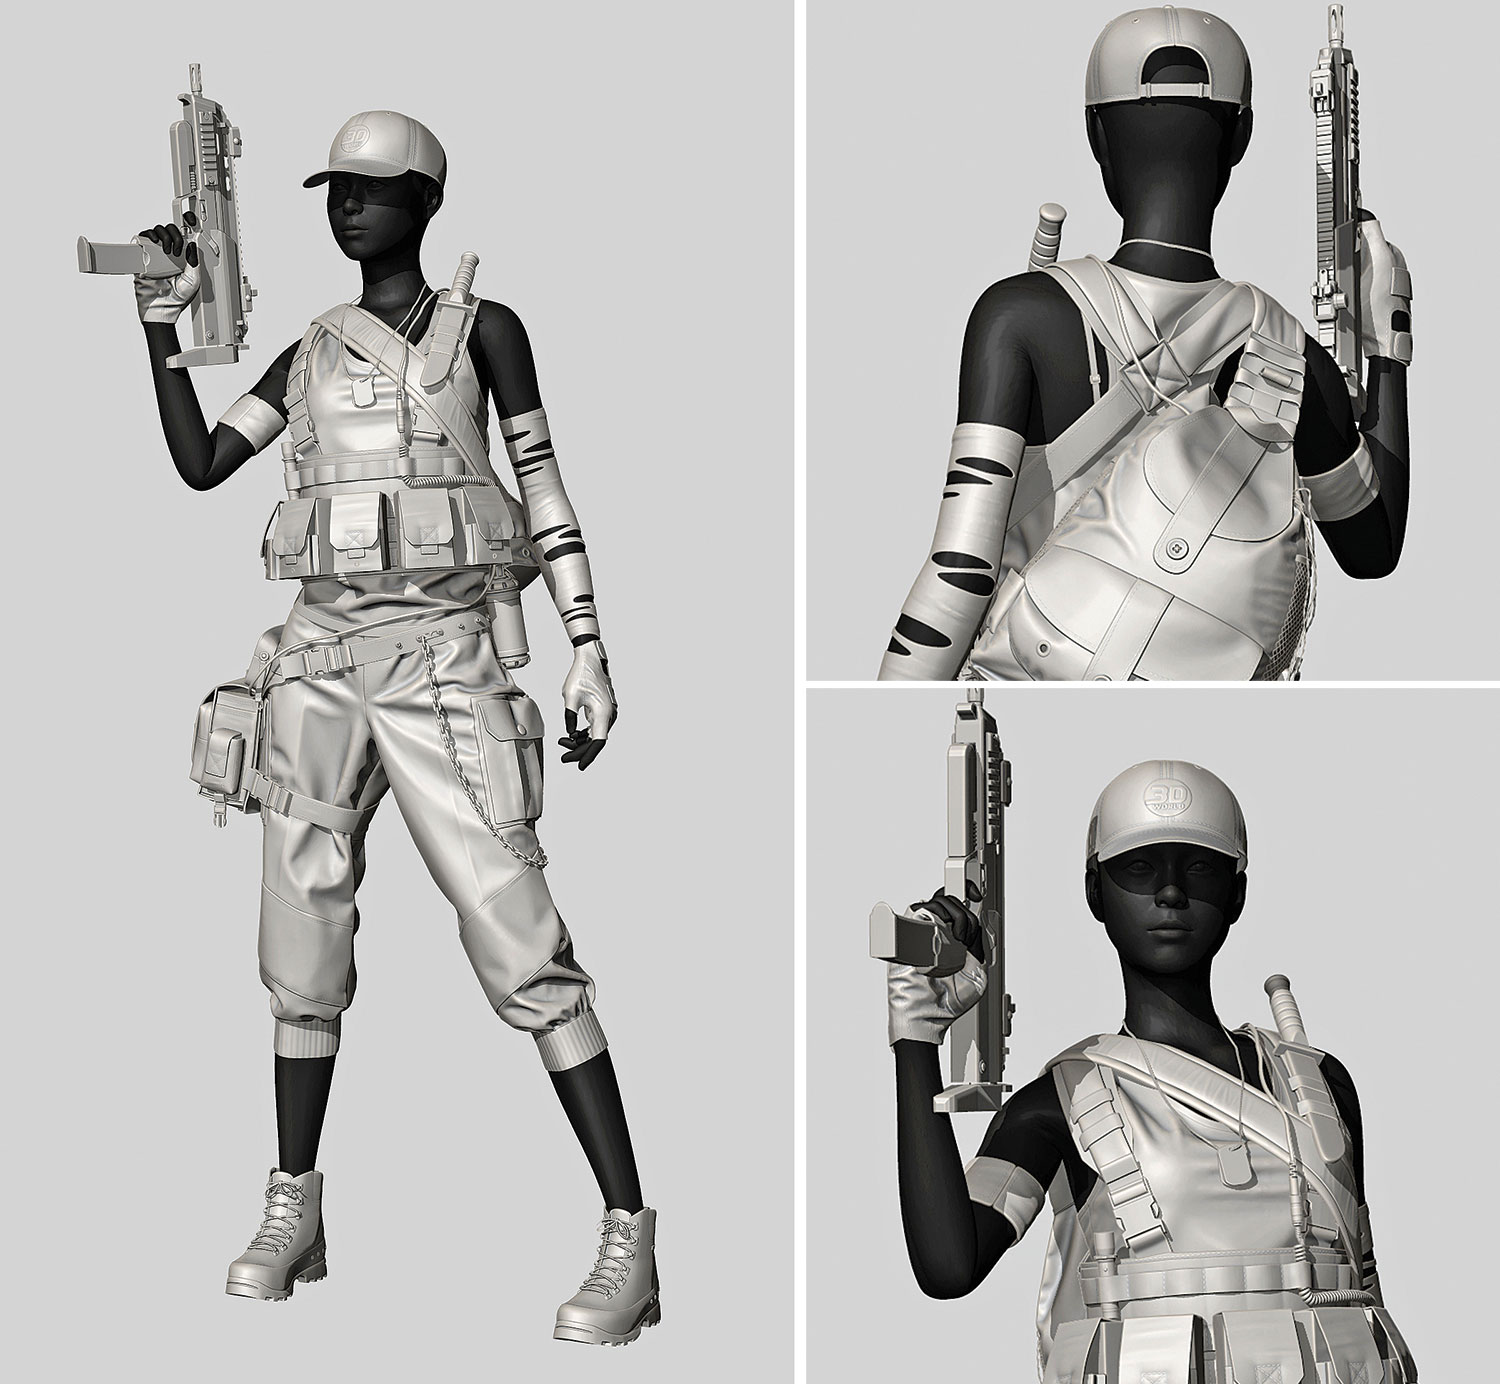
This is an extra step outside of MD. At some point you're probably looking to add some details to your clothing. Start by exporting your garments one by one as .obj files, and then load them into ZBrush as SubTools. Flip the Normals if there are any reversed, then choose double-sided. Make sure that you have Polygroups using UVs then add thickness using The Panel option from the Geometry Palette, set the Polish to 0, Bevel to 0 and the Elevation to -100. Divide the subtool a couple of times and refine the folds using the Standard Brush. Add extra details using the MicroMesh and the NoiseMaker.
This article originally appeared in 3D World issue 211; buy it here!
