An insight into game character production
Character artist Baj Singh shares his production workflow, from concept design to final modelled game asset.
Sign up to Creative Bloq's daily newsletter, which brings you the latest news and inspiration from the worlds of art, design and technology.
You are now subscribed
Your newsletter sign-up was successful
Want to add more newsletters?

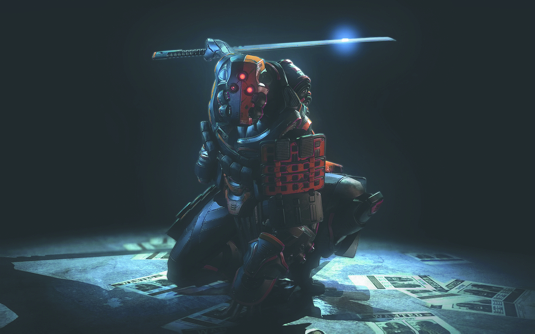
I created this character for the Comic-con Challenge 2014 on gameartisans.org. I was going to create a variation of the DC villain Victor Zsasz (using Rutger Hauer as a model, based on his performances in The Hitcher and Blade Runner).
After some sketching, I found I wasn't happy with the original direction I was taking and so after mulling it over, I decided to do a Deathstroke variation instead.
The tools for creating character art have evolved significantly over the past few years, with more and more programs available that help speed up or automate the character production process.
Article continues belowThis workflow overview should be helpful for anybody who wants to explore the world of creating game-ready character art, in fact this training would be useful for any type of 3D game art, as parts of this workflow are applicable to environment artists, weapon artists and so on as I cover the core steps that I take to achieve the final result.
- Click here to download free game character productions files
01. Pre-production

This step is a mix of sketches and quick sculpts – but it gives me a solid idea of the silhouette, proportions and functionality of the final model.
02. Production

ZBrush and 3ds Max were used for the high-poly assets. Max to build the mesh and Photoshop for textures. I used Crazybump and XNormal for the additional maps.
03. Post-prod

Creating a quick bone system in 3ds Max helped me pose the character. He was then rendered in Marmoset Toolbag (an excellent program for game artists).
Sign up to Creative Bloq's daily newsletter, which brings you the latest news and inspiration from the worlds of art, design and technology.
04. Additional maps

As it's very easy for a Photoshop file to become bloated, it's useful to organise everything into groups. Each texture map is created using a separate Photoshop file and contains four groups: one for base colours, one for texture, one for additional maps like wireframe/masks, and one for ambient occlusion maps.
05. Sculpting in details

Features within ZBrush such as DynaMesh and Decimation Master were used to help create the smaller details (such as rivets and screws) while allowing ZBrush to run at a stable framerate. ZBrush can become laggy depending on your computer specifications and the number subtools/subdivisions used.
06. Using Marmoset

Marmoset Toolbag is a simple and versatile tool that allows you to create fantastic game quality renders with little effort. To get the ideal scene setup, I created a ground plane in a similar fashion to the character, and used Marmoset's lighting system to achieve a good contrast on the final image.
Words: Baj Singh
Baj Singh has worked as a character artist for over five years. He currently works at The Creative Assembly, specialising in character creation. This article originally appeared in 3D World issue 183.

The Creative Bloq team is made up of a group of art and design enthusiasts, and has changed and evolved since Creative Bloq began back in 2012. The current website team consists of eight full-time members of staff: Editor Georgia Coggan, Deputy Editor Rosie Hilder, Ecommerce Editor Beren Neale, Senior News Editor Daniel Piper, Editor, Digital Art and 3D Ian Dean, Tech Reviews Editor Erlingur Einarsson, Ecommerce Writer Beth Nicholls and Staff Writer Natalie Fear, as well as a roster of freelancers from around the world. The ImagineFX magazine team also pitch in, ensuring that content from leading digital art publication ImagineFX is represented on Creative Bloq.
