Level up game characters with Creative Assembly
Discover how to sculpt forms while focusing on flow, texture with multiple texture sheets and more.
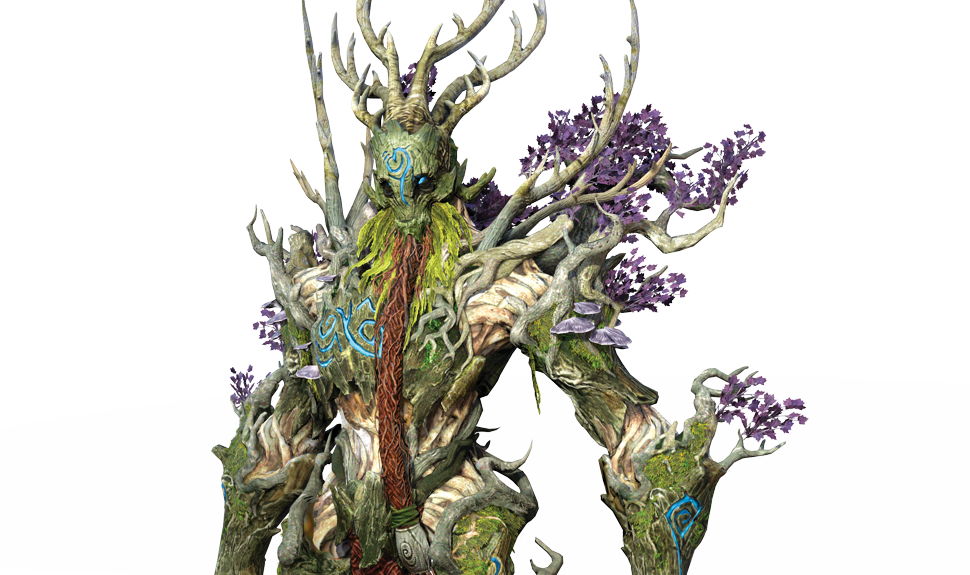
With a huge variety of fearsome creatures and characters to create, working with Games Workshop to translate Warhammer miniatures into Total War video game characters has been one of the most satisfying professional experiences for the team at Creative Assembly.
In this step-by-step tutorial, we'll reveal the process we went through, including the tricks we used to speed up the creation of the large and complex Treeman character here.
We’ll mention the methods we chose to employ in ZBrush and 3ds Max, as well as a suite of other programs. By the end of this tutorial you’ll have gained some useful insights into the character art creation process.
Creative Assembly’s Danny Sweeney will be presenting a workshop at our debut 3D event, Vertex. Make sure you get tickets now and don’t miss out!
01. Examine miniatures, concepts and lore
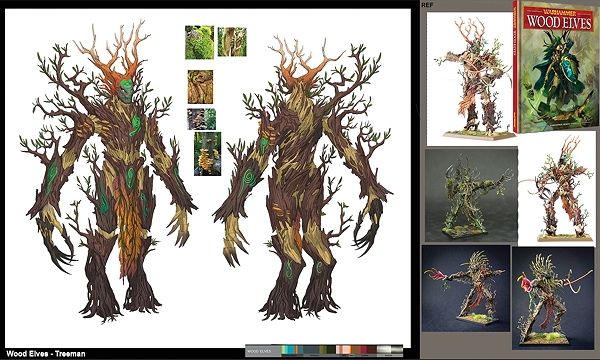
One of the most enjoyable steps involves getting into the mindset of the character. This includes reading the lore books and looking at the miniature/concepts to identify the key design elements and personality traits that Games Workshop has established.
In the lore, the Treemen have a strong affinity for the lesser creatures of the forest – if required, they’ll strike ferociously to protect them from outsiders. It’s that balance of fury and benevolence that we wanted to incorporate into the Total War version.
We ensure this by closely collaborating with the concept and animation teams from the very outset.
Daily design news, reviews, how-tos and more, as picked by the editors.
02. Amass references
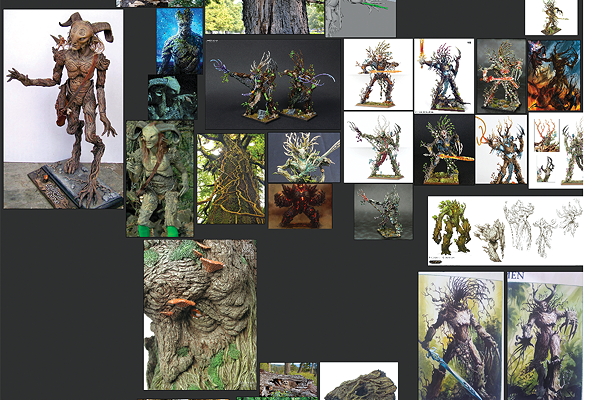
As well as doing the obligatory collection of material and anatomy references, there are vast amounts of illustrations both from Warhammer and mythology to draw from.
We always begin by identifying and respecting the key design elements established by Games Workshop; however, it’s also a fun process to find places where we can add extra details for our own unique take on the character.
Usually we try to find interesting movie or pop culture characters that have similar personalities and draw details from them. These details and ideas can be used to help convey the intended personality of the creature.
03. Blockout
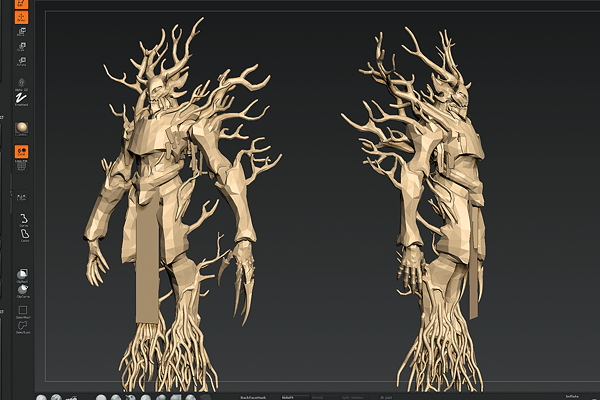
Usually we’ll have a proxy model already made for the animators, which is also a good base model with most parts already blocked out.
It then becomes a job of defining the silhouette and primary shapes. This phase will also involve drawing in as many reusable pieces from other characters in the faction, such as the specific leaves and skulls.
Reusing assets provides a huge time-saving benefit, as reused high-poly elements will already be low-poly modelled and UV unwrapped.
04. Make the face
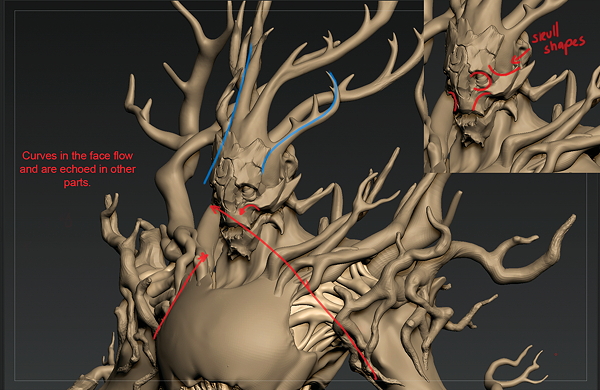
This is where the viewer’s eyes go first, so that makes it a great place to convey the protective fury of the Treemen.
There’s a lot of aggression you can add to a character simply by mimicking the structure of the skull. Playing up the cheekbones and giving the eyes a sunken depth all helps to achieve this idea.
Usually we will sculpt the face to almost surface-detail level before moving on to the rest of the body. The curves and shapes that you establish in the face are what you are going to propagate to the rest of the character.
05. Create branches
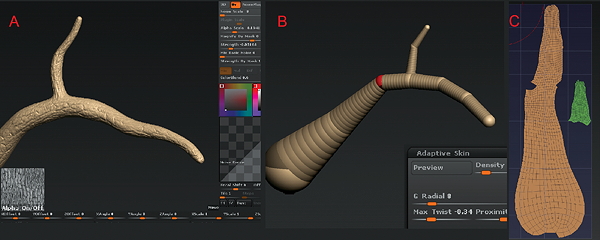
The Treeman is comprised of a huge amount of branches to create and detail. A good system for tackling this is using ZSpheres for primary shapes and then using the Surface Noise feature (Tool>Geometry) to apply a bark alpha for the secondary/tertiary forms.
You can easily hide the repetitiveness of the tiled texture by adding twists in the ZSpheres using the Max Twist slider. In ZBrush there’s an amazing plugin called UV Master, which enables you to unwrap assets with one click. This is handy in aligning the UVs to the same direction as the alpha you’re using.
06. Create the vine anatomy
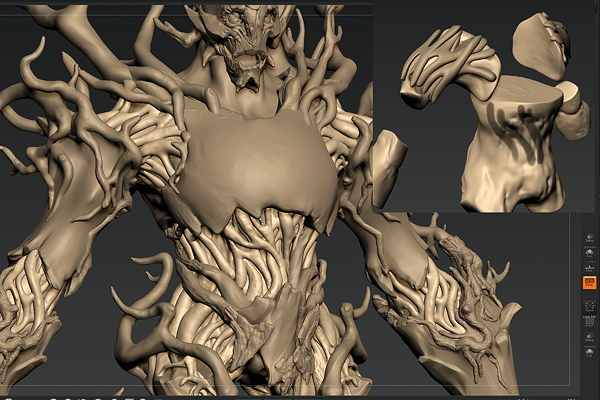
To create the vines that contour an underlying form, it’s a simple method of masking and extracting the pieces (Tool>Subtool>Extract).
Having separate bits of geometry, as opposed to sculpting it directly onto a base mesh, means you have freedom to move vines around to better flow with shapes throughout the model.
Once you have the general forms you like, you can ZRemesh the subtool (Tool>Geometry>ZRemesher) and use the Surface Noise technique again.
07. Add details
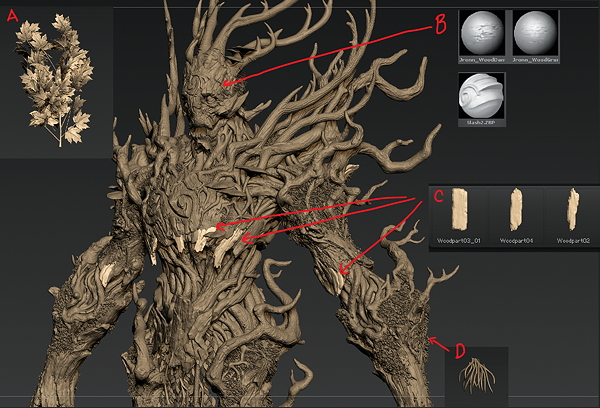
In-game the leaves are transparent cards, so it’s a matter of blocking out a small group of branches with leaves.
Make sure you find the right balance between getting good coverage without recognisable repetition (A). Detailing the trunk armour was as simple as finding a few choice alphas and sculpting over the top of them (B).
However, we also used IMM brushes of wood chunks to create that splintered wood effect on some edges (C). To create moss, we used NanoMesh on a duplicate of the trunk geometry (D).
Even though ultimately we’d use hair cards, you still want to blend that into the body better with some baked-in detail.
08. Make the weave pattern
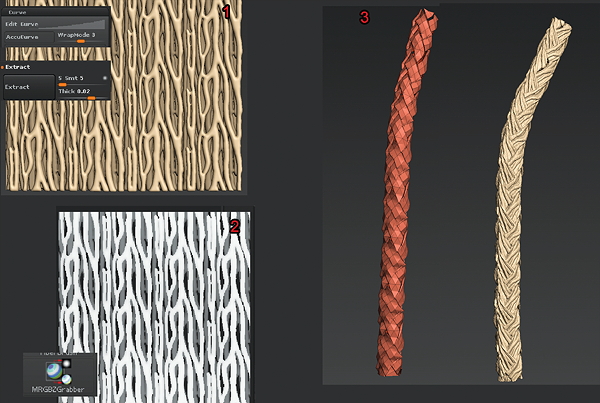
Masking a plane in Wrap Mode (Brushes>Curve>WrapMode) enables you to sketch out vine shapes in a repeatable pattern and then extract.
This is done so you can then create layers of these vines, in order to effectively sell the sense of dense growth on the creature. It then becomes a matter of simply modelling any repeating pieces that simulate the larger clumps of weave.
Unwrap and align vertically again to enable you to use the repeating patterns in surface noise. To avoid it all looking very synthetic, apply the surface noise to the geometry, sculpt and move the larger shapes afterwards.
09. Decimation
This is an important step in making retopology manageable. Decimation enables you to import the high-poly models in 3ds Max while keeping it responsive; moreover, it speeds up the baking process as there are fewer vertexes to read.
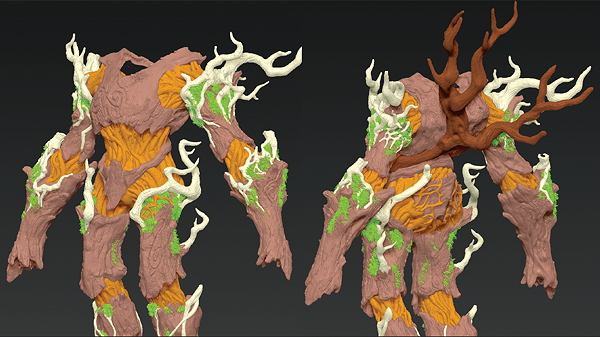
Before you begin the decimating process, make sure that you save out a duplicate ZTool – you will still need the undecimated tool for Polypainting later.
And before you begin exporting OBJs to 3ds Max, paint basic colours for selection/material ID.
10. Low-poly modelling
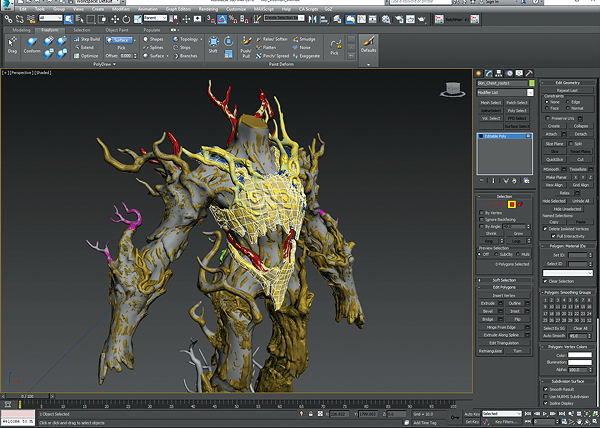
We made extensive use of the Wrapit plugin for 3ds Max, which augments the graphite tools beautifully. Sketching branches of polygons while conforming to the high poly lets you block out the major shapes pretty fast.
The auto snap feature lets you use all of your regular modelling tools, which is also a godsend.
All of these features help create a first pass quickly, without you needing to worry about polycount. It’s much easier to reduce polygons than it is to add more later on.
11. Fast UV base
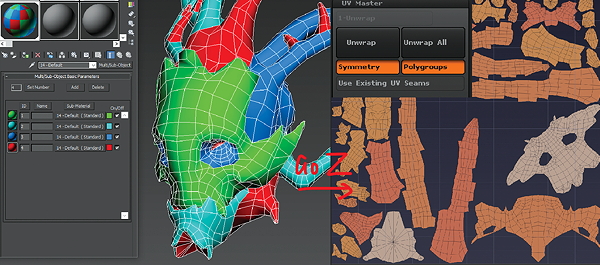
As you finish up your low-poly model, it’s a good idea to think about how to split your UVs.
Create a multi-sub material – a feature unique to 3ds Max that enables you to group unique materials, and apply them to a mesh dependant on material IDs – to help visualise the UV islands.
Then ZBrush interprets material IDs as different polygroups, which you can then tell UV Master to preserve as UV islands. UV Master will kick out a pretty nice base, which you can further refine in 3ds Max.
If you use GoZ to bring the model back to Max, you’ll still have the material IDs to use as selection groups in the UV Editor.
12. Mega texture sheets
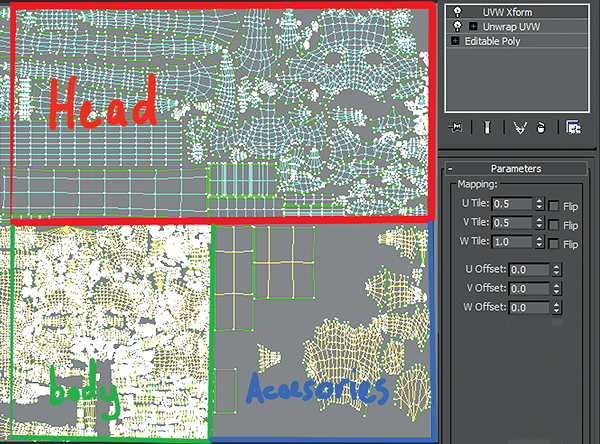
Texture sheets for our characters are usually split between head, body, legs and accessories.
For the convenience of authoring under one texture, we stitch together those separate pieces using an instanced UV Xform on top of the regular UV Unwrap modifier.
The modifier enables you to squeeze and offset the UVs of the different pieces, and when the time comes to split the UVs again, it’s just a matter of deleting that modifier.
13. Polypaint
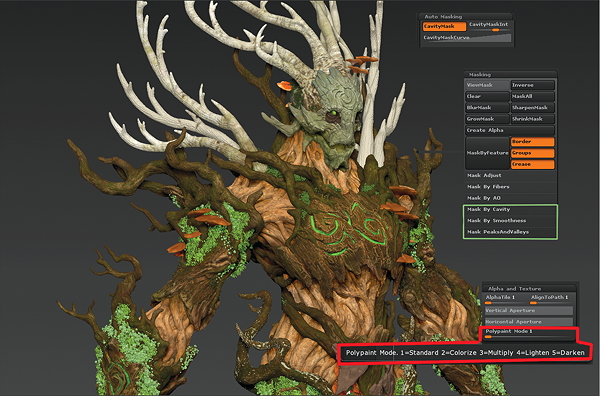
This method gives such immediate and satisfying feedback. It can be quite easy to get carried away, but the aim of Polypainting is to establish the general regions of colour.
Fine details such as the cavity and edges can be made using DDO. The Polypaint modes enable you to paint with blend modes similar to Photoshop, mixed with auto masking/masking to help establish gradients.
Some parts here were reused from other Treeman variants, but thanks to the selection sets you made earlier, colourising to match is easy in Photoshop.
14. Time to bake
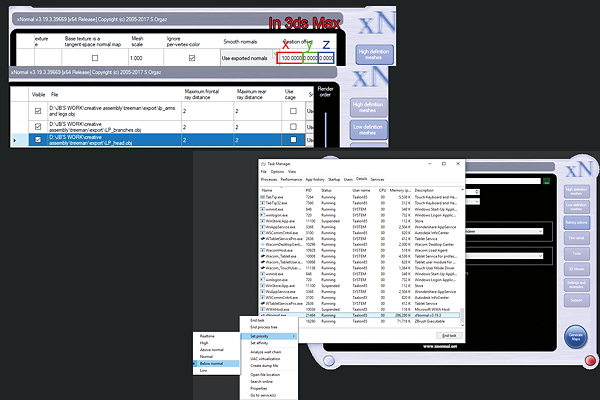
In xNormal you can offset the high-poly models before you bake.
Provided you’re using 3ds Max’s default measurement units, spacing the low-poly models by multiples of 100 in Max will line up with the high poly in xNormal.
This will enable you to avoid using cages and simply set the ray casting distance to something larger, like one to two units. We’ll render the usual Normal, Bent Normal, Vertex Color and Ambient Occlusion.
To keep your computer usable while baking, set the priority of xNormal to Below Normal in Windows Task Manager.
15. Refine textures
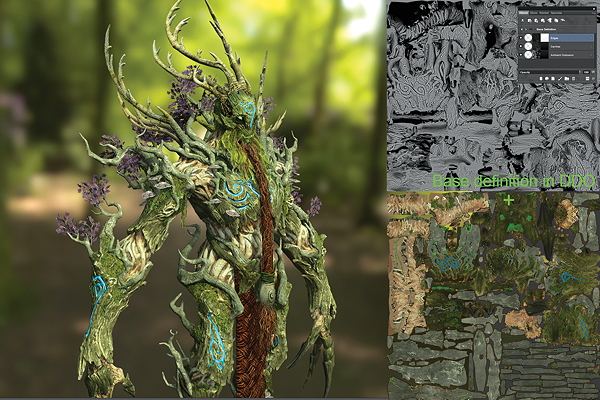
We have plugged the Normal map into DDO to create very highly detailed cavity and edge maps.
Afterwards, move all the other maps into Photoshop and set up a quick Marmoset scene to preview the textures.
Add levels on parts of the model to provide more contrast in the Polypaint textures.
We decided that the vine anatomy needed more definition between the individual vines, so we went back into ZBrush and created Polypaint from polygroups.
We then brought that baked map back into Photoshop, blending it on top of the original Polypaint layer with a Soft Light blend mode.
16. Get it in the game
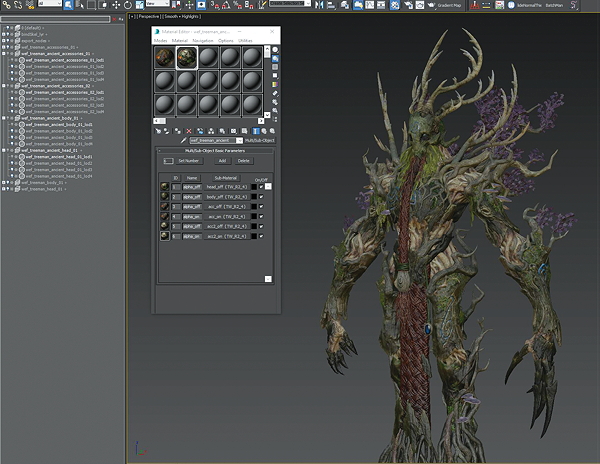
Preparing the character for game-ready status requires a bit more housekeeping: cutting the textures up into the separate components; creating LoDs (Level of Detail) using Simplygon; hooking up all the textures into the proprietary materials in 3ds Max as well as making sure that all the models and textures follow specific naming conventions.
From the character artist point of view, it’s now ready to be handed to others in the pipeline so that the Treeman can tear up the battlefield in Total War.

Don’t miss out, book your ticket now at vertexconf.com. There are still some amazing workshops we’ve yet to announce so keep an eye on our website, where you can also find out more about the other amazing speakers, workshops, recruitment fair, networking event, expo and more.
This tutorial originally appeared in issue 109 of 3D Artist, the magazine offering practical inspiration for 3D enthusiasts and professionals. Subscribe to 3D Artist here.
Read more:
