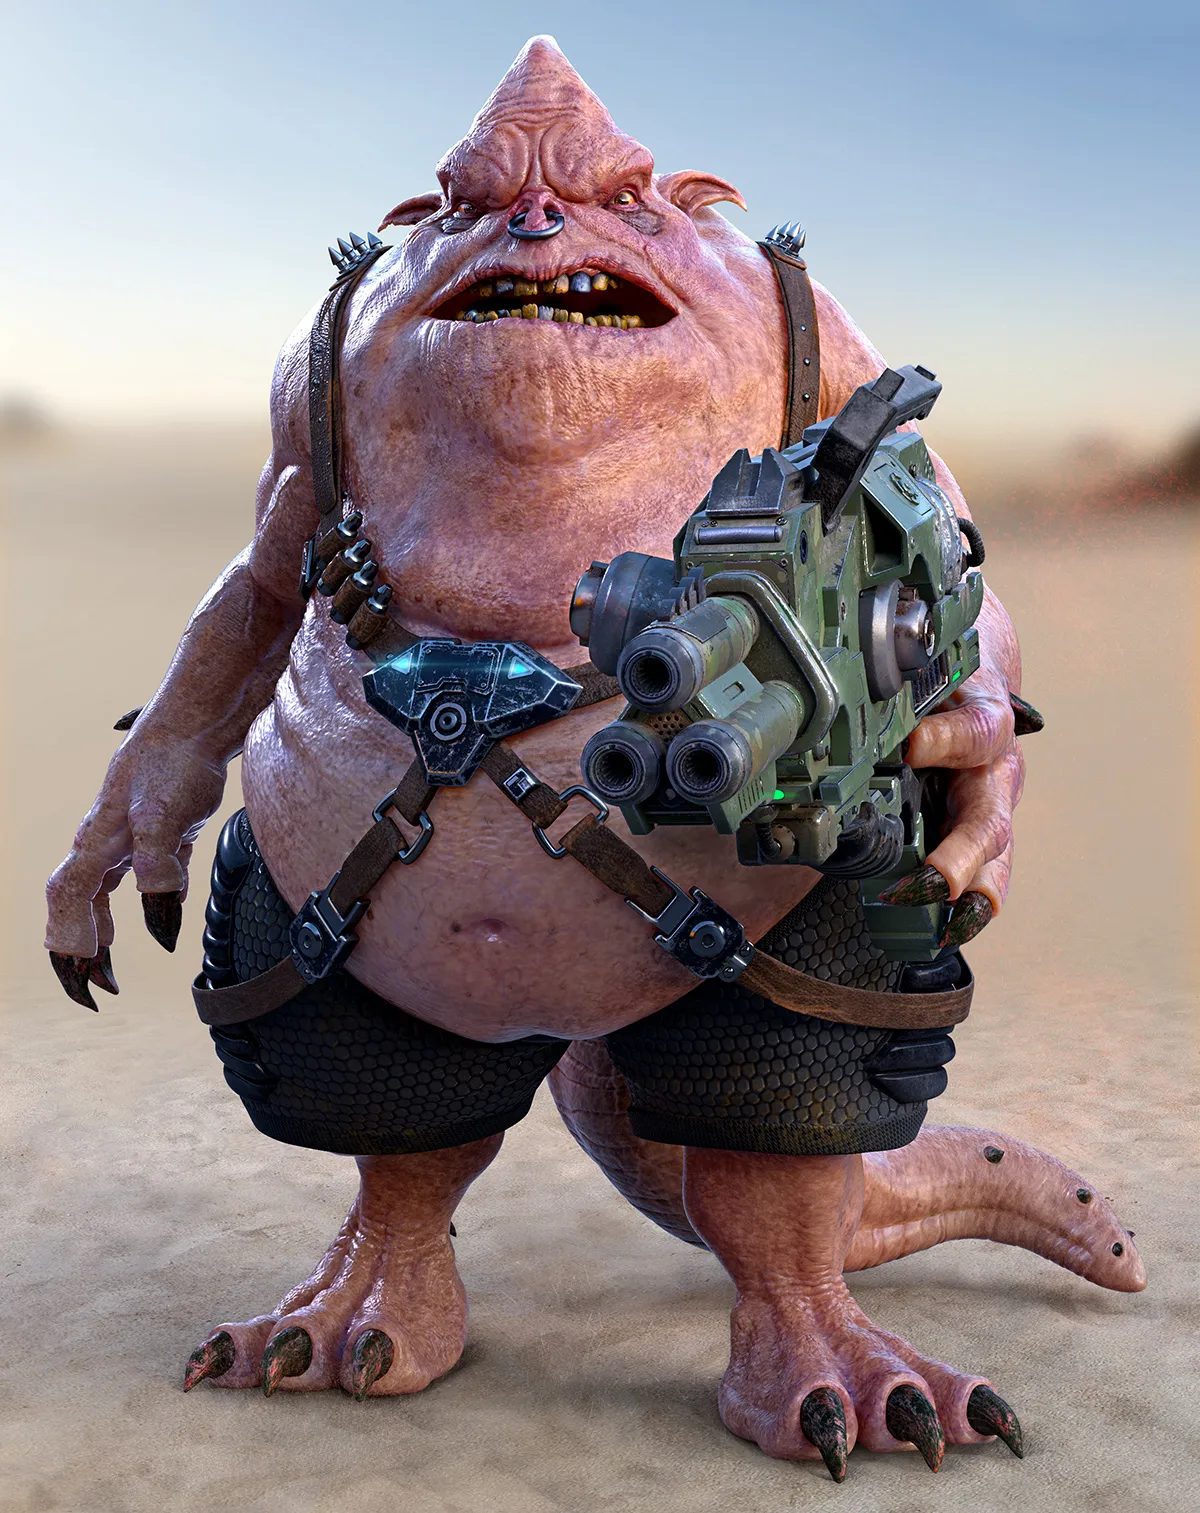
To help you learn how to create a 3D alien pirate character, I will show you how I sculpted the face of my creature, Worgrock (above), and put him into a dramatic pose. ZBrush is my main weapon of choice due to its many sculpting tools, and generally being fun to sculpt with. I'll also use Maya, Substance Painter and V-Ray.
I will share with you some techniques I use in everyday modelling and concept visual development work. For the past 13 years I’ve worked for various movie, game and commercial studios as a 3D modeller, texture painter and concept artist. I’m something of a creature specialist now, but before I went digital I worked as a traditional sculptor, painter and make-up artist.

To help with your character design, gather references that spark ideas. Inspiration for the alien's weapon was from my 2D concept art, inspiration for the head shape from the rhino beetle and the costume from my dog’s harness.
Feel free to use pre-made 3D models such as teeth, tongues or heads to quickly kitbash a creature concept together using MergeVisible and DynaMesh.
Download the files you'll need for this tutorial – including a video walkthrough – here (865MB)
01. Do some major form sculpting

Start to sculpt your face to the point where it has all the major forms, including large forehead wrinkles, large eyebags and features that break the silhouette and catch the light.
02. Carve in large wrinkles


For bigger wrinkles such as the forehead wrinkles, carve in the lines with the Dam Standard brush on your mesh’s highest subdivision level, then drop down a level or two and use the Inflate brush to bulk up the folds. Switch back to the highest level and use the Pinch brush and a little Smooth to finish them off.
03. Gather an alpha library

Now you are ready to add some finer detail such as pores, fine wrinkles, warts and stretch marks. For this we will use a combination of ZBrush alphas and hand sculpting.
Gnomonology, Surface Mimic and XYZ all have great alphas for sale on their websites. There are also a lot of free alphas available online, such as from the Pixologic Download Center. I suggest starting your own alpha library that you can have and take with you to each job to reuse for future projects.
04. Use recommended alphas

I’ll start with the alphas that come with ZBrush. For skin warts and breakup I like to use alpha 08, with the Standard brush and DragRect turned on. Tweak the Z Intensity and Zadd or Zsub as needed. You can also tweak Modify>Contrast in the Alpha palette. For quick pores, you can choose alpha 07 with the Spray stroke set to Spray and Zsub.
For the dry skin on the alien’s shoulders and back I will use the Spray stroke with alpha 58 Zsub. Blur the alpha in the Alpha palette for different effects.
You can quickly browse to alphas using the comma key to get thumbnails, or just import them into the Alpha palette directly.
05. Make custom alphas

Feel free to edit your own alphas and save them as a PSD. I found some great wrinkle details on the Hand_Male_RingFinger from Surface Mimic, so I went in and lassoed out the wrinkle sections and saved it. I made sure to keep a 50% grey border and I kept the layers in the PSD in case I wanted to go back in and edit it later. I also used wrinkles from Hand_Male_ IndexFinger – I just cropped out everything except the knuckle. These are good crosshatch patterns for wrinkle layout.
After you lay down the alphas, go back into some of the grooves with the Dam Standard brush.
06. Add pores to give skin detail

I have a photo of an orange-skin.jpg I downloaded online from undoz on ZBrushCentral that works great for pores. I also used skin_BaldHeadTopSkin01 and skin_BaldHeadShaved from Surface Mimic for the pores with Surface mode on in the Alpha palette as well as Rf set to 10.
07. Refine skin textures

After I drag out my wrinkle and pore alphas I go over areas by hand using the Inflate brush on the wrinkles and Dam Standard on the lines/crevices as a final touch. For some parts of the face I smooth the details out a slight bit, with a low smooth intensity and BrushMod set to 50 or 70 so only the small details get smoothed out, leaving the larger forms undamaged.
08. Test render with skin material

For skin I like to do test renders with the ZBrush skin shader material or the default Blinn with WaxPreview set to 30. This will give you a better idea of how the sculpt works on skin rather than just using metal or stone type material.
We will render with BPR in ZBrush and set up the render globals: SmoothNormals on, AO on set to 0.5, WaxPreview on, BPR Shadow Angle 95, Blur 6, Rays 64 and BPR AO Strength 0.5, Blur 4.
09. Decimate your model
If the image is for a still and you do not want to deal with baking out displacement, decimate your model with Keep UVs on if your model has UVs.
10. Do final renders in V-Ray

For testing, I prefer to render in the final renderer that will be used as soon as possible. This project is a V-Ray project so I will do test renders in V-Ray – just to make sure the details pop as much as I’d like. This is when it’s nice to have details sculpted on a layer in ZBrush so you can dial the intensity of fine details up and down as needed.
11. Perfect your posing
Having your character in a nice pose is a must for creating an engaging image. An interesting pose will really help bring your character to life and give an insight into what they are like and how they move.
12. Load into ZBrush
Load your neutral-posed model into ZBrush. To make life easier I combine the costume as one mesh, combine the gun as one mesh, then I have the creature body, teeth, eyes and tongue.
13. Get set up
Dock the ZPlugin menu and press Transpose Master. If you want you can turn on the Grps to preserve polygrounds and Layer to make a layer per subtool. This can be useful later if you want to use the Morph brush to x poses.
Hit TPoseMesh. I tend to use this instead of a ZSphere rig as I find this way is faster and you have exact control over how the mesh bends. Now you’ll notice your mesh shows up as one mesh in the Subtool menu, this is good.
14. Hide and unhind
Now we will use a series of hiding/unhiding geo and mashing plus the Transpose tool to pose our creature. A helpful hotkey is to hold Ctrl plus Shift and then left-click on a mesh to hide all but the parts you clicked.
15. Use the Transpose Line tool
Press W to bring up the Transpose Line tool in ZBrush 4R7. In ZBrush 4R8, to switch from Gizmo 3D to Transpose Line, press Y or click the circle icon.
16. Transpose masks
To drag out a mask, hold Ctrl and left-click from the edge of your mesh inward to create a mask that follows the form of your object. I dragged the tool-masking buttons out into my main interface because I use them so much.
For example you can grow the mask using the grow mask button, or sharpen, then grow, then blur. Ctrl+I inverts the mask.
17. Test a quick pose
I tend to do the large pose shapes first, such as a hip turn or a left step/lean, then the small ones last, such as a finger bend. I suggest doing some quick tests (parts can collide etc) and then finding a pose you like, screengrabbing it and then going back and redoing it cleanly with no penetration parts or stretching.
Sometimes if you really know the pose you want you can nail it on the first try without this process, but I tend to test several poses first.
18. Add a ground plane

I recommend having a ground plane in your scene so that you can get the bottom of the foot to be flush with the floor. I find it easier to model a flat plane in Maya and extrude the outer edges out and down slightly so you see the ground plane from an orthographic view in Maya. If it’s just a flat plane it disappears in the side view.
19. Create a sense of weight
For the hips pose, I look through the front view and press P to turn off perspective mode. Hold Ctrl and left-click-drag a mask out over the legs, so that you can lock the legs down while you pose the upper torso and arms.
20. Check the silhouette

Hold Ctrl and click the stroke lasso tool. Pick lasso mode so you can drag a lasso out instead of a box. Once you have lassoed the legs, Ctrl-shift-click the ground plane so only the ground is visible and also mask off the ground. Then Ctrl-shift-click in the viewport to reveal all the meshes.
You can switch to a flat colour material so that it’s easier to see what parts are masked and not.
21. Blur feather masks
Once the mask is good on the legs, I tend to blur this a fair bit as we need a nice falloff. Drag a transpose line down your creature from head to belly, click Rotate R and click the centre dot. You may need to have less masking on the hip area so they bend properly from the right spot. Once I have the upper body in the right spot, I’ll move onto posing the legs using the same process.
22. Save the pose

Once you have your final pose, press TPose>SubT. I recommend pressing TPose>SubT every 10 to 15 minutes and saving. Sometimes this process crashes and this way you won’t lose your work. Happy posing!
This article was originally published in issue 230 of 3D World, the world's best-selling magazine for CG artists. Buy issue 230 here or subscribe to 3D World here.
Related articles:
