
If you can work on a canvas with paints, then many of the same painting techniques you use will transfer directly over to digitally painting in Photoshop. The good news is that core principles such as composition, colour theory and perspective still apply – so once you're all set up with your Creative Cloud subscription, you just need a little know-how and you're good to go.
This Photoshop tutorial will break down the process of creating a simple digital painting, from start to finish. However, it's important to remember that most artists will develop their own unique workflows.
01. Start with a sketch

Sketching is essential to many artists, both traditional and digital. The benefits of sketching before painting is that it allows for quick iteration of ideas without committing to the longer process of painting. Things can be worked out in rough form ahead of time.
Sketching digitally can take many different forms – it can be a traditional pencil sketch or (as in this case) a quick painting. When working on quick sketches, try to give yourself time limits, both per sketch and for the overall sketching process. This will help you avoid spending too much time on any one idea and get you into painting faster.
02. Establish perspective and set the mood

Once a sketch has been finalised, it’s a good idea to lay down some perspective guides before you paint anything. Perspective is such an important part of painting – even in paintings like this one where there aren’t a lot of visual cues. It’s something I make a habit of doing in every painting, as it helps with the flow of the image.
Every element you paint should recede towards the vanishing point. This is quick and easy to do in Photoshop CC with the Line Tool.
You’ll also note that in this image above I’ve applied a simple gradient behind the perspective lines. This is something I like to do for exterior paintings as it does two things. First, it implies the direction of the primary light source in the image (in this case, the sun). Second, it gives me a bit of direction for the colours I want to start painting with. I’ve opted for cool, muted blue tones.
03. Choose your brushes
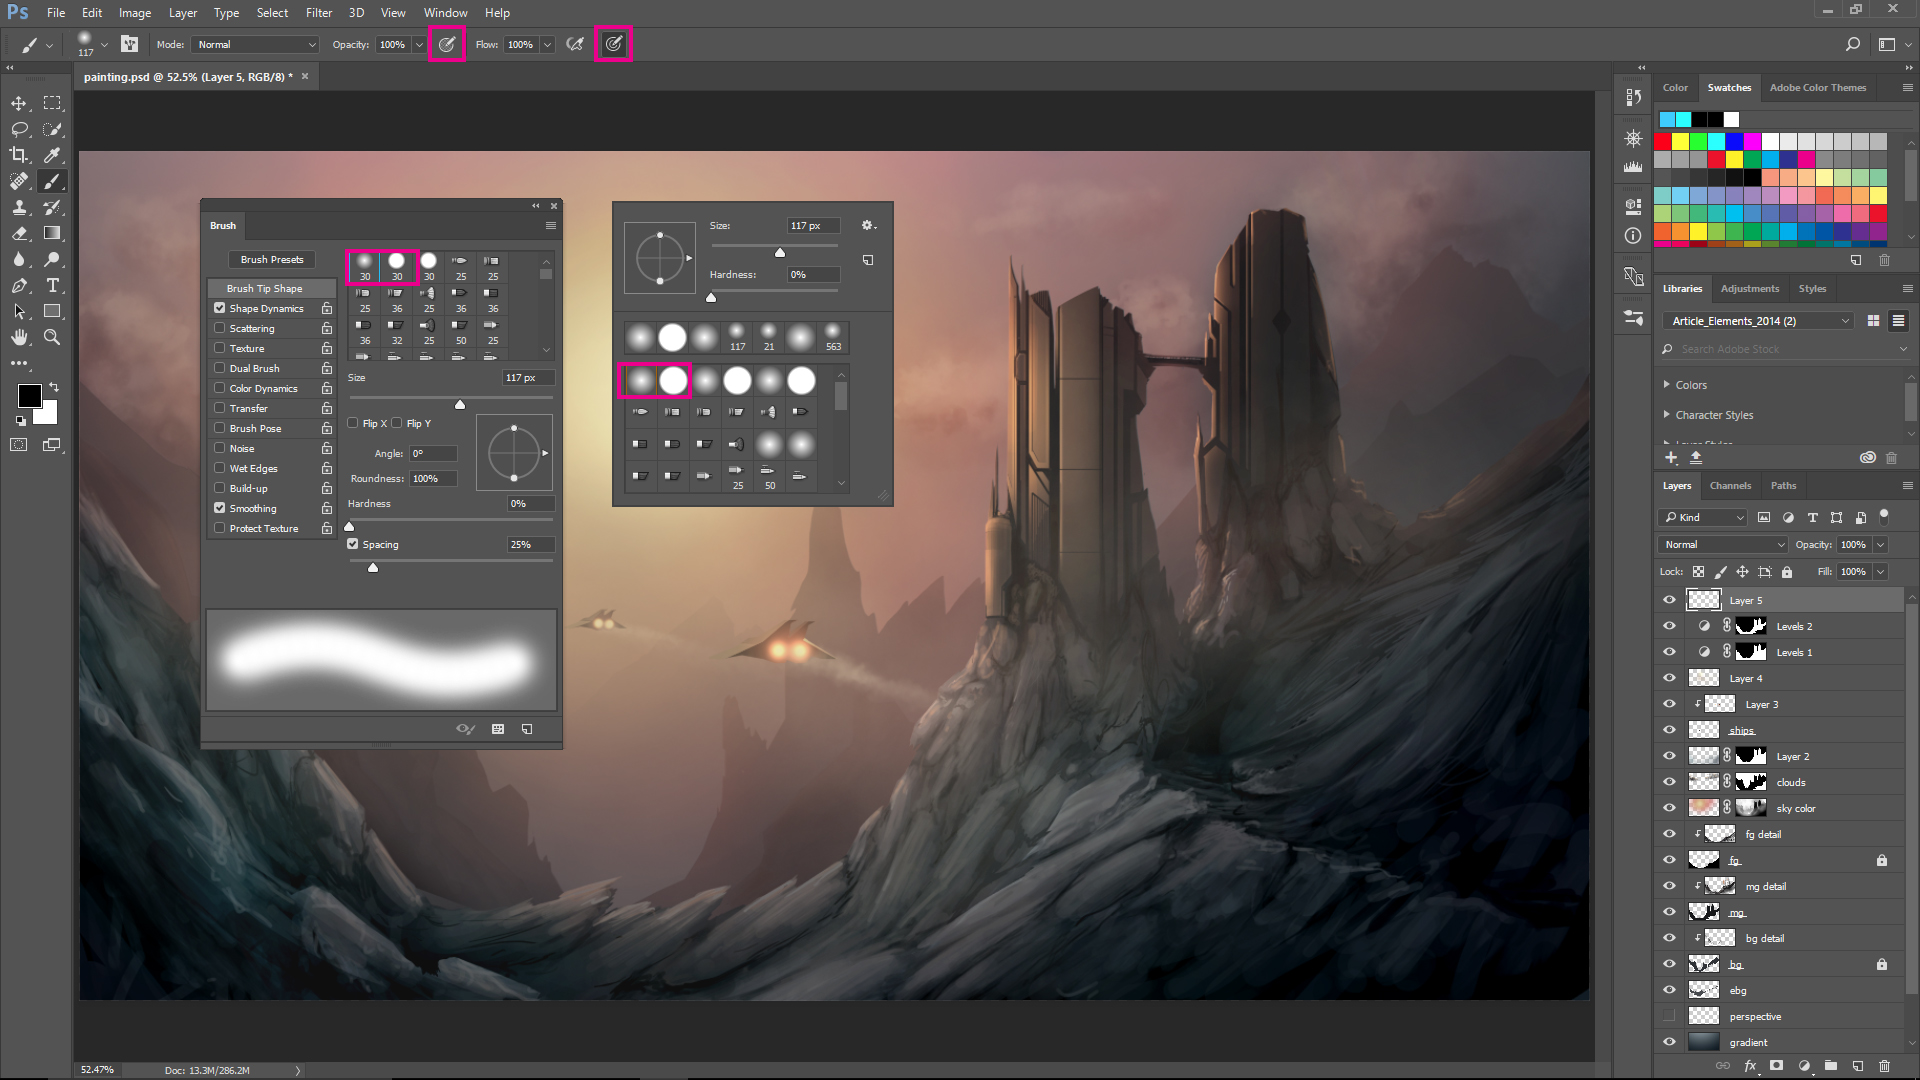
As you start using Photoshop’s Brush tool and Brush panel for the first time you might feel a little overwhelmed. The amount of customisation and control you have over what your brush looks like and the way it behaves can be something that sidetracks you if you're new to digital painting.
My recommendation is to limit yourself when first starting out to two brushes. Here, I’ve highlighted both the Soft Round and the Hard Round brush in both the Brush panel and the Brush pop-up.
It’s also worth mentioning that painting in Photoshop feels infinitely more natural when you use a pressure-sensitive tablet. I use a but can also recommend its . Photoshop actually has tools built in to take advantage of this hardware. The two options marked in the Options bar at the top of the image correspond to pressure control over the brush’s opacity and size.
04. Build the foundations

As you start to think about translating your sketch using these two brushes, it’s easiest to start with simple shapes and silhouettes. This allows you to focus on the composition and flow of the image without getting bogged down in the details.
Here, I’ve used the Hard Round brush with pressure-sensitive size control to shape the silhouettes. This can be done rather quickly by applying paint with the Brush tool and subtracting it with the Eraser tool.
It’s also worth noting in this image that I’m breaking the composition apart into layers. In the Layer panel I’ve created layers for background, midground and foreground. When painting silhouettes for these layers, I’ve also considered the effects of atmospheric perspective in the colours I’ve chosen. These silhouettes can serve as a base to build detail upon later.
05. Turn on the lights

Now it’s a good idea to define your main light source. In an exterior painting like this, the primary source of illumination is typically the sun. It's vital to establish the light source because it will influence the way you render out the details on top of the silhouettes as it will affect colour selection and shadow placement.
For this step, I used a large Soft Round brush, first with red, then orange and finally yellow. I shrunk down the brush as I changed from one colour to another.
06. Find the details

The next step can easily be the most time-consuming: we need to find the details in each layer of the composition. Here, Photoshop's clipping layers will be helpful.
If you create a new layer above the layer with a silhouette on it, you can alt+left click the space between the layers and clip the new layer to the existing layer. Any paint applied to the new layer will now only be visible where the silhouette layer underneath it has opaque pixels. By doing this you can begin to quickly apply paint to the new layer without worrying about cleaning it up later.
Now using the Hard Round brush, start by adding some random organic shapes to define the tops of all the rock faces. These will be the portions of the rocks that the light illuminates the most. If the silhouette layer underneath isn’t dark enough, you can then follow up by painting some shadows between the recesses in the rocks.
Repeat this process for each of the defined layers of the composition. Remember, as you move further back in the composition details should become less and less apparent and colours should desaturate.
07. Polish and distribute details

During this step, the first thing you should do is to take a hard look at the painting and ask yourself what could be better. Maybe a detail you’ve already painted could use a bit more work. Maybe you feel like the image is missing something.
For this painting, I wanted to add some ships flying through the canyon and some clouds to break up the sky a bit. For the ships, use the exact same process you used earlier with the rocks: silhouettes or shapes first, then detail.
For the clouds, start with the Hard Round brush and in the Brush pop-up adjust the Hardness to around 50%. On a new layer begin painting your clouds using the pressure-sensitivity of your tablet to create variation. Don’t forget to define colours for the lightest areas and darkest, shadowed areas of the clouds. If your clouds feel too bold, adjust the opacity of the layer in the Layer panel.
If your painting doesn’t turn out just like this one, don’t be discouraged. Digital painting (just like traditional painting) is something that takes a lot of practice.
Related articles:
