If you’re starting in digital art, the iPad is one of the most accessible and creative tools you can use. It combines a responsive touchscreen with powerful drawing apps, making it ideal for both quick sketches and detailed illustration.
Choosing the best iPad for drawing depends on your goals: the newest M5 iPad Pro delivers studio-grade colour and speed, while the iPad Air with the M3 chip and 10th-gen models are perfect for learning and experimenting. Pair your tablet with the Apple Pencil Pro and a piece of best digital art software like Procreate, Adobe Fresco or Affinity Designer, and you have everything you need to create wherever you are.
In this guide, I'll show you how to set up, get comfortable, and start improving, step by step, while learning using our Procreate tutorials to build skills and confidence will help you get started with drawing on iPad.
1. Get set up
Before you start drawing, take a few minutes to get your hardware right. The Apple Pencil Pro connects magnetically and pairs automatically with the latest iPads. Open Settings > Apple Pencil to adjust sensitivity and shortcut options. Read our guide on how to connect a stylus to an iPad for more Apple Pencil generations.
The new Apple Pencil Pro has features that can make drawing on an iPad more intuitive, such as the squeeze gesture that opens tools without breaking concentration. If your Apple Pencil skips or lags, replace the nib; they wear down faster than you might think.
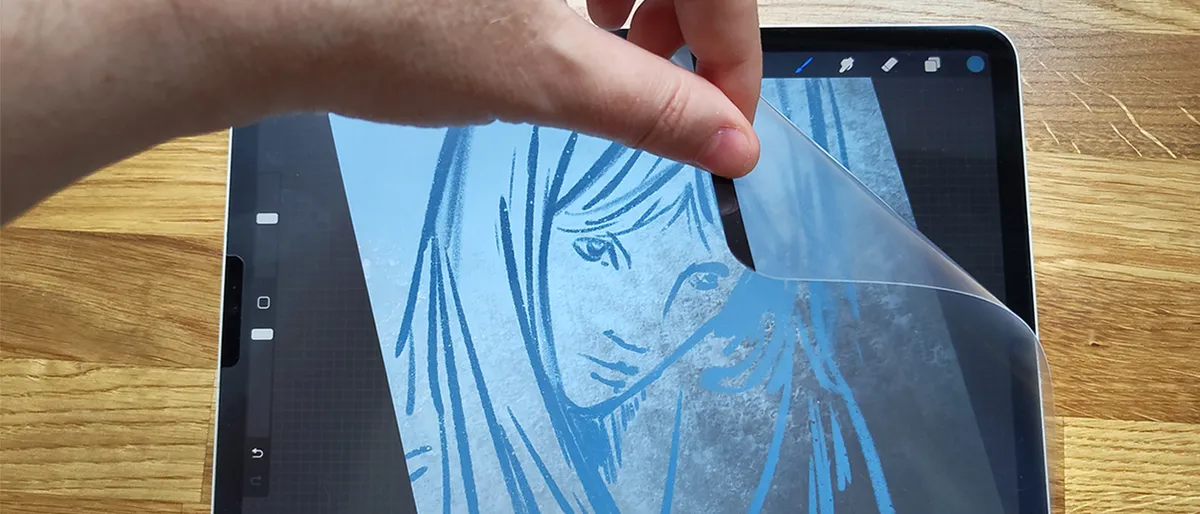
Many artists prefer a matte screen protector for extra grip, especially when sketching fine details. I personally use one called Rock, Paper, Pencil that also comes with metal nibs. You can also enable 'Palm Rejection' and customise double-tap behaviour to toggle between the brush and eraser.
Finally, test your setup in Notes or Procreate to check pressure response and tilt behaviour. Once your Apple Pencil feels natural, you’re ready to move from setup to sketching.
2. Get to know the apps

The iPad’s creative ecosystem is a big part of its appeal. For most beginners, Procreate remains the top pick thanks to its one-time cost, smooth interface, and professional brush engine – read our best iPad drawing apps guide. It's a favourite of mine, though I also love the jittery, digital appeal of Heavy Paint.
If you’d like to explore animation later, Procreate Dreams expands into movement with timelines and keyframes – read my first impressions of Procreate Dreams to see why I love this app. Adobe Fresco is another great option for anyone using Creative Cloud, offering natural live brushes and seamless syncing across devices.
The best way to choose is by feel: download each app (many have a free version to try), open a blank canvas, and draw a few strokes. Notice how the brush reacts and how comfortable the layout is. If you’re new to Procreate, start learning using our Procreate tutorials – they’ll walk you through layers, masks, and brushes step by step until everything clicks.
3. Learn the basics

Start simple and focus on fundamentals. Open a blank canvas and practice line control first: light pressure gives clean, thin strokes, while firmer pressure deepens and tapers the line. Draw basic foundational shapes next, such as circles, boxes, and cylinders, to understand form and structure. Then move on to basic shading using a soft pencil or airbrush – read our list of Procreate brushes for ones to try.
In Procreate, the opacity slider helps mimic the feel of graphite or charcoal. Try drawing a sphere, adding light and shadow to create volume. Small drills like these build muscle memory faster than jumping into complex subjects. Keep your sketches loose and repeat them daily. Confidence comes from comfort with your tools.
4. Use layers

Layers are what make digital art forgiving and flexible. Treat them like sheets of tracing paper: your rough sketch sits on one, your clean line art on another, and your colours below both. This structure lets you adjust one element without touching the rest.
Experiment with blend modes to enhance lighting and depth, for example, Multiply darkens for shadows, Overlay lifts highlights. Group related layers together (for example, character, background, or effects) so your file stays organised. As projects grow, good layer habits save time and frustration. Once you understand how to separate elements, editing becomes far easier.
Read the tutorial Learn how Procreate can help you master colour and light for a good explanation of how layers can be used. Or my simple guide to tracing on iPad for how layers can be used in a basic way (but a good place to start).
5. Explore brushes and textures

Brushes define the personality of your digital art. Procreate’s default sets are excellent, covering sketching, painting and texture work. Start with the 6B Pencil for line drawing and experiment with the Round Brush for colour blocking. From there, explore custom sets, artists share thousands online for free.
Brush behaviour depends on pressure, tilt, and grain. Adjusting these settings changes the way each stroke feels, from smooth ink to rough charcoal. If you like a particular texture, save it as a custom preset for consistent results. Adding subtle paper or canvas textures on a top layer (set to Overlay) can also give your digital work a traditional finish.
6. Practise daily exercises

Drawing regularly, even for ten minutes, improves control more than long, irregular sessions. Warm up with line drills, filling a page with straight and curved lines. Next, practise shape construction by sketching everyday objects as simple forms. This builds confidence with proportion and perspective.
Then move on to light studies: pick a single light source and sketch how it falls on a sphere or cube. As you improve, draw from life, mugs, plants, and shoes to sharpen observation skills. Keeping a 'daily sketch' folder is a great motivator. After a few weeks, you’ll clearly see your progress.
Every artist is different, and the best way to improve your drawing is going to differ for everyone. With that said, here are a few quick Apple Pencil exercises that should help you learn how to draw on the iPad more effectively.
- Drawing lines: Practise drawing daily. Open a blank canvas and draw evenly spaced horizontal, vertical, and curved lines without touching. Once complete, add lines between them. For variety, create dashed lines, keeping spacing and length consistent to build precision, control, and rhythm in your strokes.
- Tracing and copying: The Apple Pencil is precise enough to trace standard paper on your iPad, though thick paper won’t work. Simply lay the sheet over the screen and trace. You can also place an image from Photos alongside your drawing app on larger iPads to copy or study it while drawing.
- Calligraphy: Calligraphy is a fun way to improve control and consistency with the Apple Pencil. It’s a quick daily exercise, simply choose a favourite font and try to replicate it on your iPad. This practice helps refine precision, steadiness, and familiarity with the Pencil while producing visually satisfying results.
- Practise tilt: The Apple Pencil’s tilt sensitivity lets your iPad detect its angle and nib position, giving line thickness and character. Hold it upright for fine lines or sideways for thicker strokes. Practise shading in a drawing app, experimenting with brushes and tools to explore the variety of effects you can create.
7. Optimise your setup

A comfortable setup keeps you focused. Use a stand to tilt the iPad to a natural drawing angle, particularly if you're using the larger iPads, and consider an artist glove to reduce friction, though this will limit touch control unless you trim the fingers. I personally like using the Darkboard iPad stand, which gives the iPad a large 'bezel' like the best drawing tablets, for resting your wrist.
In Procreate, customise Gesture Controls (Actions > Prefs > Gesture Controls) to suit your habits. Two-finger tap for undo, three-finger tap for redo, or pinch to zoom. Adjust shortcuts until your hands move intuitively; that’s when drawing becomes fluid. Good ergonomics and smart shortcuts save time and reduce fatigue during long sessions.


![Lamicall, Lamicall Adjustable Ipad Stand for Desk - [ultra-Slim Foldable][360°rotation] Tablet Stand With Heavy-Duty Base, Tablet Holder for 4.7-13" Devices, 2025 Ipad Pro Air Mini, Kindle, Iphone 17 Pro Max](https://cdn.mos.cms.futurecdn.net/wot8bnKSPCpQonLuvZNPJ7-1200-80.jpg.webp)
8. Save, share and evolve

Once your piece is finished, export it properly. Save layered files as PSDs if you plan to edit in Photoshop, or share flat images as PNGs for transparent backgrounds. Procreate automatically records time-lapse replays, perfect for showing your process or tracking progress over time.
Make backups via iCloud or an external drive, and keep earlier sketches rather than deleting them; they show how far you’ve come. As you grow, explore Procreate Dreams or Affinity Photo to expand into animation or advanced post-processing. The goal isn’t perfection, it’s steady improvement and enjoying the creative process.
FAQs
How do I use double-tap for drawing?
The Apple Pencil 2 lets you double-tap the flat edge for a quick toggle between settings. Once you get used to remembering this option, it can be really handy. By default, double-tap switches between your current tool and the eraser, but you can also set it to switch between the current and previous tool, show the colour palette, or even do nothing if you prefer to disable the feature.
Can you draw on iPad without Apple Pencil?
Yes. You can use your finger or a third-party stylus such as the Logitech Crayon or Zagg Pro Stylus 2. You can even make your own stylus using household items. However, the Apple Pencil is the best suited to the iPad and the Apple Pencil Pro offers the most precise control and features like tilt, pressure, and squeeze gestures.
What’s the best iPad for drawing?
The iPad Pro (M5) has the most accurate display and fastest refresh rate, making it ideal for professional work. The iPad Air (M3) balances power and price, while the 10th-gen iPad is a great starting point for beginners.
Is Procreate free?
No, but it’s a one-time purchase of around £12.99 / $12.99, which is excellent value considering its capability and lifetime updates.