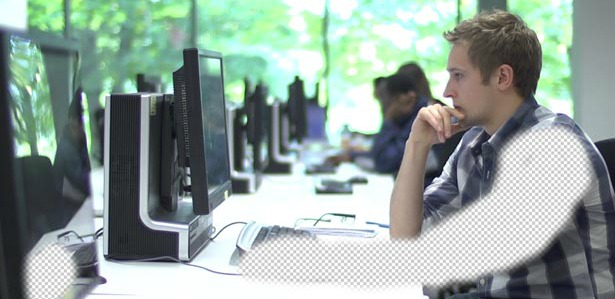
How to create cinemagraph animated GIF images in Photoshop
Described as "more than a photo, but not quite a video", the cinemagraph takes the idea of an animated GIF and cranks the beauty levels up to 11.
Sign up to Creative Bloq's daily newsletter, which brings you the latest news and inspiration from the worlds of art, design and technology.
You are now subscribed
Your newsletter sign-up was successful
Want to add more newsletters?
Not seen a cinemagraph before? The technique was pioneered by NYC-based fashion photographer Jamie Beck and designer Kevin Burg and cleverly mixes still photography with a moving video element.
The format is essentially an animated GIF and it's amazing what you can do if you employ a little subtlety. Here are some fantastic examples from Beck and Burg to whet your appetite.
Note the skirt flapping in the wind; the model lit by the flickering light of an old movie projector; the man reading a newspaper in the midst of a crowd frozen in time.
Article continues belowThese eye-catching effects are surprisingly straightforward to create. All you need is an HD video camera, Photoshop and some patience. About an hour, we reckon.
Creating your own cinemagraph
Here's the basic process for creating a cinemagraph in Photoshop:
1. Choose your subject
You'll need an image with a moving element that you can endlessly loop. In the image above, the office background is completely still, enabling us to animate our subject's arm.
2. Frame your subject
It's important that you have background elements that don't move when you...
Sign up to Creative Bloq's daily newsletter, which brings you the latest news and inspiration from the worlds of art, design and technology.
3. Capture the scene on video
Film your subject for a few seconds with a video camera. Try a few different angles so that you have more than just one bit of footage to work with. Use a tripod to avoid camera shake.
4. Import your video into Photoshop
Transfer your footage from the video camera to Photoshop. You may have to process it first in video software like Final Cut.
5. Select a clip and choose a still
Isolate a section of the video clip that you want to use in the timeline and choose a frame that will be the main still image. Save this still image out as a separate layer.

6. Make a mask
Make a mask of the moving element in your scene and view it on the still image.
7. Render the movie
Save the clip as a video file and then import the video to layers.
8. Loop it!
Duplicate your frames and use the 'reverse frames' option to loop your video clip.
9. Make a few cosmetic enhancements...
Adjust the timings of your video if necessary, reduce the colours to 256 (a limitation of the animated GIF format) and limit the final file size to make it web-friendly.
10. Save your cinemagraph
Save your creation and admire your handiwork.
For a detailed run-down of how to create a cinemagraph like the one in the photo at the top of this article, see this excellent tutorial on the .net magazine website.

The Creative Bloq team is made up of a group of art and design enthusiasts, and has changed and evolved since Creative Bloq began back in 2012. The current website team consists of eight full-time members of staff: Editor Georgia Coggan, Deputy Editor Rosie Hilder, Ecommerce Editor Beren Neale, Senior News Editor Daniel Piper, Editor, Digital Art and 3D Ian Dean, Tech Reviews Editor Erlingur Einarsson, Ecommerce Writer Beth Nicholls and Staff Writer Natalie Fear, as well as a roster of freelancers from around the world. The ImagineFX magazine team also pitch in, ensuring that content from leading digital art publication ImagineFX is represented on Creative Bloq.
