This tutorial is all about creating a cute little fantasy house and turning it into a finished illustrated piece. The goal isn’t just to end up with something that looks nice, but also to enjoy the whole creative process along the way, whether you’re completely new to Blender or already exploring the best 3D modelling software out there.
Think of it like building your own tiny magical place. A small, cosy house where you can try ideas, experiment and learn new techniques without stressing about mistakes. It’s meant to be a fun and relaxed project where you can just explore and be creative. If you’re working on the best laptop for 3D modelling or an older setup that’s just about hanging in there, this kind of stylised project is a great way to practise without getting bogged down in heavy technical demands.
We’ll start things off with some quick sketches, so we can play around with different ideas and find a design that feels both charming and unique. Once we have something we like, we’ll jump into Blender and turn that sketch into a simple 3D model. Step by step, we’ll build the main shapes of the house, add a few details and set up the scene. If you’re still learning the ropes, this tutorial also pairs nicely with our collection of Blender tutorials, which cover everything from beginner workflows to more advanced scene-building techniques.
In the finishing stages, we’ll bring everything together to create the final illustration. With a lot of painting on top, we’ll give the scene a warm and cosy vibe. Most importantly, have fun and don’t be afraid to experiment!
01. Define a brief for yourself
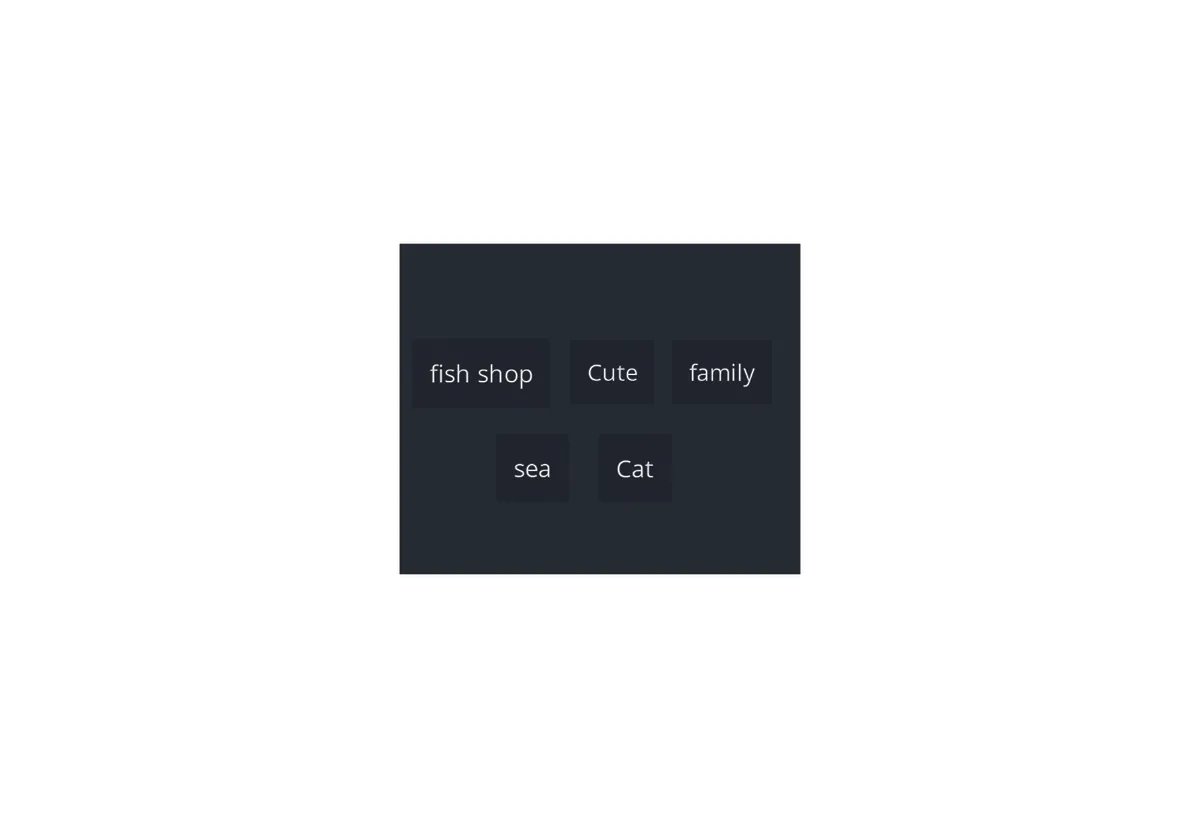
For this first step, try to pick something you genuinely like, so you can stay excited and motivated while working on your piece. The idea is to keep your brief short, simple and clear – ideally, just one sentence. For example: “Cute cat family fish shop by the sea.” Keeping it concise helps you to remember every word and makes it easier to ensure that each element appears in your environment.
02. Related ideas
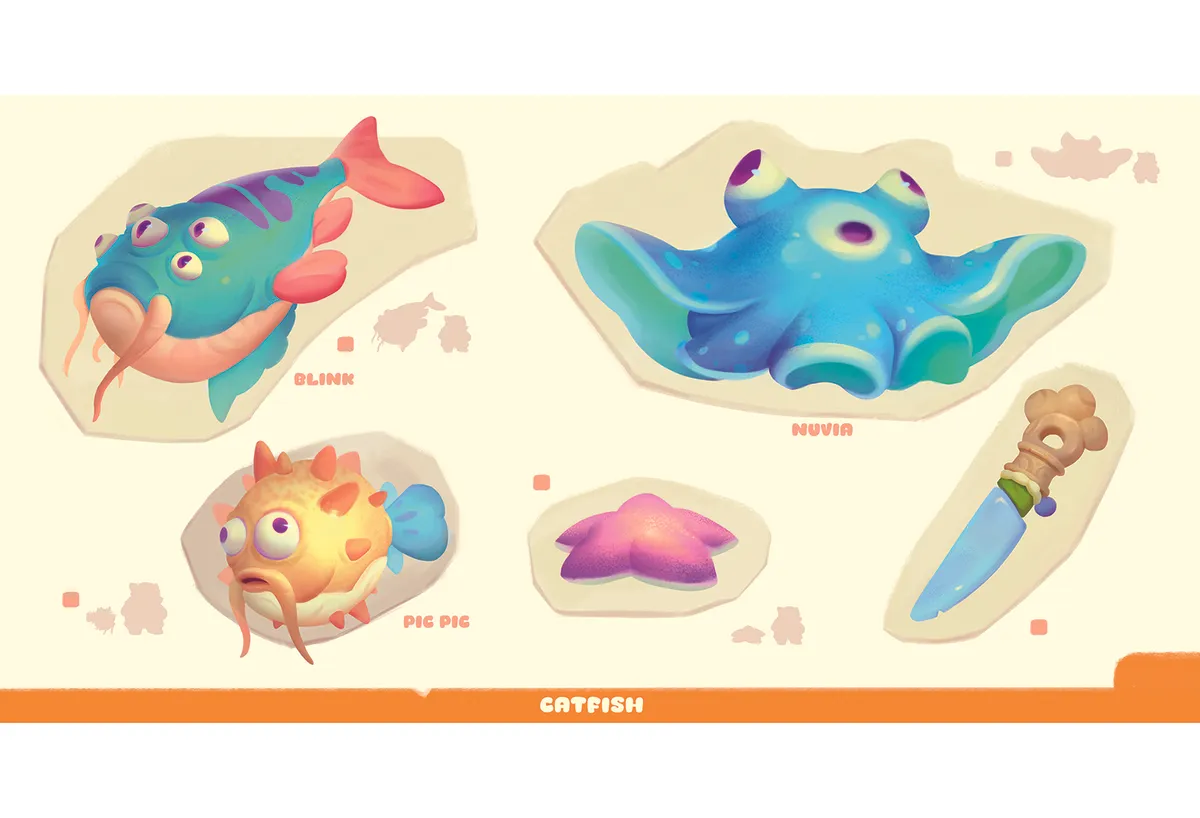
Just have fun with it and don’t be afraid to get a bit crazy. Look for playful or silly ideas that make your concept more fun. For example, I wanted to work with cats – and cats love fish, right? So why not cats selling fish? And what kind of fish? Catfish! Little ideas like that make the project more entertaining.
03. Break down references
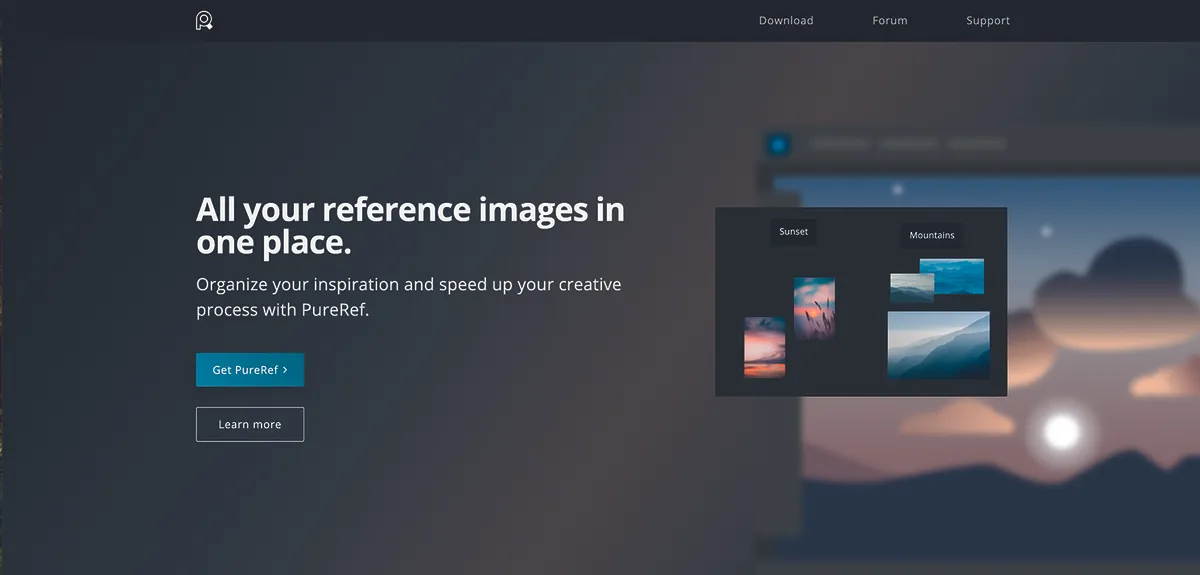
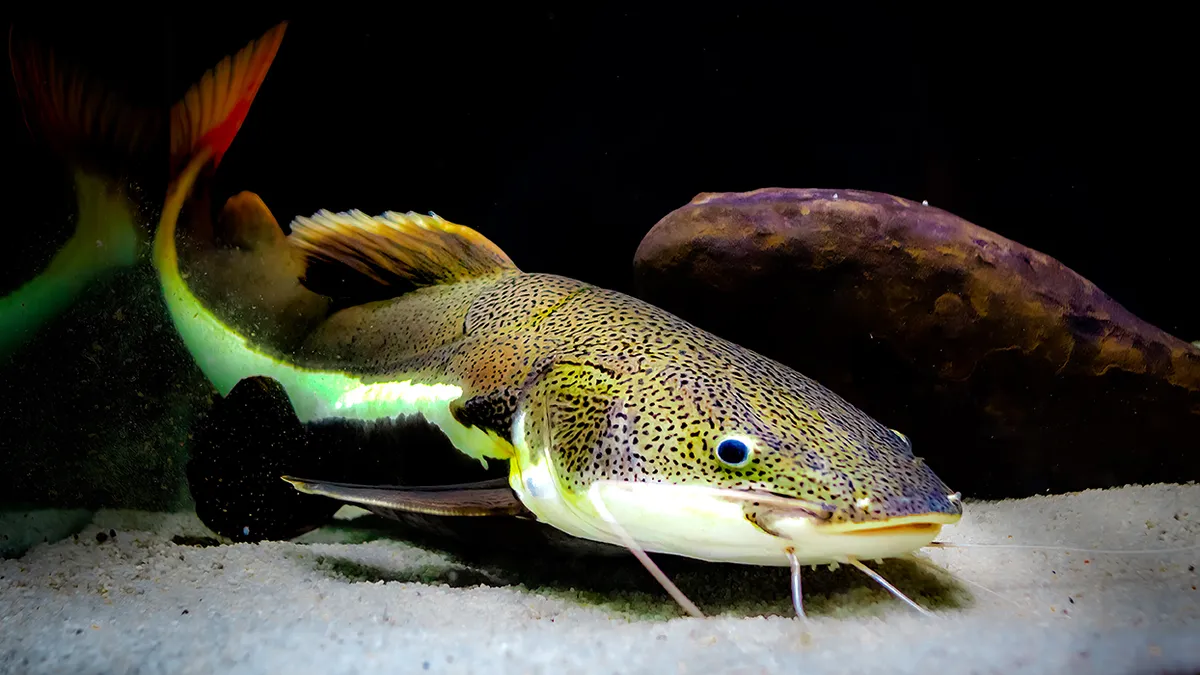
For this stage, I really recommend using PureRef. It’s a simple app that lets you keep all your references on one board as you work, making it much easier to stay organised and keep your ideas in front of you. Once your brief is clear, this step becomes one of the most fun and relaxing. Just take the keywords from your brief and split them into small categories to search for references, such as fish shop, cats, or sea landscape. Then collect images that match your idea, and don’t forget to add a benchmark image to keep everything aligned with the world you want to create. For example: “Supercell”.
04. Search for interesting references

I really recommend using AI filters when searching for references, so you don’t get flooded with AI images. At this stage, it’s better to stick to real photos, because they bring more soul and authenticity to your artwork. Try to find older references of photos, videos, or anything that helps you feel immersed in the world you’re creating. And don’t forget audio references! For example, playing sea sounds while working can really help you get into the mood and make decisions based on how the environment would actually feel.
05. Early sketching
At this point, don’t worry about making things look perfect. The goal is just to explore ideas, not to create a polished sketch. Most of the time, no one will even see this part. So experiment and have fun with it. I recommend using a simple flat design so you can stay efficient and focus on the main ideas. Don’t overwork anything – keep it rough and loose.
06. Research for composition
Now you need to find your composition. It’s important, so you don’t waste time designing things that will end up tiny or not even visible in the final image. Pick a composition that fits the mood of your story. If it’s cosy and chill, keep the angle simple and calm. But if you want something epic, go for a more dynamic lens and a stronger perspective.
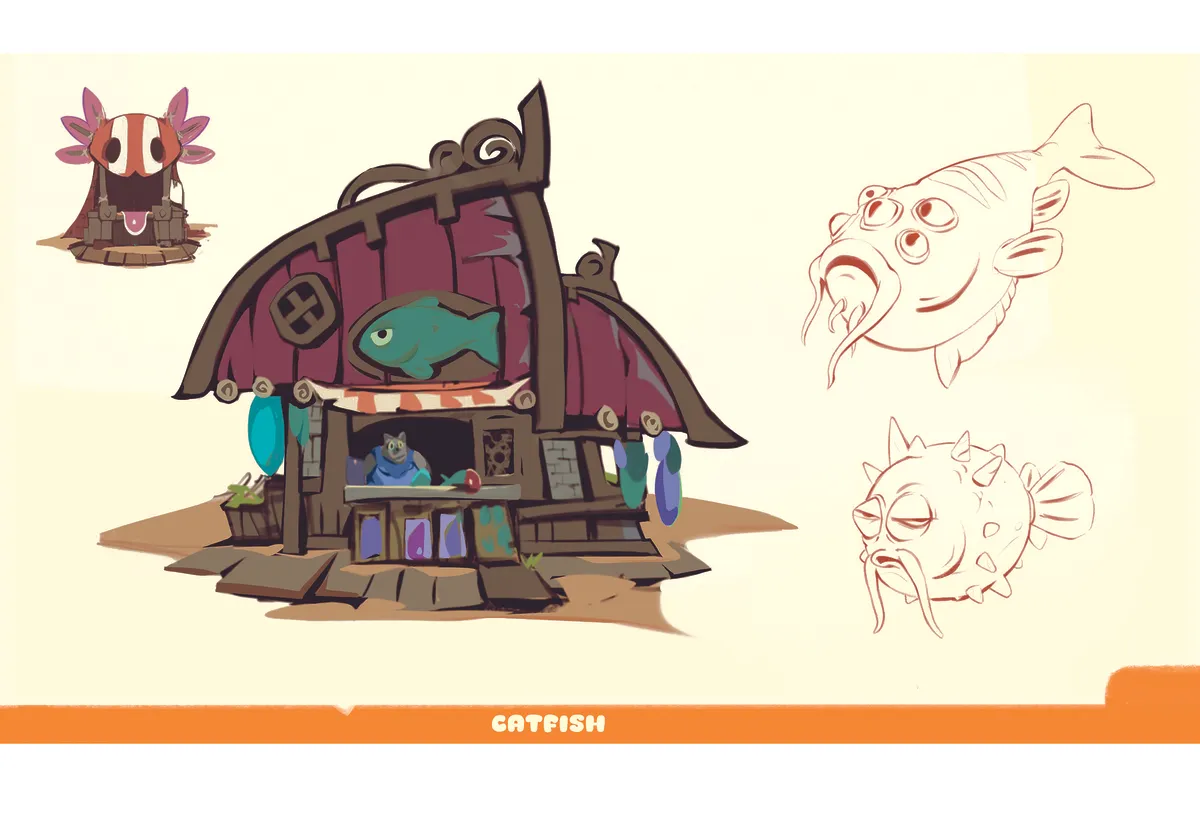
07. Refine your sketches

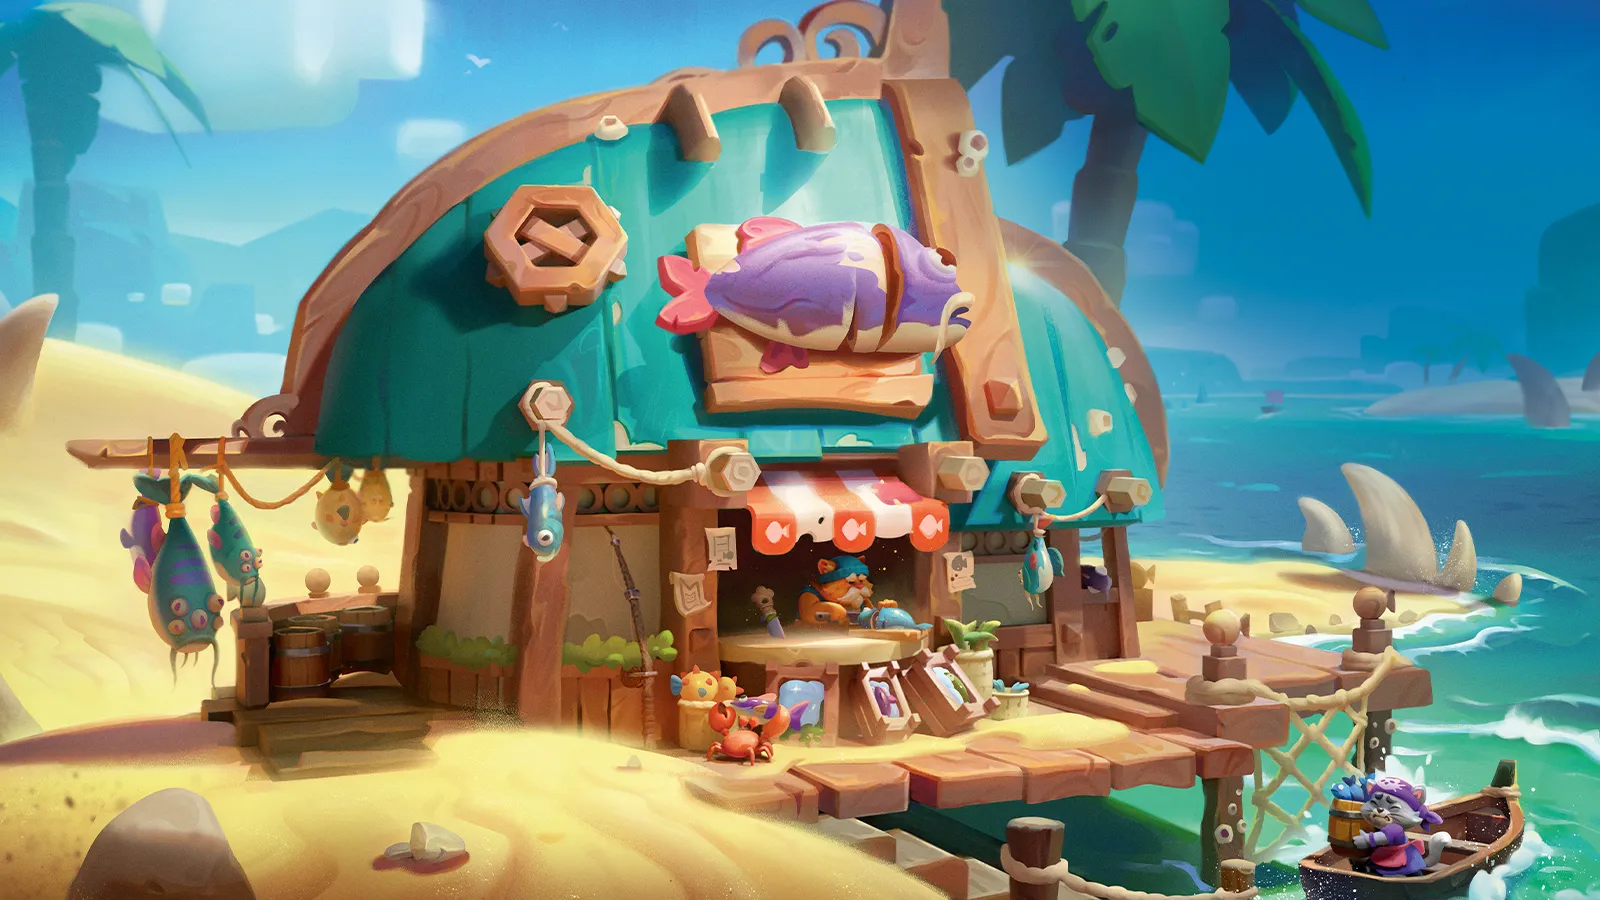
Refine the most important part of your sketch: the focal point. It’s important to clearly understand what you’re designing, so others can read it easily. Add the key elements you want directly into that area. At this stage, only design the focal point. In my case, it’s the shop and some fish. Don’t go into too much detail, just focus on a clear, readable design.
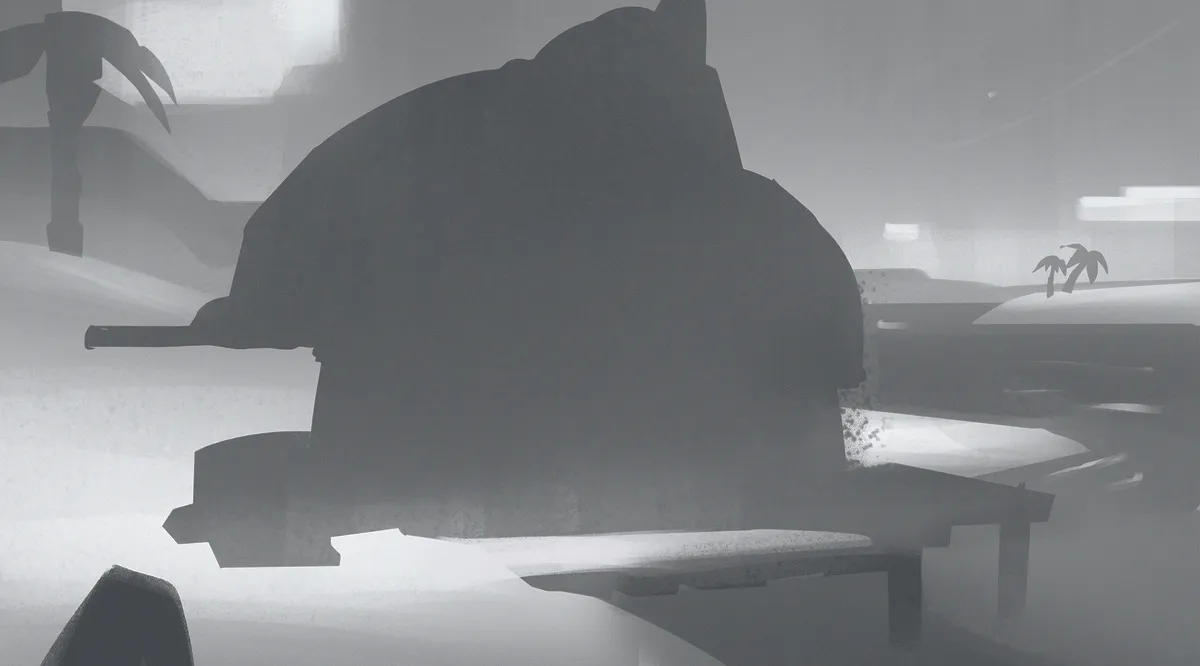
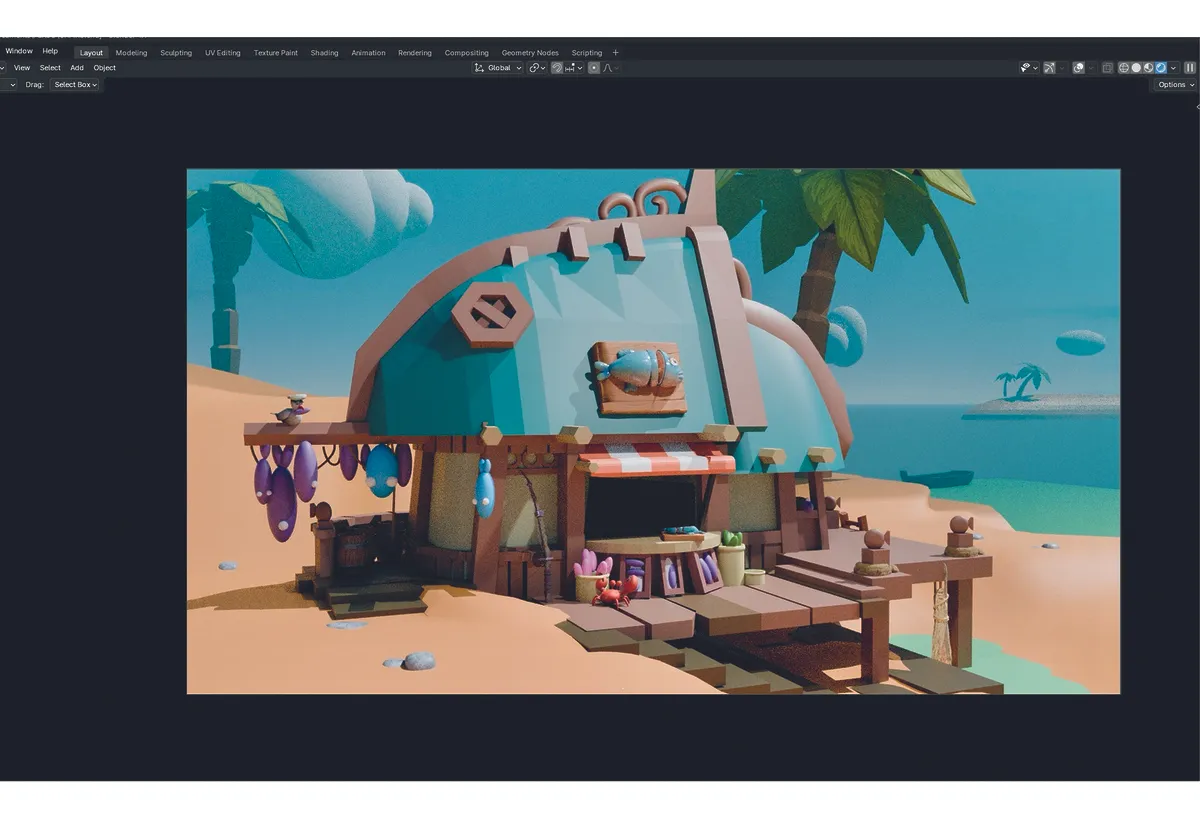
08. Block out your scene in Blender
Now it’s time to build your scene in Blender. Start with a quick blockout using only simple primitive shapes. This helps you place everything and check your composition in 3D. You can also add quick local colours to your materials to make them easier to read in the scene. The goal here is just to see if the concept works in context. Don’t hesitate to change things if needed – this stage is all about improving your design with a better perspective and overall depth.
09. Colour key
Time for a little paint-over! I recommend making a small colour key to explore what the illustration could look like. The idea is to quickly test rough ideas that are faster to try in 2D than in 3D. It saves a lot of time. And if it’s just for you, don’t be too precious about it.
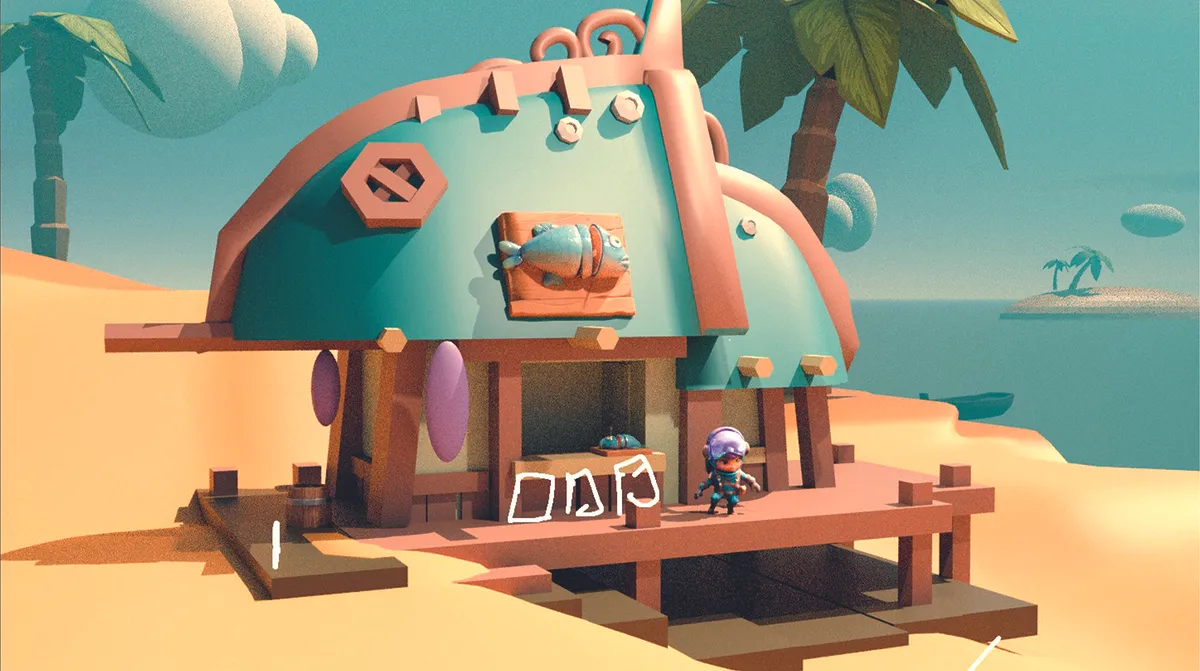
10. Build your final scene
Keep pushing your scene with the new ideas you explored. Also, keep in mind that a lot of small details can be added later in 2D. For this style, I didn’t go too crazy in Blender, because it’s often easier to paint some things afterwards. But feel free to push the 3D as much as you want. You can also use assets from Sketchfab, such as a small boat or trees, especially if they’re not in the focal point. The goal is to save time, and you can always paint over them later to adjust the design and make it feel like yours.
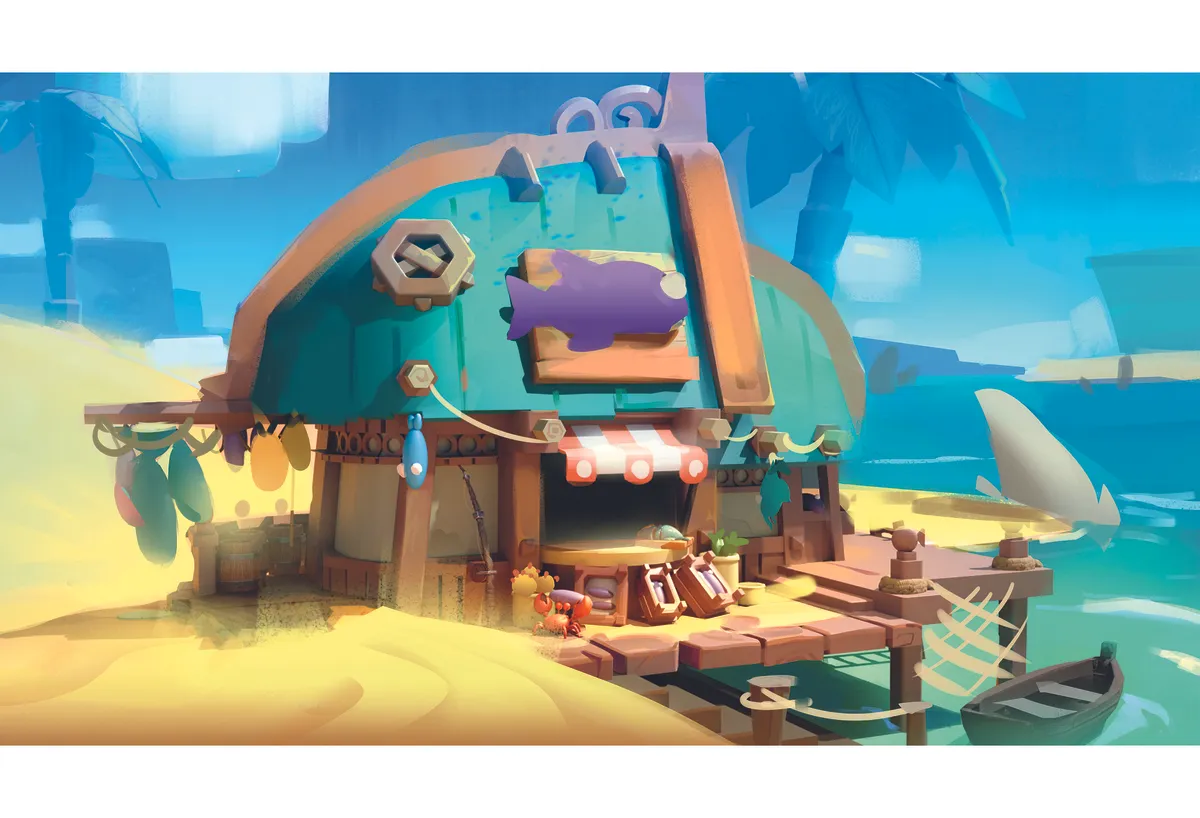
11. Paint your scene
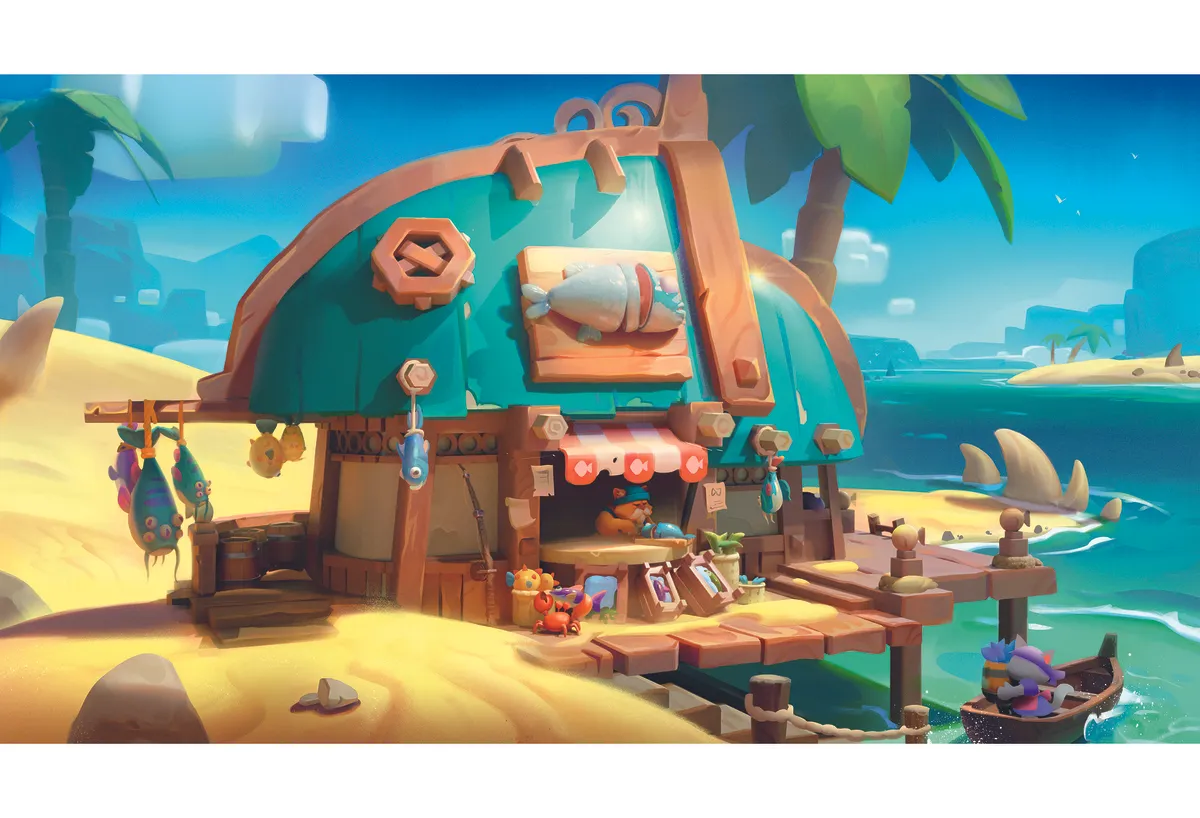
Let’s paint! After exporting my render from Blender, I usually paint directly on top of it, but feel free to use whatever workflow works best for you. This stage is about bringing together all the ideas from the previous steps. I like to start by setting the mood, because it makes it easier to place the other elements afterwards. While painting, remember that the goal isn’t to replace the 3D but to add what 3D can’t. Always ask yourself whether what you’re adding actually improves the piece.
12. Add textures

You’re almost done! Now it’s time to paint the textures. This is the moment when you can finally zoom in and start adding those little details that push the piece further. Take your time with it – work on the transitions and the light carefully. Don’t hesitate to look at references, so you stay close to the style you’re aiming for.
13. Know when to stop
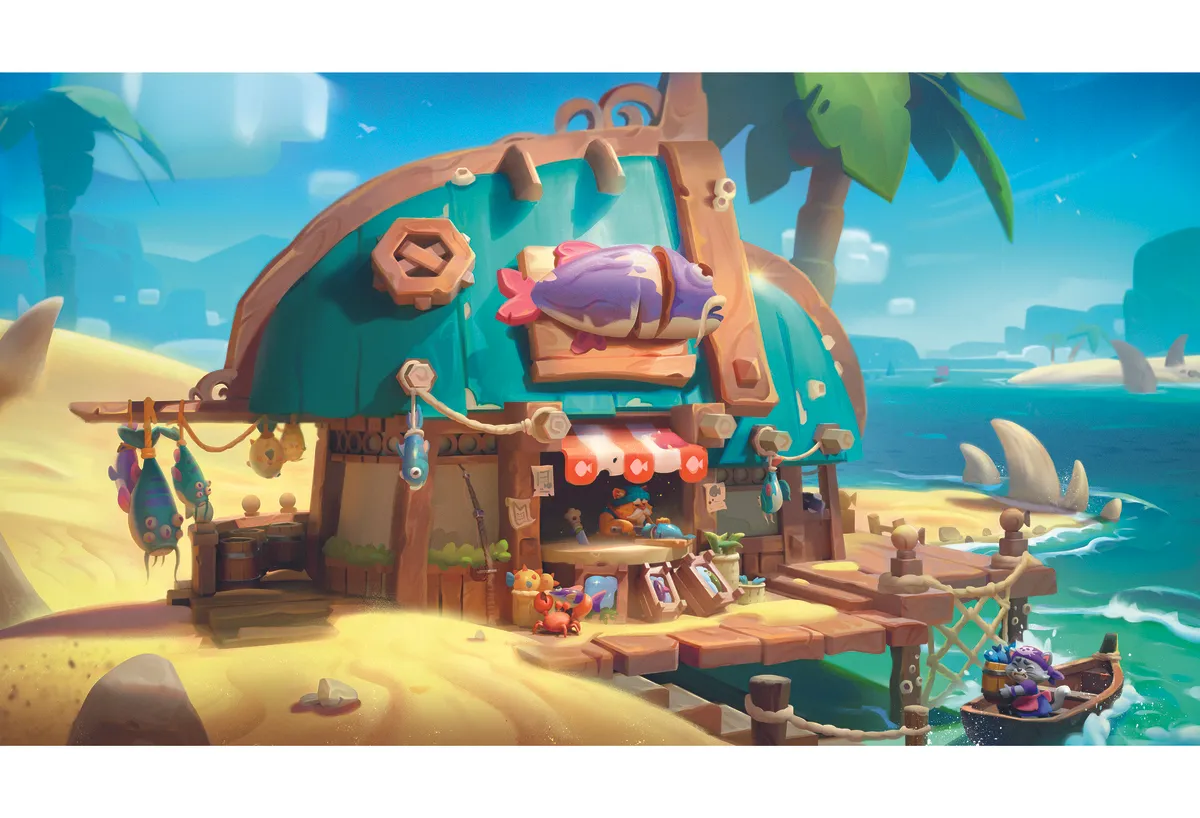
Make sure every shape in your image is clear and easy to read. Your focal point should have a clear definition, clean edges, and nice, crisp textures. Don’t be afraid to push the contrast in values, colours and shapes, so it really stands out. Extra punch in the shapes and lighting can also bring the whole piece to life. If everything looks good and readable, you’re done!
14. Presentation!
Finally, keep your presentation clean and simple. Avoid fancy text or unnecessary effects. It should be clear and straightforward, so people instantly understand what they’re looking at. If you’re unsure how to present your work, take a look at posts from studios on ArtStation. It’s a great way to get inspiration and to see how professionals showcase their projects in a clean, appealing way.